1
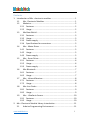
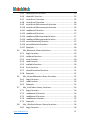
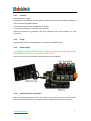
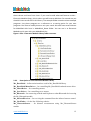
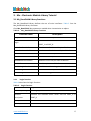
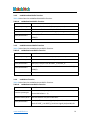
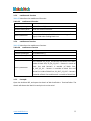
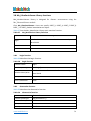
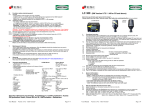
Me–Electronic Modules
User Manual
@2011 Hulu Root Technology Co., Ltd.
04/2013. Rev.1.0 by Eric
Contents
1. Introduction of Me - electronic modules ............................................ 1
1.1
Me - Electronic Modules ......................................................... 1
1.2
Meduino .................................................................................. 2
1.2.1 Features............................................................................. 2
1.2.2 Usage................................................................................. 2
1.3
Me-Base Shield........................................................................ 2
1.3.1 Features............................................................................. 3
1.3.2 Usage................................................................................. 3
1.3.3 Power supply ..................................................................... 3
1.3.4 Specifications for connectors ............................................ 3
1.4
Me – Motor Driver .................................................................. 5
1.4.1 Features............................................................................. 5
1.4.2 Usage................................................................................. 5
1.4.3 Power supply ..................................................................... 5
1.5
Me – Servo Driver ................................................................... 6
1.5.1 Features............................................................................. 6
1.5.2 Usage................................................................................. 6
1.5.3 Power supply ..................................................................... 6
1.6
Me–Bluetooth ......................................................................... 7
1.6.1 Features............................................................................. 7
1.6.2 Usage................................................................................. 7
1.7
Me – Infrared Receiver ............................................................ 8
1.7.1 Features............................................................................. 8
1.7.2 Usage................................................................................. 8
1.8
Me–Line Finder ....................................................................... 9
1.8.1 Features............................................................................. 9
1.8.2 Usage................................................................................. 9
1.9
Me – UltraSonic Sensor ......................................................... 10
1.9.1 Features........................................................................... 10
1.9.2 Usage............................................................................... 10
2. Me – Electronic Module Library Introduction ................................... 11
2.1
Arduino Programming Environment ..................................... 11
www.makeblock.cc
I
2.2
Me – Electronic Module Programming Library ..................... 11
2.2.1 Library folder ................................................................... 11
2.2.2 Description of each Electronic Module Library ............... 12
3. Me – Electronic Module Library Tutorial ........................................... 13
3.1
Me_BaseShield Library functions .......................................... 13
3.1.1 begin function ................................................................. 13
3.1.2 setMePortOutsidePin function........................................ 14
3.1.3 setMePortInnersidePin function ..................................... 14
3.1.4 setMePort function ......................................................... 14
3.1.5 readMePortOutsidePin function ..................................... 15
3.1.6 readMePortInnersidePin function ................................... 15
3.1.7 readMePort function ....................................................... 15
3.1.8 readAnalogMePortOutsidePin function .......................... 16
3.1.9 readAnalogMePortInnersidePin function ........................ 16
3.1.10 readAnalogMePort function............................................ 16
3.1.11 Example: .......................................................................... 17
3.2
Me_BaseShieldMotorDriver Library functions ...................... 18
3.2.1 runMotor1 function ........................................................ 18
3.2.2 runMotor2 function ........................................................ 19
3.2.3 runMotors function ......................................................... 19
3.2.4 stopMotor1 function ....................................................... 20
3.2.5 stopMotor2 function ....................................................... 20
3.2.6 stopMotors function ....................................................... 20
3.2.7 Example: .......................................................................... 20
3.3
Me_MotorDriver Library functions ....................................... 21
3.3.1 begin function ................................................................. 21
3.3.2 run function .................................................................... 21
3.3.3 stop function ................................................................... 22
3.3.4 Example: .......................................................................... 22
3.4
Me_ServoDriver .................................................................... 23
3.4.1 Servos_begin function ..................................................... 24
3.4.2 Servo1_begin function .................................................... 24
3.4.3 Servo2_begin function .................................................... 24
3.4.4 detachServo1 function .................................................... 25
www.makeblock.cc
II
3.4.5 detachServo2 function .................................................... 25
3.4.6 detachAll function ........................................................... 25
3.4.7 writeServo1 function ....................................................... 25
3.4.8 writeServo2 function ....................................................... 26
3.4.9 writeServo1Microseconds function ................................ 26
3.4.10 writeServo2Microseconds function ................................ 26
3.4.11 readServo1 function ........................................................ 26
3.4.12 readServo2 function ........................................................ 27
3.4.13 readServo1Microseconds function ................................. 27
3.4.14 readServo2Microseconds function ................................. 27
3.4.15 servo1Attached() function .............................................. 27
3.4.16 servo2Attached function ................................................. 28
3.4.17 Example: .......................................................................... 28
3.5
Me_Bluetooth Library functions ........................................... 29
3.5.1 begin function ................................................................. 29
3.5.2 setName function ............................................................ 29
3.5.3 write function .................................................................. 30
3.5.4 read function ................................................................... 30
3.5.5 available function ............................................................ 30
3.5.6 flush function .................................................................. 31
3.5.7 checkConnected function................................................ 31
3.5.8 Example: .......................................................................... 31
3.6
Me_InfraredReceiver Library functions ................................. 32
3.6.1 begin function ................................................................. 32
3.6.2 read function ................................................................... 32
3.6.3 Example: .......................................................................... 32
3.7
Me_LineFinder Library functions .......................................... 34
3.7.1 begin function ................................................................. 34
3.7.2 readSensor1 function ...................................................... 34
3.7.3 readSensor2 function ...................................................... 35
3.7.4 readSensors function ...................................................... 35
3.7.5 Example: .......................................................................... 35
3.8
Me_UltraSonicSensor Library functions ................................ 36
3.8.1 begin function ................................................................. 36
www.makeblock.cc
III
3.8.2 distanceCm function ....................................................... 36
3.8.3 distanceInch function ...................................................... 37
3.8.4 Example: .......................................................................... 37
www.makeblock.cc
IV
1. Introduction of Me - electronic modules
1.1 Me - Electronic Modules
Module
Module Name
Introduction
Meduino
Meduino is Arduino compatible board.Based on Uno R3
Schematic, 100% compatible to its existing program,
shield and IDEs.
Me-Base Shield
The Me - Base Shield is an Arduino Shield that brings out
most of the Arduino Pins to the uniform 4pin RJ10
connectors. You can easily connect the other Me
Modules to the Arduino through the Base Shield.
Me-Motor Driver
The Me - Motor Driver is designed to drive one 6~12V
DC geared motor.
Me-Servo Driver
The Me - Servo Driver is designed to drive servo motors.
Me–Bluetooth
The Me – Bluetooth is designed to connect with mobile
phones by using the specific APP.
Me–Infrared
Receiver
The Me – Infrared Receiver module is designed for
controlling the robotics by receiving the commands
from the infrared remote control.
Me–Line Finder
The Me – Line Finder module is designed for the line
following robotics.
Me–UltraSonic
Sensor
The Me – UltraSonic Sensor module is designed for
distance measurement or obstacle avoidance of the
robotics.
www.makeblock.cc
1
1.2 Meduino
Meduino is Arduino compatible board. Based on Uno R3 Schematic, 100% compatible
to its existing program, shield and IDEs.
1.2.1
Features
More details about Arduino Uno R3, visit following webpage:
http://arduino.cc/en/Main/ArduinoBoardUno
1.2.2
Usage
Plug the Base Shield to the Meduino, then it can connect with other Me – Electronic
Modules.
1.3 Me-Base Shield
The Me - Base Shield is an Arduino Shield that brings out most of the Arduino Pins to
the uniform 4pin RJ10 connectors. You can easily connect the other Me Modules to
the Arduino through the Base Shield.
www.makeblock.cc
2
1.3.1
Features
6-10VDC power supply
Compatible with Arduino Uno R3, Arduino Leonardo, Arduino Due, Arduino Mega and
other Arduino compatible board.
Two channel motor driver integrated. (M1, M2)
1.2A (ave)/3.2A (peak) current for each channel
Intuitive connection by labeling tags with different color and number for each
connector
1.3.2
Usage
Plug the Base Shield to the Meduino or Arduino compatible board.
1.3.3
Power supply
It is suggested to power the board by connecting 9V-12VDC to the DC JACK of Base
Shield. Otherwise there'll be no power for PORT 1 and 2.
There's a switch on the Shield for controlling the power ON/OFF.
1.3.4
Specifications for connectors
There're 8 RJ10 connectors in total. The tags on the connectors have 5 types of color.
Check the following table for the detail function and attribute of each connector.
www.makeblock.cc
3
Table 1.
Connectors’ detail function and attribute
PORT
No.
Tag Color
1
Red
(9-12VDC)
Motor Driver, Servo Driver, Lego
driven modules Motor Bridge
2
Red
(9-12VDC)
Motor Driver, Servo Driver, Lego
driven modules Motor Bridge
3
Blue&Orange
1 or 2 way
Line Finder, Bluetooth, Infrared
digital modules Receiver, Lego Digital Bridge
4
Blue&Orange
1 or 2 way
Line Finder, Bluetooth, Infrared
digital modules Receiver, Lego Digital Bridge
5
Line Finder, Bluetooth, Infrared
Blue&Orange 1 or 2 way
digital or analog Receiver, Lego Digital Bridge,
&Black&Green modules
Lego Analog Bridge
6
Line Finder, Bluetooth, Infrared
Blue&Orange 1 or 2 way
digital or analog Receiver, Lego Digital Bridge,
&Black&Green modules
Lego Analog Bridge
7
Green&Orange
1 way digital or Infrared Receiver, Lego Analog
analog modules Bridge
8
Green&Orange
1 way digital or Infrared Receiver, Lego Analog
analog modules Bridge
www.makeblock.cc
Compatible
Module types
Typical Me Modules
4
1.4 Me – Motor Driver
The Me - Motor Driver is designed to drive one 6~12V DC geared motor.
1.4.1
Features
9-12VDC power supply
4 Pin RJ10 interface and 2.54mm breakout pins
Compatible with Me – Base Shield
2 signal controlling motor direction and speed
One 2A current output channel
Over-current protection
Labeled with red tag
16mm interval M4 mounting holes, compatible with Makeblock beams
Compact size: 2.4cmx4.8cm
LED indicator: PWR (Red LED) – Power indicator. PWM (Blue LED) – PWM indicator.
DRC (Blue LED) – Direction indicator.
1.4.2
Usage
As the Red tag illustrated, the Me – Motor Driver can be connected to the port 1 or 2
of the Me – Base Shield by an telephone wire.
Connect the DC motor to the yellow terminal which is the output of the motor driver.
1.4.3
Power supply
When connected, the Me – Motor Driver can be powered by the 9-12V DC power from
the port 1 or 2 of the Me – Base Shield.
www.makeblock.cc
5
1.5 Me – Servo Driver
The Me - Servo Driver is designed to drive servo motors.
1.5.1
Features
9-12VDC power supply
4 Pin RJ10 interface and 2.54mm breakout pins
Compatible with Me – Base Shield
Two PWM output channels for controlling two servo motors
The power voltage for servos are regulated to 6V
Labeled with red tag
16mm interval M4 mounting holes, compatible with Makeblock beams
Compact size: 2.4cmx4.8cm
LED indicator: PWR (Red LED) – Power indicator. SERVO-1 (Blue LED) – PWM indicator
for Servo1. SERVO-2 (Blue LED) – PWM indicator for Servo2.
1.5.2
Usage
As the Red tag illustrated, the Me – Servo Driver can be connected to the port 1 or 2
of the Me – Base Shield by an telephone wire.
Connect one or two servo motors to the 3pin headers.
1.5.3
Power supply
When connected, the Me – Servo Driver can be powered by the 9-12V DC power from
the port 1 or 2 of the Me – Base Shield.
www.makeblock.cc
6
1.6 Me–Bluetooth
The Me – Bluetooth is designed to connect with mobile phones by using the specific
APP. The Bluetooth module provides TTL level UART interface.
1.6.1
Features
Power Supply: 5VDC power supply
4 Pin RJ10 interface and 2.54mm breakout pins
Compatible with Me – Base Shield
Bluetooth Protocol: Bluetooth Specification v2.0 +EDR
Working Frequency: 2.4-2.48GHz unlicensed ISM Band
Transmission Distance: 10 meters in free space
Default Baud rate: 9600
Supported baud rate: 9600, 19200, 38400, 57600, 115200, 230400, and 460800.
LED indicator: PWR (Red LED) – Power indicator. STA (Blue LED) – Bluetooth status
indicator: Uniform Slow blinking indicates waiting to be paired. Always ON indicates
the connection has been established.
1.6.2
Usage
As the Blue tag illustrated, the Me – Servo Driver can be connected to the port 3, 4, 5
or 6 of the Me – Base Shield by a telephone wire.
www.makeblock.cc
7
1.7 Me – Infrared Receiver
The Me – Infrared Receiver module is designed for controlling the robotics by
receiving the commands from the infrared remote control. The IR detector have a
demodulator inside that looks for modulated IR at 38 KHz. The Infrared Receiver can
receive signals well within 10 meters.
1.7.1
Features
Power Supply: 5VDC power supply
4 Pin RJ10 interface and 2.54mm breakout pins
Compatible with Me – Base Shield
Transmission Distance: 10 meters in free space
LED indicator: PWR (Red LED) – Power indicator. Blinking while receiving infrared
signals
1.7.2
Usage
As the Yellow tag illustrated, the Me – Infrared Receiver can be connected to the
port 3, 4, 5, 6, 7 or 8 of the Me – Base Shield by a telephone wire.
Infrared remote control
www.makeblock.cc
8
1.8 Me–Line Finder
The Me – Line Finder module is designed for the line following robotics. It has two
sensors on the module and each sensor contains two parts – an IR emitting LED and
an IR sensitive phototransistor. It can output digital signal to Arduino so the robot
can reliably follow a black line on a white background, or vice versa.
1.8.1
Features
5VDC power supply
4 Pin RJ10 interface and 2.54mm breakout pins
Compatible with Me – Base Shield
Detecting range: 1~2cm
LED indicator: PWR (Red LED) – Power indicator. SENSOR1 (Blue LED) – Sensor1
status indicator. Lighten shows black line detected by Sensor1. SENSOR2 (Blue LED) –
Sensor2 status indicator. Lighten shows black line detected by Sensor2.
1.8.2
Usage
As the Blue tag illustrated, the Me – Line Finder can be connected to the port 3, 4, 5
or 6 of the Me – Base Shield by a telephone wire.
www.makeblock.cc
9
1.9 Me – UltraSonic Sensor
The Me – UltraSonic Sensor module is designed for distance measurement or obstacle
avoidance of the robotics.
1.9.1
Features
5VDC power supply
4 Pin RJ10 interface and 2.54mm breakout pins
Compatible with Me – Base Shield
Detecting range: 3cm~4m, best in 30 degree angle.
LED indicator: D1 (Red LED) – Power indicator.
1.9.2
Usage
As the Yellow tag illustrated, the Me - UltraSonic Sensor can be connected to the port
3, 4, 5, 6, 7 or 8 of the Me – Base Shield by a telephone wire.
www.makeblock.cc
10
2. Me – Electronic Module Library Introduction
2.1 Arduino Programming Environment
Meduino uses Arduino Software for programming. If you have not already, visit
following webpage, and download the Arduino Programming environment software
for your operating system.
http://arduino.cc/en/Main/Software
Follow the instructions at that webpage to install it on your computer.
2.2 Me – Electronic Module Programming Library
Me – Electronic Module Library provides several features of different electronic
modules which are accessible through C/C++ NXShield library. If you have not already,
visit following webpage, and download latest library, example programs and utilities
from following location.
http://www.makeblock.cc/download/
Follow the instructions at that webpage to download the zip file on your computer.
The Me – Electronic Module Library is supplied in one single zip file. The extraction of
the zip file generates one folder, Me_Lib_v1.0\. Open the Me_ElectronicModules
folder, there are eight Electronic Modules Libraries folder and a MakeBlock_Demo
folder.
Before first programming, we have to make a copy of these Electronic Modules
Libraries folders to Arduino default library path. The default path is usually in:
“C:\Users\user name\Documents\Arduino\libraries” (on Windows7)
“Documents/Arduino/libraries” (on Mac)
Figure 1 shows the Electronic Modules Libraries folders structure after copy them to
Arduino default library path.
After doing the copy, open the Arduino IDE (if you have already open the Arduino IDE,
you have to restart it) and click “File->Sketchbook->libraries” you will see Me –
Electronic Module Library appear in the menu in the Arduino IDE.
If you want to know more details about how to add a library, visit following webpage:
http://www.arduino.cc/en/Hacking/Libraries
2.2.1
Library folder
Me – Electronic Module Library folder contains eight different Electronic Modules
Libraries folders and a MakeBlock_Demo folder. Each electronic module library folder
contains library header files, class files and an example folder. You should refer to
www.makeblock.cc
11
these classes and learn from them. If you need to add advanced features to Me –
Electronic Module Library, this is where you will have to add them. For normal use you
shouldn’t have to edit files in this library. The example folder contains various example
programs. Use these programs as a reference or a starting point for your own
programs. Feel free to modify them to suit your needs. We also have several demos
for MakeBlock Kits here in MakeBlock_Demo folder. You can use it as Electronic
Modules quick start with your MakeBlock Kits.
Figure 1. Me – Electronic Module Library folder structure
2.2.2
Description of each Electronic Module Library
Me_BaseShield – define main interfaces used in Me_BaseShield library
Me_BaseShieldMotorDriver – for controlling Me_BaseShield onboard motor driver
Me_MotorDriver – for controlling motors
Me_ServoDriver – for controlling servo motors
Me_Bluetooth – for connecting with the mobile phone or other Bluetooth devices using
the Me_Bluetooth module
Me_InfraredReceiver – for receiving the command from the infrared remote control
Me_LineFinder – for the line following robotics
Me_UltrasonicSensor – for distance measurement using Me_UltrasonicSensor
module
www.makeblock.cc
12
3. Me – Electronic Module Library Tutorial
3.1 Me_BaseShield Library functions
The Me_BaseShield Library defines the use of main interfaces. Table 2 lists the
Me_BaseShield Library functions.
Class Me_BaseShield: No parameters needed when instantiation an object.
Table 2.
Me_BaseShield Library functions
Function name
Me_BaseShield
Description
Instantiation an object.
Initialize the onboard motor driver and the
begin
PORT_1 to PORT_8.
setMePortOutsidePin
Set the state for the outside pin of Me Port.
setMePortInnersidePin
Set the state for the inner side pin of Me Port.
setMePort
Set the state for the pins of Me Port.
readMePortOutsidePin
Read the outside pin state of Me Port.
readMePortInnersidePin
Read the inner side pin state of Me Port.
readMePort
Read the pins state of Me Port.
readAnalogMePortOutsidePin
Read the outside analog pin value of Me Port.
readAnalogMePortInnersidePin Read the inner side pin state of Me Port.
readAnalogMePort
3.1.1
Read the analog pins value of Me Port.
begin function
Table 3 describes the begin function.
Table 3. begin function
Function name
begin
Function prototype
void begin()
Behavior
Initialize the onboard motor driver and the PORT_1 to
description
PORT_8
Input parameter
None
Return parameter
None
www.makeblock.cc
13
3.1.2
setMePortOutsidePin function
Table 4 describes the setMePortOutsidePin function.
Table 4. setMePortOutsidePin function
Function name
setMePortOutsidePin
Function prototype
void setMePortOutsidePin(int port, int state)
Behavior description
Set the state for the outside pin of Me Port.
Input parameter1
port (int): The port can be PORT_1 to PORT_8.
Input parameter2
Return parameter
3.1.3
state (int): The variant outsidePinState can be HIGH(1) or
LOW(0).
None
setMePortInnersidePin function
Table 5 describes the setMePortInnersidePin function.
Table 5. setMePortInnersidePin function
Function name
setMePortInnersidePin
Function prototype
void setMePortInnersidePin(int port, int state)
Behavior description
Set the state for the inner side pin of Me Port.
Input parameter1
port (int): The port can be PORT_1 to PORT_6.
Input parameter2
Return parameter
3.1.4
state (int): The variant innersidePinState can be HIGH(1) or
LOW(0).
None
setMePort function
Table 6 describes the setMePortInnersidePin function.
Table 6. setMePortInnersidePin function
Function name
Function prototype
Behavior description
Input parameter1
www.makeblock.cc
setMePort
void setMePort(int port, int outsidePinState = -1, int
innersidePinState = -1)
Set the state for the pins of Me Port.
port (int): There are two signal pins(outside and inner side) for
each of PORT_1 to PORT_6, and one signal pin(outside) for
14
Table 6. setMePortInnersidePin function (cotinued)
each of PORT_7 and PORT_8.
Input parameter2
Input parameter3
Return parameter
3.1.5
outsidePinState (int): The variant outsidePinState can be
HIGH(1) or LOW(0).
innersidePinState (int): The variant innersidePinState can be
HIGH(1) or LOW(0).
None
readMePortOutsidePin function
Table7 describes the readMePortOutsidePin function.
Table 7. readMePortOutsidePin function
Function name
readMePortOutsidePin
Function prototype
void readMePortOutsidePin(int port)
Behavior description
Read the outside pin state of Me Port.
Input parameter
port (int): The port can be PORT_1 to PORT_8.
Return parameter
The returned value can be HIGH(1) or LOW(0).
3.1.6
readMePortInnersidePin function
Table 8 describes the readMePortInnersidePin function.
Table 8. readMePortInnersidePin function
Function name
readMePortInnersidePin
Function prototype
void readMePortInnersidePin(int port)
Behavior description
Read the inner side pin state of Me Port.
Input parameter
port (int): The port can be PORT_1 to PORT_6.
Return parameter
The returned value can be HIGH(1) or LOW(0).
3.1.7
readMePort function
Table 9 describes the readMePort function.
Table 9. readMePort function
Function name
readMePort
Function prototype
void readMePort(int port, int *outsidePinState = NULL, int
www.makeblock.cc
15
Table 9. readMePort function (cotinued)
*innersidePinState = NULL)
Behavior description
Read the pins state of Me Port.
port (int): There are two signal pins(outside and inner side)
Input parameter
for each of PORT_1 to PORT_6, and one signal pin(outside)
for each of PORT_7 and PORT_8.
Return parameter1
Return parameter2
3.1.8
*outsidePinState(int): The variant *outsidePinState can be
returned HIGH(1) or LOW(0).
*innersidePinState(int): The variant *innersidePinState can
be returned HIGH(1) or LOW(0).
readAnalogMePortOutsidePin function
Table 10 describes the readAnalogMePortOutsidePin function.
Table 10.
readAnalogMePortOutsidePin function
Function name
readAnalogMePortOutsidePin
Function prototype
void readAnalogMePortOutsidePin(int port)
Behavior description
Read the outside analog pin value of Me Port.
Input parameter
port (int): The port can be PORT_1 to PORT_8.
Return parameter
The returned value can be HIGH(1) or LOW(0).
3.1.9
readAnalogMePortInnersidePin function
Table 11 describes the readAnalogMePortInnersidePin function.
Table 11.
readAnalogMePortInnersidePin function
Function name
readAnalogMePortInnersidePin
Function prototype
void readAnalogMePortInnersidePin(int port)
Behavior description
Read the inner side analog pin value of Me Port.
Input parameter
port (int): The port can be PORT_1 to PORT_6.
Return parameter
The returned value can be HIGH(1) or LOW(0).
3.1.10 readAnalogMePort function
Table 12 describes the readAnalogMePort function.
www.makeblock.cc
16
Table 12.
readAnalogMePort function
Function name
readAnalogMePort
Function prototype
void readAnalogMePort(int port, int *outsideADValue = NULL,
int *innersideADValue = NULL)
Behavior description
Read the analog pins value of Me Port.
Input parameter
port (int): There are two signal pins(outside and inner side) for
each of PORT_1 to PORT_6, and one signal pin(outside) for
each of PORT_7 and PORT_8.
Return parameter1
*outsideADValue (int): The returned value of variant
*outsideADValue can be 0~1023.
Return parameter2
*innersideADValue (int): The returned value of variant
*innersideADValue can be 0~1023.
3.1.11 Example:
Open the Arduino IDE, there is a demo sketch for Me-BaseShield.
Open the sketch of Me-BaseShield -> ReadAndWriteBaseShieldPort. The sketch
change the state of pins from PORT_1 to PORT_8.
www.makeblock.cc
17
3.2 Me_BaseShieldMotorDriver Library functions
The Me_BaseShield MotorDriver Library is designed to drive two 6~12V DC geared
motors by connecting them with the yellow terminal (M1+, M1-) and (M2+, M2-) on
Me – Base Shield.
Class Me_BaseShieldMotorDriver: No parameters needed when instantiation an
object.
Table 13 lists the Me_MotorDriver Library main member function.
Table 13.
Me_MotorDriver Library functions
Function name
runMotor1
runMotor2
runMotors
stopMotor1
stopMotor2
stopMotors
3.2.1
Description
Control the motor connected to the yellow terminal (M1+,
M1-).
Control the motor connected to the yellow terminal (M2+,
M2-).
Control the two motors connected to the onboard motor
driver.
Make the motor connected to the yellow terminal (M1+, M1-)
stop running (Short brake).
Make the motor connected to the yellow terminal (M2+, M2-)
stop running (Short brake).
Make the two motors stop running (Short brake).
runMotor1 function
Table 14 describes the runMotor1 function.
Table 14.
runMotor1 function
Function name
runMotor1
Function prototype
void runMotor1(int spd)
Behavior description
Control the motor connected to the yellow terminal (M1+,
M1-).
spd (int): The value can from -255 to 255, having motor
Input parameter
running with highest speed from one direction to the opposite
direction.
Return parameter
www.makeblock.cc
None
18
3.2.2
runMotor2 function
Table 15 describes the runMotor2 function.
Table 15.
runMotor2 function
Function name
runMotor2
Function prototype
void runMotor2(int spd)
Behavior description
Control the motor connected to the yellow terminal (M2+,
M2-).
spd (int): The value can from -255 to 255, having motor
Input parameter
running with highest speed from one direction to the opposite
direction.
Return parameter
3.2.3
None
runMotors function
Table 16 describes the runMotors function.
Table 16.
runMotors function
Function name
runMotors
Function prototype
void runMotors(int M1spd, int M2spd)
Behavior description
Control the two motors connected to the onboard motor
driver.
M1spd (int): M1Spd represent the speed and direction of the
Input parameter1
Motor1 being controlled. The value can from -255 to 255,
having motor running with highest speed from one direction
to the opposite direction.
M2spd (int): M2Spd represent the speed and direction of the
Input parameter2
Motor2 being controlled. The value can from -255 to 255,
having motor running with highest speed from one direction
to the opposite direction.
Return parameter
www.makeblock.cc
None
19
3.2.4
stopMotor1 function
Table 17 describes the stopMotor1 function.
Table 17.
stopMotor1 function
Function name
stopMotor1
Function prototype
void stopMotor1()
Behavior description
Make the motor connected to the yellow terminal (M1+, M1-)
stop running (Short brake).
Input parameter
None
Return parameter
None
3.2.5
stopMotor2 function
Table 18 describes the stopMotor2 function.
Table 18.
stopMotor2 function
Function name
stopMotor2
Function prototype
void stopMotor2()
Behavior description
Make the motor connected to the yellow terminal (M2+, M2-)
stop running (Short brake).
Input parameter
None
Return parameter
None
3.2.6
stopMotors function
Table 19 describes the stopMotors function.
Table 19.
stopMotors function
Function name
stopMotors
Function prototype
void stopMotors()
Behavior description
Make the two motors stop running (Short brake).
Input parameter
None
Return parameter
None
3.2.7
Example:
Open the Arduino IDE, there is a demo sketch for Me-BaseShieldMotorDriver.
Open the sketch of Me-BaseShieldMotorDriver -> TestBaseShieldMotorDriver. The
sketch controls two motors connected to the onboard motor driver running in two
directions and then stop.
www.makeblock.cc
20
3.3 Me_MotorDriver Library functions
Me_MotorDriver library is designed for controlling motors with Me_MotorDriver
module.
Class Me_MotorDriver: Users can specify PORT_1 or PORT_2 when instantiation an
object.
Table 20 lists the Me_MotorDriver Library main member function.
Table 20.
Me_MotorDriver Library functions
Function name
Initialize the state of connected and unconnected ports of
begin
Base Shield.
Control the speed and direction of the motor connected to
run
the driver board.
stop
3.3.1
Description
Make the motor stop running (Short brake).
begin function
Table 21 describes the begin function.
Table 21.
begin function
Function name
begin
Function prototype
void begin()
Behavior description
Initialize the state of connected and unconnected ports of
Base Shield.
Input parameter
None
Return parameter
None
3.3.2
run function
Table 22 describes the run function.
Table 22.
run function
Function name
run
Function prototype
void run(int speed)
Behavior description
Control the speed and direction of the motor connected to
the driver board.
Input parameter
speed (int): The value can from -255 to 255, having motor
running with highest speed from one direction to the
opposite direction.
Return parameter
None
www.makeblock.cc
21
3.3.3
stop function
Table 23 describes the stop function.
Table 23.
stop function
Function name
stop
Function prototype
void stop()
Behavior description
Make the motor stop running (Short brake).
Input parameter
None
Return parameter
None
3.3.4
Example:
Open the Arduino IDE, and open the sketch of Me-MotorDriver -> TestMotorDriver.
The sketch will control the motor connected to the driver board running in two
directions and then stop.
www.makeblock.cc
22
3.4 Me_ServoDriver
Me_ServoDriver library is designed for controlling servo motors of Me_ServoDriver
module.
Class Me_ServoDriver: Users can specify PORT_1 or PORT_2 when instantiation an
object.
Table 24 lists the Me_MotorDriver Library main member function.
Table 24.
Me_MotorDriver Library functions
Function name
Description
Initialize the state of connected and unconnected ports
Servos_begin
of Base Shield. If you want to control both Servo1 and
Servo2 you should use this function to initialize.
Initialize the state of connected and unconnected ports
Servo1_begin
of Base Shield. If you just want to control Servo1 you
should use this function to initialize.
Initialize the state of connected and unconnected ports
Servo2_begin
of Base Shield. If you just want to control Servo2 you
should use this function to initialize.
detachServo1
detachServo2
detachAll
writeServo1
writeServo2
writeServo1Microseconds
writeServo2Microseconds
Detach Servo1 variable from its pin. If you want to
attach it again, use Servo1_begin function.
Detach Servo2 variable from its pin. If you want to
attach it again, use Servo2_begin function.
Detach Servo1 and Servo2. If you want to attach both
Servo1 and Servo2 again, use Servos_begin function.
Writes a value in degrees (angle from 0 to180) to
Servo1, controlling the shaft accordingly.
Writes a value in degrees (angle from 0 to180) to
Servo2, controlling the shaft accordingly.
Writes a value in microseconds (us) to Servo1,
controlling the shaft accordingly.
Writes a value in microseconds (us) to Servo2,
controlling the shaft accordingly.
readServo1
Read the current angle of Servo1.
readServo2
Read the current angle of Servo2.
readServo1Microseconds
Read the current value in microseconds of Servo1.
readServo2Microseconds
Read the current value in microseconds of Servo2.
www.makeblock.cc
23
Table 24.
Me_MotorDriver Library functions (continued)
servo1Attached
Check whether the Servo1 variable is attached to a pin.
servo2Attached
Check whether the Servo2 variable is attached to a pin.
3.4.1
Servos_begin function
Table 25 describes the Servos_begin function.
Table 25.
Servos_begin function
Function name
Servos_begin
Function prototype
void Servos_begin()
Behavior description
Initialize the state of connected and unconnected ports of
Base Shield.
Input parameter
None
Return parameter
None
3.4.2
Servo1_begin function
Table 26 describes the Servo1_begin function.
Table 26.
Servo1_begin function
Function name
Servo1_begin
Function prototype
void Servo1_begin()
Behavior description
Initialize the state of connected and unconnected ports of
Base Shield.
Input parameter
None
Return parameter
None
3.4.3
Servo2_begin function
Table 27 describes the Servo2_begin function.
Table 27.
Servo2_begin function
Function name
Function prototype
Input parameter
Return parameter
Servo2_begin
void Servo2_begin()
Initialize the state of connected and unconnected ports of
Base Shield.
None
None
www.makeblock.cc
24
Behavior description
3.4.4
detachServo1 function
Table 28 describes the detachServo1 function.
Table 28.
detachServo1 function
Function name
detachServo1
Function prototype
void detachServo1()
Behavior description
Detach Servo1 variable from its pin.
Input parameter
None
Return parameter
None
3.4.5
detachServo2 function
Table 29 describes the detachServo2 function.
Table 29.
detachServo2 function
Function name
detachServo2
Function prototype
void detachServo2()
Behavior description
Detach Servo2 variable from its pin.
Input parameter
None
Return parameter
None
3.4.6
detachAll function
Table 30 describes the detachAll function.
Table 30.
detachAll function
Function name
detachAll
Function prototype
void detachAll()
Behavior description
Detach Servo1 and Servo2.
Input parameter
None
Return parameter
None
3.4.7
writeServo1 function
Table 31 describes the writeServo1 function.
Table 31.
writeServo1 function
Function name
Function prototype
Return parameter
writeServo1
void writeServo1(int value)
Writes a value in degrees (angle from 0 to180) to Servo1,
controlling the shaft accordingly.
value(int): The angle value to write to Servo1, from 0 to
180.
None
www.makeblock.cc
25
Behavior description
Input parameter
3.4.8
writeServo2 function
Table 32 describes the writeServo2 function.
Table 32.
writeServo2 function
Function name
Function prototype
Behavior description
Input parameter
Return parameter
3.4.9
writeServo2
void writeServo2(int value)
Writes a value in degrees (angle from 0 to180) to Servo1,
controlling the shaft accordingly.
value(int): The angle value to write to Servo2, from 0 to
180.
None
writeServo1Microseconds function
Table 33 describes the writeServo1Microseconds function.
Table 33.
writeServo1Microseconds function
Function name
Function prototype
Behavior description
Input parameter
Return parameter
writeServo1Microseconds
void writeServo1Microseconds(int value)
Writes a value in microseconds (us) to Servo1, controlling
the shaft accordingly.
value(int): The value of the parameter in microseconds.
None
3.4.10 writeServo2Microseconds function
Table 34 describes the writeServo2Microseconds function.
Table 34.
writeServo2Microseconds function
Function name
Function prototype
Behavior description
Input parameter
Return parameter
writeServo2Microseconds
void writeServo2Microseconds(int value)
Writes a value in microseconds (us) to Servo2, controlling
the shaft accordingly.
value(int): The value of the parameter in microseconds.
None
3.4.11 readServo1 function
Table 35 describes the readServo1 function.
Table 35.
readServo1 function
Function name
Function prototype
Behavior description
Input parameter
Return parameter
www.makeblock.cc
readServo1
int readServo1()
Read the current angle of Servo1.
None
The angle of Servo1, from 0 to 180 degrees.
26
3.4.12 readServo2 function
Table 36 describes the readServo2 function.
Table 36.
readServo2 function
Function name
readServo2
Function prototype
int readServo2()
Behavior description
Read the current angle of Servo2.
Input parameter
None
Return parameter
The angle of Servo2, from 0 to 180 degrees.
3.4.13 readServo1Microseconds function
Table 37 describes the readServo1Microseconds function.
Table 37.
readServo1Microseconds function
Function name
readServo1Microseconds
Function prototype
int readServo1Microseconds()
Behavior description
Read the current value in microseconds of Servo1.
Input parameter
None
Return parameter
The current pulse width in microseconds for Servo1.
3.4.14 readServo2Microseconds function
Table 38 describes the readServo2Microseconds function.
Table 38.
readServo2Microseconds function
Function name
readServo2Microseconds
Function prototype
int readServo2Microseconds()
Behavior description
Read the current value in microseconds of Servo2.
Input parameter
None
Return parameter
The current pulse width in microseconds for Servo2.
3.4.15 servo1Attached() function
Table 39 describes the servo1Attached function.
Table 39.
readServo1 function
Function name
servo1Attached
Function prototype
bool servo1Attached()
Behavior description
Check whether the Servo1 variable is attached to a pin.
Input parameter
None
Return parameter
True if Servo1 is attached, otherwise false.
www.makeblock.cc
27
3.4.16 servo2Attached function
Table 40 describes the servo2Attached function.
Table 40.
servo2Attached function
Function name
servo2Attached
Function prototype
bool servo2Attached()
Behavior description
Check whether the Servo2 variable is attached to a pin.
Input parameter
None
Return parameter
True if Servo2 is attached, otherwise false.
3.4.17 Example:
Open the Arduino IDE, and open the sketch of Me-ServoDriver -> TestServoDriver. The
sketch will control the motor connected to the driver board running in two directions
and then stop.
www.makeblock.cc
28
3.5 Me_Bluetooth Library functions
Me_Bluetooth Library is designed for connecting with the mobile phone or other
Bluetooth devices using the Me_Bluetooth module
Class Me_Bluetooth: Users can specify PORT_3, PORT_4, PORT_5 or PORT_6 when
instantiation an object.
Table 41 lists the Me_ Bluetooth Library main member function.
Table 41.
Me_Bluetooth Library functions
Function name
Description
Initialize the state of connected and unconnected ports of
Begin
Base Shield.
setName
Set device name.
Write
Write a byte.
Read
Read a byte.
Get the number of bytes (characters) available for reading
available
from the serial port.
Flush
Wait for the transmission of outgoing serial data to complete.
cheackConnected
Check the connected between the master and the slave.
3.5.1
begin function
Table 42 describes the begin function.
Table 42.
begin function
Function name
begin
Function prototype
void begin()
Behavior description
Initialize the state of connected and unconnected ports of
Base Shield.
Input parameter
None
Return parameter
None
3.5.2
setName function
Table 43 describes the setName function.
Table 43.
setName function
www.makeblock.cc
29
Function name
setName
Function prototype
int setName(String name)
Behavior description
Set device name as “abcdefg”.
Input parameter
name (String): The name of the device.
Return parameter
The state weather the name is set successfully or not. 1 for
success.
3.5.3
write function
Table 44 describes the write function.
Table 44.
write function
Function name
write
Function prototype
size_t write(uint8_t byte)
Behavior description
Write a byte.
Input parameter
byte (uint8_t): A value to send as a single byte.
Return parameter
3.5.4
write() will return the number of bytes written, though
reading that number is optional
read function
Table 45 describes the read function.
Table 45.
read function
Function name
read
Function prototype
int read()
Behavior description
Read a byte.
Input parameter
None
Return parameter
The character read, or -1 if none is available
3.5.5
available function
Table 46 describes the available function.
Table 46.
available function
Function name
available
Function prototype
int available()
Behavior description
Get the number of bytes (characters) available for reading
from the serial port.
Input parameter
None
Return parameter
The number of bytes available to read.
www.makeblock.cc
30
3.5.6
flush function
Table 47 describes the flush function.
Table 47. flush function
Function name
flush
Function prototype
void flush()
Behavior description
Wait for the transmission of outgoing serial data to
complete.
Input parameter
None
Return parameter
None
3.5.7
checkConnected function
Table 48 describes the checkConnected function.
Table 48.
checkConnected function
Function name
checkConnected
Function prototype
int checkConnected()
Behavior description
Check the connected between the master and the slave.
Input parameter
None
Return parameter
The state of the Bluetooth: BLUETOOTH_CONNECTED or
BLUETOOTH_PAIRABLE.
3.5.8
Example:
Open
the
Arduino
IDE,
and
open
the
sketch
of
Me-Bluetooth->
TestSlaveBluetoothBySoftSerial. The sketch will control the motor connected to the
driver board running in two directions and then stop.
www.makeblock.cc
31
3.6 Me_InfraredReceiver Library functions
Me_InfraredReceiver library is designed for receiving the command from the
infrared remote control of the Me_InfraredReceiver module.
Class Me_InfraredReceiver: Users can specify PORT_3, PORT_4, PORT_5 PORT_6
PORT_7 or PORT_8 when instantiation an object.
Table 49 lists the Me_ InraredReceiver Library main member function.
Table 49.
Me_InrareadReceiver Library functions
Function name
Initialize the state of connected and unconnected ports of
Begin
Base Shield.
Read
3.6.1
Description
Read the button name from the infrared remote control.
begin function
Table 50 describes the begin function.
Table 50.
begin function
Function name
begin
Function prototype
void begin()
Behavior description
Initialize the state of connected and unconnected ports of
Base Shield.
Input parameter
None
Return parameter
None
3.6.2
read function
Table 51 describes the read function.
Table 51.
read function
Function name
read
Function prototype
int16_t read()
Behavior description
Read the code number from the infrared remote control.
Input parameter
None
Return parameter
The code number of the IR control.
3.6.3
Example:
Open the Arduino IDE, and open the sketch of Me-InfraredReceive->
TestInfaredReceiver. The sketch will read the code number from the infrared remote
control and print the button name to the serial port.
www.makeblock.cc
32
Infrared remote control code table
Button
Button Name
IR_POWER_BUTTON
100
IR_MENU_BUTTON
102
IR_TEST_BUTTON
103
IR_PLUS_BUTTON
104
IR_RETURN_BUTTON
105
IR_PREVIOUS_BUTTON
106
IR_PLAY_BUTTON
107
IR_NEXT_BUTTON
108
IR_BUTTON_0
www.makeblock.cc
Code Number
0
IR_MINUS_BUTTON
109
IR_CLR_BUTTON
110
IR_BUTTON_1
1
IR_BUTTON_2
2
IR_BUTTON_3
3
IR_BUTTON_4
4
IR_BUTTON_5
5
IR_BUTTON_6
6
IR_BUTTON_7
7
IR_BUTTON_8
8
IR_BUTTON_9
9
33
3.7 Me_LineFinder Library functions
Me_LineFinder library is designed for the line following robotics of the Me_LineFinder
module.
Class Me_LineFinder: Users can specify PORT_3, PORT_4, PORT_5 or PORT_6 when
instantiation an object.
Table 52 lists the Me_ Bluetooth Library main member function.
Table 52.
Me_LineFinder Library functions
Function name
Description
Initialize the state of connected and unconnected ports of
begin
Base Shield.
readSensor1
Read the status of Sensor1.
readSensor2
Read the status of Sensor2.
readSensors
Read the status of the two sensors.
3.7.1
begin function
Table 53 describes the begin function.
Table 53.
begin function
Function name
begin
Function prototype
void begin()
Behavior description
Initialize the state of connected and unconnected ports of
Base Shield.
Input parameter
None
Return parameter
None
3.7.2
readSensor1 function
Table 54 describes the readSensor1 function.
Table 54.
readSensor1 function
Function name
readSensor1
Function prototype
int readSensor1 ()
Behavior description
Read the status of Sensor1.
Input parameter
None
Return parameter
www.makeblock.cc
The status of Sensor1. HIGH when receiving reflective
signal, LOW when finding black line.
34
3.7.3
readSensor2 function
Table 55 describes the readSensor2 function.
Table 55.
readSensor2 function
Function name
readSensor2
Function prototype
int readSensor2 ()
Behavior description
Read the status of Sensor2.
Input parameter
None
Return parameter
The status of Sensor2. HIGH when receiving reflective
signal, LOW when finding black line.
3.7.4
readSensors function
Table 56 describes the readSensors function.
Table 56.
readSensors function
Function name
readSensors
Function prototype
int readSensors ()
Behavior description
Read the status of the two sensors.
Input parameter
None
Four statuses: S1_IN_S2_IN -Sensor1 and Sensor2 are both
inside of black line; S1_IN_S2_OUT – Sensor1 is inside of
Return parameter
black line and Sensor2 is outside of black line;
S1_OUT_S2_IN – Sensor1 is outside of black line and
Sensor2 is inside of black line; S1_OUT_S2_OUT – Sensor1
is outside of black line and Sensor2 is outside of black line.
3.7.5
Example:
Open the Arduino IDE, and open the sketch of Me-LineFinder-> TestLineFinder. The
sketch will detect the black line and print it to the serial.
www.makeblock.cc
35
3.8 Me_UltraSonicSensor Library functions
Me_UltraSonicSensor library is designed for distance measurement using the
Me_UltrasonicSensor module.
Class Me_UltraSonicSensor: Users can specify PORT_3, PORT_4, PORT_5 PORT_6
PORT_7 or PORT_8 when instantiation an object.
Table 57 lists the Me_MotorDriver Library main member function.
Table 57.
Me_MotorDriver Library functions
Function name
Description
Initialize the state of connected and unconnected ports of
Begin
Base Shield.
distanceCm
Read the distance in centimeters.
distanceInch
Read the distance in inches.
3.8.1
begin function
Table 58 describes the begin function.
Table 58.
begin function
Function name
begin
Function prototype
void begin()
Behavior description
Initialize the state of connected and unconnected ports of
Base Shield.
Input parameter
None
Return parameter
None
3.8.2
distanceCm function
Table 59 describes the distanceCm function.
Table 59.
distanceCm function
Function name
distanceCm
Function prototype
long distanceCm ()
Behavior description
Read the distance in centimeters.
Input parameter
None
Return parameter
The distance in centimeters.
www.makeblock.cc
36
3.8.3
distanceInch function
Table 60 describes the distanceInch function.
Table 60.
distanceInch function
Function name
distanceInch
Function prototype
long distanceInch ()
Behavior description
Read the distance in inches.
Input parameter
None
Return parameter
The distance in inches.
3.8.4
Example:
Open the Arduino IDE, and open the sketch of Me-UltraSonicSensor->
TestUltrasonicSensor. The sketch will read the distance from the ultrasonic sensor and
print it to the serial port in centimeters.
www.makeblock.cc
37