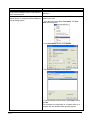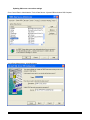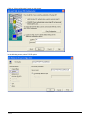
1
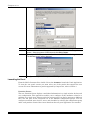
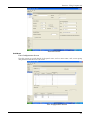
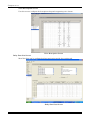
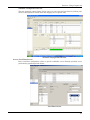
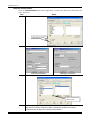
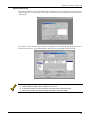
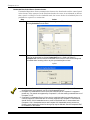
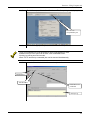
Compass 2.0 WINDOWS Compatible Network Downloader Read Me Document Version 2.0.11 K14563V1_Rev. A 04-06-09 PRELIMINARY VERSION 2.0.9.x Table of Contents SECTION 1: System Overview ................................................................................................................. 1-1 Introduction ............................................................................................................................................................... 1-1 Components of Compass 2.0 ..................................................................................................................................... 1-1 Shell........................................................................................................................................................................... 1-1 Panel Applications..................................................................................................................................................... 1-1 Communication Server.............................................................................................................................................. 1-1 Databases................................................................................................................................................................... 1-1 System/Software Requirements................................................................................................................................. 1-2 SECTION 2: Feature Enhancements ...................................................................................................... 2-1 New Features in Compass 2.0 ................................................................................................................................... 2-1 Shell Features ............................................................................................................................................................ 2-1 Panel Application Features........................................................................................................................................ 2-1 Unattended/Unsolicited Communications Features................................................................................................... 2-2 General ...................................................................................................................................................................... 2-2 SECTION 3: Functional Limitations ...................................................................................................... 3-1 Functional Limitations............................................................................................................................................... 3-1 Panels Supported on Windows Vista: ....................................................................................................................... 3-1 Compass Supported Modems: ................................................................................................................................... 3-2 SECTION 4: Using Compass 2.0 ............................................................................................................... 4-1 Starting the Application............................................................................................................................................. 4-1 Logging On................................................................................................................................................................ 4-1 Communications Setup.............................................................................................................................................. 4-1 Launching the Panel .................................................................................................................................................. 4-2 Partition Screen.................................................................................................................................................... 4-2 Sub-Menus ................................................................................................................................................................ 4-3 User Configuration Screen................................................................................................................................... 4-3 Voice Description Screen .................................................................................................................................... 4-4 Relay Zone List Screen........................................................................................................................................ 4-4 Schedule Configuration Screen............................................................................................................................ 4-5 Access: Card Data Screen.................................................................................................................................... 4-5 Interactive Communication ....................................................................................................................................... 4-6 Status and Event Log................................................................................................................................................. 4-7 Unattended/Unsolicited Server Communication ....................................................................................................... 4-8 Appendix A : Known Issues and Work-Arounds ........................................................................................................10 Installation issues ........................................................................................................................................................10 General Issues..............................................................................................................................................................13 Panel Application Issues..............................................................................................................................................16 Updating SQL server connection settings ...................................................................................................................17 Glossary…………………………………………………………………………………………………...…………………Inside Back Cover i S E C T I O N 1 System Overview In This Section System/Software Requirements Introduction Components of Compass 2.0 Introduction Compass 2.0 is a downloader application similar to Compass 1.5.8.X with new features added. Installing Compass 2.0, customers can perform the same operations they have been performing using Compass 1.5.8.X with their existing Compass accounts, i.e., panel configuration, communicating with the panels, upload/download etc. The only difference (with respect to Compass 1.5.8.X) is that they will see new User Interface Screens and added features which have been designed as part of Compass 2.0. Components of Compass 2.0 Shell The Compass 2.0 Shell application is a new shell with many new features as explained in Section 2. NOTE: There is a menu option in the Shell under Options > Always launch 16-bit User Interface to allow user to select the shell to launch Compass 1.5.8.X or Compass 2.0. If the user selects this option, the Compass 1.5.8.X UI (User Interface) screens will be displayed for all the panels. By default, this option is not selected, which means all the screens (Panel, Communication etc.) that are launched within Compass will be the new Compass 2.0 UI screens (except when the panel is not supported in Compass 2.0). Panel Applications This release includes an all new redesigned panel application framework which has more information screens, an improved look and feel, and provides Compass users with an improved screen navigation system and configuration experience. For panels not supported by this release, the existing User interface (Compass 1.5.8.X) will be used. See Section 3 for details. Communication Server The Compass 2.0 Commserver is a redesigned communication server with a new User Interface. For some legacy panels, the existing communication server (Compass 1.5.8.X) will be used. See Section 3 for details. In this release, the Commserver has support for all the protocols that are currently supported by Compass 1.5.8.X (ADEMCO APEX, FBII, etc.). Databases The databases supported are MS SQL Server 2000, MS SQL Server 2005 and MS SQL Express 2005. Access 2.0 and MSDE are not supported. 1-1 Compass 2.0.11 System/Software Requirements The following tables list the system software requirements necessary to run Compass 2.0. Verify that your system meets these requirements prior to installing the application. System Attributes Processor Disk Space (Free) Monitor Resolution Minimum Intel Pentium II - 256 MB RAM 1 GB 800 X 600 Recommended 512 MB RAM >1 GB 1024 x 768 Be sure that you are running the correct version of the software application to ensure proper installation of Compass 2.0. Application Operating System Database Application Microsoft Internet Explorer 1-2 Version • Windows • Windows • Windows • Windows • Windows • Windows 2000 Service Pack 4 (Limited Support) 2003 Server XP (Service Packs 2 and 3) Vista Business Vista Ultimate Vista Home Basic MS SQL Server 2000 ,MS SQL Server 2005, MS SQL Express 2005 5.5 and above S E C T I O N 2 Feature Enhancements In This Section New Features in Compass 2.0 New Features in Compass 2.0 The feature enhancements in Compass 2.0 are summarized below. Shell Features When the panel application for one account is opened, jobs can be scheduled for other accounts. Export subscriber utility with report format is provided from the shell. Customer list can be printed from the shell. All customer records can be viewed from the shell. Only the first 500 records can be viewed in Compass 1.5.8.X. New options for purging event logs in the shell and purge history have been moved to the Tools tab. Mass Download of Jobs. Export and import of operators, templates and receiver group-phone number in the respective forms in Shell. Search option in Templates form. Option to Release Database Connections upon exiting from Compass when exiting from Shell, provided under Options menu in Shell. Right Click Menu for accounts in Customer Screen. Panel Application Features A common navigation and screen design for all panel applications that Compass supports (in Compass 1.5.8.X there are minor variations between an Omni Panel, Lynx Panel and Vista commercial panel, etc.) Easy to use, faster user interface Informative screen Improved look and feel includes: Schedule Screen, Relay Voice Descriptor and Relay Zone List Fast and easy configuration Combined screens for Partition, Access Card Data, Access point configuration, Access group configuration. Faster navigation Provision to view/edit Zones, Devices, Users and Schedule configuration data associated with a partition by clicking on Links, present under that partition itself. Search screen provides quick searching of panel features based on feature groups (Partition, Dialer etc.) Application level Help File support and F1 context-sensitive control level help support. The “Change” option (present in the “Change and Compare” screen) allows you to see the changes you have made to the currently loaded view in a Session (since the last Save operation) 2-1 Compass 2.0.11 Drag and drop commands are supported in Interactive communications, as well as in scheduling modes for all protocols. Event Logs will be saved automatically to the database. History of Event Logs can be viewed for all panels. Activity Log can be viewed /exported in Interactive Mode. This can be enabled or disabled by the user. In Interactive Mode user can view the last retrieved panel status (offline status) for an account by selecting menu Status-Read Status from Database. In Interactive Mode, user can cancel a command which is under current execution. Unlike Compass 1.5.8.X, user can see which commands have been executed previously in Interactive Mode. Unattended/Unsolicited Communications Features Unattended mode for APEX and FBII is supported (Compass 1.5.8.X does not support this). Unattended - Activity Logs can be saved in text mode. Automatic saving of uploaded information in Unattended Mode is available for all protocols. All the protocol screens share the same look and feel and only one unattended screen will be launched for all the protocols/ports on a machine. Details of the job in the queue can be seen in the unattended screen. While rescheduling an unattended batch, commands which require user input can be modified with new values using the Edit button. TCP/IP (Transmission Control Protocol/Internet Protocol), GSM and dial-up unattended jobs cwan be executed simultaneously. Unattended/Unsolicited Server displays Caller ID information in the activity log. General 2-2 A new utility to obtain reports on panels being used by a Compass system can be generated. Context sensitive F1-Help available in all user interface modules (Shell, Panel Application and Communication screens) New Compass 2.0 User Manual is now available Database Management Utility to switch between the different database servers that are supported in Compass 2.0. S E C T I O N 3 Functional Limitations In This Section Functional Limitations Functional Limitations 1. Panels that are not supported by Compass 2.0 will use existing Compass 1.5.8.X. 2. Compass 2.0 Unattended Server will not receive unsolicited calls from panels that are not currently supported. For panels not currently supported by Compass 2.0 Commserver, should use the Compass 1.5.8.X Unattended server to receive unsolicited calls. In cases where both (Compass 1.5.8.X Unattended server and Compass 2.0 Unattended server) servers are running, some of the features like phone line hunt group may be affected. See the Compass HELP file for details on this feature. 3. The current release supports MS SQL Server \ SQL Express database in the network. It does not support Access 2.0 due to limitations imposed by Microsoft in accessing an older (legacy) database simultaneously from Compass 2.0 and Compass 1.5.8.X. However, the solution to this is migration of Access 2.0 legacy database to MS SQL Server \ SQL Express; this is made available in the new installation with the Migrate Access accounts option. 4. Panel application short-cut keys are not supported for check-boxes etc. Panels Supported on Windows Vista: 4110XM-1 FA1220CV-1 Lynx-6 Vista10SE-9 4110XM-4 FA1220CV-10V LynxR-2-17 Vista128B-1 4110XM-5 Lynx-5 Vista32FB-5 Vista250BP-3 4110XM-6 Lynx-6 Vista10SE-9 Vista250BP-4 4110XM-7 LynxR-2-17 Vista128B-1 Vista250FBP-1 5110XM-1 LynxR-2SIA-17 Vista128B-2 Vista250FBP-2 5110XM-2 LynxREN-1 Vista128B-3 Vista250FBP-3 FA1660CSIA-3 LynxREN-11 Vista128BP-1 Vista32FB-1 FA1660CSIA-4 LynxREN-13 Vista128BP-2 Vista32FB-2 FA130CP-1 LynxRENSIA-13 Vista128BP-3 Vista32FB-3 FA130CP-2 LYNXR-I-14 Vista128BP-4 Vista32FB-4 FA130CPSIA-2 LYNXR-ISIA-14 Vista128FB-1 Vista15PCN-1 FA130CPSIA-3 LYNXR-2-18 Vista128FB-2 Vista15PCN-2 FA1660C-1 LYNXR-2SIA-18 Vista128FB-3 Vista15PCN-3 FA1660C-2 L3000-20 Vista128FB-4 Vista15PCN-5 FA1660C-3 L3000SIA-20 Vista128FB-5 Vista20EX-3 FA1660C-4 Vis128BPSIA-3 Vista128FBP-1 Vista20EX-4 FA1670C-1 Vis128BPSIA-4 Vista128FBP-2 Vista20EX-5 FA1670C-2 Vis20PSIA-5(IP) Vista128FBP-3 Vista20PCN-1 FA1670C-3 Vista10P-1 Vista15P-1 Vista20PCN-2 FA1700C-1 Vista10P-2 Vista15P-2 Vista20PCN-3 FA1700C-2 Vista10PSIA-2 Vista15P-3 Vista20PCN-5(IP) FA1700C-3 Vista10PSIA-3 Vista15P-5 Vista20PSIA-5(IP) FA168CPSSIA-5(IP) Vista10SE-11 Vista15PSIA-3 ReadyGuardR-1 3-1 Compass 2.0.11 FA1340C-8 Vista10SE-13 Vista15PSIA-5 FA2000C-1 Vista10SE-14 Vista20-3 RgdR2SIA-18 FA2000C-2 Vista10SE-15 Vista20-4 ReadyGuardR-11 FA1220CV-1 Vista40-1-5 Vista20-5 ReadyGuardR-13 FA1220CV-10V Vista40-6 Vista20HW-3 ReadyGuardR-5 FA1220CV-12V Vista40-10V Vista20HW-4 ReadyGuardR-6 FA1220CV-14 Vista40-12V Vista20HW-5 READYGD-R2-17 FA1220CV-16 Vista40-14 Vista20HWSE-1 RgdR-2SIA-17 FA130CP-4 Vista40-16 Vista20HWSE-10 ReadyGuardEN-11 FA130CPSIA-4 Vista50P-3 Vista20HWSE-11 ReadyGuardEN-13 FA1670C-4 Vista50P-4 Vista20HWSE-12 RgdrenSIA-13 FA1700C-4 Vista50P-6 Vista20P-1 READYGD-RI-14 FA148CP-1 Vista50P-8 Vista20P-2 RgdR-ISIA-14 FA148CP-2 Vista20P-7(IP) Vista20P-3 FA148CP-3 Vista20PSIA-7(IP) Vista20P-5(IP) FA148CP-5 Vista20PCN-7(IP) Vista20PS-1 FA148CPSIA-3 Vista15P-6 Vista20PSIA-3 FA148CPSIA-5 Vista15P-CN6 Vista20SE-1 FA168C-1 Vista15P-SIA6 Vista20SE-10 FA168CPSIA-5(IP) Vista21IP-2 Vista20SE-11 FA168CPSSIA-3 Vista21IPSIA-2 Vista20SE-12 Lynx-1 Vista10P-4 Vista21IP-1 Lynx-10 Vista10PSIA-4 Vista21IPSIA-1 ReadyGuardR-10 Compass Supported Modems: The following modems are supported in Compass 2.0. More modems will be supported in a phased manner in future releases. Ademco Modems Ademco CIA 2400 Hayes Accura 144 V4.0 Hayes Optima 336 External Hayes Optima Smartmodem 2400 Hayes Smartmodem 1200 Hayes Smartmodem 2400 Hayes Smartmodem Optima 2400FAX Hayes Smartmodem 1200 W/Vol FBII Modems Ademco CIA 2400 for FBII Hayes Smartmodem 2400 Hayes Smartmodem 2400 FAX Apex Modems Ademco CIA 2400 for Apex Hayes Accura 144 V4.0 Hayes Optima 336 External Hayes Optima Smartmodem 2400 Hayes Accura 288 V34 Fax 3-2 New HayesOptima24 Smartmodem US Robotics 56K FAX Modem US Robotics Sportster 14.4 Zoom 56K for Apex S E C T I O N 4 Using Compass 2.0 In This Section Starting the Application Launching the Panel Starting the Application After the downloader is successfully installed, you will see the Compass 2.0 icon on your desktop. Double-click the icon to start the application. You can also access Compass 2.0 from Start > Programs > Compass Windows Downloader->Compass2.0. ATTENTION: You must not start the Compass application by any other method. Logging On To logon to Compass 2.0, perform the following steps: Step Action 1 Double click on the Compass 2.0 icon on your desktop to open the program. The Compass login window will be displayed. 2 Type the Operator ID and Password. Once the Operator ID and Password have been validated, the Compass 2.0 program will be launched. NOTE: The default Operator ID and Password is "Master" (not case sensitive). 3 Click Ok. Communications Setup To set up communication with different protocols, you must set up a modem for each protocol in the Communication Setup dialog box. Click on Modems to launch the Communication Settings dialog box. Step 1 Action NOTE: Modem strings for Compass 2.0 will appear in the "Modem Settings" section as depicted in the next screen. User must select this to initialize the modem. 4-1 Compass 2.0.11 2a 2b 2c 3 Select the name from the list of companies whose panel you are using. Additions and deletions of Com ports and TCP/IP ports can be made using this screen. Select the system COM Ports and click Add or Delete. To configure TCP/IP port related details, click on the TCP IP Port Settings button. The following screen will be displayed. Configure the respective Com ports and TCP/IP ports; click Ok. Launching the Panel From the Shell's Customer List, double click on the Account to launch the Panel Application. To view the new panel screens you must select one of the panels that support the new screens. For more information on panels supported by Compass 2.0, refer to Section 3. Partition Screen The new Partition Screen displays consolidated information in a single window for fast and easy configuration. This application enables you to configure all the attributes related to a partition on a single page, whereas with the previous panel you had to navigate to different tabs. The left pane is the navigation bar to the different configuration groups. You can configure associated zones, devices, users, and schedules by selecting the configuration group under each partition. Some of the screen shots from the new panel application are attached. 4-2 Section 5: Using Compass 2.0 Partition Screen Sub-Menus User Configuration Screen Use this screen to record details of the panel users, such as user name, code, access group and partitions that the user can access. User Configuration Screen 4-3 Compass 2.0.11 Voice Description Screen Use this screen to configure the descriptions for panels supporting voice alarms. Voice Description Screen Relay Zone List Screen Mass Zone Lists can be configured without navigating outside the partition tab. Relay Zone Lists Screen 4-4 Section 5: Using Compass 2.0 Schedule Configuration Screen The new graphical control feature allows you to set your start and end times by clicking your mouse in the graphical control chart and dragging it to a specific time. Schedule Configuration Screen Access: Card Data Screen Easy Card Data configuration allows a specific cardholder access through specified access points during specified periods of time. Card Data Screen 4-5 Compass 2.0.11 Interactive Communication Click on Communications from Panel Application to launch the Interactive downloader UI (User Interface). Step Action The following screen is displayed. 1 Click here to connect 2 Click the Connect button. This opens a dialog with connection options. 3 TCP IP Connection Dial-up Connection Select the appropriate options and click the Connect button. Select command and click execute 4 4-6 After establishing connection with panel, select the command from the left side list box and click execute. Selection of batch commands is possible even before connection with the panel in interactive communication. Section 5: Using Compass 2.0 Status and Event Log The Status and Event log, if available from the database, can be launched from the menu or when Compass 2.0 is connected to the panel. The Status Screen displays the current status of the panel. The details of the selected log recorded are displayed in the Event Log Response screen. Event logs can also be viewed through the Shell when it is available in the database. 1. 2. 3. 4. Screen displays look and feel will be same across all the protocols. Offline status message can be viewed for an account. In interactive mode, user can cancel the command under current execution. User can see which command has been executed in interactive mode. 4-7 Compass 2.0.11 Unattended/Unsolicited Server Communication Unattended Operation allows communication between the downloader and the control panel in the absence of the operator. In the Unsolicited mode, the server is not informed in advance that a panel is calling in. In the scheduled mode, the server checks for scheduled jobs to be performed on a panel at a certain time. Step 1 2 Action You can schedule jobs using the Scheduling screen. This can be launched by clicking Schedule from the Shell. Compass 2.0 Unattended Server selects the job scheduled for supported panels. This can be launched by clicking Unattended from the Shell and selecting Compass 2.0 from the Launch Unattended Server screen. Ports can be configured to handle either incoming calls or to pick up scheduled jobs or both. update 1. Compass 2.0 will not handle incoming calls from an unsupported panel/protocol. For panels/protocols not supported, use the 16-bit Unattended server. 2. Compass 2.0 Unattended server will select the scheduled job of Compass 2.0 supported panels only. For panels not supported by Compass 2.0, use the existing unattended server of Compass 1.5.8.X. 3. Compass 2.0 Unattended Server will not receive unsolicited calls from panels that are not currently supported. Panels that are not currently supported by Compass 2.0 Commserver, should use the 16-bit Unattended server to receive unsolicited calls. In cases where both (Compass 1.5.8.X Unattended server and Compass 2.0 Unattended server) servers are running, some features like phone line hunt group may be affected. See the Compass HELP file for details on this feature. 4-8 Section 5: Using Compass 2.0 3 To initialize a port, click the Start Port button. The Setup dialog box is displayed. Click here to setup/initialize port 4 Choose the appropriate options and click OK to start the port. 1.Only one Unattended UI will be launched for all the protocols/ports on a PC. 2.Details of the job in the queue can be seen in the Unattended screen. 3.Activity log can be saved in text mode. 4.Both TCP IP and Dial-up unattended jobs can be executed simultaneously. 5 Use the Scheduler Activities Viewer to view job details. COM PORT 1 TCP IP PORT 1 Click here to see job details Activity Log 4-9 Appendices Appendix A : Known Issues Installation issues and Work-Arounds Issue Work-Around During Compass20 installation, sometimes you may get a popup message “.Net framework/SQLExpress could not be installed. Install .Net framework/SQLExpress manually”. Run CompassSetup.exe again from the CD The Compass20 Client installations cannot connect to Compass SQL Server. This normally happens when SQL Express is installed manually. Update SQL server connection settings so that Compass client can connect to Compass database server. After step1, if you still see the same issue, install .Net Framework or SQL Express Manually from the Prerequisites folder present in CD NOTE: Perform this setting on server PC only. Check “Updating SQL server connection settings” at the end of this doc. When ACCESS Database accounts are migrated to SQL Express, you will see default panel names without any personality disc. Run appropriate personality disc to see specific company panel type During Installation and Un-installation of Compass or Commander the following to be kept in mind to avoid unpredictable results 1. Do not run the installation setup of Commander and Compass2.0 together on the same PC at same time. 2. If you are using any other Honeywell software like Commander, close all those applications before starting Compass20 installation or uninstallation Issue Work-Around Sometimes during installation the following dialog box appears, with a list of applications which are using files that need to be updated by the Compass 2.0 Setup. You have the option to close the applications before proceeding further. Sometimes during installation, the following message box appears. You might see this error if another software application is being installed simultaneously along with Compass20. Complete the other installation and later run the Compass setup. If you still see the same message, restart the computer and begin installation. Sometimes the installation fails with the message “1628: Failed to complete installation.” Ensure that you have the required free space on the hard drive. Compass 2.0 recommends 1 GB free disk space. The Compass20 application does not work with all the Windows user accounts. Launch the Compass20 application from the user account in which it was installed. The Compass20 installation setup creates desktop shortcut icons for all the Windows user accounts on the computer. But the application can be used only in the user account in which Compass20 is installed by a user with administrator privileges. 13-11 Issue Sometimes during installation, the following error message might appear. Sometimes during installation, feature transfer error appears. Work-Around Uninstall Compass2.0 and reinstall Compass2.0. This error appears when the installation is abruptly stopped, due to system reboot. 1. In the CD, from the Utilities folder, run Cleanup Utility. 2. Delete shortcuts from the desktop. 3. Delete Compass2.0 folder. 4. Reinstall Compass2.0. 13-12 General Issues Issue Sometimes, Interactive Communication UI may hang/take long time during connection/disconnection or command execution. Work-Around 1. Copy the Compass_Cleanup folder from the utilities folder in the CD ROM to the local machine 2. Run the batch file “CompassCleanup.bat” present in the Compass_Cleanup folder. 3. Now close Compass and re launch. NOTES: On VistaOS “CompassCleanup.bat” will popup message whether to allow the exe to run. Select “Allow”. “CompassCleanup.bat” will close unattended server automatically. Run this batch file with no pending jobs in unattended server. Rarely observed few commands under scheduled jobs may fail (dialup & TCP/IP connection) for VISTA128BP-4 & 250BP-4 panel. Retry executing the same command Rarely observed in Telco mode of communication any of the following DownloadAll, DownloadAlpha and UploadAll command may fail. Retry executing the same command In Interactive communication screen, Commands in queued up may not be picked up automatically by Interactive UI. Click on UI element where commands are queued up. If step 1 is not solving the problem, remove all commands and add to the queue again. Some panel types do not appear in VistaOS Refer the list of panels supported on VistaOS Sometimes in Interactive Communications, “Unable to connect” message box is displayed when user clicks "Connect". 1. Exit the Compass application Event Log commands fail for 250P1 panels. 2. Restart the connection to the panel. This scenario can also occur when the port is already in use by another application (e.g. Unattended Server); check for this and close the application, if desired. Retry Event log commands fail for FA147C panels in the panel initiated mode of Communication. Retry Seconds are always displayed as "00" in event log when it is uploaded, even though the protocol doesn’t support seconds. Ignore Seconds part of the time displayed in event log. Hour and Minutes part of the time shown will be always valid. In low end PCs a window titled "pro_comm" appears along with the "switch-to" and "retry" buttons when you click on the Connect button, and also when you try clicking on other areas of the screen while communication is in process. When panel is in Armed state, ZoneBypass command actually fails but Interactive UI shows ZoneBypass is successful This normally happens if the connection is not set up properly. Check the connection and try again. Refrain from clicking on any other areas of the screen while a connection is being established. It is an UI issue. Ignore the command execution status that appears as “#Zone Bypass” in Command Queue List. Check the status of the zone in status window to know the actual status. You might see a message “Panel Application didn’t Respond for the DDE Message” while executing commands for the Vista 50P-8 client. Close the interactive UI and the shell and re-launch the application. 13-13 Issue In interactive communication, you might see the disconnection message on the UI even after the panel is disconnected. You might have problems printing using a network printer, on computers with the Windows Vista operating system. Work-Around Close the interactive UI and the shell and re-launch the application. Configure the network printer through the Print Setup option present in the shell. 1. From the shell choose File > Print Setup. The Print Setup window appears. 2. In the Print Setup window, click Network. 3. The Connect to Printer window appears. 4. Type the network printer's name in the Printer box and click OK. This completes the configuration of a network printer on a computer with the Windows Vista operating system. 13-14 Issue When the upload/download is in progress, Interactive communication screen displays the error message “Unable to process command”. When an USB to serial converter, which is not recommended, is used, the following error message appears. The Panel is disconnected either due to, 1. Issue with modem or serial cable. 2. Issue with telephone cable. 3. Panel has been switched off. Sometimes when the Compass account belongs to lower panel revision and the connecting panel hardware is of higher revision, the Revision mismatch error appears and disconnects. In the event log viewer, the user number displays blank for the events generated by the installer. Work-Around Close Compass2.0 completely and relaunch Compass2.0. Recommended USB to serial converters. Manufacturer - Keyspan / Tripp-Lite. Model - USA-19HS. Change the panel revision appropriately in Details option in shell, and connect. When the user number is being displayed on the event log viewer, consider that the event is generated by installer. 13-15 Panel Application Issues Issue It is observed that sometime in the shell the buttons “Modify”, “Schedule” is disabled. Work-Around 1. Copy the Compass_Cleanup folder from the utilities folder in the CD ROM to the local machine 2. Run the batch file CompassCleanup.bat present in the Compass_Cleanup folder. 3. Now close Compass and re launch. History takes long time to display 1*76 field missing under partition tab filters 13-16 NOTES: In the Vista operating system, CompassCleanup.bat will display a popup message asking if you want to allow the .exe file to run. Click Allow. CompassCleanup.bat will close the unattended server automatically. When you run this batch file, ensure that there are no pending jobs in the unattended server. The History screen takes a relatively long time to display (as compared to Compass 16-bit screen) if you have large history data for that particular account. 1*76 can be found under Access tab Updating SQL server connection settings Go to Control PanelAdministrative ToolsData SourceSystem DSN and select SQLCompass You will see below screen - click Next button 13-17 Click on “Client configuration” button on this screen. In the following screen, select TCP/IP option 13-18 Glossary DSN - Database Source Names are data structures used to describe a connection to a database. GSM - Global System for Mobile Communications is the most popular standard for mobile phones in the world. LAN - Local Area Network is a computer network covering a local area. MSDE - Microsoft Data Engine is a database platform. It is a modified version of Microsoft SQL Server. MS SQL - Structured Query Language produced by Microsoft, is a relational database management system (RDBMS). TCP/IP - Transmission Control Protocol / Internet Protocol are communications protocols that implement the protocol stack on which the Internet and most commercial networks run. 13-19 165 Eileen Way, Syosset, NY 11791 Copyright 2007 Honeywell International Inc. www.honeywell.com/security ÊK14563BŠ K14563V1_Rev. A 11/28/08