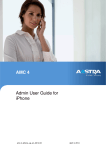
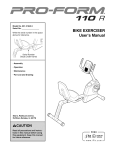
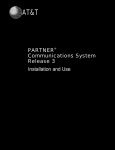
1
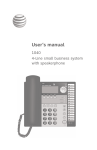
P0802245 03 E UG Page -3 Tuesday, February 29, 2000 4:49 PM
9009
User Guide
P0802245 03 E UG Page -2 Tuesday, February 29, 2000 4:49 PM
P0802245 03 E UG Page -1 Tuesday, February 29, 2000 4:49 PM
Table of Contents
The 9009 - Introduction
1
Installing your 9009
2
Checking your phone
5
Personalizing your phone
Options
To change any of the five options
6
6
6
Saving numbers and
services in memory
To save a number in memory
To erase the contents of a memory key
To program a Call Forwarding ON key
To program a Call Forwarding OFF key
7
7
7
7
7
Using the 9009 features
Protecting the contents of your
memory keys
Placing a customer on hold
Ensuring privacy
Controlling the ringer volume
Controlling the receiver volume
Releasing a call
To unlock your memory keys
Pause Feature
Remembering the last incoming call
8
8
8
8
8
8
8
9
9
Light and display messages
Using telephone company services
Knowing when you have a message
Light and Display
What it means
9
9
9
9
9
Answering your questions
Index
8
10
P0802245 03 E UG Page 0 Tuesday, February 29, 2000 4:49 PM
P0802245 03 E UG Page 1 Tuesday, February 29, 2000 4:49 PM
The 9009 telephone...simplicity at work
Taking care of your business
In today's competitive marketplace, you need a business tool that will help you stay in touch
with your customers. This business telephone will give you the features of a large office system,
but is as affordable and easy to use as a small office telephone.
The 9009 puts new features to work
Your 9009 telephone works with the new and powerful call management services and supports
Centrex features. The phone also works with the new messaging services available as telephone
company subscriber services or as an optional Centrex system feature.
The 9009's display guides you step by step
Perhaps the most exciting feature about your 9009 telephone is the display that provides
messages to guide you step by step through any function. Just read the display for instructions
on making or receiving calls and using features.
A new point of view
Answering the phone doesn't have to be a surprise. The 9009's display lets you see who's calling
before you answer the phone. If you subscribe to Call Display†/Caller ID†, the caller's
telephone number (and name, if available) appears on the display as your phone is ringing.
Discover the 9009
The Discovery Card lets you use your new 9009 telephone right away. This learning tool tells
you what the keys do and how to use them. Experiment by pressing various keys and reading the
display. Use the Discovery Card for a few days until you become familiar with the many
features of your new phone.
†Until you subscribe to Call Display or Caller ID (not available with PBX), or until your Centrex system provides a Call
Display/Caller ID feature, the number (and name, if available) of the call will not appear on the display. The name for
this service may differ in your calling area.
1
P0802245 03 E UG Page 2 Tuesday, February 29, 2000 4:49 PM
Installing your 9009
1. Connecting the receiver and receiver cord.
2. Stand (desk-mount or wall-mount).
Attach the wedge-shaped stand in desk-mount or wall-mount (see Figure 8) position.
2
P0802245 03 E UG Page 3 Tuesday, February 29, 2000 4:49 PM
3. Connect the line cord.
4. Connect the power adapter cord.
!
!
5. Attach the faceplate.
3
P0802245 03 E UG Page 4 Tuesday, February 29, 2000 4:49 PM
6. Attaching Receiver Card and lens.
After saving numbers in memory, attach
the Receiver Card and lens (shiny side
down).
7. Fitting the Discovery Card.
Place your phone on a desk. Then fit the
Discovery Card over the keys on the
phone.
4
P0802245 03 E UG Page 5 Tuesday, February 29, 2000 4:49 PM
8. Wall Mount Only.
For wall mounting, we recommend that you
use a wall-mount plate. The excess line cord
fits into the stand of the phone.
Checking your phone
When you plug in your 9009, you may see a message on the display asking you to make a
language selection. Read the directions on the display to select one of two languages.
The phone also runs a test to ensure that the phone cord is connected properly. If the test fails,
the display may prompt you to check the phone cord. Make sure that all connections are
fastened securely. If the test passes, the message may stay temporarily, then disappear.
5
P0802245 03 E UG Page 6 Tuesday, February 29, 2000 4:49 PM
Personalizing your phone
The 9009 has five options to personalize your phone. Move the sliding panel which is located
below the display and press the SET OPTIONS key to see each of the choices. You can change
any of the five options by following the change procedure at the bottom of the page.
Options
1. Change the language
You have a choice of display messages in one of two languages.
2.
Set the time and date
You can set the time and date. If you subscribe to Call Display/Caller ID, the current time
and date are set automatically when the first call comes in. This also happens after a power
failure.
3.
Set the ring tone and ringer volume
You can choose one of four different ring tones. While you are selecting the ring tone, you
can adjust the ringer volume by pressing the volume bar ¶ below the dial pad.
Use ß to end only when you are satisfied with the ring tone and ringer volume.
4.
Turn the light off
You can program a memory key to turn the light on and activate a feature at the same time.
If you don't want the light on while the feature is active, use this option to turn the light off.
5.
Enter your area code
When Call Display/Caller ID shows local calls, it may also show the area code. If you want
local calls to appear without the area code, enter your area code using this option.
To change any of the five options:
1.
Don't pick up the receiver.
2.
Slide the panel (located below the display) and press the SET OPTIONS key.
3.
4.
6
Press • to move through the list of options one at a time
OR
Press the desired option number on the dial pad.
For example, when 5 items in list appears on the display, press ¤ to set the time and
date.
Press the selected option number again (⁄ through
display to change the option.
fi), and follow the instructions on the
P0802245 03 E UG Page 7 Tuesday, February 29, 2000 4:49 PM
Saving numbers and services in memory
After you have set up your phone, save the names and numbers of your customers, associates or
anyone else you call frequently in the phone's memory. For easy access, you can also save
feature codes for system services in memory.
To save a number in memory:
1.
OR
Press ß and follow the instructions on the display.
For example, to save the number 555-1440 on a memory key:
1.
Press ß.
2.
Press the memory key where you want to save the number.
3.
Use the dial pad to enter the number. In this case press fififi⁄››‚.
Note: If you require a pause, press ˙ when you want the pause.
4.
Press ß.
5.
Write the name (in pencil) in the space provided on the receiver card.
To erase the contents of a memory key:
1.
Press the memory key to see its contents.
2.
Press £twice to erase.
You can save access codes for system features in memory. You can store the ON feature code in
one key and the OFF feature code in another. For example:
To program a Call Forwarding ON key:
To program a Call Forwarding OFF key:
1.
Press ß.
1.
Press ß.
2.
Press ⁄ to program the light to turn on.
2.
Press ‚ to program the light to turn off.
3.
Press the desired memory key.
3.
Press the desired memory key.
4.
Press the access code for turning the
feature on (for instance •‡¤ which
may turn Call Forwarding on†).
Read the display to confirm the number.
4.
Press the access code for turning the feature off (for instance •‡‹which may turn
Call Forwarding off†).
Read the display to confirm the number.
5.
Press ß again.
5.
Press ß again.
6.
Write Call Forwarding ON on the receiver 6.
card (in pencil).
Write Call Forwarding OFF on the receiver
card (in pencil).
When you turn a feature on using a memory key, the 9009's light comes on to remind you that
the feature is in use. When you turn the feature off using a memory key, your phone's light also
turns off. The light can be programmed to work with only one feature at a time.
Note: To save ON and OFF keys for a feature without the light, omit step 2 from the above
procedures.
†Codes may vary between PBX or Centrex systems and telephone companies.
7
P0802245 03 E UG Page 8 Tuesday, February 29, 2000 4:49 PM
Using the 9009 features
Protecting the contents of your memory keys
For security reasons, you can protect the contents of your memory keys by locking them. You
will still be able to use your memory keys to place calls, but you will not be able to erase them or
save new numbers while they are locked.
To lock your memory keys:
To unlock your memory keys:
1.
Don't pick up the receiver.
1.
Don't pick up the receiver.
Press the SET OPTIONS key.
2.
Press the SET OPTIONS key.
3.
Press ˙ .
3.
Press ˙ .
4.
Press •.
4.
Press £.
2.
Placing a customer on hold
If you want to continue your conversation at another extension, press ˙ and hang up the
receiver. The hold feature keeps the caller on the line and is released once you pick up the
extension telephone.
Ensuring privacy
The 9009's light comes on and Extension in use appears on the display when another person
in your office picks up an extension on your line. The light remains on until the other person
hangs up. The 9009 telephone will sense most types of communication equipment connected to
your telephone line.
Controlling the ringer volume
While the telephone is ringing, you can press the left or right side of the volume bar
¶ for soft or loud ringer volume. You can also adjust the ringer volume and tone in
the SET OPTIONS list, as long as the ringer has not been turned off.
You can turn the ringer off by pressing the left side of the volume bar without lifting the receiver.
Ringer is OFF may appear on the display unless another message has priority. Your phone still
shows who is calling if you subscribe to Call Display/Caller ID. When you want to turn the
ringer on, press the right side of the volume bar without lifting the receiver.
Controlling the receiver volume
While you are using the phone, you can press the left or right side of the volume bar
¶ for softer or louder receiver volume.
Releasing a call
When pressed, the RELEASE (Rls) key releases the call you were on and provides you with a
dial tone without replacing the handset.
8
P0802245 03 E UG Page 9 Tuesday, February 29, 2000 4:49 PM
Pause Feature
You may add a pause by pressing the ˙ key at any time while programming your
memory keys. A pause should be used in any programming sequence that requires waiting for a
second dial tone or a confirmation tone.
Remembering the last incoming call
The 9009 automatically stores the number of the last person that called you whether you
answered the call or not. Without lifting the receiver, you can view the telephone number of the
last incoming call by pressing •†.
Light and display messages
Using telephone company services
The 9009 can give you all the subscribed services that your telephone company offers, from Call
Display/Caller ID to Message Waiting. Contact your local telephone company for more
information.
Knowing when you have a message
You don't have to wait until you pick up the receiver to know that a message is waiting.
The 9009 works with your voice mail system. The light flashes and the display shows Message
waiting after your voice mail has received a call. Ask your local telephone company or system
administrator to find out how you can obtain message waiting services.
In addition to alerting you when another extension is in use, the light flashes when the telephone
rings, a caller is on hold, or a message is waiting for you.
Light and Display
What it means
Extension in use
Light is on
Someone is using an extension on your line.
Feature is in use
Light is on
A feature such as Call Forwarding is activated.
Call is on hold
Light flashes quickly
A call is on hold.
Private number
Caller has requested that number be blocked.
Unknown Caller
Information is unavailable.
Long Distance
The call originates outside your local area.
Message Waiting
Light flashes slowly.
<
A voice message is waiting.
Call was forwarded from another location
Light flashes in time with phone’s ring
Visual ringing: indicates an incoming call.
†Until you subscribe to Call Display or Caller ID, the number (and name, if available) of the call will not appear on the
display. The name for this service may differ in your calling area.
9
P0802245 03 E UG Page 10 Tuesday, February 29, 2000 4:49 PM
Answering your questions
Display is in wrong language.
You can change to the other language by pressing the SET OPTIONS key and pressing ⁄
twice.
Callers are not identified on the display.
Until you subscribe to Call Display/Caller ID, or until your Centrex system provides this
service, your telephone will not receive the number (and name if available) of the caller. Also,
you must let the phone ring twice before answering.
Call Display shows: Unknown caller.
Information about the call is not available.
While pressing * to view last incoming call, display shows: Key is empty.
Until you subscribe to Call Display/Caller ID, or until your Centrex system provides this
service, your telephone will not record the last incoming call.
No dial tone. Check phone cord may appear on the display.
Read the display. If the line cord is not attached properly, the display may prompt you. Make
sure the receiver cord is attached securely. The message may stay for a while and then disappear.
Telephone doesn't ring. Ringer is OFF may appear on the display.
The ringer volume may be turned off. Without lifting the receiver, press the right side of the
volume bar, ¶ to turn the ringer on again. You can adjust the ringer volume and tone
in the SET OPTIONS list.
No information appears on the display and the volume is low.
Make sure the power adaptor is plugged into a working electrical outlet. If the display only
shows >_, information about the call may be incomplete.
Cannot hear a caller or be heard.
Make sure the receiver cord is inserted securely into the jack.
Light stays on when a feature is not in use.
You can program a memory key to turn the light and a feature both on at the same time. If the
light stays on, turn the light off by pressing the SET OPTIONS key and then pressing ›twice.
Cannot save or erase numbers in memory.
Your memory keys may be locked. Without picking up the receiver, press the SET OPTIONS
key, press ˙ and then press £ to unlock.
When you have a power failure
The 9009 will still operate as a regular telephone during a power failure, but the display will not
operate until the power is restored.
10
P0802245 03 E UG Page 11 Tuesday, February 29, 2000 4:49 PM
Index
A
Area code, entering 6
C
Call Display, obtaining 1
Call Forwarding
off key 7
on key 7
Caller ID, obtaining 1
D
Date, setting 6
Discovery Card, attaching 4
E
Erase, memory key 7
F
Faceplate, attaching 3
Feature light, on and off 6
Features
hold 8
last incoming call 9
locking 8
memory 7
pause 9
privacy 8
release 8
unlocking 8
volume 8
H
Hold
adding a pause in memory 7
putting a call on hold 8
releasing a call on hold 8
11
I
Installation
desk-mount 2
Discovery Card 4
faceplate 3
lens 4
line cord 3
power adapter 3
receiver 2
Receiver Card 4
receiver cord 2
wall-mount 2
wall-mount plate 5
L
Language, changing 6
Lens
installing 4
M
Memory keys
erasing 7
labelling 7
locking 8
pausing 7, 9
saving numbers 7
saving services 7
unlocking 8
Messages, definitions 9
Mounting
desk 2
wall 2, 5
O
Options
area code 6
date 6
language 6
ring tone 6
ringer volume 6
time 6
P0802245 03 E UG Page 12 Tuesday, February 29, 2000 4:49 PM
P
Privacy, ensuring 8
R
Receiver
attaching cord 2
volume setting 8
ReceiverCard,
installing 4
Release, a call 8
Ring tone, setting 6
Ringer volume
setting 8
Ringer volume,
setting 6
S
Services
saving in memory 7
telephone company
provided 9
T
Testing, phone 5
Time, setting 6
Troubleshooting 10
V
Volume
receiver volume 8
ringer 6
ringer volume 8
If you’ve read this owner’s manual and consulted the “Answering your Questions” section and
still have problems, please call 1-800-574-1611 for technical assistance.
P0802245 Issue 03
© Aastra Telecom 2000
12