1
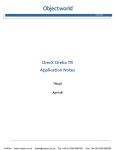
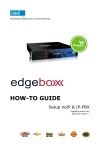
Installing Your Vista 200 Phone
•
•
1
•
•
•
•
•
•
•
•
1
•
•
•
•
5
Attach the language faceplate.
8
•
•
•
•
2
Desk Mount
Connect the receiver and receiver
cord
.
•
•
•
•
•
•
•
•
•
•
•
•
•
3
•
•
•
•
•
•
•
4
Wall Mount
Attach the wedge-shaped base in
desk mount or wall mount† position.
6
Attach the receiver card and lens
(shiny-side down).
9
Connect the line cord
.
Connect the power adaptor
Wall Mount
7
Attach the memory key card and
lens (after saving numbers and
names in memory). The lens snaps
on and off so you can add numbers.
.
For wall mounting, we recommend
that you use a wall mounting plate,
which your local telephone company
can install. The excess line cord fits
into the stand of the phone.
†
When you have power:
When you plug in your new phone, you may see a message on the display asking you to make a language selection. Read the directions on the display to
select one of two languages.
Vista 200 also runs a test to ensure that the phone cords are connected properly. If
the test fails, the display will prompt you to check the phone cords. Make sure
all connections are fastened securely.
Fit the Discovery Card on the phone.
To find the OPTIONS key, slide the panel.
•
Setting the time and date
2
•
•
•
•
•
•
•
•
•
•
•
•
•
•
•
Saving frequently called
numbers in memory
•
•
•
When your phone is connected
Once the installation and the power-up sequence are complete, your phone
is ready to make and receive calls.
If the display is hard to see, you can adjust it. A button to the right of the
display lets you control the contrast for easy reading in different lighting
conditions.
How to adjust the contrast:
1. Press the CONTRAST button repeatedly until the display is easy to read.
When to set the time and date:
If you subscribe to Call Display, you do not have to set the time and date.
The current time and date appear automatically when the first call comes in.
If you do not subscribe, set the time and date manually using the steps
below.
How to set the time and date:
1. Don’t pick up the receiver.
2. Move the sliding panel below the display and press the OPTIONS key.
3. Press [2] [2] on the dial pad.
4. Use the dial pad to type the hour. Then press SAVE.
5. Type the minutes and press SAVE.
6. Press [*] for am or [#] for pm.
7. Type the month (eg. 1 for January, 2 for February, 3 for March). Press SAVE.
8. Type the day (eg. 7, 12, 31, etc.). Press SAVE. The current time and date will
appear on the display.
3
•
•
•
•
•
•
•
•
•
•
•
•
•
•
•
•
•
You can save emergency numbers and phone numbers of your family and
friends in Vista’s ten memory keys. You can also use the dial pad to save a
name with each number. If you subscribe to Call Display, your phone will
show the name you've entered along with the incoming number.
How to save a number in a memory key:
1. Press SAVE.
2. Press the memory key where you want to save the number.
3. Use the dial pad to enter the number.
For example, to save 555-1440 , press [5] [5] [5] [1] [4] [4] [0] on the dial pad.
4. Press SAVE.
5. Press SAVE again to quit OR use the optional steps below to add a name.
6. Write a name or number next to the memory key on the memory key card (in pencil).
How to save a name when you save a number:
1. To enter a name, follow steps 1-5 above, then use the keys on the dial pad to add a
name. In most cases, press once for the first letter on a key, twice for the second
letter, and three times for the third. "S" and "Z" need four key presses. (The chart
at the bottom of the page shows which keys to press for each letter.)
• When you finish a letter, press the arrow [-->] to start a new letter.
For example, to enter the name "JEAN," you would follow these steps:
For "J," press [5} , then press [->] ; for "E," press [3] [3] , then [->] ;
for "A," press [2] , then [->] ; for "N," press [6] [6] .
• If you wish to change a letter after you've entered it, press [<-] to erase it.
2. When the name is complete, press SAVE to save the name.
To erase the contents of a memory key:
Tips for setting the time and date:
1. Press the memory key to see its contents.
• Setting the time and date is easier if you write them down first in this
order: hour, minutes, am or pm, month (as a number), day (as a number).
• If a number is already correct, you can press SAVE to skip to the next item.
• If you make a mistake and want to start over, lift the receiver then hang
up.
2. Press [#] then [#] again to erase. You can also save new numbers over old ones.
Discovering Vista 200
Letter Chart:
The Discovery Card lets you use your new telephone right away by telling
you what the keys do and how to use them. Place the card on the phone,
then experiment by pressing various keys and reading the display. The
Discovery Card will help you become familiar with the many features of your
new phone—fast.
To program a pause into a number (to receive a second dial tone on PBX systems):
1. When you save the number on a memory key, press HOLD where the pause
should occur, for example, 9 HOLD 800-555-1212.
A=2
D=3
B=22 E=33
C=222 F=333
G=4
H=44
I=444
J=5
M=6
P=7
T=8
K=55 N=66
Q=77 U=88
L=555 O=666 R=777 V=888
S=7777
W=9
X=99
Y=999
Z=9999
•
Subscriber services: saving
feature codes in memory keys
•
4
•
•
•
•
•
•
•
•
•
•
•
•
•
•
•
•
•
If you subscribe to Telephone Company Services
You can save codes for telephone company features in the phone's memory
keys for easy access. Some services need only an ON code, while others like
Call Forwarding require both ON and OFF codes. If you need both codes, you
can save the ON code in one memory key and the OFF code in another.
To program a light with ON and OFF keys:
You can program Vista's light to work with the ON and OFF keys: the light will
come on when you press the feature-ON key to show that the feature is in use.
When you press the OFF key, both the light and the feature will turn off together. The light can be assigned to work with one pair of feature codes only.
Here's how to save a feature-ON and a feature-OFF key with a light. (If you
wish to program an ON and OFF key without the light, skip step 2.)
To save an ON key for a feature
To save a OFF key for a feature
1. Press SAVE .
1. Press SAVE .
Using Link, Hold, ReDial
and ReCall
•
5
•
•
•
•
•
•
•
•
•
•
•
•
•
•
•
•
•
Stopping your conversation temporarily
HOLD lets you interrupt your conversation for a short time or continue your
call at another extension without losing the call.
To move to another phone:
To interrupt your call for a short time:
1. Press HOLD.
1. Press HOLD.
2. Hang up the receiver.
2. Hang up or set the receiver on a table.
3. To resume your conversation
3. To resume your conversation:
pick up the receiver at an
•
if you hung up, pick up the Vista
receiver.
extension telephone.
•
if
you didn't hang up, press HOLD again.
Connecting other callers
LINK connects you to callers when you subscribe to services such as Call
Waiting† or Three-Way Calling† from your telephone company.
2. Press [1] to turn the light ON.
2. Press [0] to turn the light OFF.
When you hear a Call Waiting tone:
To connect a caller for Three-Way Calling:
3. Press the desired memory key.
3. Press the desired memory key.
4. Enter the telephone company code
for turning ON the feature (such as
a Call Forwarding ON code).
4. Enter the telephone company code
for turning OFF the feature (such as a
Call Forwarding OFF code) .
1. Press LINK. This puts your
current call on hold.
1. Make your first call as usual. Press LINK.
This puts your original call on hold.
2. Speak to your new caller.
2. Wait for a dial tone. Call the third party.
Read the display to confirm the number.
Read the display to confirm the number.
5. Press SAVE again.
5. Press SAVE again.
6. Write "Call Forwarding ON" on the
memory key card (in pencil).
6. Write "Call Forwarding OFF" on the
memory key card (in pencil).
Contact your local telephone company for more information about feature
codes and how you can subscribe to services.
3. To return to the first call, press
3. When the third party answers, press
LINK. The second call is on hold. To
LINK to reconnect the first call. All three
alternate between calls, press LINK.
parties are now connected to the call.
Calling the last number you dialed
If a number is busy the first time you call, pressing REDIAL redials the number.
To call the last number you dialled:
1. Press REDIAL. The last number you called is dialled automatically.
To Protect the Contents of Your Memory Keys
For security or child-proofing, you can lock the contents of your memory
keys. While they are locked, you can still use the memory keys to place
calls, but you will not be able to erase the keys or save new names and
numbers.
To lock your memory keys:
To unlock your memory keys:
1. Don’t pick up the receiver.
1. Don’t pick up the receiver.
2. Press the OPTIONS key.
2. Press the OPTIONS key.
3. Press HOLD .
3. Press HOLD.
4. Press [*] .
4. Press [#] .
Calling the last person who called
you
††
If you subscribe to Call Display, the RECALL key records the number of the
last person who called you.
To call the last person who called you:
1. Press RECALL. The phone automatically dials the last number you dialled.
About the Vista 200
Callers List
•
6
•
•
•
•
•
•
•
•
•
•
•
About the Vista 200
Callers List
•
•
•
•
•
•
Vista 200 remembers the numbers of up to 15 incoming calls. These numbers
are stored in the Callers List†. This feature lets you review your calls and then
dial them automatically from the list.
Your telephone records the number (and name if available) of the caller, the
time they called, and the number of times each caller has tried to reach you.
You can choose to have your phone record information for all incoming calls
or only for calls you did not answer. (Item 6 on page 8 gives more details).
Using the Callers List
• Press CALLERS to see the list.
• Press [<-- -->] to switch between the number and the name of the caller.
• Press [down/up arrow] to move down and up the Callers List.
• You can return a call automatically by pressing DIAL while the caller’s
number is on the display.
• You can erase a single caller from the list by pressing [#] then [#] again.
• You can erase all of the callers by pressing [#] [#] when [XX callers] is displayed.
Saving a number from the Callers List to a memory key
Names and numbers from the Callers List can be saved directly onto a
memory key by following these steps:
1. Press SAVE while the number is still shown on the display.
2. Press the memory key where you want to save the number.
Callers List Display Messages
Message
What it Means
NEW
OLD
✓
XX calls bumped
First time a call has been shown on the display.
The call has already been viewed.
The call has been dialed.
This number of old calls have been automatically
removed to make room for new incoming
calls.
Private number
The caller has requested that this number be blocked.
Unknown number
Information is unavailable.
Long distance
The call originates outside your local area.
The call was forwarded from another location.
A new caller has been added to the Callers List.
Lets you add a number or delete an area code.
<
1 New Caller
_555-1440
7
•
•
•
•
•
•
•
•
•
•
•
•
•
•
•
•
•
More about the display messages
If you subscribe to voice messaging
If your telephone company offers voice messaging supported by visual message
waiting, the Vista 200’s light will flash slowly and [Message Waiting] may
appear on the display (unless other messages have priority).
When another person uses an extension
Vista 200’s light comes on and [Extension in use] appears on the display
when another person in your home picks up an extension. The light remains
on until the other person hangs up. This message also alerts you when
someone accidentally leaves an extension off the hook.
How to turn off the ringer volume
If you don't want your phone to ring, you can turn the ringer off. Press the
left side of the volume bar [volume bar icon] without lifting the receiver. [Ringer
is OFF] may appear on the display unless other messages have priority. To
turn the ringer on again, press the right side of the volume bar [volume bar icon]
without lifting the receiver.
How to adjust your phone's volume
Changing the volume of your caller's voice
While you are talking on the phone, you can press the volume bar [volume bar
icon] to the right for a louder volume. If the caller's voice is too loud, press
the bar to the left for a softer volume. The phone returns to a normal volume
when you hang up.
Changing the volume of your phone's ring
While the telephone is ringing, you can press the volume bar [volume bar icon]
to the left for a softer ring or to the right for a louder ring. The ring will stay
at this level after you hang up. You can also adjust ringer volume and the
type of ring in the OPTIONS list, as long as the ringer has not been turned
off. Page 8, item 3 gives instructions for choosing a ringer tone and volume.
Personalizing your phone
with Vista's options
•
8
•
•
•
•
•
•
•
•
•
•
•
•
•
•
Easy solutions to common
problems
•
•
•
Vista has seven options to let you customize your phone. An OPTIONS key is
located behind a sliding panel below the display (Figure 9, page 1). To see
the option messages, slide the panel open and press the OPTIONS key. Then
press the [ down arrow] key to move through the list. You can change any of the
options by following the change procedures below:
1. In French? (If the language has been changed, you will see Anglais? )
Vista 200 shows you messages in one of two languages. You can change from
one language to the other by pressing [1] when you see this message.
2. Set time / date?
When you see this message, you can set the time and date. (See page 1 for
step-by-step instructions.) You may have to reset the time and date after a
power failure. If you subscribe to Call Display, the current time and date appear
automatically when the first call comes in, otherwise it must be set manually.
3. Set Ringer
You can choose one of four different rings for your phone. When you see this
message, press [3] to hear the first tone. Then press [down arrow] to hear each
remaining tone. While you are using this option, you can also adjust the ringer
volume by pressing the volume bar, [volume bar icon], below the dial pad. When you
are satisfied with the ring tone and volume, press SAVE to keep your choice.
4. Turn light OFF
Page 3 of this guide shows you how to program a reminder light to come on
with a feature. If you don’t want the feature light to stay on, you can go to
this option and press [4] to turn the light off.
5. Your Area Code
If you don't want Call Display to show the area code of local calls, press [5]
when you see this message. Then enter your 3-digit area code and press SAVE .
The phone will remove your area code from incoming local calls.
6. Change Callers
If you subscribe to Call Display, a Callers List records the numbers of up to
15 incoming calls. When you see this message, you can program your phone
to record all incoming numbers or only numbers from calls you didn't
answer. Press [6]. Then press [#] to save all calls or [*] to save only unanswered calls.
7. Add TIMER key
When you see this message, you can program a timer into a memory key to
show the length of your calls. Press [7] . Then press the memory key where you
want to save the timer. Press SAVE. Now when you press the programmed memory key, the timer will come on. To turn the timer off, press the memory key
again.
9
•
•
•
•
•
•
•
•
•
•
•
•
•
•
•
•
•
What do I do if there is no dial tone?
Read the display. If the line cord is not attached properly, the display will
prompt you to check the phone cords. Also, make sure the receiver cord is
attached securely.
If the telephone doesn’t ring... ([Ringer is OFF] may appear on the display.)
The ringer may be turned off. Without lifting the receiver, press the right
side of the volume bar [volume bar icon] to turn the ringer on. You can adjust
ringer volume and tone using option 3 in the OPTIONS list.
If I cannot hear a caller or be heard...
Make sure the receiver cord is inserted securely into the jack.
If the display is blank and ringer volume is very low...
Make sure the power adaptor is plugged in a working electrical outlet.
If the display is in the wrong language...
You can change the language by pressing the OPTIONS key and then
pressing [1] [1].
If the light stays on when features are not in use...
You can turn the light off by pressing the OPTIONS key and then pressing
[4] [4].
If numbers cannot be saved or erased on the memory keys...
Your memory keys may be locked. Without picking up the receiver, press the
OPTIONS key, press HOLD and then press [#] to unlock the memory keys.
If callers are not identified on the display...
Until you subscribe to Call Display from your local telephone company, your
telephone will not receive the number (and name if available) of a caller.
If Call Display shows [Unknown number]...
Information about the call is not available. This is not a fault with the phone.
If I press CALLERS and the display shows [List is empty]...
Until you subscribe to Call Display, your telephone will not record incoming
calls. Your telephone company can provide information on this service. If you
use a message machine, it may be answering before the second ring when
calling information is delivered. Your phone may be set to record unanswered
calls; calls answered by a message machine are counted as "answered" .
Will the phone still work if there is a power failure?
Yes. Vista 200 will still operate as a regular telephone during a power failure,
but the display will not operate until the power is restored.
If all else fails, your local telephone company will be happy to help you.
A phone so advanced...
it’s simple
•
•
•
•
•
•
•
•
•
•
•
•
•
•
•
•
•
•
Your new Vista 200* phone is part of a family of telephones that give you the
flexibility you need for today’s busy lifestyle plus the reliability you need to
stay on top of your calls.
A display that guides you step by step
Perhaps Vista's most exciting feature is its display. The display shows
messages to guide you step by step through all the functions of the phone.
Just follow the directions for making or receiving calls and using features.
A new point of view
Answering the phone doesn’t have to be a surprise. Vista 200’s display lets
you see who’s calling before you answer the phone. If you subscribe to
Call Display†, the caller’s telephone number (and name if available) appears
on the display while your phone is ringing.
A new lease on services
All of the Vista telephones work with the call management services available
from your local telephone company—Vista 200 was specially designed to
make it easy to use these services. The phone also works with your telephone company's new messaging services. Your phone company can provide
details.
Want to learn more?
This guide can give you more details on using the phone's features:
Setting up your phone
1
Using the Callers List and Display
6
Setting the time and date
2
Voice messaging and other messages 7
Saving numbers in memory 3
Adjusting the ring and receiver volume 7
Saving subscriber services
4
Personalizing your phone
8
Using Link, Hold and Redial 5
Questions and answers on Vista 200 9
* Vista is a Trademark of Aastra Telecom
† Until you subscribe to Call Display or Caller ID, or until your Centrex system provides a Call
Display/Caller ID feature, the number (and name if available) of the caller will not appear on the display.
The name for this service may differ in your calling area.