1
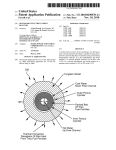
USER MANUAL
ELECTRIC FAN WITH HUMIDIFIER
Model: ORION OF1601S
Thank you for your purchase. Please read this manual thoroughly before plugging it in.
Introduction
This product has both fan and humidifier functions, which can be used together or separately. The humidifier is
especially useful on very hot days, when the extra mist in the air helps not only to cool you down, but also to increase
the humidity in the dry heat.
How does it work?
This Mist Fan uses ultrasonic vibration to atomise water into 1-5 micron particles, which can then be blown through
the room with the fan.
Why is it useful?
Not only does this fan help to cool you down with air containing micro water droplets, it also helps to avoid dry skin
and eyes which are common in dry heat. A relative humidity of 45% - 65% is recommended for comfortable living,
and this fan can help maintain that balance in the hot summer months.
Parts
1. Front mist plate
2. Front Guard
3. Blade cap
4. Blade
5. Guard Mounting Nut
6. Rear Guard
7. Motor
8. Fan Body
9. Base
10. Castor wheels
11. Base Nut
12. Fixer
13. Plastic Tube
14. Tube Button
Technical Data
Rated Voltage: 230V~
Rated Frequency: 50Hz
General Power: 120W
Max Mist Capacity: 200ml/h
Fan Head Size: 400mm
Water Tank Capacity: 1500ml
Installation
1: First base is installed in place of the main stable
2: The head fixed in the main part of the bearing hole
3: Installed guard and blade, and net fixed firmly lock the lookout Network
Filling the water tank
Place the fan on a flat, stable floor, then add water for the humidifying function as follows:
1. Open the water tank
cover.
2. Lift out the water tank
4. Over a sink, turn the water 5. Screw off the tank cap, and
tank so the outlet cap is
add water.
facing upwards.
Operation
3. Take out the water tank.
6. Screw tank cover tightly, and
put it into the fan, then close
panel.
*Insert plug to the electrical outlet, and the indicator light turns on.
*Press “ON/SPEED” button to choose the wind for low, Med, High speed that matches the light on the control
panel.
*Press “MODE” to choose the wind type from one of the following:
“Normal”: Wind flow based on Low/Med/High speed.
“Breeze”: Imitates the flow of natural wind based on strong and soft wind.
“Sleep”: The fan runs for half an hour on strong then soft natural wind mode, then changes to soft natural wind for
the next half hour, and then the fan turns off automatically.
(1).Setting H:
Operation pattern: H Stop H Stop H
(2).Setting M:
Operation pattern: M stop M Stop M
(3)Setting L:
Operation pattern: L Stop L off L
*Press “SWING” to start oscillation; press again to fix the airflow direction.
*Press “HUMIDITY” to start the humidifying function; mist comes out of the front plate if there is water in the
tank.
The MIST function can be used on its own or along with the fan function to blow the mist into the room.
*Press “TIMER” button to make the fan run for the length of the timer. There are 4 indicator lights for
automatic timing. To set a time of 7.5 hours you need to press 15 times and all the 4 indicator lights light up.
* The Remote Control must be pointed towards the Remote Sensor on the main unit for best results. If the
remote control doesn't operate as expected, replace the batteries (2 pcs, AAA battery).
*Press “NEGATIVE-ION GENERATOR ” to start the negative-ion function.
Caution
* Do not touch / pull out / put back the water tank when the unit is plugged into a power source. Make sure it
is physically disconnected from the mains before doing anything with the water tank.
* When the water level is too low, the safety switch will cut out operation of the mist function. Unplug the
unit and refill the water tank for further operation.
* Do not let dust or other particles collect on the mist plate - if the mist outlets are blocked, the mist function
could malfunction.
* Before cleaning the unit, make sure it is completely disconnected from the power source. Make sure your
hands are not wet when unplugging the unit.
* Do not use very hot water in the water tank - use water less than 40 degrees Celsius.
* Use only water in the water tank. Do not add chemicals or oils or any other additive.
* Infants,the disabled and the elderly should not be in the direct airflow from the fan for long periods of time.
Cleaning and Maintenance
* Make sure power is disconnected before any
cleaning or maintenance is performed.
* It is recommended that you clean the water tank
every 2-3 weeks of use, and clean the flume every
week.
* Pull out the water tank before cleaning it - pull
the plastic tube out of the mist cask properly, then
take out the mist cask and water tank.
* Use a dry cloth to clean the mist cask. If there
are stubborn stains on the mist cask, use a cloth
lightly dampened with mild detergent.
* If the mist feature will not be used for a long
time, empty the water tank and leave it to dry
before recapping it.
Troubleshooting
Fault Phenomenon
1.
Mist projector works
normally, but without mist
spray
2. Mist projector doesn’t work
Reason
a. Water could be contaminated with other substances
or chemicals
b. Water tank could be cracked
c. Water tank could be empty
a. Bobber doesn’t float
b. Water tank could be empty
Solution
a. Clean out the water tank and replace with clean
water
b. Pour out the water and check for cracks
c. Refill the water tank. A full tank of water will last
approximately 8 hours
a. Free the bobber and allowit to float freely.
b. Refill the water tank. A full tank of water will last
approximately 8 hours
3. No indicator light, no wind, no
a. Power cord is unplugged, and electric power is
a. Plug the power cord, and turn on the electric
mist.
power off
power
a. When new, there might be residue in the water
a. The smell should disappear after further use.
tank/mist plate.
b. Clean out the water tank and refill with fresh
b. The water in the water tank many be contaminated.
water
4.Peculiar smell from the mist
a. Find service agent or a suitable qualified person
5.The fan doesn’t work as normal
a. The plug and supply cord are damaged
to change or service b. Don’t play the blades. Use
b. The blades are bend
soft damp cloth then wipe with dry cloth
c. Don’t safety device
c. Installed correctly in accordance with the
manual. Can not be installed until there is no
electricity
WARNING:
Unplug from electrical supply source before cleaning. After servicing, any safety device (including grilles and
blades) must be reinstalled or remounted as previously installed. Use soft damp cloth then wipe with dry
cloth. Do not use harmful cleaners. Do not bend the blades.
If the plug and supply cord are damaged, it must be replaced by the manufacturer, its service agent or a
suitable qualified person in order to avoid a hazard.
This appliance is not intended for use by persons (including children) with reduced physical, sensory or
mental capabilities, or lack of experience and knowledge, unless they have been given supervision or
instruction concerning use of the appliance by a person responsible for their safety.
Children should be supervised to ensure that they do not play with the appliance.
Subject to change without notice.