1
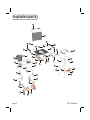
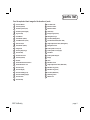
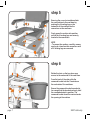
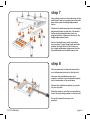
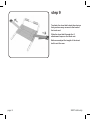
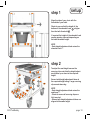
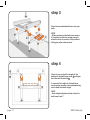
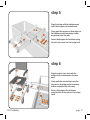
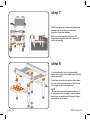
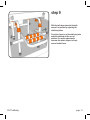
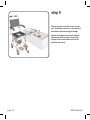
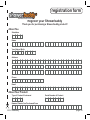
SB2
TubBuddy
Owners Manual
elimination through innovation
contents
Exploded Parts ............................................................... 3
Parts List ........................................................................ 4
TubBuddy Assembly ....................................................... 5
TubBuddy Setup ............................................................. 10
TubBuddy Operation ....................................................... 15
Cleaning + Maintenance ................................................. 20
Safety Instructions ......................................................... 21
Warranty Information ...................................................... 24
Registration Form ........................................................... 26
SB2 TubBuddy
page 2
exploded parts
42
41
37
36
40
30
27
35
38
33
34
60
61
62
39
28
3
58
32
14
31
55
59
5
29
24
45
63
15
56
6
23
13
25
57
65
24
67
64
66
23
54
68
12
25
53
51
1
52
20
page 3
SB2 TubBuddy
parts list
See the exploded chair image for the location of parts.
1
5” Castor Wheel
39
Arm Rest Knob
3
Tube Cap (25mm)
40
Back Rest Frame
5
Secondary Brake (Left)
41
Back Rest Fabric
6
Secondary Brake (Right)
42
Hand Grips
12
Leg Tube Cap
45
Bridge Tongue (Short)
13
Track Wheel
51
Rolling Base Legs
14
Tube Washer (32mm)
52
Foot Rest (Rolling Base)
15
Track Wheel Axle (Front)
53
Foot Rest Attachment (Nut + Bolt)
20
Foot Rest Grips
54
Height Adjustment Tubes (Rolling Base)
23
Tube Washer (25mm)
55
Rolling Base Track
24
Fixing Knob
56
Primary Brake Lever (Left)
25
Securing Clip (Large)
57
Primary Brake Lever (Right)
27
Arm Rest Clip
58
Seat Base
28
Cushion Connector
59
Primary Brake Stopper
29
Tube Cap (32mm)
60
Bridge
30
Cushion
61
Latch
31
Commode Bucket Connectors
62
Bath Base Track
32
Commode Bucket + Lid
63
Height Adjustment Tubes (Bath Base)
33
Arm Rest (Left)
64
Bath Base Leg (Front)
34
Arm Rest (Right)
65
Bath Base Leg (Rear)
35
Arm Rest Padding (Left)
66
Foot Rest (Bath Base)
36
Arm Rest Padding (Right)
67
Stabilising Tubes
37
Arm Rest Lock
68
Rubber Feet
38
Arm Rest Cap
SB2 TubBuddy
page 4
step 1
assembly
Insert the back rest into the seat base.
Slide the back rest into the seat base until
the clip pins click into the holes on the
seat base.
The clip pins secure the chair back frame
in position.
NOTE
- To remove the seat back press the clip
pins in and slide the seat back out of the
seat base.
step 2
Insert the arm rests into the sockets on
the seat base until the clip pin clicks and
locates the arm rests in position.
Screw the arm rest knob into the arm rest
to firmly secure the arm rest in position.
Swing the arm rest forward so that it locks
into position in the arm rest clip.
Slide the arm rest lock over the arm rest
clip to lock the arm rest in position.
page 5
SB2 TubBuddy
step 3
By sliding the armrest lock you can easily
swing the armrest out of the way or
secure the armrest in position.
To unlock the armrest slide the armrest
lock away from the armrest.
To lock the armrest slide the armrest lock
towards the armrest.
NOTE
- The armrest locks should always be used
when the armrests aren’t in the swing
away position.
step 4
The armrests can be easily swung-away
when required.
Unlock the armrest by sliding the armrest
lock away from the armrest. Once this is
done the armrest can be swung away. The
clip pin which secures the armrest in
position stops the armrest from rotating
to far.
NOTE - The armrest locks should always
be used when the armrests aren’t in the
swing-away position.
SB2 TubBuddy
page 6
step 5
Ensuring the correct orientation attach
the seat cushion to the seat base by
pushing the 4 locating lugs on the
underside of the cushion into the
connectors on the seat base.
Firmly press the cushion into position
so that the 4 locating lugs are securely
located in the connectors.
NOTE
- To remove the cushion, carefully remove
one lug at a time from the connectors until
all 4 locating lugs are removed.
step 6
Rotate the chair so that you have easy
access to the underside of the seat base.
From the back of the chair slide the
commode bucket into the 2 brackets on
the underside of the seat base.
Ensure the commode bucket is pushed in
far enough that the brackets securely hold
the commode bucket in position. The
commode bucket should be centred under
the opening in the cushion.
page 7
SB2 TubBuddy
step 7
Using the grooves on the underside of the
bath base track as a guide, place the bath
base track onto the height adjustment
tubes.
Position the bath base track on the height
adjustment tubes so that the 4 threaded
holes on the wheeled base track are
aligned with the 4 holes on the top of the
height adjustment tubes.
Secure the bath base track in position
by screwing 1 large fixing knob and tube
washer through each of the 4 holes in
the height adjustment tubes and into the
threaded holes on the bath base track.
step 8
On the underside of the seat base there
are 4 attachment points for the lap belt.
Unscrew the provided screws and
washers from the front attachment points
on the underside of the seat base.
Choose the attachment points you prefer
for your lap belt.
Slide the washer onto the screw and then
insert through the grommet in the lap belt.
Screw the lap belt securely into
position.
SB2 TubBuddy
page 8
step 9
To attach the chest belt rotate the chair so
that you have easy access to the back of
the back rest.
Slide the chest belt through the 2
attachment loops on the back rest.
Before use adjust the length of the chest
belt to suit the user.
page 9
SB2 TubBuddy
step 1
setup
Align the side of your chair with the
threshold of your bath.
Check to ensure that the height of the
bottom of the wheeled track A is higher
than the bath threshold B .
If required the height of the wheeled track
can be raised or lowered depending on
the bath threshold height.
A
B
NOTE
- Each height adjustment hole raises the
wheeled track 1”.
step 2
To adjust the seat height remove the
securing clips and slide the height adjustment tubes up or down to the required
height.
Secure both height adjustment tubes at
the required height using 1 large securing
clip on each base leg.
NOTE
- Each height adjustment hole raises the
seat base 1”.
- Check to ensure all securing clips are
fully inserted.
- Ensure both height adjustment tubes are
aligned at the same height.
SB2 TubBuddy
page 10
step 3
Place the assembled bath base into your
bath.
NOTE
- When positioning the bath base ensure
it is located so there is enough room to
allow the chair to transfer freely without
hitting any other obstructions.
step 4
A
B
Check to ensure that the height of the
bottom of the bath base track A is higher
than the bath threshold B .
If required the height of the bath base
track can be raised or lowered depending
on the bath threshold height.
NOTE
- Each height adjustment hole raises the
bath base track 1”.
page 11
SB2 TubBuddy
step 5
Align the bridge with the bath base and
insert the tongues into the bath base.
Firmly push the tongues on the bridge into
the bath base so the secondary brakes
are pushed out of the way.
Secure the bridge to the bath base using
the latch in the centre of the bridge track.
step 6
Align the side of your chair with the
bridge which is connected to the bath
base.
Firmly push the wheeled base onto the
tongues on the bridge so the secondary
brakes are pushed out of the way.
Secure the bridge to the bath base
using the latch in the centre of the bridge
track.
SB2 TubBuddy
page 12
step 7
The wheeled base, bridge and bath base
should now be securely connected
together using the latches.
Before continuing with the setup it is
important to ensure that the tracks are
level horizontally.
step 8
If the tracks are not level horizontally,
adjust the height of the bath base until the
tracks are level.
To do this screw the thread on the rubber
feet up or down depending on which way
the height needs to be adjusted.
NOTE
- Do not unscrew the thread more than 1”.
If you require more height, raise the bath
base track by adjusting the height adjustment tubes up or down.
page 13
SB2 TubBuddy
step 9
With the bath base placed in the bath
secure it in position by adjusting the
stabilising tubes.
Press the clip pin in on the stabilising tube
and slide outwards to the correct
position. For smaller adjustments
unscrew the rubber stopper to firmly
secure the bath base.
SB2 TubBuddy
page 14
step 1
operation
Securely attach the bridge to the bath
base using the latches. Next securely
attach the bridge to the wheeled base
using the latches.
NOTE
- Ensure all latches securely ‘snap’ into
the locked position. Ensure you lock all
castor wheels before beginning the
transfer. Always disconnect the bridge
from the base that the chair is located on
(bath base or wheeled base). If you leave
the bridge attached it prevents the
secondary brake from operating correctly.
step 2
To lock the castor wheels press down
firmly on the end of brake with your foot.
This will lock the castor so that it will not
move or rotate.
To unlock the castor wheels press down
firmly on the front of the brake with your
foot. This will allow the castor to move
freely again.
NOTE
- The castor wheels should always be
locked when performing transfers . The
castor wheels can be rotated forward to
make the chair more stable.
page 15
SB2 TubBuddy
step 3
With your Tubbuddy assembled you are
now ready to transfer the chair into the
bath.
Lift and hold the primary brake lever to
release the chair. The primary brakes are
located on each side of the wheeled and
bath base tracks at the front.
Once the chair has begun transferring
you can release the primary brake. The
primary brake will drop back into the
correct position.
step 4
Transfer your Tubbuddy from the wheeled
base onto the shower base.
Ensure the chair is transferred all the way
onto the bath base and primary brake
clicks to secure the chair in position.
SB2 TubBuddy
page 16
step 5
With your Tubbuddy secured in position
on the bath base remove the bridge and
wheeled base.
Release the latch which connects the
bridge to the bath base and roll the
wheeled base and bridge away. If space
is limited release the latches on the bridge
to remove the bridge from the wheeled
base.
NOTE
- Never attach the bridge to the bath base
without the wheeled base attached when
the chair is on the bath base.
step 6
Reconnect the bridge to the bath base
and secure in position with the latches.
Reconnect the wheeled base to the bridge
and secure in position with the latches.
NOTE
- Ensure all latches securely ‘snap’ into
the locked position.
- Ensure you lock all castor wheels before
beginning the transfer.
- Never attach the bridge to the bath base
without the wheeled base attached.
page 17
SB2 TubBuddy
step 7
To transfer your Tubbuddy back to the
wheeled base lift and hold the primary
brake lever to release the chair. The
primary brakes are located on each side
of the wheeled and bath base tracks at
the front.
Once the chair has begun transferring
you can release the primary brake. The
primary brake will drop back into the
correct position.
step 8
Transfer your Tubbuddy from the bath
base onto the wheeled base.
Ensure the chair is transferred all the way
onto the wheeled base and primary brake
clicks to secure the chair in position.
NOTE
- Ensure all latches securely ‘snap’ into
the locked position.
- Ensure you lock all castor wheels before
beginning the transfer.
SB2 TubBuddy
page 18
step 9
Ensure the primary brake securely locks
your Tubbuddy in position on the wheeled
base before disconnecting the bridge.
Unlock the brakes on the castor wheels.
Release the latches which connect the
bridge to the wheeled base and roll the
wheeled base away.
page 19
SB2 TubBuddy
cleaning + maintenance
It is recommended that your shower chair is serviced annually by your Showerbuddy Dealer or an
authorised, competent service agent, in addition:
1. Regularly inspect all parts of the chair for defects. Any defective part should be removed promptly.
2. Clean the seat using a damp cloth and a mild cleanser. Always read the manufacturers instructions
prior to applying the cleanser.
When using Sodium Hypochlorite (Bleach) on the seat, a solution of 0.1% Sodium Hypochlorite should
have no adverse effects on the cleaning of chairs. However, when using a solution of 1.0%, care should
be taken to rinse the chairs thoroughly with clean water after application. Over a period of time
bleaching may occur, but the integrity of the product will remain unaffected.
3. Dry off the shower chair after use.
4. Do not oil or grease any parts.
5. Keep the castors free from lime scale, soap residue and hair by cleaning after use in the shower.
Caring for stainless steel.
Stainless steel has excellent corrosion resistance, but it is not stain or rust proof. Regular maintenance
will keep stainless steel clean and free of contaminants. In most applications stainless steel will not
rust or stain even after many years of service, but when used in certain environments such as
concentrated chlorine or other corrosive elements stainless steel requires proper care and
maintenance. Do not leave stainless in contact with iron, steel or other metals.
1. Clean stainless steel frequently with soap and water. Any cleaner safe for glass is usually safe for
stainless steel; apply with a cotton cloth.
2. Use a coating such as a good wax to help safeguard the stainless steel.
3. Remove discolouration or rust spots as soon as possible with a brass, silver or chrome cleaner.
Irreversible pitting will develop under rust that remains on stainless steel for any period of time. Apply
a mild cleaner such as Ajax or an equivalent with a wet cotton cloth in the direction of the grain of the
finish. Rinse thoroughly and wipe dry. Do not use abrasives such as sandpaper or steel wool on
stainless steel.
4. Do not clean with mineral acids or bleaches.
5. Do not store near any chlorine product.
SB2 TubBuddy
page 20
safety instructions
Safety Warning!
Failure to comply with these safety instructions may result in injury or damage!
It is important that the user(s), and/or the caregivers of the user(s), learn how to safely operate the
Showerbuddy shower chair.
The following must be read before use of the Showerbuddy shower chair to ensure the safe operation
of your Showerbuddy shower chair:
The Owner(s) Manual must be read and understood before using the Showerbuddy shower chair. If you
don’t understand any parts of the Owner(s) Manual, clarification should be sought prior to using the
product.
For further clarification of any part of the Showerbuddy Owner(s) Manual call your local dealer or visit
the website below.
www.showerchairs.co
www.myshowerbuddy.com
Transfers to and from the Showerbuddy shower chair can be dangerous. Consult a physical or
occupational therapist to ensure safe and reliable transfer techniques are practiced. Individuals who
have not learned these skills must have assistance during transfers.
Do not use the Showerbuddy shower chair for any application outside of the manufacturers intended
use, this can result in damage to the shower chair and components. Not complying with the
manufacturer’s instructions can result in injury to the user(s) or caregiver. Showerbuddy will not be
held responsible for any injury or damage resulting from the misuse or inappropriate operation of the
Showerbuddy shower chair.
If any part of the Showerbuddy shower chair requires maintenance please don’t hesitate to contact
your dealer. Any problems that could affect the safe operation of the chair MUST be attended to
immediately.
Safety instructions:
The MAXIMUM weight of any Showerbuddy shower chair user(s) is: 350lbs (160kg)
ALWAYS ensure that your Showerbuddy shower chair is capable of maneuvering over the surfaces
that will be encountered during day to day use, prior to operating the shower chair with any user(s).
page 21
SB2 TubBuddy
ALWAYS lock the Showerbuddy shower chair 5” castor wheels when the chair is stationary. To do
this step-on the levers which activates the wheel locks.
DO NOT lean forward or sideways out of the Showerbuddy shower chair as this may cause the chair
to tip.
DO NOT wheel the Showerbuddy shower chair down an incline without a caregiver who can control
the chair during its descent.
DO NOT use the Showerbuddy shower chair castor wheel locks as brakes when travelling down
inclines.
DO NOT position the Showerbuddy shower chair sideways on a slope as this could cause it to tip.
Important!
Although every effort has been made by the Showerbuddy team to ensure the stability of the
Showerbuddy shower chairs during use, it is important to recognize that the most dangerous part of
using any shower chair is the transfer. If you are unsure of how to perform transfers in a way that can
be repeatedly performed safely, then contact a physical or occupational therapist who is familiar with
transfer techniques and options.
The wheel locks on the castors are designed to prevent the castor wheels from rotating when the
shower chair is stationery in use. These DO NOT and CANNOT prevent the wheels from sliding if
the floor is slippery. A slippery floor can be caused by dust, water, soap or any substance that doesn’t
allow the tires (tyres) to grip. Transfers should never be attempted with the Showerbuddy
shower chair positioned on slippery surfaces since the wheel locks can only prevent the wheels
from rotating. It is recommended that transfers be performed on clean, dry non slippery surfaces.
Transferring onto a Showerbuddy Shower Chair – always lock all castors in their outward position (front castors positioned in the forward and out position / rear castors positioned to the rearward
and out position) for maximum chair stability.
Never use the foot rests to assist with transfers. This could cause the chair to tip forward. The footrests
should be swung away or removed entirely during transfers to provide unobstructed access to the
shower chair.
The fasteners – the nuts, bolts, washers – should be checked periodically to ensure that they are
securely fastened. All nuts used on your Showerbuddy shower chair are lock nuts. Lock nuts that are
removed for any reason should be replaced rather than re-used. Your dealer should be called to check
the fasteners and other components at least once per year.
SB2 TubBuddy
page 22
All Showerbuddy shower chairs are supplied with chest and lap restraining straps which ensure the
correct and safe operation of the shower chair for both the user(s) and the caregiver. It is important
that these straps are used every time the shower chair is operated. Your Showerbuddy shower chair
is equipped with fitting points so that these can be easily and effortlessly attached.
Important!
ADJUSTMENTS SHOULD NEVER BE ATTEMPTED WITH THE USER(S) IN THE CHAIR!
Your authorized Showerbuddy dealer can help you with any adjustments you may want to make on
your Showerbuddy shower chair or can provide clarification on any of the information contained
herein.
All castor wheel shafts must be adjusted to the same height. Never attempt to change the
frame angle by changing the castor position. If the castor wheels are uneven this will cause
the chair’s stability to be compromised and may result in tipping.
page 23
SB2 TubBuddy
warranty information
2 Year Limited Warranty
Showerbuddy warrants our Showerbuddy Transfer Systems and all Showerbuddy products for
two years from the date of purchase by the consumer. The warranty will only become active once
the consumer submits the warranty registration card to the company with a copy of the purchase
receipt. This warranty covers any defects in materials and workmanship on all Showerbuddy products
except those listed in the Warranty Exclusion below:
Warranty Exclusions
- Product or parts failure from normal wear and tear
- Damage caused by failure to adhere to the Owner’s Manual
- Damage from improper installation, use or repair
- Brake line that operates the handbrake / tilt mechanism on tilting chairs (SB2T and SB3T)
- Improper use of the hand ratchet that is used in adjusting the neck support / adjustment
- Seat cushions and arm rests
Limitations
- The warranty is VOID if the original serial number tag is removed or altered
- The warranty is VOID if the unit sustains damage from unnatural causes
- The warranty is VOID if the unit is used to hold more than the weight limit of 350lbs (160kg)
- The warranty is VOID if the unit has been subjected to neglect, improper maintenance,
storage, cleaning or operation as defined in the Owner’s Manual
- The warranty is VOID if the unit is modified without Showerbuddy’s written consent
- This warranty applies to the original purchaser only, from the date of the purchase,
provided a registration card has been submitted to the company within 60 days of purchase.
Your Responsibilities
- If your unit requires warranty service, please contact the dealer from which you purchased
the Showerbuddy unit.
- If you do not receive satisfactory dealer service, contact Showerbuddy at the address
below.
- Do not return the unit to Showerbuddy without first obtaining a Return Authorization
Number from Customer Service
- A defective unit must be shipped to Showerbuddy within 14 days of issuance of a Return
Authorization Number by Customer Service
SB2 TubBuddy
page 24
Our Responsibilities
- Showerbuddy’s sole responsibility is to repair or replace, at our discretion, the covered components of the unit. This is the exclusive remedy for consequential or incidental
damages.
- Upon pre-approval, Showerbuddy may provide exchange services for Warranty returns. Under this program, a refurbished Showerbuddy unit may be shipped after the return of
the defective unit. The exchange unit may contain used parts that meet Showerbuddy
quality standards. This program is provided at the sole discretion of Showerbuddy. The original warranty term will not be extended due to such a unit exchange and a return unit will become the property of Showerbuddy.
For all USA & Canada Warranties
Register online at: www.myshowerbuddy.com/resources/register
Or you can fax or email it to us.
Showerbuddy LLC
12405 Montague Street
Pacoima, CA 91331
U.S.A
Email: [email protected]
Phone: (877) 7MY-BUDDY (769-2833)
Fax: (888) 312-3645
For all Other Countries Warranties
Register online at: www.showerchairs.co/resources/register-product
Or you can email it to us.
Showerbuddy Global Limited
PO Box 494
Waikanae 5250
New Zealand
Email: [email protected]
Phone: (+64) 21 449-806
page 25
SB2 TubBuddy
registration form
Register your Showerbuddy
Thank you for purchasing a Showerbuddy product!!
About You
Salutation
Name
First
Last
Your Date of Birth
Month
Day
Year
Address
Street Address
City
State / Province
Zip / Postal Code
Country
Phone
Email
About Your Product
Type of Product Purchased
Serial Number of Product
Under the Seat
Name of Dealer You Purchased From
SB2 TubBuddy
page 26
Please send your completed Registration Form to one of the addresses below.
For all USA & Canada Warranties
Register online at: www.myshowerbuddy.com/resources/register
Or you can fax or email it to us.
Showerbuddy LLC
12405 Montague Street
Pacoima, CA 91331
U.S.A
Email: [email protected]
Phone: (877) 7MY-BUDDY (769-2833)
Fax: (888) 312-3645
For all Other Countries Warranties
Register online at: www.showerchairs.co/resources/register-product
Or you can email it to us.
Showerbuddy Global Limited
PO Box 494
Waikanae 5250
New Zealand
Email: [email protected]
Phone: (+64) 21 449-806
page 27
SB2 TubBuddy
notes
SB2 TubBuddy
page 28
page 29
SB2 TubBuddy
USA & Canada Enquires
Showerbuddy LLC
12405 Montague Street
Pacoima, CA 91331
U.S.A
Email: [email protected]
Phone: (877) 7MY-BUDDY (769-2833)
Fax: (888) 312-3645
www.myshowerbuddy.com
International Office
Showerbuddy Global Limited
PO Box 494
Waikanae 5250
New Zealand
Email: [email protected]
Phone: (+64) 21 449-806
www.showerchairs.co
elimination through innovation
Designed in
New Zealand
All ShowerBuddy products are CE, TUV, ISO9001 and TGA (Australian Government Department of
Health and Ageing Therapeutic Goods Administration) certified.
Copyright © 2009 by Showerbuddy Global Limited, PO Box 494, Waikanae, 5250, New Zealand.
e: [email protected], t: +64 21 449 806.
All rights reserved