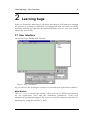
1
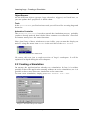
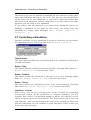
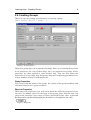
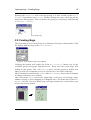
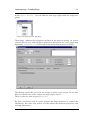
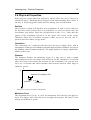
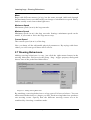
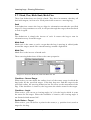
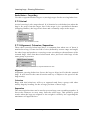
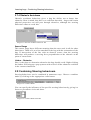
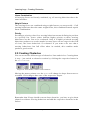
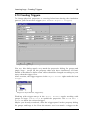
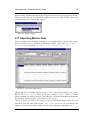
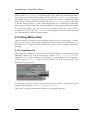
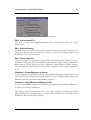
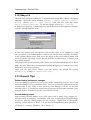
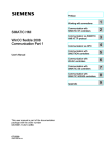
EXJ]
&UHDWLQJ&URZG0RWLRQ8VLQJ%HKDYLRXUDO$QLPDWLRQ
8VHU0DQXDO
Carsten Kolve, April 2000
Table of Contents
2
7DEOHRI&RQWHQWV
Foreword. . . . . . . . . . . . . . . . . . . . . . . . . . . . . . . . . . . . . . . . 3
1
Understanding bugz . . . . . . . . . . . . . . . . . . . . . . . . . . . . . . . 4
1.1 Behavioural Animation . . . . . . . . . . . . . . . . . . . . . . . . . . . . . . . .
2
4
Learning bugz . . . . . . . . . . . . . . . . . . . . . . . . . . . . . . . . . . . . 5
2.1 User Interface . . . . . . . . . . . . . . . . . . . . . . . . . . . . . . . . . . . . . . .
5
2.2 Creating a Simulation . . . . . . . . . . . . . . . . . . . . . . . . . . . . . . . . .
6
2.3 Controlling a Simulation . . . . . . . . . . . . . . . . . . . . . . . . . . . . . . .
7
2.3.1
Current to Start Values . . . . . . . . . . . . . . . . . . . . . . . . .
8
2.4 Creating Groups . . . . . . . . . . . . . . . . . . . . . . . . . . . . . . . . . . . . .
9
2.5 Creating Bugs . . . . . . . . . . . . . . . . . . . . . . . . . . . . . . . . . . . . . . . 10
2.6 Physical Properties . . . . . . . . . . . . . . . . . . . . . . . . . . . . . . . . . . . 12
2.7 Steering Behaviours . . . . . . . . . . . . . . . . . . . . . . . . . . . . . . . . . . 13
2.7.1
2.7.2
2.7.3
2.7.4
Seek, Flee, Moth-Seek, Moth-Flee . . . . . . . . . . . . . . . .
Arrival. . . . . . . . . . . . . . . . . . . . . . . . . . . . . . . . . . . . . . .
Alignment, Cohesion, Separation . . . . . . . . . . . . . . . . .
Obstacle Avoidance . . . . . . . . . . . . . . . . . . . . . . . . . . . .
14
15
15
16
2.8 Combining Steering behaviours . . . . . . . . . . . . . . . . . . . . . . . . . 16
2.9 Creating Obstacles . . . . . . . . . . . . . . . . . . . . . . . . . . . . . . . . . . . 17
2.10 Creating Triggers . . . . . . . . . . . . . . . . . . . . . . . . . . . . . . . . . . . . 18
2.11 Exporting Motion Data . . . . . . . . . . . . . . . . . . . . . . . . . . . . . . . . 19
2.12 Using Motion Data . . . . . . . . . . . . . . . . . . . . . . . . . . . . . . . . . . . 20
2.12.1 Lightwave 6.0. . . . . . . . . . . . . . . . . . . . . . . . . . . . . . . . . 20
2.12.2 Maya 2.5 . . . . . . . . . . . . . . . . . . . . . . . . . . . . . . . . . . . . 22
2.13 General Tips . . . . . . . . . . . . . . . . . . . . . . . . . . . . . . . . . . . . . . . . 22
bugz - User Manual
Foreword
3
)RUHZRUG
Welcome to EXJ]. EXJ] is a simulation system for creating crowd motion by
applying (mainly quite simple) behavioural rules to autonomous characters
with certain physical attributes and letting them interact in an environment you
can enrich with obstacles of different types. The aim of this manual is to introduce you to many of EXJ]’s features, from the basic functions up to the creation of complex scenes. It guides step by step through the process of creating
a crowd-simulation, showing you the principles and working schemes of the
EXJ] application.
Note that it is assumed, that you are familiar with the basics of user-interface
interaction on Windows operation systems, standard tasks like file handling
and the principles of computer animation using professional software like Maya, Lightwave 3D or 3D Studio Max.
Copyright:
Maya is a trademark of Silicon Graphics, Inc. exclusively used by Alias/Wavefront, a division of Silicon Graphics Limited. Lightwave is a trademark of NewTek, Inc.
Microsoft, Windows and Windows NT are registered trademarks of Microsoft Corporation.
All other trademarks are property of their respective owners.
bugz - User Manual
Understanding bugz - Behavioural Animation
4
1 8QGHUVWDQGLQJEXJ]
To understand EXJ], it helps to understand how bugz works at a conceptual
level. This chapter is designed to give you the main concepts of the EXJ]
application. This means the focus of this introduction will be on how EXJ]’s
underlying architecture supports you in the creation of complex simulations.
%HKDYLRXUDO$QLPDWLRQ
Techniques commonly used in computer animation are keyframing, pathanimation, scripting or physical simulation (e.g. for animating collisions
between different bodies). Particle systems are also often used for animating
rain, dust in the wind, smoke and related effects. A particle system is a system
in which forces such as gravity or wind are applied to mass-points, so that
these mass-points change their position in space. In contrast to this, in
behavioural animation mass-points are not forced from the outside, forces are
self applied based on physical attributes and one or many behavioural rules.
These so called steerings behaviours can be clever combined and attached to a
number of mass-points, so these mass-points are no longer simple physical
objects, but become autonomous characters, referred to in this manual as
„bugs“. This concept tries to reflect (on an abstract level, of course) the real
life, where all characters act based on individual behavioural-rules, their view
of the world and the other characters surrounding them.
Think of a school of fish, a flock of birds, athlets running a marathon - all
groups of individuals with local behaviour-rules (avoid touching the other
characters, get from point A to point B, try to stay near the other group
members, ...), but the sum of all local movements results in a more or less
coordinated crowd-motion.
EXJ] lets you create such autonomous characters change their physical
attributes, apply various predefined steering-behaviours (you can even change
them over time by using so called „triggers“) and finally by simulating their
interaction in a 2d-world, hopefully creates a nice looking crowd motion you
can afterwards use in a computer animation package (plugins for Lightwave
6.0 and Maya 2.5 are provided) or for pure viewing pleasure.
Be warned, this is not always an easy task - these bugs have a mind of their
own and sometimes it seems, as if they don’t want to be forced to do, what you
want them to.
But you were looking right for this kind of chaotic, nonpredictable, - realisticmotion, were you not?
bugz - User Manual
Learning bugz - User Interface
5
2 /HDUQLQJEXJ]
After you found out, what EXJ] is all about, this chapter will guide you through
the process of creating a simulation. It is suggested, that you read everything
carefully and then go right into the application and try to use your new earned
knowledge practically.
8VHU,QWHUIDFH
On startup, EXJ] should look like this:
Image 2-1: bugz - User Interface
As you can see, the workspace consists of four different application windows.
0DLQ:LQGRZ
The Main Window contains the toolbar, where you can set different parameters
for the application itself and the simulation parameters, create new
simulations, groups and triggers. Of course you can do common tasks like file
handling (by using the toolbar) as well.
bugz - User Manual
Learning bugz - Creating a Simulation
6
2EMHFW%URZVHU
All the different objects (groups, bugs, obstacles, triggers) are listed here, so
you can update their properties or delete them.
7RROV
In the Tools Window you find various tools you will need for creating bugs and
obstacles.
$QLPDWLRQ&RQWUROOHU
The Animation Controller is used to control the simulation process, probably
you have already noticed, that it looks like a common vcr-controller - therefore
its buttons nearly have the same functions.
Note, that if any of these windows are not visible, you can turn the display on
and off using the menu item Window in the tool-bar of the Main Window.
Image 2-2: Toolbar, Window Menu Items
Of course, this was just a rough overview of EXJ]’s workspace. It will be
explained in depth during the next chapters.
&UHDWLQJD6LPXODWLRQ
On startup, the application has already set a simulation. In fact, it is neither
possible to have the application running without an active simulation, nor is it
possible to have more than one simulation at the same time.
To start a new simulation, simply press Main Window: File > New
Image 2-3: Simulation Properties Window
bugz - User Manual
Learning bugz - Controlling a Simulation
7
The dialog gives you the options of changing the size and color of the space
where the simulation takes place, the Arena. You also have the possibility to
set the frame rate for the simulation - if you want to export the motion data
afterwards in an animation package, make sure to set this value to the same
framerate you are using in your animation.
If you realize, that the properties you entered here during the process of
building a simulation do not quite fit your needs, you always have the
possibility to change them hindsight ( Main Window: Simulation >
Properties... ).
&RQWUROOLQJD6LPXODWLRQ
Now that you have set up a simulation it is time to learn how you can control
the simulation process. The key to this is the Animation Controller.
Image 2-4: Animation Controller
7LPH,QGLFDWRU
The Time Indicator shows the current timestep of the simulation, indicated in
seconds and frames.
%XWWRQ3OD\
This button starts the simulation at the current time. Selecting Menu Item Main
Window: Simulation > Run has the same effect.
%XWWRQ5HZLQG
This button rewinds the simulation so the time is set to zero. Selecting Menu
Item Main Window: Simulation > Rewind has the same effect.
%XWWRQ3DXVH
This button pauses the simulation process at the current timestep. Selecting
Menu Item Main Window: Simulation > Pause has the same effect.
&KHFNER[/RRSDW
When active, you can set a certain point of time at which the simulation
rewinds and restarts. In the production of computer animation you will
certainly have scenes of predefined lengths in which you want the crowdeffects to appear (given in a storyboard). This feature helps you to focus on
your sequence - just enter the length of the shot you are working on. When you
start the simulation you can examine it again and again, refine it until you
achieve the desired results.
bugz - User Manual
Learning bugz - Controlling a Simulation
8
&KHFNER[6KRZ7UDLOV
When active, you can see the path the bugs take. Take into account that this
feature is only useful when you are dealing with relative low numbers of bugs
and/or short terms, because the arena will soon be full of paths.
&KHFNER['RXEOH%XIIHU
At each simulation step the display of the Arena including the bugs and
obstacles on it is repainted. Since this repaint can (and it surely does) cause
flickering effects, all the necessary painting is done on a non visible arena and
then copied to the visible arena. While this greatly reduces flickering, it
reduces the speed of processing also. If you are working on a real slow
machine, you might want to turn double buffering off, but it is not suggested.
,QSXW)UDPH'HOD\
You can adjust the speed of the simulation process with this value slider. It
indicates the time (in ms) the simulation process waits before the next step is
computed - useful to examine motions at different speeds and the key to
achieving realtime replay, even when you have got simulations of different
complexity.
&XUUHQWWR6WDUW9DOXHV
This handy feature can not be found in the Animation Controller, but under
Main Window: Simulation > Current to Start Values. You will see, that
often bugs exhibit the behaviour you are straving for not until a certain time
has passed. You do not have to wait all the time, just use this command and
you will start right with the properties the bugs had when you applied the
command.
Now you know how to control a simulation. You can already do this in an
empty simulation, but it will be much more entertaining with a little more
complex setup.
In the next chapters you will learn how to add bugs to the arena.
bugz - User Manual
Learning bugz - Creating Groups
9
&UHDWLQJ*URXSV
The next step in creating crowd motion is creating a group.
( Main Window: Objects > Group... ).
Image 2-5: Group Properties
Think of a group object as a container for bugs. Since you certainly do not want
to set properties for each of these bugs, they are organized in groups, whose
properties are then applied to each member bug. You can still adjust the
properties of every single bug, but groups help you in adjusting parameters for
a large number of bugs in minimum time.
*URXS3URSHUWLHV
You can provide the name of the group, the colour of the group members and
a default name for new group members.
3K\VLFDO3URSHUWLHV
These physical properties (you will learn about the different properties later
on) serve as default values for the bugs in the group. Note, that not only can
you provide one value, but a range of values specified by one value, a percental
deviation and a sign determining how the deviation is to be applied to the value.
Image 2-6: Range Edit
bugz - User Manual
Learning bugz - Creating Bugs
10
Pressing the OK-Button will create the group, it is now visible in the Object
Browser, beneath the entry Groups. Doubleclicking the item will bring up the
properties dialog again. You can delete the group by selecting it and pressing
Del or Edit > Delete.
Image 2-7: Object Browser, Group Entry
&UHDWLQJ%XJV
The first thing to do to create bugs is switching to the bug-creation mode. Click
the button with the bug in the Tools Window.
Image 2-8: Tools Window, Bug Creation Button
Clicking the button will enable the field Bug Creation. Choose one of the
available groups using the drop-down box. Soon you will create bugs that
belong to this group. The edit Density gives you the option to define how
many percent of rectangular area you selected is to be filled with bugs.
Move the mouse pointer in the Arena of the Main Window. Notice that it changes
its shape from arrow to crosshair.
One click in the Arena creates one single bug. A fast way of creating a large
number of bugs is click-dragging a rectangular area. The status bar of the Main
Window will tell you, how many bugs will approximatly be created when you
release the mouse button.
Image 2-9: Bug Creation Rectangle
bugz - User Manual
Learning bugz - Creating Bugs
11
In the Object Browser, you will find the new bugs right under the respective
group.
Image 2-10: Object Browser, Bug Entry
These bugs inherited the properties defined in the superior group. Of course
you are able to view and edit these properties afterwards for every single bug
separately. A doubleclick will bring up the dedicated properties-dialog.
Image 2-11: Bug Properties
This dialog equals the one used for groups in many ways except for the fact
that you can not edit value ranges but only single values.
There is also the new property Position.
By now, you know how to create groups and bugs and how to control the
simulation. The next step will be to learn about the different properties and
steering behaviours.
bugz - User Manual
Learning bugz - Physical Properties
12
3K\VLFDO3URSHUWLHV
Each bug has certain physical properties which affect the way it moves in
simulation space. Knowing these properties and understanding their effect is
one key in achieving good results and fine-tuning your crowd motion.
3RVLWLRQ
The position of a bug is defined by two coordinates, X and Y (in m). Since in
the current version of EXJ] there is a predefined 1:1 pixel per meter ratio, the
coordiantes you define equal the pixelposition in the Arena. Note that the
origin of the coordinate system is in the upper left corner of the arena.
Therefore while the X-position increases when you go to the left, the Yposition increases when you go down.
2ULHQWDWLRQ
The orientation (in °) indicates the direction the bug is taking. Note, that in
consequence of this type of coordinate system the angle increases clockwise, not (as you
are probably used to) counter-clockwise. The angle used here is always a global one,
relative to the x-axis.
'LDPHWHU
The diameter defines the bounding circle of a bug, this is only a rough
approximation of the real shape, but sufficient for the simulation. At current
state, this value is not taken into account for the simulation, but you can still
use it as a reference and check whether intersections between other bugs or
obstacles occure.
X
Y
diameter of bounding circle
position
orientation
Image 2-12: Position, Orientation and Diameter
0D[LPXP)RUFH
The maximum force (in N), is, well, the maximum force the bug can apply to
itself. The bigger this value, the more strength the bug has, the faster it can
change orientation or speed.
bugz - User Manual
Learning bugz - Steering Behaviours
13
0DVV
Bugs with different masses (in kg), but the same strength (indicated through
the maximum force) react differently on change of orientation or speed. Heavy
bodies usually react slower than light ones.
0D[LPXP6SHHG
Maximum speed (in m/s) the bug can take.
0LQLPXP6SHHG
Minimum speed (in m/s) the bug can take. Setting a minimum speed can be
useful, if you want to force the bugs not to stop.
&XUUHQW6SHHG
The current speed (in m/s) of the bug.
Now you know all the adjustable physical parameters. By toying with these
values you will soon get to know their effects.
6WHHULQJ%HKDYLRXUV
Adding steering behaviours is easy, just click the right mouse-button in the
steering behaviour field seen in the group / bug / trigger property-dialog and
choose one of the predefined behaviours.
Image 2-13: Adding Steering Behaviours
By attaching a steering behaviour to a bug you tell it how to behave. You can
add as much behaviours to a bug as you like. Each steering behaviour produces
one steering vector. Specify how the different steering vectors are to be
combined by choosing a combine mode.
bugz - User Manual
Learning bugz - Steering Behaviours
14
6HHN)OHH0RWK6HHN0RWK)OHH
These four behaviours are closely related. They have in common, that they all
deal with targets, in form of a fixed point in the arena or a moving bug.
6HHN
Seek-behaviour causes the bug to align its orientation towards the specified
target. If a bug continues to seek, it will pass through the target, then turn back
to seek it again.
)OHH
Flee-behaviour is simply the inverse of seek. It causes the bug to turn its
orientation away from the target.
0RWK6HHN
Moth-seek is the same as seek, except that the bug is moving in orbital paths
around the target, much like a moth buzzing around a light bulb.
0RWK)OHH
Moth-flee is the inverse of moth-seek.
These steering behaviours all have the same properties
Image 2-14: Seek, Flee, Moth-Seek, Moth-Flee Behaviour Tab
&KHFNER[6HQVRU5DQJH
When active you can define the radius (in m) of the sensor range in which the
bug looks for the specified target. If the bug does not find the target in the
specified radius, the steering behaviour has no effect on the movement of the
bug. If the checkbox is inactive, the bug scans the whole arena for the target.
&KHFNER[$QJOH
When active, you can set a viewing angle (in °) for the bug in which it scans
the arena for the target. When the checkbox is inactive, the viewing angle is
not limited which means 360°.
5DGLR%XWWRQ7DUJHW
When active, you can define a point in the arena (x, y position in m) used as
target for the bug.
bugz - User Manual
Learning bugz - Steering Behaviours
15
5DGLR%XWWRQ7DUJHW%XJ
Use this to appoint another bug as a (moving) target for the steering behaviour.
$UULYDO
Arrival steering is also target-based. It is identical to seek behaviour when the
bug is far away from the target, but if the target is in a predefined distance
(Stopping Radius), the bug slows down and eventually stops at the target.
Image 2-15: Arrival Behaviour Tab
$OLJQPHQW&RKHVLRQ6HSDUDWLRQ
These three steering behaviours have in common that when one of them is
attached to a bug, it scans its field of view (defined by sensor range and angle)
for other bugs and produces a steering vector according to the attributes of the
scanned bugs. Note that these behavioural rules just work with bugs of the
same group at present.t
Image 2-16: Alignment, Cohesion, Separation Behaviour Tab
$OLJPHQW
Alignment steering behaviour forces the bug to align itself with the scanned
bugs. It will head in the same direction and try to adjust to the speed of the
bugs nearby.
&RKHVLRQ
Bugs with this behaviour will try to approach and form a group with other
nearby bugs by heading for the average position of these bugs.
6HSDUDWLRQ
This steering behaviour can be used to prevent bugs vom crowding together. It
forces the character to steer away from the other bugs. This produces good
results when the bugs are aligned or the weight is relativly low regarding the
maximum self applied force.
bugz - User Manual
Learning bugz - Combining Steering behaviours
16
2EVWDFOH$YRLGDQFH
Obstacle avoidance behaviour gives a bug the ability not to bump into
obstacles. Bear in mind, that this is no collision detection - bugs with certain
physical properties can still pass through obstacles, although the steering
behaviour wants to avoid this.
Image 2-17: Obstacle Avoidance behaviour Tab
6HQVRU5DQJH
This sensor range has a different meaning than the ones used in all the other
behaviours. Think of it as a line attached to the bug with the orientation of the
bug. If intersection of the line with an obstacle occurs, then the steering
behaviour will produce a steering force perpendicular to the obstacle at the
point of intersection.
/LVWER[2EVWDFOHV
Here is the place to determine obstacles the bug should avoid. Right-clicking
the listbox will bring up a pop-up menu with a list of all the obstacles available
in the current simulation.
&RPELQLQJ6WHHULQJEHKDYLRXUV
Steering behaviours can be combined in numerous ways. Choose a combine
mode by clicking on the appropriate radio button.
Image 2-18: Combine Modes
You can specify the influence of the specific steering behaviour by giving it a
factor or precedence in its tab-sheet.
Image 2-19: Combine Mode Value Edit
bugz - User Manual
Learning bugz - Creating Obstacles
17
/LQHDU&RPELQDWLRQ
All steering forces are linearly combined, eg. all steering behaviours have the
same influence.
:HLJKW)DFWRUV
The steering forces are combined using weight factors you can provide - if all
steering behaviours have the same weight factor, this combination mode equals
linear combination.
3ULRULW\
Providing a priority-value for a steering behaviour means defining its position
in a priority list. Lower values indicate higher priority as these steering
behaviours are the first to be evaluated. Only if a higher priorized steering
behaviour produces no result (maybe because there was no target in the field
of view), the lower behaviour is evaluated. If you want to be sure that a
steering behaviours has full effect when its needed, this combine mode
produces good results
&UHDWLQJ2EVWDFOHV
You can create two different type of obstacles: lines and circles. Creating them
is easy - just switch to obstacle-creation by clicking the respective button in
the Tools Window.
Image 2-20: Tools Window, Obstacle Creation Buttons
Moving the mouse pointer over the Arena will change its shape from arrow to
crosshair. Click-drag to draw one of the respective shapes.
Image 2-21: Line / Circle Creation
Remember that if bugs should react on these obstacles, you have to give them
obstacle-avoidance steering behaviour and add the respective obstacles in the
listbox.
bugz - User Manual
Learning bugz - Creating Triggers
18
&UHDWLQJ7ULJJHUV
To change physical properties or steering behaviours during the simulation
process, you can create a trigger (Main Window: Objects > Trigger).
Image 2-22: Trigger Properties Dialog
You see, this dialog equals very much the properties dialog for groups and
single bugs - except all the property-edits now have checkboxes in front.
Enable a checkbox to define what values should be changed according to your
entry when the trigger fires.
After creation, the trigger appears in the Object Browser right under the item
Trigger.
Image 2-23: Object Browser, Trigger Entry
Working with trigger-entrys in the Object Browser equals working with
groups or bugs. Double-click to update the properties. Hit Del or Edit >
Delete to delete the selected trigger.
Maybe you already wondered, what the trigger-panel in ther property-dialog
for groups and bugs is for. Here the answer: use it to attach a trigger to the
bugz - User Manual
Learning bugz - Exporting Motion Data
19
group or bug. Right-clicking on the trigger panel will bring up a pop-up menu.
Choose from the list of available triggers to put it in the listbox. Now the
specified bug will react to the trigger.
Image 2-24: Adding a Trigger
([SRUWLQJ0RWLRQ'DWD
After creating a nice looking simulation, you might want to export the motion
data to import it in a common animation package. Open the Export Motion
Data Dialog by pressing Main Menu: File > Export Motion Data.
Image 2-25: Export Motion Data Dialog
Obtaining and exporting motion data is easy, just follow theses few steps.
Below the Export panel, there is an entry called Groups. Choose a Group
whose motion you want to export. Note that the columns in the datagrid change
accordingly to the number of members in the group.
The next step is to define the range of time in which the motion data is to be
recorded. Use the edit-fields in the Time - panel to do so. As you change the
values you will notice the number of rows in the datagrid changes, too.
bugz - User Manual
Learning bugz - Using Motion Data
20
Click on the Record-Button to fill the cells in the data grid with motion data.
Now you can save the motion data to disk (using the Save-Button). However,
you might want to reduce the amount of data for reasons of disk-space and
faster usage in the animation package. In the Shrink Panel, use the edit field
to define which frames (= rows in the datagrid) to use. Take into account that
large values will downsize the amount of data very much, but on the other hand
the exported motion will get less accurate (values between 2 and 10 have
worked well). Click the Apply-Button to actually delete the unwanted data and
save afterwards to store the motion data.
8VLQJ0RWLRQ'DWD
There would be no much use in having the ability so save motion data, if there
was no way to use it afterwards. Plugins have been written for Lightwave 6.0
and Maya 2.5 to import the data and work with it in the computer animation
package.
/LJKWZDYH
The Plugin for Lightwave 6.0 was created using Lightwave’s internal scripting
language LScript. To run an LScript, go to the General Options Dialog in
Lightwave 6.0. At the bottom of the dialog is a drop-down box for generic
plugins named Generics. From this box choose the LW_LScript entry, the
interpreter for LScripts.
Image 2-26: Starting the LScript-Interpreter
A file-dialog appears. Choose the LScript to be executed - the name for the
motion-import plugin is: import_bugzMotionData.ls
The script is interpreted and the dialog for the plugin appears:
bugz - User Manual
Learning bugz - Using Motion Data
21
Image 2-27: Lightwave bugzMotionData Import Plugin Dialog
(GLW&KRRVHEPG)LOH
Use this to load the bugzMotionData-Files you created with the EXJ]application.
(GLW6FDOH9DOXHVE\
As in the current version of EXJ] the virtual coordinate system is fixed to a 1:1
(meter per pixel)-ratio. You can use this edit to provide a scaling factor to fit
the data to your specific needs.
(GLW&KRRVHOZR)LOH
Use this to specify a Lightwave Object File. This lwo will be cloned for every
member of the group you are importing, the member’s motions are attached to
these objects. If you do not provide a name here, Null-Objects will be created.
You can use these Null-Objects afterwards to attach a more complex geometry
to it.
&KHFNER[3DUHQW0HPEHUVWR*URXS
If active the group-members will be parentend to the group (Null-Object) , so
you can move the complete group moving the parent. If deactivated, all groupmembers will be created as independent objects.
&KHFNER[$OLJQ0HPEHU+HDGLQJWR3DWK
If active, the member-objects will always be aligned to the motion-path just as
it is the case in the simulation.
The plugin will create motion curves for each member of the group whose
group motion you are importing. It will create keyframes at every frame you
defined in the export dialog of EXJ]
bugz - User Manual
Learning bugz - General Tips
22
0D\D
There is also a plugin for Maya 2.5, implemented using MEL, Maya’s skripting
language. Open the skript window ( Window > General Editors > Skript,
Editor), choose File > Open Skript, load the file with the name
import_bugzMotionData.mel . To run the skript, select Edit > Execute.
A dialog-box appears, resembling very much the look of the Lightwave Plugin,
you are already familiar with.
Image 2-28: Maya bugzMotionData Import Plugin Dialog
In fact, the options you can choose from are the same as in Lightwave, with
one exception: You cannot define a object file, but an object already available
in the current Maya scene. Just select an object in the scene and its name will
show up in the edit field. If you do not provide an object here, Locators will
be created instead.
The plugin will create motion paths (nurbs curves) and attach objects to these
paths, because Maya does not support aligning an object to a motion curve only
defined by a set of keyframes.
Until you do not restart Maya, you can restart the plugin by typing
bmdImport(); in Maya‘s command line entry.
*HQHUDO7LSV
5HZLQGEHIRUHSHUPDQHQWFKDQJHV
You can change properties at every step in the simulation process, but if you
want the changes to be permanent make sure you rewind the simulation so the
current time is 0|0. Only at this position your changes will be set as new
starting values. If you do not change the properties at zero-time position, your
changes will be lost the next time you rewind or loop.
3URYLGHWDONLQJQDPHV
EXJ] assumes default names every time you create a group, bug, trigger etc.,
but especially in complex simulations with lots of interaction between bugs,
be sure to provide talking names for the objects. „AlphaWolf of Wolfpack“
seeking „slowCaribou of Herd“ is a lot more self-explanatory than „Member_1
of Group_0“ seeking „Member_34 of Group_1“.
bugz - User Manual
Learning bugz - General Tips
23
6DYH6DYH6DYH
Even though no problems were observed running the current version of EXJ] it
is not possible to write software that runs under all possible circumstances
without any error. It is therefore suggested to Save often - besides, this is a
good habit in general.
bugz - User Manual