1
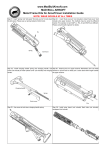
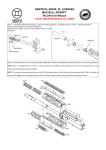
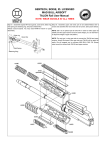
WEAR GOGGLE ALL THE TIME!
MAD BULL XC-02 User Manual
** CO2 regulator will provide you regulated pressure and pure “GAS” CO2 (No liquid CO2 output)
Step 01:Attach XC-02 onto your CO2 tank. Sometimes it is hard to
install XC-02 onto CO2 Tank because of the initial CO2 pressure will try
to push out the XC-02. Make sure you totally thread XC-02 onto CO2 Step 03:If you don’t want to use XC-02 for a while, you need to take off
the XC-02. First, loose the knob by turning counter-clockwise. (If not,
tank.
the spring may lose the elasticity.) Continue to Step 04.
Step 04:Once you process step 03, you need to push the XC-02
vertical down and release the rest of CO2 inside XC-02. (If not, o-ring
may be failed in the long-run. Continue to Step 05
Step 02:Clockwise turn “Pressure adjustment knob” “slowly” and you
will see the pressure will go up slowly. Stop turning knob when pressure
reaches to what you want. (1kg=14.28psi. Please adjust the correct
pressure for your gears)
Step 05:Then, counter-clockwise turn the XC-02 (about 1/2~1 turn) to
release the rest of CO2. (WARNING: Keep away from your
eyes, immediately high pressure release may hurt
your eyes.) WEAR GOGGLE ALL THE TIME!
If the pressure is higher than what you want, you need to turn the XC-02
vertical down and release pressure by pushing XC-02 onto hard
surface. Again, follow Step 01 to adjust the pressure. (Important!!
Apply vertical force onto CO2 tank only or the fill stem will be
broken.)
Important Notice:
1. This CHARGER is only for Airsoft. Unauthorized
modified will cause damage.
2. For safety reason, disassemble is not allowed. If you find
problems with your CHARGER, consult with your local
dealers.
3. Maintenance: Please use silicon oil to lubricate the
components frequently.
4. Only replaced with the original factory parts in order to
ensure the quality and safety.
Details:
1.
Major Body
10. O-ring for 8.
2.
Fill stem
11.
3.
brass screw
12. Pressure adjustment knob
4.
Rubber packing
13. Pressure adjustment valve
5.
Spring of fill stem
6.
XC-02 Main Body
14. Pressure adjustment valve
base
15. Spring for 13.
7.
Pressure adjustment pin
8.
Pressure adjustment
adapter
Spring for 7.
9.
Anti-freeze O-ring
16. Pressure adjustment valve
O-ring
pin 17. O-ring (same size to CO2
tank O-ring)
18. CO2 pressure meter (Not
showing in diagram)
WARNING:
Don’t change, obscure, alter, remove, or obliterate any coloration or markings on this gun. The
coloration and/or marking on this product, including the blaze orange barrel tip are designed to
comply with applicable state and federal law and regulations.
WARNING:
This product may be mistaken for a firearm by law enforcement officers or others. Any person
who changes, alters, removes, or obliterate any coloration or markings that are required by state
or federal law or regulation, in any way that makes this product look more like a firearm is guilty
of a misdemeanor.
WARNING:
The open display, brandishing and/or exposing of this product in any “public place” may cause
confusion and may be a crime. The term “public place” means any area opened to public,
including but not limited to, streets, sidewalks, bridges, alleys, plazas, parks, driveways, front
yards, parking lots, automobiles, whether moving or not, and buildings opened to the general
public including those that serve food or during, or provide entertainment, and the doorways and
entrances to buildings or dwellings.
WARNING:
Every person who, except in self-defense, draws or exhibits this product in a threatening manner
against another in such a way as to cause a reasonable person apprehension or fear of bodily
harm is guilty of a misdemeanor punishable by imprisonment in the county jail for a term of not
less than 30 days.