1
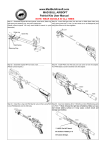
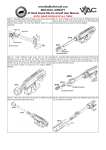
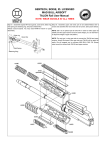
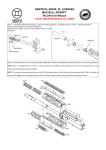
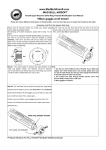
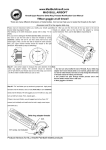
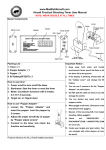
www.MadBullAirsoft.com
MAD BULL AIRSOFT
Metal Frame Kits for Airsoft User Installation Guide
NOTE: WEAR GOGGLE AT ALL TIMES
Step 01:Insert “spring” and “bolt assist” first and use “pin” to lock down Step 04: Insert “Dust cover pin” (not include) to install “dust cover “(not
the bolt assist. Please use our spring instead of other brand.
include) unto upper receiver. The methods may be varied by different
brands. For example, CA and G&P v.s. TM, JG and ECHO are different.
Please consult Airsoft engineer for details.
Pin Spring Bolt Assist Step 02:Install charging handle spring onto charging handle. Use Step 05:Install 2 pins on to upper receiver. Remember, don’t use metal
screw (not include) to install “plastic cover” (not include) onto charging hammer to punch hard on these pins. Leave about 6mm length outside
handle.
the upper receiver.
Charging handle Spring Plastic cover Pins Step 03:Use screw to lock down charging handle spring.
Step 06:Install outer barrel (not include)/ flash hider (not include)/
handguard (not include)
Step 07:Install “fire selector” (not include), and use crazy glue to glue 5 Step 10:If you use 2 pcs hopup, please use our screw and spacer to lock
decoration covers onto upper receiver.
hopup set onto lower receiver. Note: You have to use our screw and
spacer instead of other brands.
Deco cover Deco cover Fire selector Step 08:Use our trigger guard ping to install trigger guard (not include) Step 11:We strongly suggest you to ask experienced Airsoft engineer to
You have to use our trigger guard pin instead of other brands.
help you install the metal body.
The completed installation requires advanced knowledge and skills.
Trigger guard Trigger pin Step 09:Install the “bolt release” and then, insert the upper receiver to Step 12:Install the gearbox pin and 2 upper/ lower receiver pins. You
lower receiver.
have to use our gearbox pin instead of other brands.
Receiver pin Gearbox pin Receiver pin Step 13:Use screws to lock 2 receiver pins.
Step 14:Use “adjustment screw” to tight down the gearbox. The screw
should slightly touch the gearbox instead of “push” the gearbox.
Adjustment screw Product Advisory for ALL Airsoft/ Paintball related products
WEAR GOOGLE AT ALL TIMES!
WARNING:
Don’t change, obscure, alter, remove, or obliterate any coloration or markings on this gun. The
coloration and/or marking on this product, including the blaze orange barrel tip are designed to
comply with applicable state and federal law and regulations.
WARNING:
This product may be mistaken for a firearm by law enforcement officers or others. Any person
who changes, alters, removes, or obliterate any coloration or markings that are required by state
or federal law or regulation, in any way that makes this product look more like a firearm is guilty
of a misdemeanor.
WARNING:
The open display, brandishing and/or exposing of this product in any “public place” may cause
confusion and may be a crime. The term “public place” means any area opened to public,
including but not limited to, streets, sidewalks, bridges, alleys, plazas, parks, driveways, front
yards, parking lots, automobiles, whether moving or not, and buildings opened to the general
public including those that serve food or during, or provide entertainment, and the doorways and
entrances to buildings or dwellings.
WARNING:
Every person who, except in self-defense, draws or exhibits this product in a threatening manner
against another in such a way as to cause a reasonable person apprehension or fear of bodily
harm is guilty of a misdemeanor punishable by imprisonment in the county jail for a term of not
less than 30 days.