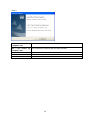
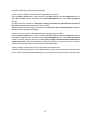
1
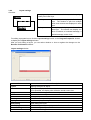
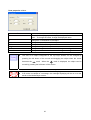
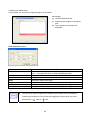
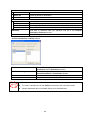
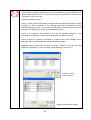
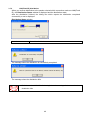
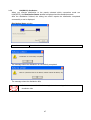
Authoring software
Ver. 2.1
User’s Manual
Ver. 1.11
NEC Display Solutions, Ltd.
Microsoft, MS, Windows, PowerPoint are registered trademarks or trademarks of Microsoft
Corporation in the United States and other countries.
All other product names mentioned herein are trademarks of their respective owner.
Notes:
(1) No part of this document and software shall be reproduced, stored in a retrieval system, or
transmitted by any means, electronic, mechanical, photocopying, recording, or otherwise,
without prior written permission from NEC Display Solutions, Ltd., excluding a backup of
software.
(2) NEC Display Solutions, Ltd. reserves the right to make changes in this guide, and/or in the
software, without prior notice.
(3) Although every precaution has been taken in the preparation of this document, the author
assumes no responsibility for errors or omissions. If you find any errors or omissions, please
contact us.
(4) Notwithstanding the conditions of the preceding paragraph, neither is any liability assumed for
damages resulting from the use of this software.
Copyright © NEC Display Solutions, Ltd. 2010
Preface
This guide describes features and operations of this system in detail for system administrators, and will
be helpful when using Authoring software.
Conventions used in this guide
z
z
z
z
z
Windows and dialog box titles
Windows and dialog box titles are bold and title caps.
Fields on dialog boxes
Names and values on dialog boxes are bold and title caps.
Keys
Key names are all uppercase.
(Sample) CTRL
Keys are concatenated with + to represent key combinations.
(Sample) CTRL + 1 indicate that pressing and holding CTRL and pressing 1.
Buttons
Button names are bold.
Marks
Notes and precautions to avoid wrong operations or on unavailable functions.
Tips and important information on this product and its operations
Contents
CHAPTER
1
Overview of Authoring software
1
1.1 FEATURES
1.2 SYSTEM CONFIGURATION
1.3 TERMINOLOGY
1
2
3
CHAPTER
4
2
Implementation of Authoring software
2.1 SYSTEM REQUIREMENT
2.2 NOTES ON SYSTEM ADMINISTRATIONS
2.3 INSTALLATION OF AUTHORING SOFTWARE
2.3.1 PREPARATIONS BEFORE INSTALLATION
2.3.2 INSTALLATION OF AUTHORING SOFTWARE
2.3.3 INSTALLATION PROCEDURE
4
5
6
6
7
8
Features of CenterSystem
16
3.1 MAIN WINDOW
3.2 BASIC CONFIGURATION OF SCHEDULES
3.2.1 PROGRAMS AND SCHEDULES
3.2.2 ELEMENTS OF PROGRAM
3.3 FLOW OF OPERATIONS
3.4 PROGRAM REGISTRATION
3.4.1 FLOW OF PROGRAM REGISTRATION
3.4.2 EDIT PROGRAM
3.4.3 PROGRAM PROPERTIES
3.4.4 PANE PROPERTIES
3.4.5 CONTENTS PROPERTIES
3.4.6 CONTENTS TYPE
3.4.7 EDIT MESSAGE
3.4.8 SOUND PROPERTIES
3.4.9 PROGRAM PREVIEW
3.5 EDITING MESSAGE
3.5.1 EDIT MESSAGE
3.5.2 EDIT MESSAGE PROGRAM
3.5.3 MESSAGE PROGRAM PROPERTIES
3.6 SCHEDULE REGISTRATION
3.6.1 SCHEDULING ON MAIN WINDOW
3.6.2 SCHEDULING SETTING
3.6.3 SELECT PROGRAM
3.6.4 CHANGING CALIBRATION OF TIME ON SCHEDULE
3.6.5 NOTES ON SCHEDULE REGISTRATION
3.6.6 LAYOUT SETTINGS
3.7 DISTRIBUTION
16
17
17
18
18
19
19
19
20
23
24
25
26
26
27
29
29
30
31
32
32
33
34
35
35
39
43
CHAPTER
3
3.7.1 DISTRIBUTION OPERATIONS
3.7.2 LAN(FIXED IP) DISTRIBUTION
3.7.3 LAN(DHCP) DISTRIBUTION
3.7.4 OFFLINE DISTRIBUTION
3.7.5 DISTRIBUTION LOG
3.8 SCHEDULE MANAGEMENT
3.8.1 SCHEDULE MANAGEMENT
3.8.2 SCHEDULE CONTROL PROPERTIES
3.9 PANEL MANAGEMENT
3.9.1 PANEL CONTROL
3.9.2 WIZARD FOR PANEL SETTING
3.9.3 PANEL ADDITION (SETTINGS)
3.9.4 PANEL ADDITION (DISTRIBUTION RESULTS)
3.9.5 PANEL ADDITION (POWER MANAGEMENT)
3.9.6 PANEL ADDITION (TIME SYNCHRONIZATION)
3.9.7 PANEL PROPERTIES (SETTINGS)
3.9.8 PANEL PROPERTIES (DISTRIBUTION RESULTS)
3.9.9 PANEL PROPERTIES (POWER MANAGEMENT)
3.9.10 PANEL PROPERTIES (TIME SYNCHRONIZATION)
3.10 ENVIRONMENTAL SETTINGS
3.10.1 CONFIGURATION (ENVIRONMENT)
43
46
47
48
49
51
51
52
53
53
54
59
61
62
63
64
66
67
68
69
69
CHAPTER
1
Overview of Authoring software
Authoring software is a system for displaying advertisements and notices on large screen displays
such as LCD display based on different schedules for each.
1.1
z
z
z
z
z
z
z
Features
Authoring software supports movies such as MPEG1, MPEG2, Windows Media Video9 and still
pictures such as jpg, bmp, png.
Plentiful layout
The plentiful layout in which movies, still pictures and messages are combined is prepared. And
with layout editing feature, various combinations of contents can be made.
Scheduling
You can edit schedules by date and/or time with easy-to-use operations, mainly dragging &
dropping items.
Audio file
You can schedule audio files to play back.
Data storage
Player can store schedule data and contents files. Therefore, 24-hour network connection is not
required for them to display contents.
Panel management
Player side can be started/terminated/restarted from CenterSystem remotely.
Messages
Plenty of effects are provided for displaying messages on screen.
1
1.2
System Configuration
This system consists of the followings:
CenterSystem
Computer
+
Authoring software
Media Player
Display
Network
USB memory
USB memory
System Configuration
CenterSystem
Media Player
Registers contents and edits schedules.
Content is displayed in accordance with the schedule registered at the
CenterSystem.
2
1.3
Terminology
This section describes terms specific in this guide.
Terms
Center (system)
Player
Center PC
Contents (file)
Program
Normal Program
Contents folder
Program layout
Pane
Message
Cell
Program cell
Time cell
Descriptions
Application to configure all of the system such as schedule
editing, maintenance, and others.
Application to replay contents based on schedule information
distributed from CenterSystem.
PC where CenterSystem is installed.
Materials such as movies, still pictures and DVDs to be
displayed on screen.
Unit of a group of contents. This system compiles a schedule
by allocating programs in a timetable scaled by date and time.
Programs can be classified into normal programs and class
programs.
A program that combines multiple contents and messages.
Folder to store all contents files to be used in this system.
Layout of split-screen display of a program
A part of a layout and an area that displays contents.
A part of a layout and an area that displays messages.
There are horizontal message and vertical message.
Cell on schedule sheet
A unit of program registered in a schedule sheet
The leftmost column on the schedule sheet displaying time
scales.
3
CHAPTER
2
Implementation of Authoring software
This chapter describes how to implement Authoring software.
2.1
System Requirement
This system requires the following environment to run:
z
CenterSystem side
CPU
Memory
Available free disk space
Supported OS
Resolution
Others
(*1)
(*2)
(*3)
Intel® Pentium® III 1.0GHz or faster recommended
256MB or more recommended
20GB or more (*1)
Microsoft® Windows® Vista Ultimate Edition English 32-bit Ver.
Microsoft® Windows® Vista Business Edition English 32-bit Ver.
Microsoft® Windows® XP Professional English 32-bit Ver.
Microsoft® Windows® XP Home Edition English 32-bit Ver.
Microsoft® Windows® 7 Professional English 32-bit Ver.
Microsoft® Windows® 7 Home Premium English 32-bit Ver.
1024×768 65,536 colors or more
Microsoft® Internet Explorer 6.0, 7.0, 8.0
For Windows XP, Microsoft .NET Framework Version 2.0 or 3.5 (*2)
Windows® Media Player 9 or later (*3)
Separate free disk space is required for storing content files.
In case you use Windows XP, this needs to be installed beforehand.
In case you play a MPEG1 or MPEG2 format file on CenterSystem’s PC by previewing
of Authoring software, the PC needs the codec for MPEG1 or MPEG2 separately.
Hereinafter, Microsoft® Windows® XP, Microsoft® Windows® Vista and Microsoft® Windows® 7 are
referred to as Windows.
4
2.2
Notes on System Administrations
This section describes notes on operation and administrations of this system.
(1)
(2)
(3)
Accuracy of schedule operation
Based on PC’s system clock, this system executes schedules. However, PC’s system
clock is not always accurate. In addition, it is not predictable how long it takes to load files
at a program execution, or the display durations themselves of contents such as
PowerPoint and Flash are not always the same. Please understand that it is impossible
to execute schedules punctually.
Backup of data
This system does not have a data backup function. It is recommended to back up your
information files such as schedules working folder and contents files contents folder on
regular basis.
Not allowed characters
The following characters are not allowed as names used in Player such as file names and
program names;
/, :, *, ?, , <, >, |, ¥, ;, ,
The messages can use all one-byte characters except “<” and “>”.
5
2.3
Installation of Authoring software
2.3.1
Preparations Before Installation
When installing on a computer running Windows XP, Microsoft. NET Framework 2.0 or 3.5 must
be installed first. If you find that it is not installed after performing the following reference
procedure, install Microsoft NET Framework first. This is not required for computers running
Windows Vista or Windows 7.
Procedure 1
z Confirmation of installation of Microsoft.NET Framework 2.0 or 3.5
(For Windows XP)
Open the “Start Menu” -> “Control Panel” of Windows XP. Select “Add/Delete
Program”, and confirm the list in “Currently Installed Programs”.
If it is not installed, go to Step 2.
*Note 1) Even when .NET Framework 1.0/1.1/3.0 are already installed, it is still
necessary to install NET Framework 2.0 or 3.5.
*Note 2) Installation is not necessary if any of the following is already installed.
.NET Framework 2.0/ .NET Framework 2.0 Service pack1/.NET Framework 2
Service pack2 / .NET Framework 3.5 / .NET Framework 3.5 Service pack1
Procedure 2
z
Installation of Microsoft.NET Framework 2.0 or 3.5 (For Windows XP)
1) Set the computer’s internet connection.
2) Select “Start” -> “All Programs” -> “Windows Update” in Windows.
3) Select “Customize” and wait until the confirmation of updated program has finished.
4) Select “Add Selection (Software)” on the left side of the display.
5) Select one of the following from the updated program by ticking the box. *Note3)
.NET Framework 2.0 / .NET Framework 2.0 Service pack1/.NET Framework 2.0
Service pack2 / .NET Framework 3.5 / .NET Framework 3.5 Service pack1
6) Select and install “Install Updated Program”.
*Note3) In case no selection is shown, it may be possible that it is already installed.
Confirm with Step 1 again.
*Note4) When Authoring software is installed before .NET Framework2.0 or 3.5 is
installed, the following errors will be displayed. In that case, uninstall authoring
software and follow Steps 1 and 2.
6
2.3.2
Installation of Authoring software
Execute the ”setup” in “<Authoring software> / <ENG>” folder on the attached utility disc.
“setup” executing
7
2.3.3
Installation procedure
When the “setup” is executed, the installer starts and Authoring software installation begins.
According to the following steps, set up the necessary data.
Step 1.
Cancel
Close down the installation.
z
In case you use Windows XP, Microsoft .NET Framework Version 2.0 or 3.5 needs to
be pre-installed before the Authoring software is installed.
Refer to “2.3.1 Preparations Before Installation”.
Step 1-1.
Yes
No
Confirmation window
Go to the next step.
Close down the installation.
8
Step 2.
Back
Next
Cancel
Go to the next step.
Close down the installation.
Step 3.
Back
Yes
No
Return to the previous step.
Go to the next step.
Close down the installation.
9
Step 4.
[Specifying the folder to install]
Destination Folder
Browse
Back
Next
Cancel
z
Step 4-1.
Use the Brows button when you want to specify the folder other than the default
folder.
[Choose Folder] window
Path
Directories
OK
Cancel
The folder path name is shown here in which Authoring software will be
installed.
The [Choose Folder] window will be displayed and you can specify the
folder to install.
Return to the previous step.
Register the setting and go to the next step.
Close down the installation.
The path of selected folder is shown.
Folder list is shown in tree structure.
The selected folder is chosen and return to the [Specifying the folder to
install].
Discard the setting data and return to the [Specifying the folder to install].
10
Step 5.
[Specifying the configuration folder and the contents folder]
Configuration Folder
Browse
Contents Folder
Browse
Back
Next
Cancel
z
z
The folder path of configuration files is shown.
The [Choose Folder] window will be displayed and you can select the
folder of configuration files.
The folder path of contents files is shown.
The [Choose Folder] window will be displayed and you can select the
folder of contents files.
Return to the previous step discarding settings here.
Register the setting and go to the next step.
Close down the installation.
If there is no actual folder as a default path shown at Configuration Folder or
Contents Folder, the dialog box will be displayed at the timing the Next button
clicked so that you can select whether create it.
Use the Browse button to select the convenient folder other than a default shown.
Step 5-1.
Dialog box (to create the configuration folder)
Yes
Create the configuration folder and return to the [Specifying the configuration folder
and the contents folder].
Without creating the configuration folder, return to the [Specifying the configuration
folder and the contents folder].
No
11
Step 5-2.
Dialog box (to create the contents folder)
Yes
Create the contents folder and return to the [Specifying the configuration folder and
the contents folder].
Without creating the contents folder, return to the [Specifying the configuration folder
and the contents folder].
No
Step 6.
[Settings Confirmation] window
The confirmation window for specified paths of folders will be displayed.
Back
Next
Cancel
Return to the previous step.
Go to the next step.
Close down the installation.
12
Step 7.
Cancel
Close down the installation.
Step 8.
in Desktop
in Start-up
Back
Next
Cancel
z
Create the shortcut of Authoring software on the desktop.
Register the Authoring software on the Startup menu.
Register the setting and go to the next step.
Discard the setting and go to the next step.
Even if you click the Cancel button here, the installation itself is not closed down.
13
Step 9.
Yes, I want to restart my Restart the computer after the setup finished.
computer now.
No, I will restart my Don’t restart the computer after the setup finished.
computer later.
Back
Finish
Finish the setup with executing the selected conduct.
Cancel
14
Start-up in Windows 7 or Windows Vista
In case you use Windows 7 or Windows Vista, you may get an error message which
says “SpSv stopped operating”, and the PC may not start. In that case, follow the
procedures below to execute the Authoring software.
Step1. Create a shortcut menu for the Authoring software to be executed.
Step 2. Right click the shortcut menu and open the properties.
Step 3. Click on the compatibility tab 햲 to select “Execute this program as an
administrator” 햳.
Step 4. For subsequent start-ups click the shortcut menu.
15
CHAPTER
3.1
3
Features of CenterSystem
Main Window
After the Center System is started, the Main window below appears.
Main window
(1)
(6)
(1)
(2)
(3)
(4)
(5)
(3)
(7)
(8)
(4)
(9)
(2)
(5)
(10)
(11)
(12)
(13)
(14)
Program List
Reregistered programs are listed on the left pane. Select and right-click a program for editing
from the list. You can add a program by dragging & dropping from the Program List to compile
the displayed schedule.
Display schedule
Select a schedule from the drop-down list to change the displayed schedule. This system can
manage up to 100 schedule sheets.
Start Editing/Quit Editing
By clicking this button, you start and quit editing the displayed schedule.
Schedule Management
Specified schedule information.
Scroll schedule buttons
Scroll the schedule by month, week or day. Viewable scope of schedule is six months in the
past and six months in the future.
<<<, >>>
<<, >>
<, >
Today button
Scrolls the schedule by one month.
Scrolls the schedule by one week. These buttons cannot be
used on the monthly operation screen.
Scrolls the schedule by one day. These buttons cannot be used
on the monthly operation screen.
Displays the week containing today on the screen.
16
(6)
(7)
(8)
(9)
(10)
(11)
(12)
(13)
(14)
Edit Program
You edit program information. By right-clicking the Program List, you can do the same.
Edit Message
You edit message programs and Properties.
Schedule Setting
You register a program in a schedule. By dragging & dropping a program from the Program List,
you can do the same.
Layout settings
You create and edit a layout.
Distribution
You distribute schedules and programs via network or USB memory.
Distribution Log
You view distribution results.
Panel Control
You edit information of Player such as to add destinations or to set the schedule which a player
uses.
Configuration
You configure environments for CenterSystem.
Exit
You quit CenterSystem.
3.2
Basic Configuration of Schedules
This section describes the configuration of schedules to be used by this system.
3.2.1
Programs and schedules
This system’s schedule consists of programs and timetables.
Program
ABC.PPT
AAA.MPG
BBB.JPG
Program
Schedule
1
1’30
2’35
0’10
Schedule 1
8/1 10:00 Program 1
11:00 Program 2
8/2 09:00 Program 1
A group of contents. Displaying durations are defined here for each contents file.
You register information such as contents files, URLs, input terminal switching, and
displaying durations in the order you want to display them.
In the above sample, Program 1 displays first ABC.PPT for 1:30 (90 seconds), next
AAA.MPG for 2:35 (155 seconds) and then BBB.JPG for 0:10 (for 10 seconds).
Registering created programs in schedules, you make a real schedule for a Player.
In the above sample, Schedule 1 starts the program 1 from 10:00 and the program
2 from 11:00 on August 1st, and the program 1 from 09:00 on August 2nd.
17
3.2.2
Elements of program
This section describes what elements constitute a program and how.
Programs of this system contains one layout which consists of display areas called Pane,
Message.
The programs are configured by registering contents and Message Program to display areas.
The followings are sample program configurations:
Sample program configuration: A program with two panes, one message
Program
3.3
Pane 1
ABC.JPG
AAA.BMP
DDD.PNG
Pane 2
BBB.MPG
Message
Message Program 1
Flow of Operations
This chapter describes operations from creating programs on CenterSystem to displaying them
on Player.
Prepare contents
First, you prepare contents to be displayed.
create files, and DV camcorders for AV data.
Use contents editors to
↓
Register contents
Copy the created contents files in the contents folder.
↓
Register programs
Register the created contents files in programs of the system.
↓
Create schedules
Allocate programs on a schedule to fix it.
↓
Distribute
z
Distribute the updated contents, program data or shedules to Player via
network or write them in USB memory.
If you use this system for the first time, you should configure the environment before
using it. See the following sections for details;
section 3.7 Distribution on page 43,
section 3.8 Schedule Management on page 51,
section 3.9 Panel Management on page 53,
section 3.10 Environment on page 69.
18
3.4
Program Registration
Register created contents files in programs of the system.
3.4.1
Flow of program registration
This section describes the flow of operations to register a program.
Copy contents files.
Copy the contents files to be used in the contents folder.
↓
Create a program.
Create a program.
↓
Determine a program
layout.
Determine a program layout on Properties of the program.
↓
Edit panes.
Add contents files for each pane in the program.
You create/edit programs from the right-click menu of the Program List on the Main window or the
Edit Program button.
The following sections describe the operations based on the Edit Program button.
3.4.2
Edit Program
Click Edit Program on the Main window. The Edit Program window will appear.
You add/delete/edit programs on this window.
Edit Program window
Program List
Add
Create a copy
Properties
Delete
OK
Cancel
Registered programs are listed.
Adds a new program. See Section 3.4.3 Program properties on page 20
for details.
Creates a copy of the program selected on the Program List.
Displays the properties of program selected on the Program List.
Deletes the program selected on the Program List.
Applies the changes and return to the Main window.
Discards the changes and returns to the Main window.
19
z
z
Up to 50 programs can be registered.
If you delete a program which is used by a schedule, it will automatically be deleted
from the schedule, too.
3.4.3
Program properties
You make basic settings of a program.
Program Properties dialog box
Program Title
Layout
Program Color
Layout settings
Object list
Object name
Object type
Properties
Sound
Preview
OK
Cancel
Enter a program title up to 50 bytes.
Select a layout for the program.
Select a color for the program. It will be in the selected color on
schedule.
The Layout settings window is displayed. See Section 3.6.6 Layout
settings on page 39.
Objects of the selected layout are displayed.
Either a pane, a horizontal message or a vertical message is displayed.
The kind of the object is displayed.
The pane are two kinds (the movie pane and the image pane), and can
register movie and each image.
An item selected in the Object list can be configured.
When a pane is selected, the Pane Properties window is displayed, and
the pane information can be edited.
When a message is selected, the Edit Message window is displayed, and
Message Program can be selected.
When a clock is selected, the Clock Selection window is displayed, and a
Clock can be selected.
The Sound window is displayed, and settings of Sound for the program
can be configured.
A program is previewed. See Section 3.4.9 Program preview on page 27
for details.
Apply the changes and return to the Edit Program window.
Discard the changes and return to the Edit Program window.
20
The following 20 layouts are registered by default in this system:
<Horizontal>
10. Split
[Top (image)
01. FullScreen (Image)
+Bottom (Msg)]
+Movie
21. Split
[Left (Movie)
02. FullScreen (Movie)
+Right (Image)]
+Msg
22. Split
03. Split
[Left (Image)
[Top (Image)
+Right (Movie)]
+Bottom (Msg)]
+Msg
04. Split
[Top (Movie)
+Bottom (Msg)]
25. Split
[Top (Image)
+Bottom (Image)]
05. Split
[Left (Movie)
+Right (Image)
+Bottom (Msg)]
06. Split
[Left (Image)
+Right (Movie)
+Bottom (Msg)]
26. Split
[Left (Image)
+Right (Image)]
27. Split
[Top (Image)
+Bottom (Image)
+Bottom (Msg)]
28. Split
[Left (Image)
+Right (Image)
+Bottom (Msg)]
29. Split
[Top (Image)
+Bottom (Image)]
+Msg
30. Split
[Left (Image)
+Right (Image)]
+Msg
07. FullScreen(Image)
+Msg
08. FullScreen(Movie)
+Msg
09. FullScreen(Image)
+Movie +Msg
<Vertical>
11. FullScreen (Image)
32. Split
[Top (Movie)
+Bottom (Image)] +Msg
12. FullScreen (Movie)
33. Split
[Top (Image)
+Bottom (Movie)] +Msg
21
13. Split
[Left (Msg)
+Right (Image)]
34. Split
[Top (Image)
+Bottom (Image)
+V (Msg)]
14. Split
[Left (Msg)
+Right (Movie)]
35. Split
[Top (Image)
+Bottom (Image)] +Msg
15. Split
[Top (Movie)
+Bottom (Image)
+V (Msg)]
16. Split
[Top (Image)
+Bottom (Movie)
+V (Msg)]
36. Split
[Top (Image)
+Bottom (Image)]
+V(Msg)
37. Split
[Top (Image)
+Bottom (Msg)]
17. FullScreen (Image)
+V (Msg)
38. Split
[Top (Msg)
+Bottom (Image)]
18. FullScreen (Movie)
+V (Msg)
39. Split
[Top (Movie)
+Bottom (Msg)]
19. FullScreen (Image)
+Movie+ V (Msg)
40. Split
[Top (Msg)
+Bottom (Movie)]
20. Split
[Left (V (Msg))
+Right (Image)]
+Movie
23. Split
[Top (Movie)
+Bottom (Image)]
+V (Msg)
24. Split
[Top (Image)
+Bottom (Movie)]
+V (Msg)
41. FullScreen (Image)
+Msg
42. FullScreen (Movie)
+Msg
43. Split
[Top (Image)
+Bottom (Movie)]
+Msg
31. Split
[Top (Image)
+Bottom (Image)]
If Panes bracketed by “FullScreen( )” or “Split” are put on Base layer.
Otherwise panes are put on Top layer and are overlayed on panes on Base layer.
See section 3.6.6 Layout settings on page 39 for Top layer and Base layer.
22
3.4.4
Pane properties
You register the pane information.
Here you register contents which are displayed in a pane.
Pane Properties window
Program Title/Pane
Contents List
Add
Copy
Properties
Delete
Up
Down
OK
Cancel
z
z
z
z
z
z
z
The program title and pane name you selected in the previous dialog
box are displayed.
All contents files registered in this pane are listed. Contents files are
listed in the order in which they were registered in this list in Player.
Adds a new contents file. See Section 3.4.5 Contents properties on
page 24 for how to add contents.
Creates a copy of a contents file selected on Contents List.
Changes the properties of a contents file selected on Contents List.
See Section 3.4.5 Contents properties on page 24 for how to add
contents.
Deletes the contents file selected on Contents List.
Moves up one level the selected contents file on Contents List.
Moves down one level the selected contents file on Contents List.
Applies the changes and return to the Program Properties window.
Discards the changes and returns to the Program Properties window.
UP to 100 contents can be registered per pane.
Each pane can cover up to 24 hours.
An movie pane can register movie files only.
It’s not necessary to get every movie files to be same size.
An image pane can register image files only.
In case of one image for an image file, the maximum resolution is 2047*2047.
In case of two images for an image file, the maximum resolution is 1920*1080 or
1080*1920.
23
3.4.5
Contents properties
You register the contents information to be registered in pane.
Content Properties window
Contents type
Duration
Contents
Browse
Execute
OK
Cancel
z
z
z
z
In the movie panel, select contents file or video (external video) when
registering the initial contents property.
See 3.4.6 Contents type (page 25) for details.
Specify how long you want to display the still pictures in HH:MM:SS.
This should be 5 seconds or longer.
The display time for movies and video cannot be set.
Specify a contents file name, URL or others to be displayed.
Displays the Open window to select a file.
If a movie file is specified for [Contents], the playback time for the movie
file is automatically calculated and displayed for [Duration].
Applies the changes and returns to Pane properties window.
Discards the changes and returns to Pane properties window.
All contents files should be stored in the specified contents folder. Make sure to
copy created contents files and their related files to the specified contents folder.
In the contents folder, you cannot use subfolders.
Files over 2 GB are not manageable in this system.
For vertical layout, please rotate a movie by 90 degrees counter–clockwise.
Refer to “Attention for vertical layout” ( 28 page)
24
3.4.6
Contents type
This system supports the following four types of contents:
z
Contents file
Open window
Transferred to Player, files are locally
displayed on Player. Contents files of
PowerPoint and HTML are mainly specified.
Click Browse to specify a contents file on
the Open window.
Contents files supported by the system are as follows:
File format
Extension
Still pictures
Movie files
Audio
z
MPEG1、MPEG2
Windows Media Video 9
MP3
*.jpg, *.jpeg, *.bmp, *.png
*.mpeg, *.mpg, *.m2p, *.m2v, *.vob
*.wmv
*.mp3
Video
It can select in "content type:" in "content properties" for movie pane.
The video input image connected by the Media Player’s external video input* (S terminal input or
component video input) is displayed. *MP-01 : S terminal input only
z
z
For vertical layout,please don’t select “Video” in contents type.
Media player doesn’t support “Video” for vertical layout.
When selecting video (external video), connect the visual device to the media
player’s S terminal input connector.
25
3.4.7
Edit Message
You select a message program to display.
Edit Message window
Edit Message
Edit
OK
Cancel
Select a Message Program to display.
The Edit Message window is displayed and you can edit the contents of
the selected Message Program.
Changes are confirmed and the Program Properties window is
displayed.
Changes are discarded and the Program Properties window is
displayed.
3.4.8
Sound properties
You make settings of audio files for a program.
The audio file set here is played back in the background while displaying the program.
Sound properties window
Program Title
Content
Add
Copy
Properties
Delete
Up
Down
OK
Cancel
A program name is displayed.
The list of audio files is displayed.
The Open window is displayed, and audio files can be added.
A copy of the audio file selected on the Contents is added.
The Open window is displayed, and audio files can be changed.
Deletes registration of the audio file selected on the Contents.
Moves up the order of the selected audio file on the Contents by one.
Moves down the order of the selected audio file on the Contents by one.
Changes are confirmed and the Program Properties window is
displayed.
Changes are discarded and the Program Properties window is
displayed.
26
z
z
When the layout including the movie pane has been selected, it is not possible to set it.
Up to 100 audio files can be registered per program.
3.4.9
Program preview
You can preview registered programs.
To preview programs, click the Preview button on the Program Properties window, or select a
program (or pane) from the Program List on the Main window and select Preview from the
right-click menu.
A program is previewed in full screen and the Preview window appears.
Preview window
Program Title
Select Pane menu
Content Title
Content Number
Duration
<, >
<<, >>
End
z
z
A program title is displayed.
Select a pane to be previewed. When All Panes is selected, the entire
program is previewed.
When a pane is previewed, the previewed contents name is displayed.
When a pane is previewed, the previewed contents number and the
total number of contents are displayed.
The duration for the contents is displayed.
Previews the previous or next contents.
Previews the first or last contents.
Quits the preview and returns to the previous window.
For vertical layout, a movie on “Preview” can not reflect a movie on media player.
Refer to “Attention for vertical layout” (28 page)
When the video is previewed, the message “The video is being displayed” is
displayed.
27
Attention for vertical layout
z Please rotate a movie file by 90 degrees counter- clockwise
If a movie file is a portrait style like the left lower picture,please rotate it by 90degrees counterclockwise on your PC by movie file editing tool supplied from software vendor before it is
registered in program.
Ex)
Before edit
After edit
1080 dots max
Left-90degrees
1920 dots max
*note: The rotated movie’s size need to be within 1920(width) x 1080(height).
If it is more than 1920 x 1080,please down-scale it by movie file editing tool.
z Movie on “Preview” can not reflect movie on Media player
Movie on display installed vertically for Media player is displayed with rotated by
90degrees clockwise due to the limitation for “Preview”function.
Ex)
Authoring software
Layout
Movie on display for
Media player
Preview
Movie
Image
Image
Image
z Please don’t select “Video” *1 in Content type for movie pane.
Media player doesn’t support external video for vertical layout.
*note1. ”Video” means video from an external external source input via the s-video terminal.
28
3.5
Editing Message
By assigning message programs to programs, this system can display messages on Player.
This section describes how to edit message programs.
3.5.1
Edit Message
First, you register a message program. A message program is a set of messages to be
displayed during a program. Click the Edit Message button on the Main window. The Edit
Message window is displayed.
Edit Message window
List of message programs
Add
Create a copy
Properties
Delete
OK
Cancel
z
z
Registered message programs are listed.
Adds a new message program. Clicking this button displays the
Edit Message program window.
Creates a copy of a message program selected on Message
program List.
Changes contents of a message program selected on Message
program List.
Clicking Edit displays the Edit Message
program window.
Deletes a message program selected on Message program List.
Applies the changes and returns to the Main window.
Discards the changes and returns to the Main window.
Up to 50 message programs can be registered per CenterSystem.
You cannot delete a message program if it is used in any program for the moment.
29
3.5.2
Edit message program
Next, you edit the message program. Add message elements to the message program.
Messages appear in the top-to-bottom order in the list.
Edit Message Program window
Message
Program Enter a name of message program. It can be up to 50 bytes.
Title
List of message
Message elements registered in the message program are listed.
Add
Adds a new message element to the message program. Clicking
this button adds a new message element area to List of message to
accommodate a message.
Display check box
Specifies whether to show or hide a message element. If here is not
selected, its message element is not displayed on Player.
Create a copy
Creates a copy of message element selected on List of message.
Delete
Deletes a message element selected on List of message.
Up
Moves up one level a message element selected on List of message.
Down
Moves down one level a message element selected on List of
message.
Properties
Click here to specify how you want to show the message program.
The Message Properties window and message samples are
displayed.
OK
Applies the changes and returns to the Edit Message window.
Cancel
Discards the changes and returns to the Edit Message window.
z
z
z
z
Up to 100 message elements can be registered per message program.
A message element can be up to 255 bytes.
You can copy and paste the text string from other texts into a message by using Ctrl
+ C and Ctrl + V on a keyboard.
The messages are unable to use one-byte characters of “<” and “>”.
30
3.5.3
Message program Properties
Finally, you specify how you want to display a message program.
Message program Properties window
Display Color
Text Color
Background Color
Opacity
Scrolling Speed
OK
Cancel
z
Specify displaying color of the message.
Select a color for message’s characters.
Select a color for message’s background.
The background for a message can be transparent.
Specify the transparent ratio.
0%: Transparent
100%: No transparent
Specify how fast (or slow) the message scrolls.
Applies the changes and returns to Edit Message Program window.
Discards the changes and returns to Edit Message Program window.
As for the message font, the font installed in the Media Player side is used.
Therefore, the display of a center system and the player's display might be different.
31
3.6
Schedule Registration
Register configured programs in schedules.
There are two ways to register programs in schedules.
z From the Main window
z From the Schedule Setting window
The following sections describe these two types operations.
z
z
z
Before additionally editing a schedule, you need to register its basic schedule in
Schedule Management.
See Section 3.8 Schedule Management on page 51 for details.
There is a limitation in the number of programs that can be registered in the
schedule, and when the limitation is exceeded, the alert message is displayed.
Please decrease the registered number of programs or, in that case, shorten the
registration period.
The schedule is made up of two components: the basic schedule and the normal
schedule. See “3.6.5 Notes on schedule registration (page 35)” on when to use
which component.
3.6.1
Scheduling on Main window
To edit a schedule on the Main window, follow the procedures below.
(1) Select a schedule sheet you want to edit from the Displayed Schedule list.
(2) Click the Start Editing button.
(3) The schedule sheet becomes editable. You can start editing the schedule.
(4) When you finished, click the Quit Editing button to save the changes.
When a schedule sheet is editable, the following operations are available:
Types of the edit
How to edit
Register programs
z
z
z
Move programs
z
Copy programs
z
z
z
Remove programs
z
z
Drag & drop a program from Program List onto a cell on the
schedule sheet.
Double-click a cell on the schedule sheet.
Right-click a cell on the schedule sheet and select Properties.
By either of the above operations, the Select Program window is
displayed.
See Section 3.6.3 Select program on page 34 for details.
Select a program you want to move from the schedule sheet, and
drag & drop it on a destination cell.
Select a program you want to copy from the schedule sheet, and
CTRL+drag & drop it on a destination cell.
Right-click a program you want to copy on the schedule sheet, select
Copy, and then right-click on a destination cell and select Paste.
Copy and paste can be done by CTRL+C and CTRL+V on the
keyboard.
Right-click a program you want to delete on the schedule sheet and
select Delete.
Select a program you want to delete from the schedule sheet and
press DEL.
32
Change scheduled
times of programs
z
z
Point the cursor to the top (or bottom) of a program registered on the
schedule sheet, then the cursor turns into a two-headed arrow.
Then drag & drop it.
Double-click a program registered on the schedule sheet or right-click
it and select Properties to display the Select Program window for
changing the starting or ending time.
3.6.2
Scheduling Setting
This section describes how to schedule programs on the Schedule Setting window.
Select a date from the schedule sheet on the Main window and click the Schedule Setting button.
The Schedule Setting window appears.
z
When the displayed schedule sheet is editable on the Main window by clicking the
Start Editing button, the Schedule Setting button is disabled.
Schedule Setting window
Settings
Normal Schedule
OK
Cancel
Select the range of dates you want to apply the Schedule from.
z Date
Specify a date.
z Time Period
Specify staring and ending dates. The Schedule is applied to the
specified term.
z Day of week
Specify a day of the week. The Schedule is applied after the
specified date every day of the week.
A schedule sheet for a day is displayed. The schedule on the Main
window is updated with information specified here for the specified date
(or term or day of the week).
Apply the specified programs to Schedule.
Cancel settings you entered and returns to the Main window.
33
z
z
z
z
You can register “Normal Schedule” for 6 months ahead.
You cannot change schedules of past dates.
The Schedule specified here is used together with the Basic schedule. See Section
3.6.5 Notes on schedule registration on page 35 for details.
The Basic schedule is showed in gray so that you can distinguish it from the Normal
schedule.
z These two ways of schedule operations are provided for your convenience. Use
either of them according to how and what you want to change. For instance, if you
want to apply the same schedule for a week or month, use Schedule Setting. If
you want to change a part of schedule, use operations on the Main window.
3.6.3
Select program
This section describes the Select Program window. This dialog box is displayed by a schedule
operation on the Main window or by clicking Select Program button on the Schedule Setting
window. This dialog box updates a schedule with a specified program and starting/ending times.
Select Program window
Programs
Start at
End at
Layout
Contents list
OK
Cancel
z
Select a program to be added in the schedule.
Specify the time to start the above program.
Specify the time to end the above program.
The layout of selected program is displayed.
Contents of selected program are listed.
Apply the program with specified settings to the schedule.
Cancel settings you entered and returns to the previous window.
The basic schedule cannot be edited on the main screen. See 3.8.2 Schedule control
properties (page 52) for basic schedule editing.
34
3.6.4
Changing calibration of time on schedule
You can change the calibration of time on Schedule sheet and Basic schedule on the Schedule
Setting window. This function is helpful if you register programs in schedules in increments of
minutes.
To change the calibration of time on schedules, right-click a time cell to open the menu and
specify the calibration.
z When 5 minutes is selected from the right-click menu, you change the calibration for
a selected hour (between an o’clock and the next o’clock). You can select only an
hour at a time to change a part of calibration.
3.6.5
Notes on schedule registration
Note the following when registering schedules:
(1) Basic schedule and Normal schedule
There are two types of schedule; one is the Basic schedule, the other is Normal schedule.
Please make schedules on daily basis be set up as the Basic schedule. Just for some individual
schedules, please set up them as the normal schedule.
There is an upper limit (2500 max.) to the number of “Normal Schedule”, so if you make all
schedules only as “Normal Schedule”, it can exceed the upper limitation.
Set up schedules by reference to the following examples.
Type 1:
Display programs from 8 am to 8 pm.
Display different programs in the morning, noon and night.
Display different programs at different time zones for both on weekdays and on days of weekend.
Monday to Friday
Sunday and Saturday
8:00
9:00
Program 4
Program1
10:00
11:00
12:00
13:00
14:00
Program2
Program 5
15:00
16:00
17:00
18:00
19:00
Program 3
Program 6
20:00
Setting of Program1, Program2 and Program3:
- Set up a general schedule as Basic schedule.
- Click the Schedule management button on Main window, select a schedule in the Schedule
List, and click the Properties button.
- Select the preferred time zone in the Basic schedule table on the Schedule control property
window, and then set a program to display by clicking the Select Program button.
35
Setting of Program4, Program5 and Program6:
- Set up a particular day’s schedule such like for only days of weekend as Normal schedule.
- Click the Schedule Setting button on Main window to display the Schedule Setting window.
- Select the Day of Week button, select Saturday, and select the preferred time zone in the
Normal schedule table and then set a program to display by clicking the Select Program button..
- In the same way, set up Sunday’s programs.
Type2:
Schedules are same as Type1 basically.
Display programs from 8 am to 8 pm.
Display different programs in the morning, noon and night.
Display different programs at different time zones for both on weekdays and on days of weekend.
However, display the special programs on 1st of month to 5th of month.
29
30
31
1
2
3
4
5
6
7
8
9
Th
Fr
Sa
Su
Mo
Tu
We
Th
Fr
Sa
Su
Mo
8:00
ProProgram7
9:00
Program4
ProProgram4
Program1
10:00
gram1
gram1
11:00
12:00
13:00
Program8
14:00
ProProProProgram5
Program2
15:00
gram2
gram2
gram5
16:00
17:00
Program9
18:00
ProProProgram3
Pro19:00
gram3
gram3
Program6
gram6
20:00
Setting of Program1, Program2, Program3, Program4, Program5 and Program6:
- Set up a Basic schedule and a Normal schedule in the same way as Type1.
Setting of Program7, Program8 and Program9:
- Click the Schedule Setting button on Main window to display the Schedule Setting window.
- Select the Date button and specify the date in the rite-side box.
- Select the Time Period button and specify the last date of special programs displaying in the
rite-side “to” box.
- Select the preferred time zone in the Normal schedule table and then set a program to display
by clicking the Select Program button.
36
Refer the followings for other particular settings.
● How to power ON/OFF the Media Player automatically everyday:
Click the Panel control button, select a panel in the Panel List and click the Properties button in
the Panel control window, and select the Power Management tab in the Panel properties
window.
And then select the check box of The power supply is turned at the specified time of a day of
the week, and select all check boxes of days of week.
Specify the times to power on/off in the boxes of the Power-On At and Power-Off At according to
the time zones of programs displaying.
● How to set up to power off the Media Player on specified days of week:
Click the Panel control button, select a panel in the Panel List and click the Properties button in
the Panel control window, and select the Power Management tab in the Panel properties
window. And then select the check box of The power supply is turned at the specified time of
a day of the week, select the necessary check boxes of days of week to power on, and don’t
select the other check boxes on which power off the Media Player.
● How to display programs on the day which power-off has been set:
You have to perform a power-on for the Media Player by other remote control tool. And the power
won’t be OFF automatically after the displaying, so you also have to power off it by remote control.
37
(2) Overlay of Basic schedule and Normal schedule
Normal schedule is overlaid on Basic schedule to make a panel’s final display schedule.
(Normal schedule overrides Basic schedule.)
Sample display schedule
Basic schedule
10:00
Program A
11:00
Program A
12:00
13:00
Program B
14:00
+
Normal schedule
10:00
11:00
Program C
12:00
13:00
14:00
Program C
=
Display Schedule
10:00
Program A
11:00
Program C
12:00
13:00
Program B
14:00
Program C
(3) Time calibration
You can change the calibration of time on schedule. This time calibration is just for your
convenience to specify/view programs on schedules. On the assumption that you specified a
program in a schedule whose time calibration is 5 minutes and you changed the calibration to
one hour, the program exists there though its name is invisible and * is presented instead.
In other word, when one or more programs are hidden in a schedule whose time calibration is
longer than the programs’ durations, * is presented on the program cell.
Sample display schedule
Schedule calibrated by
15-minute intervals
10:00
Program A
10:15
Program A
10:30
10:45
Program B
11:00
z
→
Changed to
60- minute
intervals
Schedule calibrated by
60-minute intervals
10:00
*
11:00
12:00
13:00
14:00
←
Only “*” is displayed but
a schedule with
15-minute interval exists
When you change registered programs or their starting/ending time, hidden
programs are all overwritten.
In the above sample, if you register the Program C between 10:00 to 11:00 in the
schedule of 60-minute calibration, all old programs in the hour is replaced with the
Program C in the schedule of 15-minute calibration, too.
38
3.6.6
Overview
Layout settings
Top layer
In a program layout, there are two windows, and the top layer
overlays the base layer.
Base layer
Base layer
Top layer
The base layer is displayed behind the top
layer. The window is spilt into multiple
areas, and contents are displayed in each
area.
The top layer is displayed in front of the
base layer. The window can display one
each of contents, a horizontal message, a
vertical message, and a clock.
For editing a program layout, click the Layout settings button on the Program Properties window
to display the Layout settings window.
After you quit editing a layout, you can select whether or how to register the changes on the
Resister confirmation window.
Layout settings window
Name
Layout
Resolution
Copy
Delete
Rename
Base layer tab
Top layer tab
Start Editing
Quit Editing
Cancel Editing
Finish
Description
Specify the layout to adjust.
Specify the display size of the entire window
If not specified, the display size will be the actual screen size.
Create and add a copy of the selected layout.
Delete the selected layout.
Change a layout name.
Switch to base layer editing mode.
Switch to top layer editing mode.
Start editing the layout.
Finish editing the layout. And go to the Resister confirmation window.
Cancel editing the layout. The edited data is discarded.
Returns to the Main window.
39
z
z
z
z
z
When Undesignated is specified at the Resolution, areas can be created by
specifying ratio (%).
The position or size of an area sometimes may not be adjusted by the dot. In such a
case, adjust the position or size on the area’s properties.
You can register layouts up to 100 at the maximum.
The layout which is used in a program is unable to be deleted.
The pre-set layout is unable to be deleted.
[ Register confirmation ] window
Name
Overwrite
Add
Cancel
Description
Overwrite the layout selected with the editing data.
Add the editing data to the layout.
Discard the editing data and return to the Layout settings
window.
z
In case the overwritten layout is used in a program, it will be changed to the edited
layout.
● Editing on the Top layer
In this system, the size of the configured object can be edited.
Start editing:
(1) Click the Top layer tab.
(2) Double-click the object to change its
size.
(3) The properties of the object are
displayed.
40
Pane properties window
Name
Pane name
Description
A name for identifying a pane is displayed. Up to 50 characters can be
used. To change the name, change the displayed name.
Change the x coordinates of the object.
Change the y coordinates of the object.
Change the width of the object.
Change the height of the object.
Changes are registered and return to the Layout settings window.
Changes are discarded and return to the Layout settings window.
X
Y
Width
Height
OK
Cancel
z
The size of an object configured on the Top layer window can be changed by
pressing the left button of the mouse and dragging the object when the cursor
becomes the
mark.
When the
mark is displayed, the object can be
moved by pressing the left button of the mouse.
z
z
Objects cannot be superimposed each other in Top layer.
If an movie is overlaid on a message, the massage displaying will be run over the
movie on the Media Player screen.
41
● Editing on the Base layer
In this system, the size of the configured object can be edited.
Start editing:
(4) Click the Base layer tab.
(5) Double-click the object to change its
size.
(6) The properties of the object are
displayed.
Pane properties window
Name
Pane name
Description
A name for identifying a pane is displayed. Up to 50 characters can be
used. To change the name, change the displayed name.
Change the x coordinates of the object.
Change the y coordinates of the object.
Change the width of the object.
Change the height of the object.
Changes are registered and return to the Layout settings window.
Changes are discarded and return to the Layout settings window.
X
Y
Width
Height
OK
Cancel
z
The size of an object configured on the Base layer window can be changed by
pressing the left button of the mouse and dragging the object when the cursor
becomes the
mark or
mark.
42
3.7
Distribution
Schedule information, contents data and control directions are distributed to Player.
z
z
z
z
z
When a schedule or program is changed on CenterSystem, the changes are not sent
to Player unless you distribute them to Player. When you change anything on
CenterSystem, make sure to distribute them to Player.
Player information should be registered before distributions.
See Section 3.9 Panel Management on page 53 for details.
In case the connection mode is the LAN(Fixed IP) or LAN(DHCP), you need to set up
the configuration of the Media Player preliminarily.
* Refer to the ”Media Player User’s Manual” separately about the operation of the
Media Player.
In case of LAN(Fixed IP), set up the IP address, subnet mask and default gateway.
In case of LAN(DHCP), set up the host name.
3.7.1
Distribution operations
Click the Distribution button on the Main window to make a distribution.
If you select destinations and distribution programs and click the Execute Distribution button, the
Confirm Distribution Contents window will be displayed and distribution will start according to
each selected connection mode.
Distribution window
43
Distribution List
Destination
Select All
Clear All
Normal distribution
Program
Auto Select
Select All
Clear All
Distribute
Cancel
Select panels to which be distributed.
Select all panels as destination.
Clear all the selections.
Select programs to be distributed.
Select related programs for the selected panels automatically.
Select all programs.
Clear all the selections.
Click here to distribute what you specified. And go to the Confirm
Distribution Contents window.
Cancel settings you entered and return to the Main window.
Confirm Distribution Contents window
Destination
Distribution Program
OK
Cancel
The destinations (panels) are shown which were selected at the
Distribution List in Distribution window.
The distribution programs are shown which were selected at the
Normal Distribution in Distribution window.
Click here to distribute what you specified.
Don’t distribute and return to the Distribution window.
z
The number of panels to which can be distributed at a time is up to 20.
z
The order of distributions is from Offline to network in the connection mode.
z
Already distributed files to the Media Player won’t be distributed.
44
z Notes on Collective Distribution
When there are multiple schedules in use (refer to Diagram 1), please distribute one
panel (media player) at a time, or distribute a group of panels which have the same
schedules in use at one time.
(Refer to example) (*Note 1)
(*Note 1) When panels with different schedules are selected and distributed, all the
programs on all the schedules of the selected panels will be distributed to their
respective panels (*Note 2). In this case, the distribution time will be longer, and the
capacity of the SD Memory card may be exceeded (*Note 3).
(*Note 2) For example, when Panels 01 and 03 are selected (Diagram 1), the
programs on Schedules 01 and 02 will be distributed to Panels 01 and 03.
(*Note 3) When the capacity is exceeded, a “Capacity Over” error message will be
displayed. Select as described above and try distributing again.
Example: Select panels with the same schedules, “Panels 01 and 02” and start
distribution (Diagram 2 (1)). Do the same for the following 2 (2) and 2 (3).
Diagram 1 Panel
Control Screen
(1)
(2)
(3)
Diagram 2 Distribution Screen
45
3.7.2
LAN(Fixed IP) distribution
When you execute distribution to the panels selected which connection mode are LAN(Fixed
IP), the Distribution Status window is displayed and the distribution starts.
After the distribution finished, the dialog box which reports the distribution completed
successfully or not is displayed.
Distribution Status window
Cancel
Cancel the distribution.
The message when the distribution is successfully completed.
The message when the distribution fails.
z
Refer the section “3.7.5 Distribution log” about the meanings of the error when the
distribution fails.
46
3.7.3
LAN(DHCP) distribution
When you execute distribution to the panels selected which connection mode are
LAN(DHCP), the Distribution Status window is displayed and the distribution starts.
After the distribution finished, the dialog box which reports the distribution completed
successfully or not is displayed.
Distribution Status window
Cancel
Cancel the distribution.
The message when the distribution is successfully completed.
The message when the distribution fails.
z
Refer the section “3.7.5 Distribution log” about the meanings of the error when the
distribution fails.
47
3.7.4
Offline distribution
When you execute distribution to panels which connection mode are Offline, the Offline
distribution window is displayed.
Offline distribution window
Insert a USB memory or specify the destination drive, then click the Distribute button.
After the distribution finished, the dialog box which reports the distribution completed
successfully or not is displayed.
The message when the distribution is successfully completed.
The message when the distribution fails.
z
z
z
By the off-line distribution, the specified drive is initialized.
Off-line distribution does not support a larger size of files than USB memory’s
maximum capacity.
Refer the section “3.7.5 Distribution log” about the meanings of the error when the
distribution fails.
48
3.7.5
Distribution log
Click the Distribution Log button on the Main window to view results of distributions.
Distribution Log window
Distribution Log List
Display Details
Redistribute
Delete Log
Clear All
Close
z
Distributions logs are listed.
Click here to see details of distribution log selected from Distribution Log
List. The Distribution Log Details window is displayed.
Click this to execute the selected distributions again which have been
failed or canceled once.
Delete logs selected on Distribution Log List.
Delete all distribution logs.
Exit the Distribution Log window and returns to the Main window.
If the connection mode is Offline, the Redistribute button is unavailable.
49
Distribution Log Details window
Distribution results of this system are as follows:
See the table below in the event of distribution errors.
Results
Details
Completed
The distribution is completed
properly.
The distribution is canceled.
Failed to initialize distribution.
Canceled
Failed
Possible causes
z
z
z
Could not find distribution source z
files.
Distribution error occurred.
z
z
z
z
Error Codes
Error Code
100
102,101
434,435
441
-1
NIC or modem error
Network cable of CenterSystem is
detached.
Off-line distribution media is damaged.
Lack of contents files to be distributed.
Other distribution error. No cause can be
identified.
If the distribution fails, the error code showing the type of error appears.
When the distribution is not successful, an error indicating the cause will be
displayed.
When there is an abnormal distribution, refer to “Troubleshooting” in the Media
Player’s manual.
Cause
Cannot connect with the media player’s name
No response from the media player
Media player is generating the programs after distribution
Insufficient capacity in the media player’s SD memory card
Other errors
50
3.8
Schedule Management
Click the Schedule Management button on the Main window to create or edit the schedule
information.
3.8.1
Schedule Management
Click Schedule Management on the Main window. The Schedule Management window is
displayed to register the basic information of a schedule.
Schedule Management window
Schedule List
Add
Add copy
Properties
Delete
OK
Cancel
z
z
z
Registered schedules are listed.
Add a new schedule.
Create a copy of schedule selected on Schedule List.
Configure a schedule selected on Schedule List.
Delete a schedule selected on Schedule List.
Apply the changes and returns to the Main window.
Discard the changes and returns to the Main window.
You can create up to 100 schedules.
The Add button and Add copy button are unavailable when the number of schedules
has become 100.
In case you distribute the schedule created here, it should be allocated to a
PanelSystem preliminarily in the Panel control window.
Refer the section “3.9 Panel Management” for details.
51
3.8.2
Schedule control properties
Specify the information of a basic schedule.
Schedule Control Properties window
Schedule name
Enter a schedule name up to 50 bytes.
Set time displayed in Specify the starting and ending times of a basic schedule.
schedule
Select Program
Register a program in a selected cell on Basic Schedule.
See Section 3.6.3 Select program on page 34 for details.
Delete
Delete a program in a selected cell from Basic Schedule.
Delete All
Delete all programs on the basic schedule.
OK
Apply the changes and returns to the Create Schedule window.
Cancel
Discard the changes and returns to the Create Schedule window.
z
See Section 3.6.5 Notes on schedule registration on page 35 for details of Basic
schedule.
52
3.9
Panel Management
Click the Panel control button on the Main window to create and edit the panel information.
z
To register Player, advanced network knowledge is required. Make sure that a
system administrator performs this function.
3.9.1
Panel control
By clicking Panel control button, the window below is displayed.
Panel control window
Panel List
Start Wizard
Add
Properties
Delete
OK
Cancel
z
z
z
Registered PanelSystems are listed.
Start the Wizard for panel setting.
Click here to add a new PanelSystem through an interactive interface.
Follow instructions to be displayed to make settings for a new
PanelSystem.
Add a new PanelSystem.
Click here to display the Panel properties window and set up the new
panel to add in Panel List.
Properties of a PanelSystem selected in Panel List are displayed to
be set up.
Delete the PanelSystem selected in Panel List.
Apply the changes and returns to the Main window.
Discard the changes and returns to the Main window.
You need to set the LAN setting of Media Player in advance when “Connection
Mode” is set to LAN. Refer to the User’s Manual of the Media Player.
Up to 20 PanelSystems can be created.
The Start Wizard button and Add button are unavailable when the number of
PanelSystems has become 20.
53
3.9.2
Wizard for panel setting
After the clicking the Start Wizard button on Panel control window, the Wizard for panel setting
will start.
(1) Destination name setting
Destination Name
Back
Next
Cancel
Specify the unique destination name. (up to 50 bytes)
Save the setting and go to (2) Connection mode setting.
Discard the setting and return to Panel control window.
(2) Connection mode setting
LAN(Fixed IP)
LAN(DHCP)
Offline
Back
Next
Cancel
z
Set up the connection mode as LAN(Fixed IP).
Set up the connection mode as LAN(DHCP).
Set up the connection mode as Offline.
Return to (1) Destination name setting.
Save the setting and go to the next window.
* In case Offline selected, go to (4) Schedule setting.
Discard the settings and return to Panel control window.
The contents are transmitted via the USB memory when you set to “Offline”.
54
(3) IP address setting
IP address
Back
Next
Cancel
z
z
Specify the IP address of the destination.
Return to (2) Connection mode setting.
Save the setting and go to (4) Schedule setting.
Discard the settings and return to Panel control window.
This (3) IP address setting is displayed when LAN(Fixed IP) was selected in (2)
Connection mode setting.
In the “IP address”, input the IP address specified for the Media Player. Refer to the
Media Player User’s Manual.
(3’) Media Player name setting
Computer Name
Back
Next
Cancel
z
z
Specify the destination Media Player name. (up to 20 bytes)
Return to (2) Connection mode setting.
Save the setting and go to (4) Schedule setting.
Discard the settings and return to Panel control window.
This (3’) Media Player name setting is displayed when LAN(DHCP) was selected in
(2) Connection mode setting.
In the “Media Player’s Name”, input the name specified for the media player. Refer to
the Media Player’s manual.
55
(4) Schedule setting
Schedule
Back
Next
Cancel
Select the schedule used in the destination.
Return to (3) IP address setting in case LAN(Fixed IP) was selected.
Return to (3’) Media Player name setting in case LAN(DHCP) was
selected.
Return to (2) Connection mode setting in case Offline was selected.
Save the setting and go to (5) Automatic power ON/OFF (specified time)
settings.
Discard the settings and return to Panel control window.
(5) Automatic power ON/OFF (specified time) settings
Yes
Specify the automatic power-ON/OFF of the destination. Specify each clock
time for power-on and power-off among from 00:00 to 23:59.
Don’t perform the automatic power-ON/OFF.
Return to (4) Schedule setting.
Save the settings and go to (6) Automatic time correction settings.
Discard the settings and return to Panel control window.
No
Back
Next
Cancel
z
The same clock time cannot be set for automatic power-on and power-off.
56
(6) Automatic time correction settings
Yes
Send the time set on the computer from the computer to Media Player via
LAN to set the Media Player time. Specify the clock time to perform time
correction among from 00:00 to 23:59.
Don’t perform the automatic time correction.
Return to (5) Automatic power ON/OFF (specified time) settings.
Save the settings and go to (7) Final confirmation.
Discard the settings and return to Panel control window.
No
Back
Next
Cancel
z
This (6) Automatic time correction settings is not displayed when Offline was
selected in (2) Connection mode setting.
Final confirmation
Destination Name
Connection Mode
Distribution
IP Address
Computer Name
Information is shown which was set in (1) Destination name setting.
Information is shown which was set in (2) Connection mode setting.
Information is shown which was set in (4) Schedule setting.
Information is shown which was set in (3) IP address setting.
Information is shown which was set in (3’) Computer name setting.
57
Automatic Power ON
Automatic Power OFF
Automatic time
synchronization
Back
Next
Cancel
z
z
z
Information is shown which was set in (5) Automatic power ON/OFF
(specified time) settings.
Information is shown which was set in (5) Automatic power ON/OFF
(specified time) settings.
Information is shown which was set in (6) Automatic time correction
settings.
Return to (6) Automatic time correction settings.
* Return to (5) Automatic power ON/OFF (specified time) settings in
case Offline was selected.
Register all settings and listed in the Panel List on Panel control
window.
Discard all settings and return to Panel control window.
IP Address is shown when LAN(Fixed IP) was selected in (2) Connection mode
setting.
Media Player Name is shown when LAN(DHCP) was selected in (2) Connection
mode setting.
Automatic time synchronization is shown when Offline was selected in (2)
Connection mode setting.
58
3.9.3
Panel addition (Settings)
Specify the basic information for the PanelSystem which will be newly added to the Panel List.
Panel Properties (Settings) window
Panel Properties (Settings) window (in case LAN(Fixed IP) is selected)
59
Panel Properties (Settings) window (in case LAN(DHCP) is selected)
Panel Properties (Settings) window (in case Offline is selected)
Destination name
Connection Mode
IP address
Media Player name
Schedule
z
z
z
Enter a name for the PanelSystem for identification. (up to 50 bytes)
Select a connection mode from among LAN(Fixed IP), LAN(DHCP)
or Offline.
Specify the IP address of the destination.
Specify the media player’s name at the destination.
Select a schedule to be used by PanelSystem.
Please select the Schedule to be used before the distribution by necessity.
The IP address is shown when LAN(Fixed IP) is selected at Connection Mode.
In the “Media Player’s Name”, input the name specified for the media player. Refer to
the Media Player’s manual.
60
3.9.4
Panel addition (Distribution Results)
This window shows distribution statuses of programs to Player. You do not need to supply
values in any field here. This window is helpful to confirm if you did not miss to distribute any
program or if there is an enough free disk space in Panel PC where unnecessary programs are
not deleted.
Panel Properties (Distribution Results) window
Program Title
Distribution Status
Distributed at
All programs registered in System are listed.
Possible statuses are as follows;
z Distributed
The program has properly been distributed.
z Not distributed
The program is not distributed yet. It is registered in schedule
and should have been distributed already.
In this case, you should distribute the program as soon as
possible.
z To be deleted
The distributed program is not registered in schedule. It is
recommended to delete the program from Panel PC by
executing the Remove unnecessary program so as to release
Panel PC’s disk space.
The last date when the programs was distributed. This field is
helpful to confirm that the distributed program is latest.
61
3.9.5
Panel addition (Power Management)
Make settings for power management of Panel PC.
Panel Properties (Power Management) window
The power supply is When this function is used, it checks it.
turned at the specified
time of a day of the week
Specified day of the week
A day of the week when the power supply is controlled is selected.
Specified time
The power supply sets the time turned on and off.
z
If the displaying player has a power saving function, the power of the display screen
can be also turned on/off in conjunction with the Power Management of the Media
Player.
62
3.9.6
Panel addition (Time Synchronization)
Send the time set on the computer to Media Player via LAN to set the Media Player time.
Panel Properties (Time Synchronization) window
Time Synchronization
h
m
z
Select here to perform the auto-time synchronization.
Specify the hours of clock time for the time synchronization.
Specify the minutes of clock time for the time synchronization.
This Time Synchronization function does not work when the Offline is selected at
the Connection Mode.
63
3.9.7
Panel properties (Settings)
Specify the basic information for the PanelSystem which is registered in the Panel List.
Panel Properties (Settings) window
Panel Properties (Settings) window (in case LAN(Fixed IP) is selected)
64
Panel Properties (Settings) window (in case LAN(DHCP) is selected)
Panel Properties (Settings) window (in case Offline is selected)
Destination name
Connection Mode
IP address
Media Player name
Schedule
z
z
z
Enter a name for the PanelSystem for identification. (up to 50 bytes)
Select a connection mode from among LAN(Fixed IP), LAN(DHCP)
or Offline.
Specify the IP address of the destination.
Specify the media player’s name at the destination.
Select a schedule to be used by PanelSystem.
Please select the Schedule to be used before the distribution by necessity.
The IP address is shown when LAN(Fixed IP) is selected at Connection Mode.
In the “Media Player’s Name”, input the name specified for the media player. Refer to
the Media Player’s manual..
65
3.9.8
Panel properties (Distribution Results)
This window shows distribution statuses of programs to Player. You do not need to supply
values in any field here. This window is helpful to confirm if you did not miss to distribute any
program or if there is an enough free disk space in Panel PC where unnecessary programs are
not deleted.
Panel Properties (Distribution Results) window
Program Title
Distribution Status
Distributed at
All programs registered in System are listed.
Possible statuses are as follows;
z Distributed
The program has properly been distributed.
z Not distributed
The program is not distributed yet. It is registered in schedule
and should have been distributed already.
In this case, you should distribute the program as soon as
possible.
z To be deleted
The distributed program is not registered in schedule. It is
recommended to delete the program from Panel PC by
executing the Remove unnecessary program so as to release
Panel PC’s disk space.
The last date when the programs was distributed. This field is
helpful to confirm that the distributed program is latest.
66
3.9.9
Panel properties (Power Management)
Make settings for power management of Panel PC.
Panel Properties (Power Management) window
The power supply is
turned at the specified
time of a day of the week
Specified day of the week
Specified time
z
When this function is used, it checks it.
A day of the week when the power supply is controlled is selected.
The power supply sets the time turned on and off.
If the displaying player has a power saving function, the power of the display screen
can be also turned on/off in conjunction with the Power Management of the Media
Player.
67
3.9.10
Panel properties (Time Synchronization)
Make settings for power management of the Media Player.
Panel Properties (Time Synchronization) window
Time Synchronization
h
m
z
Select here to perform the auto-time synchronization.
Specify the hours of clock time for the time synchronization.
Specify the minutes of clock time for the time synchronization.
This Time Synchronization function does not work when the Offline is selected at
the Connection Mode.
68
3.10
Environmental settings
Click the Configuration button on the Main window to configure an environment for this system.
3.10.1
Configuration (Environment)
Make general settings here for this system’s environment.
Configuration (Environment) window
Day of the week to start
Show confirmation
window when center
system is terminated.
Working folder
Contents Folder
z
A day of the week displayed leftmost on an initial screen in the
schedule seat is specified.
Select here to display the confirmation window when the system is
terminated.
Specify the working folder to be used by this system.
Specify the contents folder to be used by this system.
Contents folder should have enough free space.
69
70