1
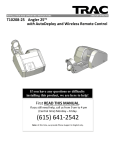
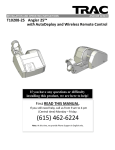
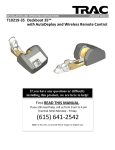
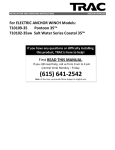
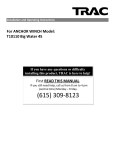
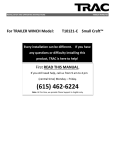
INSTALLATION AND OPERATING INSTRUCTIONS ANCHOR WINCH T10208-25 Angler 25™ with AutoDeploy and Wireless Remote Control If you have any questions or difficulty installing this product, we are here to help! First READ THIS MANUAL. If you still need help, call us from 9 am to 4 pm (Central time) Monday – Friday. (615) 641-2542 Note: At this time, we provide Phone Support in English only. Installation and Operating Instructions Please read and save these instructions. Read carefully before attempting to assemble, install, operate or maintain this anchor winch. Protect yourself and others by observing all safety information. Failure to comply with instructions could result in personal injury and/or property damage! Retain instructions for future reference. Unpacking - When unpacking, inspect carefully for any damage that may have occurred during transit. Make sure the winch is correctly installed before putting unit into service. GENERAL SAFETY INFORMATION - Throughout this manual potential safety hazards will be noted with the following terms. Please read and understand these terms before operating the product. Danger means a hazard that WILL cause death or serious injury if the warning is ignored. Warning means a hazard that COULD cause death or serious injury if the warning is ignored. Caution means a hazard that MAY cause minor or moderate injury if the warning is ignored. It may also mean hazard that will only cause damage to property. SAFETY ISSUES Read this user manual carefully. Be thoroughly familiar with the controls and the proper use of the equipment. Only persons well acquainted with these rules of safe operation should be allowed to use the winch. Rope breakage. 1. 2. 3. 4. 5. Never allow anyone to be positioned between the anchor and the winch. If the rope breaks it could snap back with enough force to cause injury. The winch is shipped with a closed loop anchor roller. If the included anchor roller is ever replaced it must be replaced by a closed loop anchor roller. The closed loop anchor roller will prevent the anchor line from snapping onto the boat deck in the event the rope breaks. Always use an anchor rope with a minimum of 500 pound tensile strength for this product. Never substitute cable for rope. Cable is not an acceptable anchor line as it does not stretch and is easily frayed. If cable breaks it can snap back with more force than a rope. This product is intended to lift short shanked river & mushroom anchors. Do not attempt to lift or move people or other objects. Inspect entire rope for weak or worn condition or kinking (short tight twist or curl) before each use. Replace worn rope with anchor rope with a minimum 500 lb break strength. Electrical shock and fire hazards. 1. 2. 3. 4. 5. Do not use electrical wire sizes smaller than 14 AWG (gauge) with a 105-C temperature rating. Using wire that is too small could result in overloading and a fire. Larger gauge wire is permitted. Use the supplied circuit breaker or a 20 amp in-line fuse when installing this winch. Use only suitable wire for electrical connections between the winch and battery. Make sure any crimped electrical connectors meet industry strength and current requirements. Always disconnect the battery lead wires from the battery before attempting to install, relocate, or service the winch. Cruising and boat trailering hazards – As a precaution, when the boat is cruising the anchor must be secured with the safety cable provided. When the boat is being trailered, the anchor must be placed inside the boat or tow vehicle. If the anchor breaks free during cruising or trailering, it could cause serious damage and/or injury. Anchoring hazards. 1. 2. It is a best practice to tie the anchor line off to a cleat (or other secure point) when the boat is anchored. The winch life may be reduced if it is used to hold the load of the boat while anchored. Damage to the winch motor WILL occur if you motor your boat while the anchor is down (dragging the anchor will damage the winch). Tying to a cleat will extend winch life and prevent wear and possible failure. Do not pull a load greater than the rating for the winch. If the circuit breaker halts operation of the winch during retrieval or deployment; the winch may have been overloaded, the supplied circuit breaker will reset after a minute. Entanglement hazards. 1. 2. 3. Never place any object or tool in the rope spool while retrieving or deploying the anchor. The tool or object could become tangled in the rope resulting in serious injury and/or damage to the winch. Do not wear loose fitting clothing, scarves, or neck ties during the operation of the winch. Loose clothing may become caught in moving parts resulting in injury or death. Do not operate the winch under the influence of drugs and/or alcohol. Storage and Maintenance – For storage, it is best to disconnect positive wire from battery. WINCH DESCRIPTION This anchor winch retrieves and deploys river and mushroom anchors using anchor rope. This anchor winch features power-up, power-down, and AutoDeploy operation with a switch that is installed on the winch cover. A wireless remote control is also included which can be installed at a remote location such as at the boat’s helm that allows the same operational functions as the cover switch. INSTALLATION TOOLS REQUIRED: 1. 2. 3. 4. 5. Electric Drill 5/16” Drill Bit Phillips Screw Driver Adjustable (Crescent style) wrench 14 mm (9/16”) socket and driver MATERIALS REQUIRED 1. Winch and Anchor Roller (davit included) 2. Seven 8mm bolts, washers and nuts (included). Longer bolts may be required if your deck is very thick. 3. Shackle for anchor attachment (included). 4. River or Mushroom anchor (not included – 20 lbs recommended with a short shank). 5. Battery Wire and Circuit Breaker (included). INSTALLING ANCHOR WINCH ON BOAT DECK The anchor winch can be installed on the fore (front) or the aft (rear) of the boat. It is important that the anchor roller be in alignment with the center of the rope spool for proper operation. To mount the anchor winch, follow these steps: 1. Locate anchor roller on deck in desired location. The anchor roller must be located at the edge of the deck and must extend over the edge to allow the anchor to clear the deck when it is docked in the anchor roller. 2. Look below the deck and check for any obstructions underneath the desired anchor roller location. Also make sure there is enough space for the winch to be placed in-line with rope spool centered on the anchor roller. 3. Remove the 2 Phillips head screws in the rear of the davit assembly to expose the mounting holes. 4. Using a marker or pencil, mark the anchor roller mounting holes on the deck. 5. Remove anchor roller. Drill the holes. 6. Secure the anchor roller to the deck using three 8mm bolts, nuts and washers. 7. Place winch on boat deck and align the center of the rope spool with the center of the anchor roller. 8. Look below the deck and check for any obstructions underneath the desired anchor winch mounting location. 9. To expose the mounting holes, remove the four Phillips head screws that hold the cover on the winch frame and disconnect the white connector for the switch. 10. Mark and drill the holes. There are four 8mm bolt mounting holes and a hole for the battery lead wires. 11. Place the anchor winch in position and bolt to the deck. Use fender washers and/or marine plywood under the deck to ensure the greatest strength and to spread the load. 12. Attach winch cover and davit cover. WIRING SELECTION & SPECIFICATION Do not use wire sizes smaller than 14 AWG with 105 degree C rated insulation. Using wire that is insufficient could result in overloading and a fire. The use of larger diameter wire (small gauge number) is permitted and can improve the flow of electrical current. If the length of wire that was included with the winch was not long enough, consider acquiring the next larger wire size (12 AWG) for your installation. Use the supplied circuit breaker or an in-line 20 amp fuse. Using incorrect circuit breakers may result in melting of wire insulation and possibly a fire. Always disconnect battery wires from the battery before attempting to install, relocate, or service the winch. Make sure all crimped electrical connectors meet industry standards. Follow order of wiring steps to ensure power is not applied to winch until wires and circuit breakers are installed. Keep wires away from intense sources of heat. Be sure newly installed wires are away from any bare wires. Never attach the circuit breaker to the negative terminal of the battery. WIRING The wires and switch are all properly connected. You will need to route the battery wires from the winch to battery and connect the RED positive (+) wire to the silver post on the circuit breaker. The small hole on the circuit breaker buss bar (flat stamped metal part with two holes) is attached to the colored post on the circuit breaker and the large hole on the buss bar is attached to the battery positive terminal. The BLACK negative (-) wire is attached to the battery negative terminal. WIRELESS REMOTE This anchor winch comes equipped with Wireless Remote Control. It consists of a compact, sealed hand-held controller (sending unit) that allows push-button anchor operation from any location within about 50 feet, and a receiving unit that is already installed on the winch frame. Also included is a bracket that can be attached to the boat’s helm, or anywhere else, and is used to store the remote control. If the bracket is placed at the boat’s helm, the remote controller can also be used as a panel switch, or removed for portable use anywhere near the boat, up to about 50 feet away. The remote is pre-programmed at the factory for your specific winch. One remote cannot operate two winches. Every remote has a unique code so there is no concern about having two remotes control one winch. If re-programming the remote becomes necessary, follow the instructions below: 1. Remove anchor from anchor rope. The winch will be powered in and out during reprogramming and it would be unsafe to leave the anchor docked in the anchor roller (davit) during this operation. 2. Disconnect anchor winch positive wire from battery. 3. Press and hold the UP and DOWN buttons on the winch housing (DO NOT RELEASE UNTIL STEP 7) 4. Connect the battery positive wire. 5. Press and hold any button on the remote for one second and release. 6. 7. 8. 9. Disconnect battery positive wire. Release UP and DOWN buttons – from STEP 3. Connect positive wire to battery. Test remote function. NOTE: Do NOT power out excessively – it may create a rope back lash on the spool. ROPE INSTALLATION Anchor rope comes pre-installed from the factory, but if you need to install new rope, insert the rope through the hole located on the inside of the drum (where the rope spools) and tie an overhand knot on the outside of the spool so the knot can be pulled into the countersunk hole on the outside end of the spool. Pull the rope so the knot is tight against the counter sunk hole. Make sure the rope is not tangled and not looped around anything and is free to wrap on the spool. Hold tension of the rope while wearing a glove. Press the “UP” direction on the switch and hold until the rope is neatly wrapped on the spool. Release the switch button at anytime during the wrapping of the rope on the spool if an unsatisfactory wrap is occurring. The spool will hold as much as 100’ of 5mm (0.20”) anchor rope. Use anchor rope with a minimum of 500 pounds of tensile strength. The rope that is installed on the winch is suitable for this winch. ANCHOR ATTACHMENT Use a river or mushroom type anchor up to a maximum weight of 25 lb (20 lb anchor is recommended). Do not exceed this weight or anchor winch damage will occur. Use a lighter anchor when possible. Attach the anchor to a shackle to the anchor shank eye. Attach the rope to the anchor shackle. The knot must be securely fastened and tested by the user before anchoring. SAFETY CABLE ATTACHMENT When the boat is being trailered, the anchor must be placed in the boat and secured. If the anchor breaks free during trailering, it could cause serious damage and/or injury. The safety cable is only designed to hold the anchor in place when the boat is underway in the water. Follow the procedures outlined below to attach a safety cable. 1. After the winch is installed and the anchor attached to the rope, power the winch UP until the anchor is in the docked position (in the anchor roller/davit). 2. Attach the safety cable snap ring hook on the anchor shackle. ANCHOR WINCH OPERATION The anchor winch is simple to operate. To lower the anchor press and hold the button with the arrow which points down. Release the button when you wish to stop letting rope out. To raise the anchor, press and hold the button with the arrow that points UP. Release the button when the anchor is docked or when you wish to stop the retrieval of the anchor. To use the AutoDeploy feature, press and release the AutoDeploy button. The winch will deploy the anchor lettering rope out until the rope becomes slack. As the boat drifts and pulls on the anchor rope more rope will be let out a little at a time. To stop letting rope out, simply press the AutoDeploy button again. Pressing any button will also stop the AutoDeploy feature from letting rope out. Helpful hints: 1. When the anchor seems to reach the lake or river bottom, allow the winch to slowly release additional rope until the boat begins to hold its position. If too much rope is let out too quickly, the rope could tangle in the winch housing. 2. If you are in 20 feet of water, you may need 60 feet of rope to hold in wind or current. The ratio of rope length to depth is called scope and a scope of 5 to 1 is common in wind or current. The more scope, or anchor line out, the better the anchor will hold. 3. Using more scope (more line out) is better than using a heavier anchor. Always raise the anchor before moving the boat. Do NOT try to drag the anchor with the boat’s power. This will cause product damage or injury. Do NOT use the anchor winch to pull the boat to the anchor position. Motor the boat toward the anchor when retrieving the anchor rope. ANCHOR WINCH PARTS If ordering a part, provide the product model as well as the part number. PARTS LIST 1 2 3 4 5 6 7 8 9 10 11 12 13 14 15 16 20 21 22 23 24 25 26 27 28 29 30 DESCRIPTION Wireless Remote Remote storage bracket Winch cover with switch support plate Davit Cover Rope Spool Winch frame Frame support rod Cover Screw Stand (SHORT) Cover Screw Stand (LONG) Switch Actuator Block Actuator Block Spring Waterproof Micro-switch Gear Motor Assembly Gear Motor Bracket Steel Gear Retainer Steel Gear Davit Frame Cover Screw Roller Shaft Screw and washer Roller Shaft Tension Spring Roller Bail Control Unit with Screws (2) Circuit Breaker Hardware Pack (not shown) Battery Wire (not shown) PART# P10208-1 P10208-2 P10208-3 P10208-4 P10208-5 P10208-6 P10208-7 P10208-8 P10208-9 P10208-10 P10208-11 P10208-12 P10208-13 P10208-14 P10208-15 P10208-16 P10208-20 P10208-21 P10208-22 P10208-23 P10208-24 P10208-25 P10208-26 P10208-27 P10208-28 P10208-29 P10208-30 QTY 1 1 1 1 1 1 1 2 2 1 1 1 1 1 1 1 1 6 2 1 1 1 1 1 1 1 2 2 26 4 1 25 24 5 23 3 10, 11 20 12 22 21 7 8 6 16 27 13 9 28 15 14 TRAC Anchor Winch Limited Warranty This limited warranty is provided by TRAC Outdoor Products Co (TRAC) to the original consumer purchaser (purchaser) of the TRAC Anchor Winch. This limited warranty is not transferable to any other party. TRAC will at it option repair or replace any part(s) of the TRAC Anchor Winch which may be found by TRAC to be defective within two (2) years of purchase. TRAC will pay the shipping charge to the purchaser for any part(s) which may be shipped by TRAC. For warranty repair or replacement, the purchaser must provide dated proof of purchase and notify TRAC of the request for warranty service. The purchaser will notify TRAC by email at [email protected] or by phone at 615-641-2542 for warranty service. TRAC will attempt to provide parts needed to repair the winch. If the winch is to be returned, purchaser will be provided a Return Goods Authorization (RGA) to include with any return for warranty service which will be shipped at the purchaser’s expense to the address provided. The purchaser must use reasonable care in maintenance and operation of the product in accordance with this manual. Failure to follow the instructions in the manual will void the warranty. This warranty covers defects in material or workmanship of the TRAC Anchor Winch. This warranty does not cover failure that results from misuse, improper installation, accident, abuse, neglect, modification, or improper maintenance. There is no other express warranty. Implied warranties, including those of merchantability and fitness for a particular purpose, are limited to two (2) years from the date of purchase. Any damage to watercraft resulting from proper or improper use of this TRAC Anchor Winch is not covered under this warranty. Costs of installation or repair by service centers or marine repair facilities are not covered by this warranty. This is the exclusive remedy and any liability for any and all incidental or consequential damages or expenses whatsoever is excluded. Some states do not allow limitations on how long an implied warranty lasts, or do not allow exclusion or limitation of incidental or consequential damages, the above limitations may not apply to you. This limited warranty gives you specific legal rights, and you may also have other rights which vary from state to state. TRAC Outdoor Products Company 6039 Dana Way Antioch, TN 37013 www.trac-outdoor.com [email protected] 615/641-2542