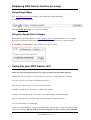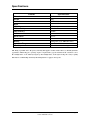
1
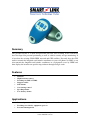
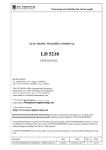
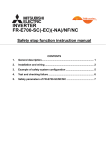
GPS PERSONAL TRACKER
User Manual
Error! No bookmark name given.
Table Of Contents
Summary ______________________________________________________________ 2
Features _______________________________________________________________ 2
Applications ____________________________________________________________ 2
Start up ________________________________________________________________ 3
To set the Authorized Number ______________________________________________ 4
Functions of Authorized Numbers __________________________________________ 4
To delete an Authorized number: ___________________________________________ 4
To check the settings of authorized numbers __________________________________ 5
To recognize the meaning of: “0; 0; 0; 0; 0; 1”: ____________________________________ 5
To locate the GPS trackers position if required anytime _________________________ 5
To receive continuous tracking information __________________________________ 6
SOS function ___________________________________________________________ 6
Dialing preset numbers ___________________________________________________ 6
Audio function __________________________________________________________ 7
Speeding alarm Function _________________________________________________ 7
Setting up a Geo-Fence ___________________________________________________ 7
Low battery alarm _______________________________________________________ 8
Setting the local time _____________________________________________________ 9
Modifying the password __________________________________________________ 9
GPRS Settings _________________________________________________________ 10
GPRS Password Set-Up __________________________________________________ 10
Displaying GPS Tracker location on a map ___________________________________11
Using Google Maps __________________________________________________________ 11
Using the GoogleEarth Software _______________________________________________ 11
Caring For your GPS Tracker Unit _________________________________________11
Specifications __________________________________________________________ 12
SmartLink International Pty. Ltd.
www.smartlink.com.au
Page 1
Summary
The personal tracker is a small and powerful data and voice tracking device which has
been developed for personal positioning as well as vehicle security and pet monitoring. It
is based on the existing GSM /GPRS network and GPS satellites. Not only does the GPS
tracker transmit the longitude and latitude coordinates to your cell phone via SMS, it can
also transmit the longitude and latitude coordinates to a designated server by GPRS and
then display the location on specific map software through Google earth.
Features
•
•
•
•
•
•
•
•
Mini size
High location accuracy.
Tracking via SMS or GPRS.
Supports audio
SOS alarms
Geo-fencing control
Speeding alarms
Low battery alarms
Applications
•
•
•
Personal protection (Children, the elderly, lone workers, dementia & disabled)
Tracking of a vehicles, equipment, pets etc.
Personnel management
SmartLink International Pty. Ltd.
www.smartlink.com.au
Page 2
Start Up
It is imperative that when the GPS tracker is first used the battery is charged to its full capacity,
which takes typically 8 -12 hours. After the first use, the battery can be charged fully in
approximately 3-5 hours. The battery and charger (If provided) by the manufacturer must always
be used and not substituted. Any USB port from a computer can also be used to charge the unit.
Take care not to break the ON/OFF switch.
(On/Off button– Push & hold down button
until “on” (All 3 Lights flashing) or “off” (Blue
& orange light only flashing)
Insert the SIM card into the GPS tracker as shown.
NB: “Please ensure pin Number on SIM card is
disabled"
NB: Switch ON the unit outdoors. Three
LEDs ON will indicate Initialization.
SmartLink International Pty. Ltd.
www.smartlink.com.au
Page 3
After approximately 10 to 30 seconds, the unit will begin to work and acquire the GSM signal as
well as the GPS signal.
•
The red LED indicates power; it will be dim for 0.5 second and bright for 0.5 second in
the normal status.
•
The orange LED indicates the GSM signal; it shall flash every 3 seconds to show it is
receiving the GSM signal.
•
The blue LED indicates the GPS signal, it shall flash every 3 seconds to show it is
receiving the GPS signal.
To set the Authorized Number
Send SMS“password+A1, +country code + mobile number” to set the first SOS number.
Send SMS“password+A2, +country code + mobile number” to set the second SOS number.
Send SMS“password+A3, +country code + mobile number” to set the third SOS number.
Send SMS“password+A4, +country code + mobile number” to set the CALL1 number.
Send SMS“password+A5, +country code + mobile number” to set the CALL2 number.
Note: The authorization numbers are case sensitive and must not contain any spaces.
E.g. send “123456A1,+61481234567” to set +61481234567 as the first SOS number.
Send “123456A2, +6134898765432” to set +61498765432 as the second SOS number.
(Default password: 123456)
Functions of Authorized Numbers
It is not mandatory for all five of the authorized numbers to be set however a minimum of one
must always be set.
Each authorized number is able to complete following operations:
To delete an Authorized number:
Send SMS: “password+A1, +D” to delete the first SOS number.
Send SMS: “password+A2, +D” to delete the second SOS number.
Send SMS: “password+A3, +D” to delete the third SOS number.
Send SMS: “password+A4, +D” to delete the CALL1 number.
Send SMS: “password+A5, +D” to delete the CALL2 number.
E.g. send: “123456A1, D” to delete the first SOS number.
SmartLink International Pty. Ltd.
www.smartlink.com.au
Page 4
To check the settings of authorized numbers
By sending an SMS which reads: “password +G” to the tracker you will receive a reply with all
the authorized numbers and settings in the unit.
Note: Commands are case sensitive therefore the letter “G” must be in capital.
By sending the following SMS: “123456G” to the unit. It will reply with: “Telephones: Axxxxx;
Bxxxxx; Cxxxxx; Dxxxxx; Exxxxx; F; G; H; Speed:080;0;0;0;0;0;1; BAT:100,30%”
The letters: A, B, C, D, E, are the entered preset numbers of the mobile phone. The letters: F; G; H;
are to be disregarded.
Speed: 080 signify the setting of the over-speed alarm which is 80km/h.
To recognize the meaning of: “0; 0; 0; 0; 0; 1”:
•
The number “0” implies that the function is turned off; whilst “1” indicates that the
function is turned on.
•
The first digit indicates the over speed alert.
•
The second digit refers to Continuous Tracking.
•
The “0; 0; 0” is to be disregarded
•
The sixth digit refers to the Low battery alarm.
The following: “100, 30%” indicates that the current battery is at 100% capacity, whilst the setting
of the low battery alarm is at 30%.
To locate the GPS trackers position if required anytime
Send an SMS: “password +F” to the unit, it will then reply with its position via SMS. Only the
authorized number will be able to receive a reply.
Note: Commands are case sensitive .Therefore the letter “F” must be in capital.
E.g. SMS: “123456F” to the unit. It will reply with its position.
SmartLink International Pty. Ltd.
www.smartlink.com.au
Page 5
To Receive Continuous Tracking Information
By sending the following SMS: “password +M (0/1), xxx (S/M/H)” to the unit, the tracker will in
turn reply with one position message at a preset time interval. The unit will only SMS the
Authorized number “A1”
•
The combination; “M0” indicates being switched off, whereas “M1” indicates being
switched on. The letter “M” must be in capital.
•
The numbers where “Xxx” are situated displays the time interval in which the position
message will be relayed. It must always be three digitals (e.g.: 030S means 30S).
•
The letter “S” stands for second, “M” means minute, “H” indicates hour.
•
Hours (H) should always be less than 90. Seconds (S) and minutes (M) should at all times
be less than 255.
An example of this can be shown by sending an SMS of: “123456M1,030S” to the GPS Tracker.
This configuration will insure that a text message of the tracker’s position will be sent to the A1
Authorized number every 30 seconds. By sending an SMS of: “123456M0,030S” to the tracker
will switch off the continuous tracking function.
SOS Function
Pressing and holding down the SOS button for three seconds will transmit an SMS which reads
“Help me!” as well as the current position of the GPS Tracker to the A1, A2, and A3 authorized
numbers programmed into the unit
Along with this, the tracker has the ability to dial up all three authorized numbers. The tracker will
attempt to make contact with the A1 authorized number first. If this fails it will attempt to contact
A2. In the event that the A2 authorized number is not able to be connected the system will dial the
third number (A3). This process will continue until one of the authorized numbers is contacted and
two way communication is established between the GPS Tracker and one of the authorized
numbers.
Dialing Preset Numbers
Pressing the “CALL1” button for three seconds will enable the tracker to dial the preset number in
the “CALL1” slot. Likewise the number preset into the “CALL2” button can be contacted by
holding down the “CALL2” button for three seconds.
SmartLink International Pty. Ltd.
www.smartlink.com.au
Page 6
Audio Function
Once either the “CALL1” or “CALL2” preset contacts dial the number of the GPS Tracker, the
unit will automatically answer the incoming call. This allows the dialer to monitor sounds
surrounding the tracker.
Speeding Alarm Function
To set the Speeding alarm function an SMS containing the following: “password +J(0/1) + speed”
must be sent to the GPS Tracker.
•
The combination “J0” will turn off the over speed alarm function. In turn” J1” will turn the
speeding alarm function on. The letter “J” in these commands must be in capital letters.
•
The speed alarm always must contain three digits and the amount at all times must be less
than 250. (e.g. 080= km/h)
•
As an example, if the SMS: “123456J1,080” is sent. The tracker will notify the A1, A2,
and A3 authorized numbers if the unit exceeds 80 km/h with a text message reading “Over
speed!” in addition to its GPS position information. Send an SMS of: “123456J0,080” to
the GPS tracker will turn off the speeding alarm function.
Setting Up a Geo-Fence
A Geo-Fence is used to restrict the movement of the GPS Tracker.
The Geo Fence can be set up by sending the following SMS: “password + I + x , + y , + z ,+
aabbccddefffgghhiijkkllmmnnepppqqrrssj” this will monitor the unit’s movement to remain in a
confined area.
Once the pre-determined quantity of space is devised, if the tracker wanders out of this space all
authorized numbers (A1, A2, and A3) will be notified with a text message reading “Stockade”
along with details revealing the exact GPS position of unit. A total of five different Geo-Fences
can be set-up.
SmartLink International Pty. Ltd.
www.smartlink.com.au
Page 7
•
The combination of “y=1” will turn on the Geo-Fence, similarly “y=0” shall turn it off.
•
Typing “x=1”, “x=2”, “x=3”, “x=4”, “x=5” is used to determine which of the 5
Gen-Fences is being edited (e.g. “x=2” will edit the 2nd Gen-Fence stored on the GPS
Tracker.
•
The formula “z=0” represents being in the Gen-Fence, whilst “z=1” represents being out.
•
The “e=N” in the SMS is used to determine the north latitude. Whereas the “e=S”
determines the south latitude.
•
The “j=E” is used to establish the east longitude, whilst “j=W” is used for the west
longitude.
•
An example of the longitudes is as follows: The first Lat.51º11'35.25''N,
Long.9º12'56.70''E. The second Lat.50º24'11.15''N, Long.:11º01'11.73''E
•
In the formula the following must all have two digits: “aa,bb,cc,dd,kk,ll,mm,nn,qq,rr,ss”.
If the amount is less than ten a zero precedes the amount (e.g. 3 is “03”).
•
In the text message “fff,ppp” must be 3 digitals. If the amount is less than 100 a zero
precedes the amount (E.g. 11 is typed as 011).
•
The “I” in this formula must be in capital form.
So the SMS command should be “123456I1,1,1,51113525N009125670E50241115N0110111.73E”
Low Battery Alarm
Sending an SMS to the GPS Tracker of: “password + N (0/1), + xx” will set the low-battery alarm
on the unit.
•
The combination of “N0” will switch off the low-battery alarm function. The combination
of “N1” will switch it on.
SmartLink International Pty. Ltd.
www.smartlink.com.au
Page 8
•
The amount in the “xx” should always be less than 45 and always only two digits.
•
An example of this function is: “123456N1, 30”. This particular formula will
communicate to the authorized numbers when the GPS Tracker’s battery is below 30%.
•
Sending the following SMS of “123456N0, 30” to the tracker will switch off the low
battery alarm function. The “N” in this formula must be in capital form.
Setting the Local Time
Send an SMS of: “password + L + time zone” will set the local time on the GPS Tracker.
•
A “+” in the “time zone” portion of the text indicates east. The symbol “-“ in the “time
zone” indicates west. The Time zone amounts must always be two digits.
•
Here’s an example: Australia’s time zone is: +10. Therefore the SMS should read:
“123456L+10” to set the time to the time zone of Australia.
•
The letter “L” in the formula must be in capital form.
Modifying The Password
Sending an SMS of: “previous password + H + new password” will change the password of the
GPS Tracker.
•
The password won’t be erased by changing the SIM card.
•
The password must be 6 digits, If not the tracker will not recognize the password.
•
Be sure to keep the password in a safe place and remember it at all times as the software
will have to be updated to restore the original setting if the password is lost.
•
An example can be seen in the following: “123456H456789” means change the password
123456 to 456789
•
The letter “H” in this formula must be in capital form.
•
The default password for the GPS Tracker is: 123456
SmartLink International Pty. Ltd.
www.smartlink.com.au
Page 9
GPRS Settings
In order to use the GPRS function, the user needs to set up the IP, Port and APN (access point
name) by sending a variety of SMS commands.
Make sure that the SIM card in the tracker supports the GPRS function.
To set-up the GPRS send an SMS containing: “password + C + APN” to the tracker, this will allow
you to set up the APN
.
All letters in this formula are case sensitive.
The “APN” can be acquired from your local GSM operators.
An example of this formula is: “123456CTELSTRA.INTERNET”.
“TELSTRA.INTERNET” is the APN for Telstra in Australia; therefore the user must set their
particular APN for their own country which the unit resides.
GPRS Password Set-Up
By sending an SMS of: “password + O + username, password” will allow the username and
password to be set for the GPRS on the tracker.
•
Some providers do not require a username or password, so be sure to check with your
particular provider.
•
An example is as follows: “123456Owap, wap” The username will be “wap” and the
password will be the second “wap”.
•
•
Sending an SMS of “password + D” will turn on the GPRS
E.g. SMS “123456D”
•
•
Sending an SMS of: “password + E” will turn off the GPRS
E.g. send SMS “123456E”
•
•
Sending an SMS of: “password + B” will acquire the IMEI number of the unit.
E.g. send SMS “123456B”
•
All formulas are case sensitive, so use capital letters in most cases
SmartLink International Pty. Ltd.
www.smartlink.com.au
Page 10
Displaying GPS Tracker location on a map
Using Google Maps
Go to http://maps.google.com and type in the latitude and longitude like this:
37.9049816S,144.9936633E
Click the Search Maps button, to view your location.
Using the Google Earth Software
Download Google earth software from http://earth.google.com/ and install it in to your computer.
Start the Google Earth software and type the latitude and longitude into the software like this:
. Click search to view your location.
37.9049816S,144.9936633E
Caring For your GPS Tracker Unit
Please note the following instructions to properly maintain and extend the units life:
1. Keep unit dry. Any liquid, i.e. rain, moisture, may destroy or damage the inside circuitry.
2. Do not use and or store unit in extremely dusty places.
3. Do not place unit in very hot or very cold environments.
4. Handle carefully and do not vibrate or shake unit violently.
5. Always clean unit with a dry cloth. Don’t clean with chemicals or harsh detergents.
6. Do not paint the unit as this may cause foreign materials to ingress into parts.
7. Do not disassemble or refit the unit.
8. Always use the charger provided by the manufacturer (If provided) as using other chargers may
cause severe damage. NB: Any USB port from a computer can also be used to charge the unit.
SmartLink International Pty. Ltd.
www.smartlink.com.au
Page 11
Specifications
Content
Dimension
Weight
Network
Band
GPS chip
GPS sensitivity
GPS accuracy
Cold start
Warm starts
Hot start
Battery
Operation Temp.
Humidity
Specifications
70.7mm x 42.9mm x 20.1mm
40g
GSM/GPRS
900/1800Mhz
SIRF3 chip
-159dBm
5-20m
42 sec.
35 sec.
1 sec.
Chargeable 3.7V 800mAh battery
-20°C to +55°C
5%--95% non-condensing
NB: Being a portable device the factory warranty that applies on these units is three (3) months from date
of purchase. This being free of charge repair or replacement of goods returned at the customers cost to
the manufacturer or an authorized agent of the manufacturer, such defects being due solely to faulty
materials or workmanship deemed by the manufacturer to apply to such goods.
SmartLink International Pty. Ltd.
www.smartlink.com.au
Page 12
Notes
SmartLink International Pty. Ltd.
www.smartlink.com.au
Page 13
© Copyright SmartLink International Pty Ltd
Nov 2009
Level 1, 304 – 308 New Street
Brighton VIC 3186 AUSTRALIA
Tel: +61 3 9596 0770 Fax: +61 3 9596 8195
Email: [email protected]
Web Site: www.smartlink.com.au
To the best of our knowledge, the information contained in this manual is correct at the time of print.
SmartLink International Pty Ltd reserves the right to make changes to the features and specifications at any
time without prior notice in the course of product development.
SmartLink International Pty. Ltd.
www.smartlink.com.au
Page 14