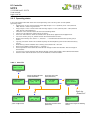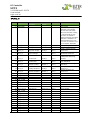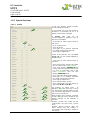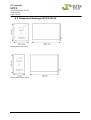
1
DC CONTROLLER UPC3/S V1.30 & V1.31 USER MANUAL Eltek_UM_UPC3_V1.30_&_V1.31_E_R1.1 DC Controller UPC3 V1.30.166 to V1.31.170 User manual Page 2 of 76 About this manual IMPORTANT! Read this manual carefully before installing and commissioning the module. This manual is a part of the delivered module. Familiarity with the contents of this manual is required for installing and operating the module. The rules for prevention of accidents for the specific country and the general safety rules in accordance with IEC 364 must be observed. The function description in this manual corresponds to the date of publishing. Technical changes and changes in form and content can be made at any time by the manufacturer without notice. There are no obligations to update the manual continually. The module is manufactured in accordance with applicable DIN and VDE standards such as VDE 0106 (part 100) and VDE 0100 (part 410). The CE marking on the module confirms compliance with EU standards 2006-95-EG (low voltage) and 2004-108-EG (electromagnetic compatibility) if the installation and operation instructions are followed. Supplier: FAX Email Internet ELTEK DEUTSCHLAND GmbH BU Industrial Schillerstraße 16 D-32052 Herford + 49 (0) 5221 1708-210 + 49 (0) 5221 1708-222 [email protected] http://www.eltek.com Please note: No part of this document may be reproduced or transmitted in any form or by any means -electronic or mechanical, including photocopying and recording- for whatever reason without the explicit written permission of Eltek Deutschland GmbH. Changes and errors excepted. 2011. ELTEK DEUTSCHLAND GmbH. All rights reserved. ©2011. ELTEK DEUTSCHLAND GmbH. Eltek_UM_UPC3_V1.30_&_V1.31_E_R1.1 DC Controller UPC3 V1.30.166 to V1.31.170 User manual Page 3 of 76 Revision history: Revision: 1.1 Date: 2012-10-31 Revision Description of change Writer Date 1.0 Derived from “UM_UPC3_V1.30_E_R5.4”. RTH 2011-08-16 1.1 LED signalling updated RTH 2012-10-31 ©2011. ELTEK DEUTSCHLAND GmbH. Eltek_UM_UPC3_V1.30_&_V1.31_E_R1.1 DC Controller UPC3 V1.30.166 to V1.31.170 User manual Page 4 of 76 Contents 1 SAFETY INSTRUCTIONS & ELECTRONIC WASTE DISPOSAL .......................................................... 6 2 UNIVERSAL POWER CONTROLLER UPC3 .......................................................................................... 7 2.1 2.2 Technical description ................................................................................................................. 7 The concept ................................................................................................................................. 8 2.2.1 2.2.2 2.2.3 2.2.4 2.2.5 2.2.6 2.2.7 2.2.8 2.2.9 2.2.10 2.2.11 2.2.12 2.2.13 2.3 Measurement inputs ............................................................................................................................. 12 2.3.1 2.3.2 2.3.3 2.3.4 2.4 Internal alarms .................................................................................................................................................13 External alarm inputs .....................................................................................................................................14 Alarm signalling outputs ................................................................................................................................14 Alarm message (failure list) ..........................................................................................................................14 Event list ...........................................................................................................................................................14 Display .................................................................................................................................................... 15 Operating elements .............................................................................................................................. 16 2.8.1 2.8.2 2.8.3 2.8.4 2.9 Default user and password ...........................................................................................................................13 Quantity of the rectifiers: adding/removing ....................................................................................... 13 Alarms..................................................................................................................................................... 13 2.6.1 2.6.2 2.6.3 2.6.4 2.6.5 2.7 2.8 Voltage measurement inputs .......................................................................................................................12 Current measurement inputs .......................................................................................................................12 Temperature measurement inputs .............................................................................................................12 Measurement range monitoring ...................................................................................................................12 Safety concept (authorization) ............................................................................................................ 13 2.4.1 2.5 2.6 System monitoring and controlling ............................................................................................................... 8 Temperature controlled output voltage ...................................................................................................... 8 Charge current limitation ................................................................................................................................. 8 Uncontrolled output voltage .......................................................................................................................... 9 PLD function (power load disconnect) .......................................................................................................... 9 LVD funktion (low voltage disconnect) ......................................................................................................... 9 Battery asymmetry........................................................................................................................................... 9 Battery test ........................................................................................................................................................ 9 Battery test data memory ............................................................................................................................10 Boost charge ....................................................................................................................................................10 Monitoring of the load utilization of the rectifiers....................................................................................11 Monitoring of redundant rectifiers ..............................................................................................................11 Isolation monitoring ........................................................................................................................................11 Change of display (leave through the displays) ........................................................................................16 Change menu ...................................................................................................................................................16 Alteration of numerical values/assignments ............................................................................................16 Saving of altered values ................................................................................................................................16 The menu ............................................................................................................................................... 17 2.9.1 Measured values .............................................................................................................................................17 2.9.2 Operating status .............................................................................................................................................18 2.9.2.1 Event list ......................................................................................................................................................18 2.9.2.2 Failure list ....................................................................................................................................................19 2.9.2.3 Operating status „battery test“ ..............................................................................................................19 2.9.2.4 Operating status modem .........................................................................................................................19 2.9.3 Control function...............................................................................................................................................21 2.9.3.1 Control function battery test ..................................................................................................................21 2.9.3.1.1 Manual start ................................................................................................................................21 2.9.3.1.2 Manual stop .................................................................................................................................21 2.9.3.1.3 Clear error battery test .............................................................................................................21 2.9.3.2 Control function boost charge ................................................................................................................22 2.9.3.3 Control function modem internal/external ..........................................................................................22 2.9.4 Log in ..................................................................................................................................................................22 2.9.5 Secondary menu (2nd menu) ........................................................................................................................23 2.10 Communication interface ........................................................................................................... 24 ©2011. ELTEK DEUTSCHLAND GmbH. Eltek_UM_UPC3_V1.30_&_V1.31_E_R1.1 DC Controller UPC3 V1.30.166 to V1.31.170 User manual Page 5 of 76 CONFIGURATION OF THE UPC3 .................................................................................................25 3 3.1 3.2 3.3 3.4 General ................................................................................................................................................... 25 Configuration of UPC systems by external modem ......................................................................... 25 UPC3 parameter groups ...................................................................................................................... 26 Configuration UPC3 .............................................................................................................................. 27 3.4.1 Basic settings UPC3 .......................................................................................................................................29 3.4.1.1 Main set........................................................................................................................................................29 3.4.1.2 CAN devices count.....................................................................................................................................31 3.4.1.3 System parameters ...................................................................................................................................32 3.4.1.4 Battery .........................................................................................................................................................34 3.4.2 Location specific parameters .......................................................................................................................36 3.4.2.1 Installation ...................................................................................................................................................36 3.4.2.2 Ethernet module ........................................................................................................................................36 3.4.2.3 UPC3 .............................................................................................................................................................37 3.4.3 Measuring system ...........................................................................................................................................37 3.4.3.1 Assignment measured values .................................................................................................................37 3.4.3.2 Assignment shunt ......................................................................................................................................47 3.4.4 Thresholds ........................................................................................................................................................48 3.4.4.1 Thresholds general parameters ..............................................................................................................49 3.4.5 Alarm signalling ...............................................................................................................................................49 3.4.5.1 Digital inputs ...............................................................................................................................................49 3.4.5.2 Signals enable .............................................................................................................................................50 3.4.5.3 Signals switch mode..................................................................................................................................51 3.4.6 LVD/PLD function ............................................................................................................................................52 3.4.7 Special functions .............................................................................................................................................53 3.4.7.1 Enable ...........................................................................................................................................................53 3.4.7.2 Battery test.................................................................................................................................................54 3.4.7.3 System test ................................................................................................................................................54 3.4.7.4 Capacity calculator ....................................................................................................................................55 3.4.7.5 Boost charge ...............................................................................................................................................56 3.4.7.6 Counter cells ...............................................................................................................................................57 3.4.7.7 MODBUS module ........................................................................................................................................57 3.4.7.8 Mains monitoring ........................................................................................................................................58 3.4.7.9 Modem..........................................................................................................................................................58 3.4.7.10 Remote Display Panel (RDP) .....................................................................................................................61 3.4.8 Enabling of signalling/text ............................................................................................................................61 3.4.8.1 Text digital inputs ......................................................................................................................................61 3.4.8.2 Text relay output .......................................................................................................................................62 3.4.8.3 Text battery parameters.........................................................................................................................63 3.4.8.4 Text system parameters ..........................................................................................................................63 3.4.8.5 Text general parameters..........................................................................................................................63 3.4.8.6 Text batt identification .............................................................................................................................63 3.4.8.7 Texts fuses .................................................................................................................................................64 3.4.8.8 Module ID texts...........................................................................................................................................64 3.4.8.9 Enable display .............................................................................................................................................64 4 TABLE OF FAILURE/SIGNAL BITS UPC3 ..........................................................................................65 5 COMPATIBILITY OF VERSION V1.30 COMPARED TO V1.31 .............................................................71 5.1 5.2 5.3 6 TECHNICAL SPECIFICATIONS UPC3 AND UPC3S ...........................................................................72 6.1 6.2 7 Configuration of an UPC3 V1.30 to be written to an UPC3 V1.31 .................................. 71 Configuration of an UPC3 V1.31 to be written to an UPC3 V1.30 .................................. 71 New available parameters at V1.31 ...................................................................................... 71 Options ........................................................................................................................................ 73 Dimensional drawings UPC3 & UPC3S................................................................................... 74 KNOWN BUGS (V1.30) ..................................................................................................................75 ©2011. ELTEK DEUTSCHLAND GmbH. Eltek_UM_UPC3_V1.30_&_V1.31_E_R1.1 DC Controller UPC3 V1.30.166 to V1.31.170 User manual Page 6 of 76 1 Safety instructions & electronic waste disposal Warning! Because several components of operating electrical modules are charged by dangerous voltage, the improper handling of electrical modules may cause accidents involving electrocution, injury, or material damages. • Operation and maintenance of electrical modules must be performed by qualified skilled personnel such as electricians in accordance with EN 50110-1 or IEC 60950-1. • Install the device only in areas with limited access to unskilled personnel. • Before starting work, the device must be disconnected from mains. Make sure that the device is earthed. • Do not touch connector pins as they can be charged with dangerous voltage up to 30 seconds after disconnection. • Only spare parts approved by the manufacturer must be used. Notes to electronic waste disposal The correct disposal of electronic waste is the responsibility to recycle discarded electronic equipment and is necessary to achieve the chosen level to protect human health and the environment. In the case of waste disposal of your discarded equipment we recommend to contact a professional waste management company. ©2011. ELTEK DEUTSCHLAND GmbH. Eltek_UM_UPC3_V1.30_&_V1.31_E_R1.1 DC Controller UPC3 V1.30.166 to V1.31.170 User manual Page 7 of 76 2 Universal Power Controller UPC3 2.1 Technical description Two versions of the DC Controller UPC3 are available: 1. 2. UPC3 (1/4 x 19’’ unit) UPC3S (1/6 x 19’’unit) The DC controller UPC is designed as a part of a modular power supply system and therefore it must be used exclusively in combination with a suited backplane. The UPC is fitted with a 64 pole male multipoint connector on the rear side (DIN 41612, type of construction: C64) which is used as interface to the backplane. Almost all individual digital or analog inputs and outputs as well as the CAN-Bus und power supply are plugged with the male multipoint connector. All individual terminals for the digital or analog inputs and outputs, CAN-Bus and power supply are available on the backplane, alternatively on the connection board CONB01/CONB03, related to the backplane. For more information regarding the connectors read the corresponding manuals of the individual backplanes/connection boards. The digital inputs and outputs of the UPC3 are carried out as floating free. Data which causes an alarm according to their configuration are saved and displayed as a fault, as long as they are active. Additionally, the latest 250 messages are saved with date and time in the history list. Analog inputs are directly connected over internal measuring transformers to the 10bit AD converter of the processor unit. The measurement values are displayed in the respective menu, the thresholds are monitored and an alarm is created in the case of an override or dropping below the system values, according to the UPC3 configuration. The firmware and the default values are permanently stored in a flash memory. In this way it is secured that the basic functions are retrievable even with the loss of customer specific adjustments (failure of the rewritable memory) after a restart of the UPC3. The UPC3 is equipped with a battery buffered real-time clock and a processor monitoring unit (Watchdog), which monitors the power supply of the processor. The buffering of the real-time clock is realised via a lithium-manganese coin cell CR2032. If the UPC3 is stored at dead-voltage, the durability of the CR2032 is for at least 10 years. At operating conditions the durability is nearly unlimited. Due to this fact a change is not necessary and therefore the coin cell is not designed for change. The UPC3 is front side fitted with a free floating USB connector for the connection of a PC for programming. The installation of the USB driver is described in the manual of the UPC configurator software. As option the UPC3 is available with a free floating RS 232 interface instead of the USB interface. The RS 232 interface is exclusively necessary if the UPC3 should be used with an external modem. REMARK: The CAN-Bus interface for control and monitoring of the connected power modules is also integrated in the 64-pole connector. The power supply (designed as DC/DC converter) provides the system with all necessary voltages. For detailed technical specifications see section Technical specifications UPC3 +UPC3S (S= small version). ©2011. ELTEK DEUTSCHLAND GmbH. Eltek_UM_UPC3_V1.30_&_V1.31_E_R1.1 DC Controller UPC3 V1.30.166 to V1.31.170 User manual Page 8 of 76 2.2 The concept 2.2.1 System monitoring and controlling The UPC3 is equipped with analog inputs for the measurement of the different system voltages and currents. Furthermore the unit is equipped with digital inputs e.g. for monitoring the states (closed or open) of switch contacts. Additionally, the data of the CAN-Bus connected modules (e.g. rectifiers) are detected and displayed, monitored and analyzed according to the UPC 3 configuration. After analyzing the data the UPC3 controls the power modules (e.g. rectifiers, LVD/PLD) and gives alarm messages if applicable according to the UPC3 configuration. 2.2.2 Temperature controlled output voltage (Float charge of batteries in backup systems) For this operation mode a connected temperature sensor of type KTY 81- 220 is necessary. The temperature information provided by the temperature sensor is analyzed by the UPC3 according to the voltage/temperature characteristic line. The output voltage for the CAN-Bus connected rectifiers are controlled accordingly. This characteristic line linearly proceeds in an adjustable range (e.g. 0°C…40°C) and is constant beyond this range (see illustration). The steepness of the characteristic line is adjustable as the charge voltage difference, related to one battery cell and one degree C is changed. The charge voltage difference of a lead acid battery is -2mV per cell and per °C by default. U [V] 0°C 20°C 40°C T [°C] (Configuration Battery) 2.2.3 Charge current limitation Discharged batteries, e.g. after backup operation, are charged with an adjustable maximum current until the temperaturecontrolled trickle charge mode, is reached. The battery voltage is measured at the beginning of the battery charging. Commencing with this battery voltage, the output voltage of the rectifiers is respectively increased so that the set maximum of the battery charging current is reached. This process is retained as long as the output voltage has reached the value of the trickle charge (temperaturecontrolled). (Configuration Main set) ©2011. ELTEK DEUTSCHLAND GmbH. Eltek_UM_UPC3_V1.30_&_V1.31_E_R1.1 DC Controller UPC3 V1.30.166 to V1.31.170 User manual Page 9 of 76 2.2.4 Uncontrolled output voltage (Autarkic operation) If the rectifiers do not get a control signal, e.g. because of: • Failure of the UPC3, • Break of the CAN-Bus connection, the rectifiers self-acting return to a constant output voltage of 54.5V. At backup systems with connected batteries this operating mode should be seen as an emergency operation. 2.2.5 PLD function (power load disconnect) There is the possibility to disconnect up to two consumer loads (inferior priority loads) independently from each other in order to save battery capacity during the backup operation. The disconnection criteria are selectable independently from one another: • Disconnection after falling below an adjustable voltage threshold, reconnection after exceeding the adjusted voltage threshold • Disconnection after expiration of an adjustable time after recognition of a battery operation. Reconnection at ending of the battery operation. The activation of the PLD contactors can be realized via an optocoupler or one of the six internal relays of the UPC3. (Configuration LVD/PLD function) 2.2.6 LVD funktion (low voltage disconnect) For the protection of the connected batteries against total discharge during back up operation a voltage threshold can be adjusted. If the threshold value is reached the LVD contactor switches off. The activation of the LVD contactor can be done via optocoupler or one of the internal relays of the UPC3. (Configuration LVD/PLD funktion) 2.2.7 Battery asymmetry It is possible to monitor the battery symmetry voltage in order to locate faulty batteries within a battery string. Therefore, a voltage (symmetry voltage) is measured at the centre of the battery string and compared with the total battery string voltage. The symmetry voltage amounts to ½ of the total battery string voltage if the connected batteries are faultless. If the symmetry voltage deviates more than an adjustable value of ½ of the battery string voltage an alarm is activated via the UPC3. For details see: (Configuration Battery) 2.2.8 Battery test The battery test serves for the inspection of the batteries as well as for the inspection of the faultless connection to the batteries. This test can be performed in the following manners: • • • • • manually at the UPC3 display, automatically with date and time automatic daily repetition externally via SNMP or MMT software via digital input For details see: (Configuration Enable) ©2011. ELTEK DEUTSCHLAND GmbH. Eltek_UM_UPC3_V1.30_&_V1.31_E_R1.1 DC Controller UPC3 V1.30.166 to V1.31.170 User manual Page 10 of 76 The rectifiers’ voltages are reduced to an adjustable voltage value during the battery test. ATTENTION! This voltage value has to be greater than the voltage threshold of the LVD/PLD function. Otherwise the load supply could be disconnected during the battery test if the batteries are faulty. Thereby, the batteries supply the connected load and therefore will be discharged. Adjustment criteria of the battery test are: • test duration • the minimum allowable battery test voltage • the maximum battery capacity to be withdrawn in % The battery test is assessed as faulty and a respective alarm is activated, if the minimum test voltage has been achieved within the test duration or the maximal battery capacity has been withdrawn. After the end of the test duration or after an identification of a faulty battery the rectifiers are set back to the default value relating to the battery charging current limitation. An activated alarm of a battery test failure can be cancelled via reset of the UPC3, via UPC3 menu or via an anew execution and faultless completion of the battery test. For details see: (Configuration Battery Test) 2.2.9 Battery test data memory With the assistance of the data memory the data are recorded during a battery test and later the data can be analyzed via USB or Ethernet with the UPC3 configuration software. The following automatically is recorded during any battery test: • Start- und stop time of the battery tests • Duration of the battery tests • The activation of the battery tests (manually or automatically) • The withdrawn capacity during the battery tests and the measured battery voltage at the end of the test • The data of the battery type, date of the battery installation and the nominal battery capacity These data are retrieved from the entered data in the main menu. The above described (head) data are each saved for the last three battery tests. Additionally the collection of the following data of the last battery test is saved: • Number of the generated data set • The elapsed time of the battery test (hours, minutes, seconds) • The particular battery voltage and the battery symmetry voltage • The particular battery current • The particular battery temperature Due to this facts detailed information are available at the end of the test. 2.2.10 Boost charge For a rapid recharge of the battery (only ventilated batteries) a boost charge mode is available. The boost charge mode can be manually activated via the user or self-acting via different configurable criteria (e.g. if a mains breakdown occurred). (Details see: Configuration Enable) During the boost charge mode the battery voltage is increased to a greater value than the trickle charge voltage. Furthermore a considerably greater battery charge current is defined for the duration of the boost ©2011. ELTEK DEUTSCHLAND GmbH. Eltek_UM_UPC3_V1.30_&_V1.31_E_R1.1 DC Controller UPC3 V1.30.166 to V1.31.170 User manual Page 11 of 76 charge mode. If the defined charge voltage value is reached, a follow up charge duration starts. After the expiration the boost charge voltage automatically is decreased to the value of the trickle charge voltage. The boost charge mode can be started via the buttons of the UPC3 and if necessary be stopped before the defined boost charge time has been elapsed. (Details see: Configuration Boost charge ) 2.2.11 Monitoring of the load utilization of the rectifiers With the assistance of this function it is possible to monitor the load utilization of each individual rectifier (REC). The UPC calculates the percentages of the different between min and max current from rectifier, to the max current of rectifier. The output power of the units is not changed by this and remains at 100%. For example: Max. current of one rectifier Min. current of one rectifier 40A 30A (40 A − 30 A) * 100% = 25% 40 A If the configured load utilization is under 25 % than the UPC set a signal bit. The UPC3 generates an alarm “REC load” if a higher current is withdrawn. The load limit of the whole facility is determined in the following way: The number of the installed rectifiers is multiplied with the load limit of each rectifier. For example: 4 installed rectifiers => 4 x 25A load limit of each unit = 100A load limit of the whole facility. 2.2.12 Monitoring of redundant rectifiers If the facility is equipped with more rectifiers as necessary (redundancy), these spare rectifiers can be configured as redundant. All rectifiers within the facility remain active, merely the signalling would be changed in the case of an unit failure. For example: The facility is equipped with 3 rectifiers, 1 unit is configured as redundant. The UPC 3 generates an alarm „REC redundant“, if one unit fails. For example this alarm could be classified as not urgent because the efficiency of the facility is not in danger with the failure of one unit because there are more units available than really necessary (redundancy). 2.2.13 Isolation monitoring Via a high-resistance resistive voltage divider the half of the UPC3 system voltage (V/2) is connected to the UPC3 housing. The UPC3 permanently measures the voltage difference between the half system voltage and the housing. In the case of failure the measured voltage is different to V/2. As exemplification both extreme cases are considered: 1. case: System voltage +V is connected to the housing. In this case the reference potential is 0V. ©2011. ELTEK DEUTSCHLAND GmbH. Eltek_UM_UPC3_V1.30_&_V1.31_E_R1.1 DC Controller UPC3 V1.30.166 to V1.31.170 User manual Page 12 of 76 2. case: System voltage -V is connected to the housing. In this case the reference potential is the system voltage. If the isolation monitoring is disabled via configuration, the mentioned voltage V/2 is separated from the housing with an independent relay. 2.3 Measurement inputs The UPC3 serially is fitted with the following measurement inputs: • UPC3- 24 V: Measurement voltage range 0-100VDC UPC3- 48 V: Measurement voltage range 0-100VDC UPC3-110V: Measurement voltage range 0-300VDC UPC3-220V: Measurement voltage range 0-300VDC • 3 x voltage 0-60V (48V version) • V1 and V2 are used as power supply • 3 x current 60mV shunt • 2 x temperature KTY81-220 2.3.1 Voltage measurement inputs The voltage measurement inputs are defined as follows: • V1 battery voltage (power supply 1) • V2 battery voltage (power supply 2) • V3 battery center tapping point (Vbatt/2) The accuracy of the measured voltage value display is 0.5% ±1 digit. 2.3.2 Current measurement inputs The measurement range of the current measurement input I1 is ± 60mV (bi-directional). The measurement range of the current measurement inputs I2 and I3 is 0-60mV (unidirectional). The accuracy of the measured current value display is 1% ±1 digit. 2.3.3 Temperature measurement inputs The temperature measurement inputs are designed for the use of sensors of type KTY81-220. The temperature measurement input 1 is related (factory preset) to battery 1 (temperature compensation). 2.3.4 Measurement range monitoring The voltage measurement inputs can be monitored with the setting of changeable thresholds within a certain range. The UPC3 generates an alarm if the voltage deviates from the adjusted parameters. Due to this fact, overvoltage and undervoltage alarms are realisable. For the system voltage/consumer load voltage two thresholds are adjustable: Vload > Vmax and Vload < Vmin For the battery voltage three thresholds are adjustable: Vbatt > Vmax, Vbatt < Vwarn and VBatt <Vmin For the battery current no range monitoring is available. For the load current a “load current limit” is to be adjusted. If the limit is exceeded a failure bit is generated. For the temperature measurement inputs a failure bit is generated if T > Tmax. A defective sensor (e.g. cable break or short circuit) is signalled with a further failure bit. ©2011. ELTEK DEUTSCHLAND GmbH. Eltek_UM_UPC3_V1.30_&_V1.31_E_R1.1 DC Controller UPC3 V1.30.166 to V1.31.170 User manual Page 13 of 76 2.4 Safety concept (authorization) A configurable user administration is implemented in the UPC3. The safety settings show, which parameters can be seen or changed by the user or which privileges are available for him (e.g. “delete event history”). When an user wants to perform a protected operation at the unit, he has to authorize via login. After 10 minutes inactivity time, the log out has to be carried out via control keys. 2.4.1 Default user and password Name: Password: User1 user All user and default passwords: Name Factory User1 User2 User3 User4 User5 User6 User7 Password <access only for the factory > User User User User User User User 2.5 Quantity of the rectifiers: adding/removing The quantity of the rectifiers which are to be monitored, results from the automatic registration of the units. But the removing of a rectifier generates an alarm. For the abolition of the alarm either you have manually to change the number of the rectifier quantity or the item „REC default ok“ is to be processed via the UPC3 system menu. 2.6 Alarms Within the configuration of the UPC3, item “signal enable”, you are able to define which failure bits shall activate an alarm (e.g. over-/under voltage, rectifier error, fuse fall etc.). Alarms which are registered within the error list are signalled via a blinking error LED. Furthermore the notice “ERR” is shown on the display. Attention: Actual alarms only can be deleted by fault repair. It can be distinguished between two kinds of alarms: • Internal alarms • External alarms. 2.6.1 Internal alarms Internal alarms are directly reported by the UPC3, e.g. failures signalled via the CAN-Bus or by excess or shortfall of alarm thresholds. The designations (failure text) of internal alarms are set by default in the program and cannot be changed. ©2011. ELTEK DEUTSCHLAND GmbH. Eltek_UM_UPC3_V1.30_&_V1.31_E_R1.1 DC Controller UPC3 V1.30.166 to V1.31.170 User manual Page 14 of 76 2.6.2 External alarm inputs External alarms are recognised via the digital alarm inputs. At those inputs it is monitored whether or not a connected contact is closed or open. By reversing of the inputs it can be determined whether an alarm is activated at an open or closed contact. The designations (clear text) of the external alarms can be entered or changed individually (max. 16 characters). The UPC3 is fitted with 8 integrated alarm inputs. Those digital inputs 1.1 up to 8.1 are freely available for the user. The connection of an external DCC-DIG8 module (as option) to the CAN-Bus extends the system with further 8 alarm inputs (digital inputs 1.2 up to 8.2). 2.6.3 Alarm signalling outputs For external fault signalling the controller is equipped with 6 internal relays (UPC3 configuration relay 1.16.1), each of them equipped with a free floating change-over contact. The connection of an external DCCRB6 module (as option) to the CAN-Bus extends the system with further 6 signalling relays (UPC3 configuration relays 1.2-6.2). Each generated alarm can be assigned to a single or several signalling outputs. Likewise it is possible to assign several activated alarms (e.g. “general fault”) to a single signalling output. In this case the signalling relay remains active until all assigned alarms are disappeared. Whether the respective signalling relay is turned on or off during an alarm is adjustable via reversing. 2.6.4 Alarm message (failure list) Within the failure list all active failures (alarms) are shown at the display (clear text and an ID number according to the definition in the program). If a failure (alarm) is not active anymore it is not shown any longer within the failure list. 2.6.5 Event list Within the event list all occurred failures are stored with the appearance and disappearance of the failures as well as the date and time. Attention: With leaving the event list the system requests whether the list shall be deleted or not. If the list shall be deleted, the system asks for a log-in if the actual user has no privilege for “delete event list” or if no log-in has been done. If the memory is full (250 entries), the eldest failure is deleted and a new one is added. ©2011. ELTEK DEUTSCHLAND GmbH. Eltek_UM_UPC3_V1.30_&_V1.31_E_R1.1 DC Controller UPC3 V1.30.166 to V1.31.170 User manual Page 15 of 76 2.7 Display The UPC3 is equipped with a green coloured front side display (two lines per 16 characters) with backlight. Four LEDs indicate the state of the device and existing active alarms. LED 1 green = UPC3 „ON“ LED 2 green = no active alarms, system „OK“ LED 3 red = isolation failure LED 4 red =active alarms existing ©2011. ELTEK DEUTSCHLAND GmbH. Configurable at ”Signals enable” LED OK Configurable at ”Signals enable” failure list Eltek_UM_UPC3_V1.30_&_V1.31_E_R1.1 DC Controller UPC3 V1.30.166 to V1.31.170 User manual Page 16 of 76 2.8 Operating elements The operation of the controller basically takes place via the 4 front side buttons (↑, ↓, ENT, ESC). The function of each button depends on what is shown at the display and on the respective menu level. ENT-Key: 1. If the symbol „→“ is shown you can switch to the particular next sub menu. . 2. Accepts and saves altered input values „Down“ Key: Changes to the next line/decrease value „Up“ Key: Changes to the previous line/increase value ESC-Key: Switches back to the particular superordinated menu without accepting and saving of alterations. 2.8.1 Change of display (leave through the displays) The change of the display takes place via pressing the buttons “↑↓“, whereas “↑“ changes to the previous and “↓“ changes to the next display. 2.8.2 Change menu Displays which include a selectable submenu are marked with the symbol „→“. By pressing the “ENT” button you get the submenu. The return to the superordinated menu takes place via pressing the “ESC” button. 2.8.3 Alteration of numerical values/assignments In order to increase the value it is necessary to press the “↑” button and press the “↓” button for the reduction of the value for alteration of a displayed value. The value is altered by the smallest possible amount by pressing the buttons in single steps. If the button is pressed by holding it down, then the values are changed continuously. The speed rate of change increases the longer the button is held down. 2.8.4 Saving of altered values Altered values are accepted and saved by pressing the “ENT” button. ©2011. ELTEK DEUTSCHLAND GmbH. Eltek_UM_UPC3_V1.30_&_V1.31_E_R1.1 DC Controller UPC3 V1.30.166 to V1.31.170 User manual Page 17 of 76 2.9 The menu As a standard four menu blocks are available (see below). The section Log in describes how to log-in at the UPC3. An authorization is necessary if you want to get access to a secured area (e.g. “Show parameters”). 1. 2. 3. 4. Measured values Control functions Operating status System menu 2.9.1 Measured values In this menu block the measured data of the system is displayed according to the configuration of the system, Measured values: • General: 4 x current, 6 x temperature and 6 x voltages • Mains: Voltage, current and frequency (only systems equipped with mains monitoring (MM) board) • Power modules: Rectifiers, DC/DC converters, inverters, static bypass switch (e.g. output voltage, output current, temperature) • Power system: System voltage/-current, earth fault measurement (if activated) and the calculated battery-, rectifier- and consumer load currents. • Batteries: Battery voltage, -current, center tapping voltage of the battery and temperature. ©2011. ELTEK DEUTSCHLAND GmbH. Eltek_UM_UPC3_V1.30_&_V1.31_E_R1.1 DC Controller UPC3 V1.30.166 to V1.31.170 User manual Page 18 of 76 2.9.2 Operating status In this menu block information about the actual operating status of the system can be queried. Operating status: • Digital inputs: Status active/inactive of the digital inputs 1.1-8.1 (internal) and 1.2-8.2 (external CAN). Active = active in signal matrix! • Relay outputs: Status active/inactive of the relay outputs 1.1-6.1 (internal) and 1.2-6.2 (external CAN). Active = Relay operates! • FM board: Status active/inactive of the fuse monitoring board. • Failure list: The failure list shows the actual alarms. • Event list: The event list shows all stored alarms (date/time, appearance/disappearance. • Fan racks: Shows „Okay“ or „Failure“ of each of the connected fan racks. • Battery test: Battery test active = ’∗’, inactive = ’ -’. Furthermore the withdrawn capacity (Ah) is shown. • Capacity calculator: Shows the available capacity of the complete system or of individual battery strings. • Data memory: Shows whether data currently are stored or not. ’ OFF/ON’ • Boost charge: Boost charge active = ’∗’, inactive = ’ -’ • Manual operation: Manual control of the default voltage value of the rectifiers. Manual charge of the batteries. • System test: Manual control of the default voltage value of the rectifiers within defined thresholds. • Modem: Shows the initialisation status of the external or internal modem. 2.9.2.1 Event list UPC3 11.12.2006 OKAY 11:47:36 X times Operating Status →Event List Shows the appeared alarm and the alarm ID no. Shows the start of the alarm (date/time) Ub1 > Umax(B1) -> [56] #6 → 11.12.2006 8:11:26 ENT ENT ESC Delete History? No/Yes: ESC/ENT ENT ENT Back to: „Event list“ 1X DC Fuse failure ←[32] Ub1 > Umax(B1) <- [56] #6 → „Leaf“ trough the list ©2011. ELTEK DEUTSCHLAND GmbH. ESC ENT 11.12.2006 9:12:56 Login procedure User 1 Shows the end of the alarm (Date/time) Authorisation require for deleting the list. Eltek_UM_UPC3_V1.30_&_V1.31_E_R1.1 DC Controller UPC3 V1.30.166 to V1.31.170 User manual Page 19 of 76 2.9.2.2 Failure list Alarm LED active and the notice „ERR“ on the display indicates one or more failures (alarms). UPC3 11.12.06 ERR 11:47:36 X times Operating Status →Failure List ENT Ub > Umax (B1) 56 Shows the active failures (alarms) Leaf through the list 2.9.2.3 Operating status „battery test“ (only available if „manual battery test“ is enabled) Operating Status →Battery Test ENT * Manual Cap.=12AH Shows the withdrawn capacity during activated battery test 2.9.2.4 Operating status modem (only available if „enable modem“ internally or externally has been configured. (Internal modem available as option) (An external modem is only available at UPC3 version with RS232 interface instead of USB interface). An internal configured modem is designated with Int at the display, an external modem with Ext. The UPC uses the internal and external serial line each with two modes: 1. 2. Modem configured. Modem status stopped. Direct communication is possible. Modem operation not possible. Modem configured. Modem status started. Direct communication is not possible. Exclusively modem operation is possible. To set the modem in the stopped status only makes sense with an external modem, because for a direct communication via front side interface the modem must be stopped. Info.: With an internal modem the communication and direct configuration via USB is possible at the same time. ©2011. ELTEK DEUTSCHLAND GmbH. Eltek_UM_UPC3_V1.30_&_V1.31_E_R1.1 DC Controller UPC3 V1.30.166 to V1.31.170 User manual Page 20 of 76 OperatingStatus →Modem Int: ENT Mode 1) Modem status stopped. No character string beside Int respectively Ext (see figure on the left). Direct communication possible. Modem operation not possible. For starting the modem see: Control function modem internal/external Int: .____0/+lI Mode 2) Modem status started. There is a character string beside Int respectively Ext (see figure on the left). Direct communication not possible. Only modem operation possible. For stopping the modem see: Control function modem internal/external Explanation of the modem status string: *____0=+lI .caeo1/!?i CAEO21>W 32w 43 54 65 76 87 9 # ^ Important is the first and the final character. Meaning of the first character: *= UPC3 communicates with the modem (e.g. sending of the initial string). .= no communication with the modem Meaning of the final character: I= initialised i= not initialised During starting the UPC3 and during starting initialisation, the first character is “*”, the final character is “i”. After a time period the first character is “.”, the final character is “I”. This indicates a successful initialisation. ©2011. ELTEK DEUTSCHLAND GmbH. Eltek_UM_UPC3_V1.30_&_V1.31_E_R1.1 DC Controller UPC3 V1.30.166 to V1.31.170 User manual Page 21 of 76 2.9.3 Control function In this menu block activated UPC3 functions can be executed. Control function: • Battery Test: Start/stop battery test, deleting of battery test failures. • Data memory: Output of the final series of measurements at the USB interface • Boost charge: Start/stop boost charge • Modem internal/external: Start/stop internal/external modem operation • Second menu: Further system sub menus 2.9.3.1 Control function battery test (only available if “enable manual battery test” has been configured) 2.9.3.1.1 Manual start ControlFunction →Battery Test Ent Batterie-Test ↕→ Ent Battery Test Start?->ENTER Esc Ent Start Battery test 2.9.3.1.2 Manual stop ControlFunction →Battery Test Ent Batterie-Test ↕→ Ent Battery Test Stop?->ENTER Esc Ent Stop Battery test 2.9.3.1.3 Clear error battery test Active battery test error ControlFunction →Battery Test Ent Batterie-Test ↕→ Clear error Test=OK Ent Error cleared! Clear error Test=err ©2011. ELTEK DEUTSCHLAND GmbH. Eltek_UM_UPC3_V1.30_&_V1.31_E_R1.1 DC Controller UPC3 V1.30.166 to V1.31.170 User manual Page 22 of 76 2.9.3.2 Control function boost charge Control Function →Boost Charge ENT Boost Charge Start?->ENTER ENT Boost Ch. starts ESC 2.9.3.3 Control function modem internal/external Control Function →Modem ext. ATTENTION! ENT Modem Op.(ext) Stop?->ENTER Adjust modem ENT operation ESC If an UPC3 with RS 232 interface (optional version instead of USB) is used with an external modem, it is necessary to deactivate the modem mode via this function for direct configuration via PC. Otherwise, communication is not possible. 2.9.4 Log in Login procedure User1 ENT Login procedure User1 ENT User: User1 Passwd: a ENT User: User1 Passwd: ****r ENT Login procedure User2 a. Select user First the user is to be selected with the arrow keys. b. Password entry Using the arrow keys the alphabet, the figures and additional characters are passed through. The required character is selected with “ENT”. After this, the cursor jumps to the next digit, overtakes the previous character as proposal and set “*” as placeholder for the previous character. If only “ENT” is pressed without prior character selection via arrow keys, this is interpreted as “enter finished” (see next item). If the password consists of two consecutive equal characters (e.g. the password “flood”), please note: After keying in “flo”, first select another character with the arrow keys. Following, go back to the character “o” and press ENT. ©2011. ELTEK DEUTSCHLAND GmbH. Eltek_UM_UPC3_V1.30_&_V1.31_E_R1.1 DC Controller UPC3 V1.30.166 to V1.31.170 User manual Page 23 of 76 c. Finishing password entry Press „ENT“. No prior pressing of the arrow keys. 2.9.5 Secondary menu (2nd menu) Via the secondary menu the status and configuration parameters of the UPC3 are visible and can be changed (by entering of a protection code). Control Function2nd Menu: • Error list: All active present errors (failures) • History list: The final 250 incoming and outgoing failures/events • History list P: History list in the memory (flash) of the UPC3. (Not used). • Config. UPC3: Configuration of the UPC3 hardware o Date & Time o Display backlight o Display contrast o Delete, Restart o Delete NVmemHis o Calibration • Control function.: Control functions of the UPC3 • View System par: Display of the UPC3 configuration parameters • Manufactorer menu: Secured area • Aut./User/Login: Explicit login/logout at the unit Following adjustments are changeable in this menu without entering of a protection code: 1. Date and Time 2. Display backlight in % 3. Contrast of the display in % Controllfunction ->Sekundar menu Ent →Error List History List →Config UPC3 Controlfunction Ent →Date&Time Display backlig →Displaybackli Displaycontrast →Displaycontra Delete,Restart ©2011. ELTEK DEUTSCHLAND GmbH. Change value Ent 11.12.2006 11:47:36 Ent Save data Change value Ent 70 Ent Save data Change value Ent 100 Ent Save data Eltek_UM_UPC3_V1.30_&_V1.31_E_R1.1 DC Controller UPC3 V1.30.166 to V1.31.170 User manual Page 24 of 76 2.10 Communication interface For the connection of a local PC to the UPC3 unit a connection via USB interface is necessary. For this connection is an USB wire A/B necessary (see figure below). Connect the USB port of the PC to the USB connector of the UPC3 using this type of cable. ©2011. ELTEK DEUTSCHLAND GmbH. Eltek_UM_UPC3_V1.30_&_V1.31_E_R1.1 DC Controller UPC3 V1.30.166 to V1.31.170 User manual Page 25 of 76 3 Configuration of the UPC3 3.1 General In principle it is possible to do the UPC3 configuration directly via the UPC3 control buttons. But it is advisable to configure the system using the optional PC software „MMT“ (Multi Management Tool). For the connection of a PC the UPC3 is fitted with an USB interface at front side, optional a connection via modem or Ethernet is possible. The configuration software works with the system software Windows 2000/XP/2003/Vista. The user manual for the dial-up and general operation of the software is optionally available (MMT user manual). REMARK: This user manual is related to the factory-side allocated configuration parameters for user 1. 3.2 Configuration of UPC systems by external modem (Only for UPC3 version with RS 232 interface possible) To configure the system by an external modem directly via serial interface using the configuration software MMT please note the following: Two different operational modes are possible. 1) External modem has been started. Dial-up at the system is possible. The system can be configured via modem. In this case a configuration directly via the serial interface is not possible. 2) External modem has been stopped. Configuration via a serial interface is possible. Dial-up at the system via modem is not possible. For information how to start and stop the modem, please see the section „Control function modem internal/external“. For information about the modem status please see the section „Operating status modem“. Basically please note following order: 1. 2. 3. 4. 5. 6. 7. Stop the external modem Check whether the external modem has been stopped. Disconnect the serial cable of the modem from the RS232 interface. Connect the PC via Null Modem Cable to the UPC3. Configuring of the system Disconnect the Null Modem Cable, connect the serial cable of the modem. Start the external modem Check whether the external modem has been started/initialised ©2011. ELTEK DEUTSCHLAND GmbH. Eltek_UM_UPC3_V1.30_&_V1.31_E_R1.1 DC Controller UPC3 V1.30.166 to V1.31.170 User manual Page 26 of 76 3.3 UPC3 parameter groups (The pictures shown in the following are screenshots of the configuration software MMT). After a successful readout/start of a configuration a register of the parameter groups is shown to the left of the screen (MMT configurator). A selected group (via the left mouse button) is shown to the right. ©2011. ELTEK DEUTSCHLAND GmbH. Eltek_UM_UPC3_V1.30_&_V1.31_E_R1.1 DC Controller UPC3 V1.30.166 to V1.31.170 User manual Page 27 of 76 3.4 Configuration UPC3 This section describes the configuration of an UPC3. The configuration process is divided in the following groups for clarity. Basic setting UPC3 Main-set CAN Devices Cnt System parameters Battery Set-up of battery charge regulator (new), battery type/number of batteries, number of cells, voltage per cell Number of the connected modules via CAN-Bus: rectifiers, analogue measurement inputs (UMD2), fan racks, etc. Maximum charge current of rectifier (old), default values (voltage/current) of the rectifier modules Set-up of the battery capacity, activating/set-up of the asymmetric measurement, activating/set-up of the temperature compensation, etc Location specific parameters Installation Location, service no., contact person, etc. The text has no effect on the system function! UPC3 Only read: Serial number, firmware version, configuration date/person Set-up: Language selection, screen contrast/-illumination, baud USBtoUART Ethernet module Set-up of SNMP agent, e.g. IP address, gateway, trap receiver. rate Measuring system Assignment Measu Assignment Shunt Displayed only at the start of the configurator with the add-on parameter „/sys“. Allows the assignment: Measurement channel to measurement object (e.g. measurement channel I1.1 = battery current) Assignment of shunt values to the current measuring inputs (e.g. I1.1 = 80A shunt) Thresholds Thresholds Thresh. Gen. par Main-set Thresholds of battery over/under voltage Threshold of over temperature Threshold of battery operation Thresholds of general parameters, e.g. UMD2 analogue measurement input Limit of the consumer load current Alarm signalling Digital inputs Signals enable Signals Sw mode Inverting/delaying of the digital inputs Via setting of failure/event bits in the related signal matrix it is possible to activate a Trap or an alarm relay. Signal switch mode, allows the inverting / delaying of output signals ©2011. ELTEK DEUTSCHLAND GmbH. Eltek_UM_UPC3_V1.30_&_V1.31_E_R1.1 DC Controller UPC3 V1.30.166 to V1.31.170 User manual Page 28 of 76 LVD/PLD LVD PLD Function Set-up of LVD/PLD function of the UPC3, e.g. switch-off-/switch-on voltage Special functions Enable Battery Test Capacity calculator Boost Charge Counter cells Mains Monitoring MODBUS-Modul Modem UPC3 display/text Texts Fuses Text Digital inp Text Relay Text Batt param Text System param Text Gen. param Module ID texts Enable display Release of spec. functions e.g. battery test or boost charge. Determines the switch-off condition of a running battery test. Set-up of the start date of an automatic battery test. Calculates the estimated battery capacity (only for Pb batteries) Conditions of an automatic boost charge, set-up “follow up charge” (follow up charge time, voltage limit) Set-up of the counter cells Relates to an external mains monitoring (MM-) board, optional Set-up of an optional MODBUS module, e.g. slave address, baud rate … Configuration of an internal/external modem Text for a maximum of 32 fuses which can be monitored with a fuse monitoring board (FMB) Text for the digital inputs of the UPC3. They appear e.g. in the failure list Text for relay outputs of the UPC3, exclusively shown at the display Display text for battery measuring values, e.g. Vbatt Display text for system measuring values, e.g. Vload Display text for general measuring values, e.g. Vana Just for display! Text of the CAN modules are read out Deactivation of indications at the display of the UPC3 ©2011. ELTEK DEUTSCHLAND GmbH. Eltek_UM_UPC3_V1.30_&_V1.31_E_R1.1 DC Controller UPC3 V1.30.166 to V1.31.170 User manual Page 29 of 76 3.4.1 Basic settings UPC3 3.4.1.1 Main set 1 2 3 4 5 10* 6 7 8 The main function of the UPC3 is to deliver a voltage default value to the rectifiers, in order to charge batteries or to keep them under well load conditions. This regulator (see picture on the left) provides a few additional functions. After a restart, the system overtakes the measured voltage as start voltage for the regulator. Every second the voltage default value is controlled (up/down) with the value (5) if deviations of the current default value exist. For trickle charge the adjusted relative current default value (1) is used. For an activated boost charge the charge current (2) is used. If a diesel generator is used for power supply, the default value (3) is used. The digital input (4) indicates when a diesel generator works. This function is disabled, when the digital input is set to “0”. The entered normal capacity (6) is used as point of reference for the relative charge currents. „Run up w. slope“ (10*) is a function, which enables the rectifiers to be individually adjusted to the control voltage by the UPC3 regulator. This function is exclusively adjustable (enabled/disabled) by the user at version V1.31. At version V1.30 this function is enabled as default. The UPC3 hardware (measuring inputs) is designed for monitoring of one battery. If more batteries are connected to the system, an external battery monitoring board (as option) is to be used. The parameter Battery Count (7) has to be set to the number of batteries accordingly. Cell Count (8) indicates the number of the used battery cells. This number amongst others is important for the function Unsymmetric measurement. ©2011. ELTEK DEUTSCHLAND GmbH. Eltek_UM_UPC3_V1.30_&_V1.31_E_R1.1 DC Controller UPC3 V1.30.166 to V1.31.170 User manual Page 30 of 76 At systems without battery (parameter=0) the function for charge control and temperature compensation is inactive. In this case the system operates with the set nominal voltage for the rectifiers. The battery string of a 48V system usually is built with four daisy chained lead acid batteries per six cells. Due to this fact the cell count (8) amounts to 24 cells. The following table shows the factory set threshold values for a 48V system (battery) as an example. The reference numbers (XX) are related to the sections “System parameters”, „Threshoulds“ and “LVD/PLD function”. Parameter Value Over voltage Vmax (56)/(59)/(64) Under voltage Vmin (65)/(66)/(67) REC nominal voltage VN (26) Battery test Vbatt_test (27) Boost charge Vboost (28) LVD/PLD voltage (89)(90) 1,200 x number of cells x volt. per cell Example: Default values for a 48V system 1,200 x 24 c x 2,00 V/c = 57,6V 0,900 x number of cells x volt. per cell 0,900 x 24 c x 2,00 V/c = 43,2V 1,135 x number of cells x volt. per cell 0,886 x number of cells x volt. per cell 1,198 x number of cells x volt. per cell 0,000 x number of cells x volt. per cell 1,135 x 24 c x 2,00 V/c = 54,5V 0,886 x 24 c x 2,00 V/c = 42,5V 1,198 x 24 c x 2,00 V/c = 57,5V 0,0V ©2011. ELTEK DEUTSCHLAND GmbH. Eltek_UM_UPC3_V1.30_&_V1.31_E_R1.1 DC Controller UPC3 V1.30.166 to V1.31.170 User manual Page 31 of 76 3.4.1.2 CAN devices count A multitude of devices can be connected via CAN-Bus to the UPC3. 11 The number (in the pictures designated with “count”) of rectifiers, DC/DC converters and inverters (11)/(12)/(13) can vary for the different power supply systems. Each marked field corresponds to the CAN address of a registered rectifier. Due to the fact that not all of the slots must be equipped, gaps within the sequence can occur. 12 13 14 15 16 17 18 19 26 * 20 21 22 23 24 25 ©2011. ELTEK DEUTSCHLAND GmbH. These parameters should be changed only for PSS, PSC and UNV modules because they do not have an automatic addressing. For all other modules (rectifiers, DC/DC converters and inverters) results the assignment and the number of the assigned modules from their automatic registration. For example eight further digital inputs (DIG8) (20) or six relay outputs (RB6) (21) In systems with redundant rectifiers, DC/DC converters or inverters additional alarms can be generated due to the designation of the parameters (14), (15), (16). Eltek_UM_UPC3_V1.30_&_V1.31_E_R1.1 DC Controller UPC3 V1.30.166 to V1.31.170 User manual Page 32 of 76 The following example relates to rectifier modules but applies for DC/DC converter and inverters accordingly. Example: System with seven registered rectifiers (11), parameter “Redundant REC” (14) is set to 2. If REC1 fails: The signal bit “REC no CAN” is active. No redundancy failure yet. If REC2 fails too: The signal bit “REC redundant” is active. No redundancy anymore. BMB Board type (26*): This function is not available at version V1.30. At UPC3 V1.30 used Battery Monitoring Boards (DCC-BMB) have to operate at compatibility mode. For details see “Brief description” of the DCC-BMB please. At firmware version V1.31 the BM type can be adjusted if DCC-BMB is used: • DCC-BMB adjusted to “compatibility mode” >>then you have to set “MU2000-BM” • DCC-BMB adjusted to normal mode >> then you have to set “DCC-BMB” according to item (26*) as shown in the picture above. For details regarding compatibility mode see “Brief description” of the DCC-BMB please. Further optional CAN modules: CAN modules Bypass STS Mains Monitor MM Analog Inputs BM Digital Inp. DE Digital Outp. RB Fuse Board FM Fan tray UMD2 count UMD1 count No (17) (18) (19) (20) (21) (22) (23) (24) (25) Explanation Active static bypass switch mains/inverters Monitors mains input Extension of the measurement inputs for battery monitoring Extension of the digital inputs Extension of the relay outputs Extension fuse monitoring Active fan rack Extension measuring control (only used for CONB03) Extension measuring control (only used for CONB03) 3.4.1.3 System parameters 26 27 28 29 30 31 32 33 34 35 ©2011. ELTEK DEUTSCHLAND GmbH. The nominal rectifier voltage „RECNom voltage” (26) is equivalent to the normal (trickle) charge voltage (26) and to the boost charge voltage “REC Boost chge V” (28) without temperature compensation. These values indicate how the maximum default voltage value should be set by the regulator in case of trickle/boost charge. Parameter (27) “REC Batt test V” indicates how the default voltage value should be set for the rectifiers in case of battery test. This value must be below the nominal voltage of the battery in order that the battery is discharged. Eltek_UM_UPC3_V1.30_&_V1.31_E_R1.1 DC Controller UPC3 V1.30.166 to V1.31.170 User manual Page 33 of 76 The parameter nominal rectifier current „REC Nom. current“ (29) is sent via CAN-Bus to the rectifiers. Usually the value indicated on the type plate of the rectifier module is to be set. The “REC Load limit” (30) applies in connection to the set “REC Nom. current”. The UPC compare the sum of all REC currents with the maximum possible current (RecCount* NomCurrent (29)). The parameters (32) and (33) make the monitoring of the load distribution of the rectifiers possible. This is only applicable in systems with more than one rectifier. If the percentage between minimum and maximum rectifier current to maximum rectifier is more than (33) over (34) sec. a failure bit is set. (Re c Im ax − Re c Im in) * 100% = LoadDis. Re c Im ax The load distribution usually is worse at low system load. So the load distribution is only active, if current from one or more rectifier exceeds this (32) threshold over more than (34) seconds. This relates to the nominal current (35). In systems with inverters but without static bypass switch (STS/UNB) the nominal voltage of the inverter (35) is sent via CAN-Bus to the inverters. In the section „Main set“ the control process for battery charging is described. ©2011. ELTEK DEUTSCHLAND GmbH. Eltek_UM_UPC3_V1.30_&_V1.31_E_R1.1 DC Controller UPC3 V1.30.166 to V1.31.170 User manual Page 34 of 76 3.4.1.4 Battery For the analysis of the battery asymmetry the battery tapping point is sent via parameter (40). The number of the cells up to the tapped point is counted from the minus pole (-) of the battery. If the difference of the measured and calculated asymmetry voltage value exceeds the value of the set „Battery unsymm.” (41), a failure bit is activated. 40 If the tapping point is equal to the half of the number of cells of the battery (see section “Main set”), the calculation according to item a) is done. Otherwise the calculation according to item b) is done considering a correction factor. 44 41 42 43 45 46 ©2011. ELTEK DEUTSCHLAND GmbH. Eltek_UM_UPC3_V1.30_&_V1.31_E_R1.1 DC Controller UPC3 V1.30.166 to V1.31.170 User manual Page 35 of 76 Legend Vtapp = Measured tapped voltage value against (–) Vbatt = Measured battery voltage Batc = Number of batteries (value to be configured) Ctapp = Tapping point counted from (-), Value to be configured Vplus = Calculated tapped voltage value against (+) (a) Asymmetry calculation with tapping point at the center of the battery: Diff = Vbatt − 2 xVtapp If the difference (without consideration of sign) is greater than (41), asymmetry is indicated. (b) Asymmetry calculation with tapping point not at the center of the battery: Vtapp 2 = (Vbatt − Vtapp) + Vbatt * (Ctapp − ( Batc − Ctapp )) Batc Uabg2 is the battery tapping voltage against (+), calculated with consideration of a correction factor. Diff = Vtapp − Vtapp 2 If the difference (without consideration of sign) is greater than (41), asymmetry is indicated. The detection of an open battery fuse only is possible if the battery tap is located behind the battery fuse. If the difference between system- and battery voltage is greater than parameter “Vdiff Fuse case” (42) and the battery current less than parameter “Itrigg fuse case” (43), the flag „Fuse open“ is activated in the signal matrix. For the temperature compensation of the charge voltage the temperature sensor (44) of a battery has to be activated, e.g. Batt1. The temperature coefficient (45) and the basis temperature (46) depend on the battery type and have to be requested at the manufacturer. Example: Vload = Vnom + Tk * N cell * ∆t with Tk = -4mV/cK; Ncell=24; ∆t=+5°K Vload = 54,3V + (−0,004) * 24 * 5 Vload = 53,8V at 30°C ATTENTION! Battery asymm. (41): If a value of e. g. 2V is set, the measured value may differ at +/- 1V of the calculated asymmetry voltage value. ©2011. ELTEK DEUTSCHLAND GmbH. Eltek_UM_UPC3_V1.30_&_V1.31_E_R1.1 DC Controller UPC3 V1.30.166 to V1.31.170 User manual Page 36 of 76 3.4.2 Location specific parameters 3.4.2.1 Installation The parameters to be entered at „Installation“ have no effect on the system function! 3.4.2.2 Ethernet module The optional available SNMP agent (internal communication plug-in board) for the UPC3 takes over the set ethernet addresses after each change of the configuration. IP, Gateway und Netmask have to be assigned via the network administrator. Alarm messages via SNMP (Traps) can be sent to 5 different receivers. The entry „SNMP-Manager“ currently is not analyzed. ©2011. ELTEK DEUTSCHLAND GmbH. Eltek_UM_UPC3_V1.30_&_V1.31_E_R1.1 DC Controller UPC3 V1.30.166 to V1.31.170 User manual Page 37 of 76 3.4.2.3 UPC3 The text, entered in Logo line 1 (47) and Logo line 2 (48) appears as info at the display of the unit. 47 48 49 50 The firmware version is indicated with the fields (49), (50), (51). In the inscription fields „Config. Date“(52) and „Config. Person“(53) automatically the date and person of the last change of the configuration are entered 51 With parameter (54) the language to be used in the UPC3 is selectable. Via the USB interface an RS 232 interface is modulated. There, the baud rate can be set (55). It is recommended to use the default baud rate 57600. 52 53 54 55 3.4.3 Measuring system 3.4.3.1 Assignment measured values In this menu it is possible to allocate to each individual measurement value of the UPC3 an user-defined input parameter. For example: Battery current = I1. In the following several examples: 1. example: Three batteries, but only one measuring line to battery1 for voltage monitoring. In this case you can allocate at “Voltage Vbatt”, Battery1 and Battery2 the same measurement source as for Battery1. Voltage Battery1= UPC3_U1 Voltage Battery2= UPC3_U1 Voltage Battery3= UPC3_U1 2. example: Two batteries but only one battery shunt. ©2011. ELTEK DEUTSCHLAND GmbH. Eltek_UM_UPC3_V1.30_&_V1.31_E_R1.1 DC Controller UPC3 V1.30.166 to V1.31.170 User manual Page 38 of 76 2a) The battery shunt is series connected to both batteries. In this case the measured current is the total battery current. Current Battery1 = UPC3_I1 Current Battery2= undefined 2b) The battery shunt is connected within one battery string. In this case the measured current is the current only of Battery1. For Battery2 the same input is to be allocated. Current Battery1 = UPC3_I1 Current Battery2= undefined Fundamental default allocations: UPC3_V1 = Battery voltage UPC3_V2 = System voltage UPC3_V3 = Asymmetry voltage UPC3_I1 = Battery current UPC3_I2 = Load current UPC3_I3 = General measurement value UPC3_T1 = Temperature sensor T1 battery compensation UPC3_T2 = General measurement value In the following tables all possible measurement sources are defined. Because UPC3 V1.30 and V1.31 are different there are two tables available. UPC3 V1.30: Index Name Default Parameter Location 0 UNDEFINED 1 STANDARD inexistant 2 UPC3_V1 3 UPC3_V2 Voltage Vbatt Voltage Vload Battery 1 UPC3 UPC3 4 UPC3_V3 Tapp volt. Vtapp Battery 1 UPC3 5 UPC3_Vi Insulat voltage 6 UPC3_I1 Current Ibatt 7 UPC3_I2 Current Iload 8 UPC3_I3 General currents Batterytemperat 9 UPC3_T1 ©2011. ELTEK DEUTSCHLAND GmbH. Description Element UPC3 Battery 1 UPC3 UPC3 Element 1 UPC3 Battery 1 UPC3 deactivated If „Standard“ manually is allocated, the individual default value (see table column on the left) namely is used internally by the UPC3 but “Standard” is shown instead of an explicit allocation. Therefore it is recommended not to use the value “Standard” but to use an explicit allocation. Battery voltage, terminal V1 System voltage, terminal V2 Battery tapping voltage, terminal V3 Insulation voltage, directly connected to the unit Battery current, terminal I1. Bidirectional measuring possible Load current, terminal I2. Only directional General current I3. Only directional Battery temperature sensor, terminal T1 Eltek_UM_UPC3_V1.30_&_V1.31_E_R1.1 DC Controller UPC3 V1.30.166 to V1.31.170 User manual Page 39 of 76 10 11 12 13 14 15 16 17 UPC3_T2 _not_usable _not_usable _not_usable _not_usable _not_usable _not_usable _not_usable 18 19 20 21 22 23 24 25 26 27 28 29 30 31 32 33 34 35 36 37 38 39 40 41 42 43 44 45 UPC3_DIG1-8 _not_usable _not_usable _not_usable STS_1.1 (St STS_2.1 (Vm STS_3.1 (Va STS_4.1 (Io STS_5.1 (Vb STS_6.1 (fm STS_7.1 (fa STS_8.1 (Th MMB_VL1.1 MMB_VL2.1 MMB_VL3.1 MMB_FLx.1 MMB_IL1.1 MMB_IL2.1 MMB_IL3.1 _not_defin.. MMB_VL1.2 MMB_VL2.2 MMB_VL3.2 MMB_FLx.2 MMB_IL1.2 MMB_IL2.2 MMB_IL3.2 _not_defin. General Temperat Element 1 UPC3 General temperature, terminal T2 Digital Inputs Digital Input 1 UPC3 Digital inputs, from UPC3 to terminal block inexistant inexistant inexistant inexistant inexistant inexistant inexistant inexistant Mains voltages Mains voltages Mains voltages Mains frequence Mains currents Mains currents Mains currents Element 1 Element 2 Element 3 Element 1,2,3 Element 1 Element 2 Element 3 STS STS STS STS STS STS STS STS MMB 1 MMB 1 MMB 1 MMB 1 MMB 1 MMB 1 MMB 1 Mains voltage L1 Mains voltage L2 Mains voltage L3 Mains frequency Mains current L1 Mains current L2 Mains current L3 Mains voltages Mains voltages Mains voltages Mains frequence Mains currents Mains currents Mains currents Element 4 Element 5 Element 6 Element 4,5,6 Element 1 Element 2 Element 3 MMB 2 MMB 2 MMB 2 MMB 2 MMB 2 MMB 2 MMB 2 Mains voltage L1 Mains voltage L2 Mains voltage L3 Mains frequency Mains current L1 Mains current L2 Mains current L3 46 DEB_stat.1 inexistant 47 DEB_2.1 48 DEB_3.1 49 DEB_4.1 Digital Inputs inexistant inexistant 50 51 52 53 inexistant s. Beschreibung inexistant inexistant DEB_stat.2 DEB_2.2 DEB_3.2 DEB_4.2 ©2011. ELTEK DEUTSCHLAND GmbH. DEB 1 Digital Inputs 2 DEB 1 DEB 1 DEB 1 DEB 2 DEB 2 DEB 2 DEB 2 Failure status board. Only internally used Digital inputs of the digital input board 1 Reserves. No function Reserves. No function Failure status board. Only internally used The UPC3 is able to manage a maximum of 16 digital inputs. With the use of two digital input boards one of them replaces the digital inputs of the UPC3. For this Eltek_UM_UPC3_V1.30_&_V1.31_E_R1.1 DC Controller UPC3 V1.30.166 to V1.31.170 User manual Page 40 of 76 application “Digital Input 1 DEB_2.2” must be used for the measuring value allocation instead of “UPC3_DIG1-8”. 54 55 56 57 58 59 60 61 62 63 64 RYB_stat.1 RYB_2.1 RYB_3.1 RYB_4.1 RYB_stat.2 RYB_2.2 RYB_3.2 RYB_4.2 BMB_V1.1 BMB_V4.1 BMB_I1.1 65 66 67 68 69 70 71 BMB_T1.1 BMB_V2.1 BMB_V5.1 BMB_I2.1 BMB_T2.1 BMB_V3.1 BMB_V6.1 72 73 74 75 76 77 78 79 80 BMB_I3.1 BMB_T3.1 _not_usable _not_usable _not_usable _not_usable BMB_V1.2 BMB_V4.2 BMB_I1.2 81 82 83 84 BMB_T1.2 BMB_V2.2 BMB_V5.2 BMB_I2.2 85 86 87 88 BMB_T2.2 BMB_V3.2 BMB_V6.2 BMB_I3.2 89 90 91 92 93 BMB_T3.2 _not_usable _not_usable _not_usable _not_usable inexistant inexistant inexistant inexistant inexistant inexistant inexistant inexistant Voltage Vbatt Tapp volt. Vtapp Current Ibatt Battery temperat Voltage Vbatt Tapp volt. Vtapp Current Ibatt Voltage Vbatt Tapp volt. Vtapp Current Ibatt Battery temperat Voltage Vbatt Voltage Vbatt Tapp volt. Vtapp Current Ibatt Battery temperat Voltage Vbatt Tapp volt. Vtapp Current Ibatt Battery temperat Voltage Vbatt Tapp volt. Vtapp Current Ibatt Battery temperat ©2011. ELTEK DEUTSCHLAND GmbH. Battery 2 Battery 2 Battery 2 RB 1 RB 1 RB 1 RB 1 RB 2 RB 2 RB 2 RB 2 BMB 1 BMB 1 BMB 1 Battery 2 Battery 3 Battery 3 Battery 3 Battery 3 Battery 4 Battery 4 BMB 1 BMB 1 BMB 1 BMB 1 BMB 1 BMB 1 BMB 1 Battery 4 Battery 4 BMB 1 BMB 1 Batterie 5 Batterie 5 Batterie 5 BMB 2 BMB 2 BMB 2 Batterie 5 Batterie 6 Batterie 6 Batterie 6 BMB 2 BMB 2 BMB 2 BMB 2 Batterie 6 Batterie 7 Batterie 7 Batterie 7 BMB 2 BMB 2 BMB 2 BMB 2 Batterie 7 BMB 2 Failure status relay board1. Only internally used Only internally used Only internally used Only internally used Only internally used Only internally used Only internally used Only internally used Eltek_UM_UPC3_V1.30_&_V1.31_E_R1.1 DC Controller UPC3 V1.30.166 to V1.31.170 User manual Page 41 of 76 See description (exclusively for CONB03, status signal not available) See description (exclusively for CONB03 Voltage Vbatt Battery2) See description (exclusively for CONB03 Voltage Vtapp Battery2) See description (exclusively for CONB03 Temperature Battery2) See description (exclusively for CONB03, status signal not available) See description (exclusively for CONB03 Voltage Vbatt Battery3) See description (exclusively for CONB03 Voltage Vtapp Battery3) See description (exclusively for CONB03 Temperature Battery3) see description see description see description see description see description see description see description see description Universal measurement controller, device 1. This is actually used with the board CONB03. This board has additional voltage and temperature inputs. Apart from that, these inputs are designed for universal usage. 110 UMD1_1.1 see description 111 UMD1_2.1 see description 112 UMD1_3.1 see description Universal measurement controller, device 2. These inputs are designed for universal usage. Currently not used. 94 UMD2_1.1 95 UMD2_2.1 96 UMD2_3.1 97 UMD2_4.1 98 UMD2_1.2 99 UMD2_2.2 100 UMD2_3.2 101 102 103 104 105 106 107 108 109 UMD2_4.2 UMD2_1.3 UMD2_2.3 UMD2_3.3 UMD2_4.3 UMD2_1.4 UMD2_2.4 UMD2_3.4 UMD2_4.4 113 UMD1_4.1 see description 114 UMD1_1.2 see description 115 UMD1_2.2 see description 116 UMD1_3.2 see description 117 118 119 120 121 122 123 124 125 126 127 128 129 130 131 132 133 134 135 136 see description see description see description see description see description see description see description see description see description see description see description see description see description see description see description see description see description see description see description see description UMD1_4.2 UMD1_1.3 UMD1_2.3 UMD1_3.3 UMD1_4.3 UMD1_1.4 UMD1_2.4 UMD1_3.4 UMD1_4.4 UMD1_1.5 UMD1_2.5 UMD1_3.5 UMD1_4.5 UMD1_1.6 UMD1_2.6 UMD1_3.6 UMD1_4.6 UMD1_1.7 UMD1_2.7 UMD1_3.7 ©2011. ELTEK DEUTSCHLAND GmbH. Eltek_UM_UPC3_V1.30_&_V1.31_E_R1.1 DC Controller UPC3 V1.30.166 to V1.31.170 User manual Page 42 of 76 137 138 139 140 141 142 143 144 145 146 147 148 149 150 151 152 153 154 155 156 157 158 159 160 161 162 163 164 165 166 167 168 169 170 171 172 173 UMD1_4.7 UMD1_1.8 UMD1_2.8 UMD1_3.8 UMD1_4.8 UMD1_1.9 UMD1_2.9 UMD1_3.9 UMD1_4.9 UMD1_1.10 UMD1_2.10 UMD1_3.10 UMD1_4.10 UMD1_1.11 UMD1_2.11 UMD1_3.11 UMD1_4.11 UMD1_1.12 UMD1_2.12 UMD1_3.12 UMD1_4.12 UMD1_1.13 UMD1_2.13 UMD1_3.13 UMD1_4.13 UMD1_1.14 UMD1_2.14 UMD1_3.14 UMD1_4.14 UMD1_1.15 UMD1_2.15 UMD1_3.15 UMD1_4.15 UMD1_1.16 UMD1_2.16 UMD1_3.16 UMD1_4.16 see description see description see description see description see description see description see description see description see description see description see description see description see description see description see description see description see description see description see description see description see description see description see description see description see description see description see description see description see description see description see description see description see description see description see description see description see description 174 SystIbatt.1 175 SystIrect.1 inexistant inexistant 176 177 . . . 255 inexistant SystIload 1 _not_usable _not_usable _not_usable _not_usable _not_usable ©2011. ELTEK DEUTSCHLAND GmbH. Calculated battery current. Result= Systlrect.- load current Total current of all rectifiers Calculated load current. Result= Systlrect. - battery current Eltek_UM_UPC3_V1.30_&_V1.31_E_R1.1 DC Controller UPC3 V1.30.166 to V1.31.170 User manual Page 43 of 76 UPC3 V1.31 Index Name Default Parameter Location Description Element 0 UNDEFINED 1 STANDARD inexistant 10 11 12 13 14 15 16 17 UPC3_T2 _not_usable _not_usable _not_usable _not_usable _not_usable _not_usable _not_usable General Temperat Element 1 UPC3 deactivated If „Standard“ manually is allocated, the individual default value (see table column on the left) namely is used internally by the UPC3 but “Standard” is shown instead of an explicit allocation. Therefore it is recommended not to use the value “Standard” but to use an explicit allocation. Battery voltage, terminal V1 System voltage, terminal V2 Battery tapping voltage, terminal V3 Insulation voltage, directly connected to the unit Battery current, terminal I1. Bidirectional measuring possible Load current, terminal I2. Only directional General current I3. Only directional Battery temperature sensor, terminal T1 General temperature, terminal T2 2 UPC3_V1 3 UPC3_V2 Voltage Vbatt Voltage Vload Battery 1 UPC3 UPC3 4 UPC3_V3 Tapp volt. Vtapp Battery 1 UPC3 5 UPC3_Vi Insulat voltage 6 UPC3_I1 Current Ibatt 7 UPC3_I2 Current Iload 8 UPC3_I3 General currents Element 1 UPC3 9 UPC3_T1 Battery-temperat Battery 1 UPC3 18 19 20 21 22 23 24 25 26 27 28 29 30 UPC3_DIG1-8 _not_usable _not_usable _not_usable STS_1.1 (St STS_2.1 (Vm STS_3.1 (Va STS_4.1 (Io STS_5.1 (Vb STS_6.1 (fm STS_7.1 (fa STS_8.1 (Th MMB_VL1.1 Digital Inputs Digital Input 1 UPC3 Digital inputs, from UPC3 to terminal block Element 1 STS STS STS STS STS STS STS STS MMB 1 inexistant inexistant inexistant inexistant inexistant inexistant inexistant inexistant Mains voltages ©2011. ELTEK DEUTSCHLAND GmbH. UPC3 Battery 1 UPC3 UPC3 Mains voltage L1 Eltek_UM_UPC3_V1.30_&_V1.31_E_R1.1 DC Controller UPC3 V1.30.166 to V1.31.170 User manual Page 44 of 76 31 32 33 34 35 36 37 38 39 40 41 42 43 44 45 MMB_VL2.1 MMB_VL3.1 MMB_FLx.1 MMB_IL1.1 MMB_IL2.1 MMB_IL3.1 _not_defin.. MMB_VL1.2 MMB_VL2.2 MMB_VL3.2 MMB_FLx.2 MMB_IL1.2 MMB_IL2.2 MMB_IL3.2 _not_defin. Mains voltages Mains voltages Mains frequence Mains currents Mains currents Mains currents Element 2 Element 3 Element 1,2,3 Element 1 Element 2 Element 3 MMB 1 MMB 1 MMB 1 MMB 1 MMB 1 MMB 1 Mains voltage L2 Mains voltage L3 Mains frequency Mains current L1 Mains current L2 Mains current L3 Mains voltages Mains voltages Mains voltages Mains frequence Mains currents Mains currents Mains currents Element 4 Element 5 Element 6 Element 4,5,6 Element 1 Element 2 Element 3 MMB 2 MMB 2 MMB 2 MMB 2 MMB 2 MMB 2 MMB 2 Mains voltage L1 Mains voltage L2 Mains voltage L3 Mains frequency Mains current L1 Mains current L2 Mains current L3 46 DEB_stat.1 inexistant 47 DEB_2.1 48 DEB_3.1 49 DEB_4.1 Digital Inputs inexistant inexistant 50 51 52 53 DEB_stat.2 DEB_2.2 DEB_3.2 DEB_4.2 inexistant s. Beschreibung inexistant inexistant DEB 2 DEB 2 DEB 2 DEB 2 54 55 56 57 58 59 60 61 62 63 64 RYB_stat.1 RYB_2.1 RYB_3.1 RYB_4.1 RYB_stat.2 RYB_2.2 RYB_3.2 RYB_4.2 BMB_Vbatt.1 BMB_Vtapp.1 BMB_I.1 inexistant inexistant inexistant inexistant inexistant inexistant inexistant inexistant Voltage Vbatt Tapp volt. Vtapp Current Ibatt Battery 2 Battery 2 Battery 2 RB 1 RB 1 RB 1 RB 1 RB 2 RB 2 RB 2 RB 2 DCC-BMB 1 DCC-BMB 1 DCC-BMB 1 65 BMB_T.1 Battery temperat Battery 2 DCC-BMB 1 66 BMB_Vbatt.2 67 BMB_Vtapp.2 68 BMB_I.2 Voltage Vbatt Tapp volt. Vtapp Current Ibatt Battery 3 Battery 3 Battery 3 DCC-BMB 2 DCC-BMB 2 DCC-BMB 2 69 BMB_T.2 Battery temperat Battery 3 DCC-BMB 2 ©2011. ELTEK DEUTSCHLAND GmbH. DEB 1 Digital Inputs 2 DEB 1 DEB 1 DEB 1 Failure status board. Only internally used Digital inputs of the digital input board 1 Reserves. No function Reserves. No function Failure status board. Only internally used The UPC3 is able to manage a maximum of 16 digital inputs. With the use of two digital input boards one of them replaces the digital inputs of the UPC3. For this application “Digital Input 1 DEB_2.2” must be used for the measuring value allocation instead of “UPC3_DIG1-8”. Failure status relay board1. Only internally used Only internally used Only internally used Only internally used Only internally used Only internally used Only internally used Only internally used Alternatively MU1000C BM1, MU2000 BM1, see 3.4.1.2 CAN devices count Alternatively MU1000C BM1, MU2000 BM1, see 3.4.1.2 CAN devices count Eltek_UM_UPC3_V1.30_&_V1.31_E_R1.1 DC Controller UPC3 V1.30.166 to V1.31.170 User manual Page 45 of 76 70 71 72 73 74 75 76 77 78 79 80 81 82 83 84 85 86 87 88 89 90 91 92 93 BMB_Vbatt.3 BMB_Vtapp.3 BMB_I.3 BMB_T.3 BMB_Vbatt.4 BMB_Vtapp.4 BMB_I.4 BMB_T.4 BMB_Vbatt.5 BMB_Vtapp.5 BMB_I.5 BMB_T.5 BMB_Vbatt.6 BMB_Vtapp.6 BMB_I.6 BMB_T.6 BMB_Vbatt.7 BMB_Vtapp.7 BMB_I.7 BMB_T.7 BMB_Vbatt.8 BMB_Vtapp.8 BMB_I.8 BMB_T.8 94 UMD2_1.1 95 UMD2_2.1 96 UMD2_3.1 97 UMD2_4.1 98 UMD2_1.2 99 UMD2_2.2 100 UMD2_3.2 101 102 103 104 105 106 107 108 109 UMD2_4.2 UMD2_1.3 UMD2_2.3 UMD2_3.3 UMD2_4.3 UMD2_1.4 UMD2_2.4 UMD2_3.4 UMD2_4.4 110 UMD1_1.1 Voltage Vbatt Tapp volt. Vtapp Current Ibatt Battery temperat Voltage Vbatt Tapp volt. Vtapp Current Ibatt Battery temperat Voltage Vbatt Tapp volt. Vtapp Current Ibatt Battery temperat Voltage Vbatt Tapp volt. Vtapp Current Ibatt Battery temperat DCC-BMB 3 DCC-BMB 3 DCC-BMB 3 DCC-BMB 3 DCC-BMB 4 DCC-BMB 4 DCC-BMB 4 DCC-BMB 4 DCC-BMB 5 DCC-BMB 5 DCC-BMB 5 DCC-BMB 5 DCC-BMB 6 DCC-BMB 6 DCC-BMB 6 DCC-BMB 6 DCC-BMB 7 DCC-BMB 7 DCC-BMB 7 DCC-BMB 7 DCC-BMB 8 DCC-BMB 8 DCC-BMB 8 DCC-BMB 8 See description (exclusively for CONB03, status signal not available) See description (exclusively for CONB03 Voltage Vbatt Battery2) See description (exclusively for CONB03 Voltage Vtapp Battery2) See description (exclusively for CONB03 Temperature Battery2) See description (exclusively for CONB03, status signal not available) See description (exclusively for CONB03 Voltage Vbatt Battery3) See description (exclusively for CONB03 Voltage Vtapp Battery3) See description (exclusively for CONB03 Temperature Battery3) see description see description see description see description see description see description see description see description see description 111 UMD1_2.1 see description 112 UMD1_3.1 see description ©2011. ELTEK DEUTSCHLAND GmbH. Battery 4 Battery 4 Battery 4 Battery 4 Battery 5 Battery 5 Battery 5 Battery 5 Battery 6 Battery 6 Battery 6 Battery 6 Battery 7 Battery 7 Battery 7 Battery 7 Alternatively MU2000 BM1, see 3.4.1.2 CAN devices count Alternatively MU1000C BM2, MU2000 BM2, see 3.4.1.2 CAN devices count Alternatively MU1000C BM2, MU2000 BM2, see 3.4.1.2 CAN devices count Alternatively MU2000 BM2, see 3.4.1.2 CAN devices count Universal measurement controller, device 1. This is actually used with the board CONB03. This board has additional voltage and temperature inputs. Apart from that, these inputs are designed for universal usage. Universal measurement controller, device 2. These inputs are designed for Eltek_UM_UPC3_V1.30_&_V1.31_E_R1.1 DC Controller UPC3 V1.30.166 to V1.31.170 User manual Page 46 of 76 113 UMD1_4.1 see description 114 UMD1_1.2 see description 115 UMD1_2.2 see description 116 UMD1_3.2 see description 117 118 119 120 121 122 123 124 125 126 127 128 129 130 131 132 133 134 135 136 137 138 139 140 141 142 143 144 145 146 147 148 149 150 151 152 153 154 155 156 157 158 159 160 161 see description see description see description see description see description see description see description see description see description see description see description see description see description see description see description see description see description see description see description see description see description see description see description see description see description see description see description see description see description see description see description see description see description see description see description see description see description see description see description see description see description see description see description see description see description UMD1_4.2 UMD1_1.3 UMD1_2.3 UMD1_3.3 UMD1_4.3 UMD1_1.4 UMD1_2.4 UMD1_3.4 UMD1_4.4 UMD1_1.5 UMD1_2.5 UMD1_3.5 UMD1_4.5 UMD1_1.6 UMD1_2.6 UMD1_3.6 UMD1_4.6 UMD1_1.7 UMD1_2.7 UMD1_3.7 UMD1_4.7 UMD1_1.8 UMD1_2.8 UMD1_3.8 UMD1_4.8 UMD1_1.9 UMD1_2.9 UMD1_3.9 UMD1_4.9 UMD1_1.10 UMD1_2.10 UMD1_3.10 UMD1_4.10 UMD1_1.11 UMD1_2.11 UMD1_3.11 UMD1_4.11 UMD1_1.12 UMD1_2.12 UMD1_3.12 UMD1_4.12 UMD1_1.13 UMD1_2.13 UMD1_3.13 UMD1_4.13 ©2011. ELTEK DEUTSCHLAND GmbH. universal usage. Currently not used. Eltek_UM_UPC3_V1.30_&_V1.31_E_R1.1 DC Controller UPC3 V1.30.166 to V1.31.170 User manual Page 47 of 76 162 163 164 165 166 167 168 169 170 171 172 173 UMD1_1.14 UMD1_2.14 UMD1_3.14 UMD1_4.14 UMD1_1.15 UMD1_2.15 UMD1_3.15 UMD1_4.15 UMD1_1.16 UMD1_2.16 UMD1_3.16 UMD1_4.16 see description see description see description see description see description see description see description see description see description see description see description see description 174 SystIbatt.1 175 SystIrect.1 inexistant inexistant 176 177 . . . 255 inexistant SystIload 1 _not_usable _not_usable _not_usable _not_usable _not_usable Calculated battery current. Result= Systlrect.- load current Total current of all rectifiers Calculated load current. Result= Systlrect. - battery current 3.4.3.2 Assignment shunt The entered value proves that e.g. at a current flow of 60A a voltage value of 60mV falls at the shunt. The shunt values of the 3 UPC3 input currents as well as the 6 shunts of the maximum 2 connectable battery monitoring boards (per board 3 channels) can be entered at this area. ©2011. ELTEK DEUTSCHLAND GmbH. Eltek_UM_UPC3_V1.30_&_V1.31_E_R1.1 DC Controller UPC3 V1.30.166 to V1.31.170 User manual Page 48 of 76 3.4.4 Thresholds All adjustments in this group serve as generation of signal bits (with the exception of (59), (66) und (67). 56 57 The exceedance of the limit of the battery overvoltage „Vmax“(56) or the under-run of the limit of the battery undervoltage “Vmin” (58) or battery warning voltage “Vwarn” (57) generate the respective failure bit in the signal matrix. 58 59 60 61 62 63 Parameter (59) defines when rectifiers shall be switched off. the For (56) and (59) hysteresis (62) and delay (60) is to be used. For (58) hysteresis (63) and delay (61) is to be used. For parameter (57) hysteresis is used too but without time delay. 64 65 66 67 68 69 70 71 72 73 For the monitoring of the system voltage, the values for Vmax (64) and Vmin (65) can be defined. The parameters (66) and (67) define the threshold values voltage low for switching- off the inverters respectively the DC/DC converters. The “Limit load current” (70), entered in the area “Main adjustments” generates an alarm bit in the failure matrix when the value is exceeded. „Temperature high“(71) refers to all battery temperature sensors. Activating of each individual sensor takes place in the main menu “Batteries”. „Battery Operation“ (72) is visible via a negative current flow. Due to errors of measurement the threshold should not amount below 5% of the shunt value. The measurement of insulation failures „Rinsul error“(73) is possible only in non-earthed systems. The adjustment should accord with the system voltage, e.g. 48V system 48kOhm Rinsul. ATTENTION! Exceeds the battery voltage the set limit „ Vmax“ (59), all rectifiers get the command „ OFF“ via CAN-Bus. ATTENTION! In systems without STS/UNB (mains bypass) all inverters get the “ switch off” signal if the value is below the limit (66). If an STS/UNB (mains bypass) is used, the static bypass switch takes over the control of the inverters. ATTENTION! If the value is below the limit (67), all DC/DC converters get the „ switch off“ signal via CAN-Bus. ©2011. ELTEK DEUTSCHLAND GmbH. Eltek_UM_UPC3_V1.30_&_V1.31_E_R1.1 DC Controller UPC3 V1.30.166 to V1.31.170 User manual Page 49 of 76 3.4.4.1 Thresholds general parameters 74 The following general measurement channels are available at the UPC3: 6 x Voltage 75 76 4x Current 6x Temperature The measurement sources are allocated via „Assignment measured values“. Each individual general parameter is used by the UPC3 when a text is configured (see: „Text general Parameter“). For each individual parameter a min (75) and max (76) threshold is arranged. When the values are exceeded/underrun a signal bit is set. Hysteresis (74) is used for all general measurement values. 3.4.5 Alarm signalling 3.4.5.1 Digital inputs 77 78 79 In the area „Digital inputs“, the eight internal (77) and eight external (78) digital inputs can be inverted and delay (79), (80) can be set. The eight internal inputs (77) (1.1 bis 8.1) are available on the UPC3-ConnectionBoard. The eight external inputs (78) (1.2 bis 8.2) are available if an external CANBoard (DI8) is used. For Info: 80 ©2011. ELTEK DEUTSCHLAND GmbH. For two external DI8 boards an allocation of the digital inputs 1.1 - 1.6 and 2.1 - 2.6 is possible via „Assignment measured values“. Eltek_UM_UPC3_V1.30_&_V1.31_E_R1.1 DC Controller UPC3 V1.30.166 to V1.31.170 User manual Page 50 of 76 3.4.5.2 Signals enable In the area „Signals enable“, all external and internal failure-/signal bits can be enabled to an output. Thereby e.g. relays or SNMP traps can be activated. 81 For a list of all failure bits, see section “List of failure/signal bits UPC3”. 82 The list “Error state” (82) is of great importance. When a signal of the list get active, the red LED (front side UPC3) starts blinking. Furthermore the list “Error state” acts as mask for the generation of SNMP traps. 83 REMARK: Only signals which have been activated at “Error state” (82) and “Modem/Traps” (84) are active and are reported. 84 85 In the list „Disable Signals“(81), several signals can be disabled for all other lists. All signals which have been activated in the list „Events History“(83) end up on the history memory of the UPC3. The history memory contains of maximum 250 messages and stores appeared as well as disappeared events/failures. The readout and reset takes place directly at the UPC3 unit or via the configuration software. The red LED „Alarm“ on the front side of the UPC3 blinks at active signals in the error list. The green LED”“ can be parameterised via the list „LED Ok“(85). The error list as well as the list „LED OK“ contains the same content in the delivery status, but „LED Ok“ is inverted in the group signals switching mode (“Signals Sw mode”). 86 87 88 Via the signal lists „LED 1 RD“ (86) up to „LED 6 RD“ the functions of the six LEDs of the optional available UPC3 remote display are assigned. The lists “Relay 1.1” (87) up to “Relay6.1” switch the internal relays K1 up to K6 of the UPC3. The contacts are available at the UPC3 connection board. With the list “Relay 1.2” (88) up to “Relay 6.2” the relays of the optional available relays board (CAN-RYB) are activated. For Info: With the use of two RYB boards, the relay contacts 1.1 up to 6.1 conform to the second RYB board instead of the internal relays (see: “Count CAN devices”). ©2011. ELTEK DEUTSCHLAND GmbH. Eltek_UM_UPC3_V1.30_&_V1.31_E_R1.1 DC Controller UPC3 V1.30.166 to V1.31.170 User manual Page 51 of 76 3.4.5.3 Signals switch mode In the area „Signals Sw mode“, the configured lists can be inverted at their output or a time delay can be set. It is common practice to let a relay operate at failure free condition so that a cable break can be recognised as failure. Due to this fact, the relay output is inverted, e.g. „Relay 1.1 = 1“. If the green LED () shall glow if no failure occurs, the LED must be inverted too. ©2011. ELTEK DEUTSCHLAND GmbH. Eltek_UM_UPC3_V1.30_&_V1.31_E_R1.1 DC Controller UPC3 V1.30.166 to V1.31.170 User manual Page 52 of 76 3.4.6 LVD/PLD function LVD = Low Voltage Disconnect. This function mainly is used to protect batteries for total discharge. When the set under voltage limit is reached the battery is disconnected from the system by contactor. PLD = Priority Load Disconnect. With this function it is possible to early disconnect “unimportant” loads at battery operation when the battery voltage under-runs voltage limit values. Consequently the backup time of prioritised loads is increased. Because the three areas for LVD, PLD1 and PLD2 nearly are identical, in the following the areas exemplarily are explained on the basis of the LVD function. The parameter „Source select“ (92) decides on the general LVD/PLD 89 90 functionality. The selection “0” (OFF) 91 deactivates the LVD/PLD function. Selection “1” (V1= battery voltage), “2” 92 (V2= system voltage) or “3” (V3= battery tapping point) refer to “Low limit OFF” (89) and “Low limit ON” (90) to the particular measuring voltage. Selection “4” switches the LVD/PLD function depending on battery operation (see thresholds); the voltage thresholds are 89 90 inoperable. Selection „5“ (Mains error) 91 only makes sense in conjunction with the 93 connection of an external Mains 92 Monitoring Board (MMB), optional. At under-run of Low limit OFF threshold a signal is generated which can be allocated to any output (relay). 89 Example LVD: 90 91 93 92 The selection source V1 (default battery voltage) and the “LVD active” signal is allocated to the LVD relay (e.g. K1). The LVD contactor (energized by relay) switches off, when the battery voltage under-runs the limit „Low limit OFF“ (89) and the Drop delay has been elapsed. The reactivation of the contactors takes place when „Low limit ON“ (90) has been exceeded. For the LVD function this takes place directly, for the PLD function when “Connect delay” (93) has been elapsed. Due to the fact that the power load disconnection directly increases the battery voltage, the hysteresis between the switch-off voltage “Low limit OFF” (89) and the switch-on voltage “Low limit ON” (90) must be great enough to avoid a direct activation of the contactors. The LVD/PLD optocoupler outputs of the UPC3 are activated via “Source select”. The optocouplers switch on when the threshold Low limit OFF is under-run (active load throw-off). If the optocouplers are used please comply with the maximum allowable operating parameters. ©2011. ELTEK DEUTSCHLAND GmbH. Eltek_UM_UPC3_V1.30_&_V1.31_E_R1.1 DC Controller UPC3 V1.30.166 to V1.31.170 User manual Page 53 of 76 3.4.7 Special functions 3.4.7.1 Enable In the area „Enable“, special functions can be enabled at the UPC3. 94 Is a parameter set to „0“, the function is disabled. Is a parameter set to “1” or greater, the function is enabled. A battery test (94) can be started/stopped by different ways at the UPC3. Possibilities: -Start/stop via front buttons/menu of the UPC3 95 - Start via date & time - Start day to day - Start/stop via an external command e.g. SNMP, configuration software - Start/stop via digital input 96 Similar to the battery test the boost charge (96) can be started/stopped by different ways: - Start/stop via front buttons/menu of the UPC3 - Start when battery voltage falls below the set value in menu “boost charge” - Start after battery operation. If the current comes out from the Battery and it is over an adjustable value in the menu “Thresholds” then the UPC detects battery operation - Start after mains error (optional MMB) - Start/stop via an external command e.g. SNMP, configuration software - Start/stop via digital input - Start/stop by battery current - Start after battery test end (BtstE) by declaration of the final criteria 97 100 98 99 101 102 103 104 ©2011. ELTEK DEUTSCHLAND GmbH. 105 For enabling via digital input: At Element1 (95), (97) “[1]Start” is to be set. At Element2 „[2]Stop/Inhibit“ is to be set. The internal digital inputs 1-8 of the UPC3 can be used for this. With enabling the parameter „Hand-op. charge” (98) the manual control of the default voltages of the rectifiers is possible. Enabling „System test“ (100): For the configuration see „Main menu, System test“. Enabling „Energy balance“ (99): The flown current into the battery is accumulated, the value (Ah) is shown on the display. Eltek_UM_UPC3_V1.30_&_V1.31_E_R1.1 DC Controller UPC3 V1.30.166 to V1.31.170 User manual Page 54 of 76 Insulation measurement: If „Rinsul measure“ (101) is enabled, the half of the battery voltage is connected to the casing of the UPC3 via a high-resistance resistive voltage divider. With differential measurement to this voltage it is detected whether an insulation failure is present or not. With parameter „Rinsu by dig inp“ (102) an additional condition for start and stop can be attached. “Start“ has priority. That means, that the insulation measurement is done when both inputs are configured and enabled. Modem: For the automatic initialization of internal/external modem, parameter (103) or (104) is to be set to „1“. The modem settings are to be done in the “Main menu, Modem”. 3.4.7.2 Battery test 106 107 108 An activated battery test either can be stopped manually or automatically with exceeding a break-off criterion. The automatic break-off criteria „Max DischargeCap“(107) (e.g. 80% of the battery capacity discharged) and „Max Test-durat.“ (108) (e.g. 240 min battery operation kept up) stop the battery test without failure, whereas the under-run of the minimum discharge voltage “MinDischarge vt” (106) stops the test with a failure. 106e 107e Reset of the battery failure bit is possible by restart of the unit; deleting is possible with the buttons or by successfully completed battery test. Battery test can be automatically started at a set date/time (106e). (Requires enabling by "Date + Time", see „Enable“). The parameter (107e) defines the repetition interval (days). Example: Start boost charge at 1.1.2009 at 8:05 Repetition every 3 days Consequently boost charge is executed at: 1.1.2009 at 8:05, 4.1.2009 at 8:05, 7.1.2009 at 8:05, a. s. o. (Enabling of “Battery test by Duration (daily)” is additionally required, see „Enable“). 3.4.7.3 System test During a system test the automatic rectifier control is put out of action; the control of the rectifier voltage is surrendered to the user. 106a 107a 108a 109a The voltage default value can be regulated between the thresholds (109a) and (110a). 110a ©2011. ELTEK DEUTSCHLAND GmbH. Eltek_UM_UPC3_V1.30_&_V1.31_E_R1.1 DC Controller UPC3 V1.30.166 to V1.31.170 User manual Page 55 of 76 With the parameter „NomRectCurrent“ (108a) the maximum current default value for the rectifiers can be changed for the test. Parameter (106a) indicates, whether the following signals and alarms respectively should be suppressed during the test: Vbatt < Vmin, Vbatt > Vmax, Vbatt < Vwarn, Vload < Vlmin, Vload > Vlmax, Battery unsymmetry (see „Thresholds“) After finishing the system test, the suppression of the alarms can be extended with parameter (107a). This makes sense e.g. when the system during system test operated off thresholds and after finishing the test still operates off thresholds. Because the automatic control takes place with 0.1V steps second by second, it may be takes some time till the system operates within the set alarm thresholds. 3.4.7.4 Capacity calculator 110c 111c 107c 109c In this area, the configuration of the capacity calculator is done. The capacity calculator works exclusively with lead acid batteries. The capacity calculator calculates the expected available capacity of the batteries (on the basis of a fully charged battery). A fully charged battery is detected by the UPC3 when the battery charge voltage ≥ the charging end voltage for a minimum of 150 seconds. This voltage results from the parameters System parameters (26). At this condition the percentages (109c) is assumed as available capacity. Subsequently the charge current is permanently estimated and resulting from that the still available capacity is calculated. The estimation of the discharge/charge current relates to the current I10. I10 is the 10th part of the current related to the nominal battery capacity. Example: Nominal capacity= 50Ah >> I10= 5A. Underlain is the estimation of the discharge/charge current because it is not linear to the available capacity. The factorization of the discharge/charge current is factory preset to 50%. Calculation: (Default 50 relates to factor=1) see below. P= Factor 50 % Ib= measured battery current I10 (A)= Nominal capacity (Ah)/ 10 h F= ib * (130 − p ) i10 * (30 + p ) At Ib= I10: Parameter Factor 0 5 10 30 50 70 90 95 100 % 4.33 3.57 3.00 1.66 1.00 0.60 0.33 0.28 0.23 1 Estimation of the discharge current Calculation (example): Battery 50 Ah Nominal capacity 95% (109c) Capacity= 47,5 Ah ©2011. ELTEK DEUTSCHLAND GmbH. Eltek_UM_UPC3_V1.30_&_V1.31_E_R1.1 DC Controller UPC3 V1.30.166 to V1.31.170 User manual Page 56 of 76 Example: From the fully charged battery 20A are withdrawn for more than 1 minute. 20 A * (130 − 50%) 5 A * (30 + 50%) F =4 F= Iest = Ib * F Iest = 20 * 4 Iest = 80 47,5 Ah * 3600 - 60 * 80/3600 = 46,166 Ah Estimation of the charge current At charging the estimation is the other way round. P= 50% ib * (130 − p ) i10 * (30 + p ) 9−F Fl = 8 Iest = Ib * Fl * (Ch arg eEfficiency / 100) F= Additional, parameter (107c) (ChargeEfficiency) is introduced, because more energy is necessary to charge a battery. When the parameters (110c), (111c) are under-run, in each case a signal is generated. 3.4.7.5 Boost charge 106b 107b 108b 109b 110b 111b 112b 113b 114b 115b 116b ©2011. ELTEK DEUTSCHLAND GmbH. In general the enabling of the boost charge function is described in the section „Enable“. In this area the threshold values for the start of an automatic boost charge is to be set. If the battery voltage falls below the value (106b) boost charge will be active after a delay of (108b) seconds. (Requires enabling „Boost charge by Start voltage“, see „Enable“). If the battery charge current exceeds the value "Threshold ON" (107b) boost charge will be active after a delay of (108b) seconds. (Requires enabling „Boost charge by battery current“, see „Enable“). If battery operation is detected for more than (112b) minutes, boost charge will be active. (Requires enabling „Boost charge by battery operation “ s. „Enable“) Eltek_UM_UPC3_V1.30_&_V1.31_E_R1.1 DC Controller UPC3 V1.30.166 to V1.31.170 User manual Page 57 of 76 Boost charge can also start automatically at a setting (115b) date and time. (Require enable Boost charge over Date + Time“ s. „Enable“) The parameter (116b) defines the repeat interval in days. e. g. start boost charge at 1.1.2009 um 8:05 Repeat 3 days The boost charge execute at: 1.1.2009 at 8:05, 4.1.2009 at 8:08, 7.1.2009 at 8:05 a. s. o. (Additional require the enable „Boost charge over Duration (daily) „Enable“) If only the enable “Boost charge over Date + Time” and not the enable „Boost charge over Duration (daily)” is configured than the UPC ignore the date and the boost charge start at setting time. Boost charge finish: When the battery voltage exceeds the parameter (109b) over (110b) second during a boost charge, the set additional charge time (111b) starts. After the expiration of this time the boost charge is finished A maximum boost charge time can (114b) set additional. If an optional fan tableau is available than the fans can run over an (113b) additional time after boost charge finish. 3.4.7.6 Counter cells 106d 108d 107d Counter cells in USV systems shall protect the consumer load against overvoltage, e.g. during a boost charge. First of all the voltage reference (106d) (1=Vbatt; 2=Vtapp; 3=Vload) and following the ON and OFF threshold is set. When the assigned voltage exceeds the ON threshold (108d), a signal bit „counter cell 1“ is activated and at following under-run of the OFF threshold (107d) deactivated. 3.4.7.7 MODBUS module For the internal communication interface an optional MODBUS module is available. After each change of the configuration the MODBUS module automatically collects the parameters „Slave address“, „Baud rate“, „Parity“ and „Mode“ from the UPC3 controller. ©2011. ELTEK DEUTSCHLAND GmbH. Eltek_UM_UPC3_V1.30_&_V1.31_E_R1.1 DC Controller UPC3 V1.30.166 to V1.31.170 User manual Page 58 of 76 3.4.7.8 Mains monitoring 109 In conjunction with an optional available external mains monitoring board (CAN MMB) or an external voltage alarm, the UPC3 is able to detect a mains failure or phase break down. The mains failure is available as signal and can be also used as source for „PLD/LVD“ function. 110 111 With the use of a MMB the voltages of each phase are measured. 112 114 115 113 The threshold values V< (109) and V> (110) are related to the nominal voltage of the inverters, set in the area „comb parameters“. When these values are exceeded/underrun, with inclusion of the parameters (112), (113) und (114) mains failure is detected. The monitoring of single phases can be enabled/disabled with parameter (111). Phases 1.1 to 3.1 belong to the MM board 1, the phases 1.2 to 3.2 belong to the MM board 2. If an external voltage alarm is used: With parameter (115) the digital input connected to the voltage alarm can be defined. 3.4.7.9 Modem 118 For remote control, the UPC3 can be extended with an optional internal or external modem. An external modem can be used exclusively with an UPC3 with serial interface (USB not possible). The activating of the modem operation takes place in the parameter group „Enable“. For the standard modem operation (communication with configurator software), the „extern_dial-in“ must be activated (bit=1). All the rest of the bits are set to „0“ (default). ©2011. ELTEK DEUTSCHLAND GmbH. Eltek_UM_UPC3_V1.30_&_V1.31_E_R1.1 DC Controller UPC3 V1.30.166 to V1.31.170 User manual Page 59 of 76 Explanation of modem control bits (“Modem ctrl bits”(118)) Daily report The modem automatically dials the entered telephone number (125) according to the configured values „weekday“ and time (119). After a connection has been released the modem disposes an “Okay” string. If „hold_after_ok“ is set to „0“, the UPC3 subsequently disconnects the modem connection. Error message If an error signal occurs in the UPC3 which has been assigned to the output „modem“ (group „signals enable“), the modem automatically dials the entered telephone number (125) after the time delay has been elapsed (122). After a connection has been released the modem disposes an “Error” string. If „hold_after_err“ is set to „0“, the UPC3 subsequently disconnects the modem connection. Standby dialling (=extern_dial-in) If „extern_dial-in“ is activated, it is possible to dial into the system (enter password, see parameter „password“). “Extern_dial-in” excludes „call-back“. 0/1= pulse/tone Pulse- or tone dialling Hold after Ok See daily report. Hold_after_err See error message. Cable_mode Not available! Auto_answers Not available! No_state_displ The display of the modem state is hidden from the display. Not recommended! Via the parameter „RepeatCountTXerr“(124) is set how often the UPC3 should try to dial the telephone number (see „Error message“). 119 Initial.string (126): AT AT%O AT&F %dATX3E0L1S0=0 121 122 123 124 125 126 This is set in the configuration of the UPC3. This instruction set is executed from the left to the right and transferred to the modem. Specific features are the tokens “%” (e.g. %O, %d). Those are not transferred but are commands which are executed via the UPC3. A blank and the end of the string effects the transfer of a CR LF (ENTER KEY at PC). 127 ©2011. ELTEK DEUTSCHLAND GmbH. Eltek_UM_UPC3_V1.30_&_V1.31_E_R1.1 DC Controller UPC3 V1.30.166 to V1.31.170 User manual Page 60 of 76 The Initial.string (see above) works nearly with all standard modems and should be changed only in exceptional cases. For the AT commands which are understood from your modem please see the attendant manual. Important! The modem must not answer self-acting (ATS0=0), otherwise the pass word is avoided. Token (UPC3 commands) %m %d %p %t40 %t %t0 %t100 %t400 %O %C %0 %% Sending without \r\n and waiting for answer from the modem 1 s pause 0.25 s pause Timeout 40 s Default 5 s (1-99 s) Timeout 320 ms min = 320 ms ditto ditto Timeout 400 ms 320 .. 999 ms Waiting for OK\r\n modem message Waiting for CONNECT\r\n ditto Waiting without check Default results in % as normal character Communication operation of the string AT AT%O AT&F %dATX3E0L1S0=0 (/r/n = carriage return line feed) Explanation of the AT commands: AT &F= Factory setting X3= Do not wait for dial tone E0= 0 Deactivates echo of sent bytes L1= Loudspeaker active, sound level 1 S0=0 Modem answers not self-acting ©2011. ELTEK DEUTSCHLAND GmbH. Eltek_UM_UPC3_V1.30_&_V1.31_E_R1.1 DC Controller UPC3 V1.30.166 to V1.31.170 User manual Page 61 of 76 3.4.7.10 Remote Display Panel (RDP) In this area the Remote Display Panel (RDP) is configured. On the panel definite block diagrams are used. For more information about the RDP please read the RDP user manual. 128 129 With parameter „Enable RDP“ (128) the panel is enabled. 130 With parameter „StartUp action“ (129) is defined how the UPC3 system shall act after a restart. „0=none“ >> no command to the CAN devices. The actual condition “ON” respectively “OFF” is kept. “1=CAN devices ON“ >> CAN devices explicitly get the ON command. “2=CAN devices OFF“ >> CAN devices explicitly get the OFF command. Parameter „Enable Switches“ (130) and „Enable Modules“ (131) give information to the RDP which digital inputs respectively CAN modules are to be used by the panel. For more information about the RDP configuration please read the RDP user manual. 131 3.4.8 Enabling of signalling/text 3.4.8.1 Text digital inputs 140 It is possible to assign the digital inputs of texts then also failure/event list or in of the SNMP-Agent. individual texts to the UPC3. These appear in the the trap message 141 For each individual digital input two texts are available. Text 1 is used if a signal is active, text 2 is used if a signal is inactive. 142 The texts (140), (142) are related to the digital inputs of the UPC3, the texts (141), (143) are related to the optional digital input board DI8. 143 ©2011. ELTEK DEUTSCHLAND GmbH. Eltek_UM_UPC3_V1.30_&_V1.31_E_R1.1 DC Controller UPC3 V1.30.166 to V1.31.170 User manual Page 62 of 76 Example 1: To the digital input 1.1 a switch is connected via a normally open contact; the input is not inverted by configuration. First case: Switch not activated No signal is generated, status text input 1.1 of (140) is used. Second case: Switch activated A signal is generated, status text fail input 1.1 of (142) is used. Example 2: To the digital input 1.2 a switch is connected via a normally closed contact; the input is not inverted by configuration. First case: Switch not activated A signal is generated, status text fail input 1.2 of (142) is used. Second case: Switch activated No signal is generated, status text input 1.2 of (140) is used. Example 3: To the digital input 1.3 a switch is connected via a normally closed contact; the input is inverted by configuration. First case: Switch not activated A signal is not generated, status text input 1.3 of (140) is used. Second case: Switch activated A signal is generated, status text fail input 1.3 of (142) is used. The other text groups are parameters exclusively for the texts to be shown on the UPC display. The modul ident texts are read out via CAN-Bus from the connected CAN devices (e.g. rectifiers) and cannot be parameterized with the configurator. 3.4.8.2 Text relay output 144 145 146 147 ©2011. ELTEK DEUTSCHLAND GmbH. The texts are used in the menu Relay Status of the UPC3. The parameters (144), (146) are used for the internal relays of the UPC3; the parameters (145), (147) are used for the optional relay board. (Specific feature: If two relay boards are used, the parameters (144), (146) are related to the second relay board, see “Count CAN devices”). When the signal (e.g. relay 1.1) is active, the fail text (146), (147) is used. When the signal is inactive, the text (144), (145) is used. Either the signal can be directly used for the relay or it can be used in inverted status (see “Signals switch mode”). Eltek_UM_UPC3_V1.30_&_V1.31_E_R1.1 DC Controller UPC3 V1.30.166 to V1.31.170 User manual Page 63 of 76 3.4.8.3 Text battery parameters >>User defined texts, used for the batteries. 3.4.8.4 Text system parameters >>User defined texts, used for the system 3.4.8.5 Text general parameters >>User defined texts, used for the general measuring values. If no text is keyed in, the measuring value is disabled and is not used in the UPC3. 3.4.8.6 Text batt identification >>Additional information about the batteries. ©2011. ELTEK DEUTSCHLAND GmbH. Eltek_UM_UPC3_V1.30_&_V1.31_E_R1.1 DC Controller UPC3 V1.30.166 to V1.31.170 User manual Page 64 of 76 3.4.8.7 Texts fuses >> These texts are used in combination with fuse monitoring boards. 3.4.8.8 Module ID texts >> All texts are for information and can not be changed. The UPC3 automatically receives the texts from the connected modules. 3.4.8.9 Enable display >> If parameter „0“ is set, the respective indications are blanked on the UPC3 display. A blanked out feature either has no effect to the system function nor to the SNMP-Agent. Features which are not available according to the system configuration are not manually to be blanked. Example: If one battery is connected and parameterized, exclusively one battery is shown on the display. ©2011. ELTEK DEUTSCHLAND GmbH. Eltek_UM_UPC3_V1.30_&_V1.31_E_R1.1 DC Controller UPC3 V1.30.166 to V1.31.170 User manual Page 65 of 76 4 Table of failure/signal bits UPC3 Signal no. 0 1 2 3 4 5 6 7 8 9 10 11 12 13 14 15 16 17 18 19 20 21 22 23 24 25 26 27 28 29 30 31 32 33 34 35 36 37 38 39 40 41 42 43 44 Signal text Fuse 1 Fuse 2 Fuse 3 Fuse 4 Fuse 5 Fuse 6 Fuse 7 Fuse 8 Fuse 9 Fuse 10 Fuse 11 Fuse 12 Fuse 13 Fuse 14 Fuse 15 Fuse 16 Fuse 17 Fuse 18 Fuse 19 Fuse 20 Fuse 21 Fuse 22 Fuse 23 Fuse 24 Fuse 25 Fuse 26 Fuse 27 Fuse 28 Fuse 29 Fuse 30 Fuse 31 Fuse 32 Fuse 33 Fuse 34 Fuse 35 Fuse 36 Fuse 37 Fuse 38 Fuse 39 Fuse 40 Fuse 41 Fuse 42 Fuse 43 Fuse 44 Fuse 45 Reference to parameter (22),Text fuses S. a. signal no. 0 S. a. signal no. 0 S. a. signal no. 0 S. a. signal no. 0 S. a. signal no. 0 S. a. signal no. 0 S. a. signal no. 0 S. a. signal no. 0 S. a. signal no. 0 S. a. signal no. 0 S. a. signal no. 0 S. a. signal no. 0 S. a. signal no. 0 S. a. signal no. 0 S. a. signal no. 0 S. a. signal no. 0 S. a. signal no. 0 S. a. signal no. 0 S. a. signal no. 0 S. a. signal no. 0 S. a. signal no. 0 S. a. signal no. 0 S. a. signal no. 0 S. a. signal no. 0 S. a. signal no. 0 S. a. signal no. 0 S. a. signal no. 0 S. a. signal no. 0 S. a. signal no. 0 S. a. signal no. 0 S. a. signal no. 0 S. a. signal no. 0 S. a. signal no. 0 S. a. signal no. 0 S. a. signal no. 0 S. a. signal no. 0 S. a. signal no. 0 S. a. signal no. 0 S. a. signal no. 0 S. a. signal no. 0 S. a. signal no. 0 S. a. signal no. 0 S. a. signal no. 0 S. a. signal no. 0 ©2011. ELTEK DEUTSCHLAND GmbH. Description Fuse, monitored via fuse monitoring board Fuse, monitored via fuse monitoring board Fuse, monitored via fuse monitoring board Fuse, monitored via fuse monitoring board Fuse, monitored via fuse monitoring board Fuse, monitored via fuse monitoring board Fuse, monitored via fuse monitoring board Fuse, monitored via fuse monitoring board Fuse, monitored via fuse monitoring board Fuse, monitored via fuse monitoring board Fuse, monitored via fuse monitoring board Fuse, monitored via fuse monitoring board Fuse, monitored via fuse monitoring board Fuse, monitored via fuse monitoring board Fuse, monitored via fuse monitoring board Fuse, monitored via fuse monitoring board Fuse, monitored via fuse monitoring board Fuse, monitored via fuse monitoring board Fuse, monitored via fuse monitoring board Fuse, monitored via fuse monitoring board Fuse, monitored via fuse monitoring board Fuse, monitored via fuse monitoring board Fuse, monitored via fuse monitoring board Fuse, monitored via fuse monitoring board Fuse, monitored via fuse monitoring board Fuse, monitored via fuse monitoring board Fuse, monitored via fuse monitoring board Fuse, monitored via fuse monitoring board Fuse, monitored via fuse monitoring board Fuse, monitored via fuse monitoring board Fuse, monitored via fuse monitoring board Fuse, monitored via fuse monitoring board Fuse, monitored via fuse monitoring board Fuse, monitored via fuse monitoring board Fuse, monitored via fuse monitoring board Fuse, monitored via fuse monitoring board Fuse, monitored via fuse monitoring board Fuse, monitored via fuse monitoring board Fuse, monitored via fuse monitoring board Fuse, monitored via fuse monitoring board Fuse, monitored via fuse monitoring board Fuse, monitored via fuse monitoring board Fuse, monitored via fuse monitoring board Fuse, monitored via fuse monitoring board Fuse, monitored via fuse monitoring board Eltek_UM_UPC3_V1.30_&_V1.31_E_R1.1 DC Controller UPC3 V1.30.166 to V1.31.170 User manual Page 66 of 76 Signal no. 45 46 47 48 49 50 51 52 53 54 55 56 57 58 59 60 61 62 63 64 65 66 67 68 69 70 71 72 73 74 75 76 77 78 79 80 81 82 83 84 85 86 87 88 89 90 91 92 93 Signal text Fuse 46 Fuse 47 Fuse 48 Fuse 49 Fuse 50 Fuse 51 Fuse 52 Fuse 53 Fuse 54 Fuse 55 Fuse 56 Fuse 57 Fuse 58 Fuse 59 Fuse 60 Fuse 61 Fuse 62 Fuse 63 Fuse 64 Fuse 65 Fuse 66 Fuse 67 Fuse 68 Fuse 69 Fuse 70 Fuse 71 Fuse 72 Fuse 73 Fuse 74 Fuse 75 Fuse 76 Fuse 77 Fuse 78 Fuse 79 Fuse 80 Fuse 81 Fuse 82 Fuse 83 Fuse 84 Fuse 85 Fuse 86 Fuse 87 Fuse 88 Fuse 89 Fuse 90 Fuse 91 Fuse 92 Fuse 93 Fuse 94 Reference to parameter S. a. signal no. 0 S. a. signal no. 0 S. a. signal no. 0 S. a. signal no. 0 S. a. signal no. 0 S. a. signal no. 0 S. a. signal no. 0 S. a. signal no. 0 S. a. signal no. 0 S. a. signal no. 0 S. a. signal no. 0 S. a. signal no. 0 S. a. signal no. 0 S. a. signal no. 0 S. a. signal no. 0 S. a. signal no. 0 S. a. signal no. 0 S. a. signal no. 0 S. a. signal no. 0 S. a. signal no. 0 S. a. signal no. 0 S. a. signal no. 0 S. a. signal no. 0 S. a. signal no. 0 S. a. signal no. 0 S. a. signal no. 0 S. a. signal no. 0 S. a. signal no. 0 S. a. signal no. 0 S. a. signal no. 0 S. a. signal no. 0 S. a. signal no. 0 S. a. signal no. 0 S. a. signal no. 0 S. a. signal no. 0 S. a. signal no. 0 S. a. signal no. 0 S. a. signal no. 0 S. a. signal no. 0 S. a. signal no. 0 S. a. signal no. 0 S. a. signal no. 0 S. a. signal no. 0 S. a. signal no. 0 S. a. signal no. 0 S. a. signal no. 0 S. a. signal no. 0 S. a. signal no. 0 S. a. signal no. 0 ©2011. ELTEK DEUTSCHLAND GmbH. Description Fuse, monitored via fuse monitoring board Fuse, monitored via fuse monitoring board Fuse, monitored via fuse monitoring board Fuse, monitored via fuse monitoring board Fuse, monitored via fuse monitoring board Fuse, monitored via fuse monitoring board Fuse, monitored via fuse monitoring board Fuse, monitored via fuse monitoring board Fuse, monitored via fuse monitoring board Fuse, monitored via fuse monitoring board Fuse, monitored via fuse monitoring board Fuse, monitored via fuse monitoring board Fuse, monitored via fuse monitoring board Fuse, monitored via fuse monitoring board Fuse, monitored via fuse monitoring board Fuse, monitored via fuse monitoring board Fuse, monitored via fuse monitoring board Fuse, monitored via fuse monitoring board Fuse, monitored via fuse monitoring board Fuse, monitored via fuse monitoring board Fuse, monitored via fuse monitoring board Fuse, monitored via fuse monitoring board Fuse, monitored via fuse monitoring board Fuse, monitored via fuse monitoring board Fuse, monitored via fuse monitoring board Fuse, monitored via fuse monitoring board Fuse, monitored via fuse monitoring board Fuse, monitored via fuse monitoring board Fuse, monitored via fuse monitoring board Fuse, monitored via fuse monitoring board Fuse, monitored via fuse monitoring board Fuse, monitored via fuse monitoring board Fuse, monitored via fuse monitoring board Fuse, monitored via fuse monitoring board Fuse, monitored via fuse monitoring board Fuse, monitored via fuse monitoring board Fuse, monitored via fuse monitoring board Fuse, monitored via fuse monitoring board Fuse, monitored via fuse monitoring board Fuse, monitored via fuse monitoring board Fuse, monitored via fuse monitoring board Fuse, monitored via fuse monitoring board Fuse, monitored via fuse monitoring board Fuse, monitored via fuse monitoring board Fuse, monitored via fuse monitoring board Fuse, monitored via fuse monitoring board Fuse, monitored via fuse monitoring board Fuse, monitored via fuse monitoring board Fuse, monitored via fuse monitoring board Eltek_UM_UPC3_V1.30_&_V1.31_E_R1.1 DC Controller UPC3 V1.30.166 to V1.31.170 User manual Page 67 of 76 Signal Signal text no. Fuse 95 94 Fuse 96 95 Dig. input 1.1 96 Dig. input 2.1 97 Dig. input 3.1 98 Dig. input 4.1 99 Dig. input 5.1 100 Dig. input 6.1 101 Dig. input 7.1 102 Dig. input 8.1 103 Dig. input 1.2 104 Dig. input 2.2 105 Dig. input 3.2 106 Dig. input 4.2 107 Dig. input 5.2 108 Dig. input 6.2 109 Dig. input 7.2 110 Dig. input 8.2 111 V1 <> Vmin/max1 112 113 114 115 116 117 118 119 120 121 122 123 124 V2 <> Vmin/max2 V3 <> Vmin/max3 V4 <> Vmin/max4 V5 <> Vmin/max5 V6 <> Vmin/max6 I1 <> Imin/max1 I2 <> Imin/max2 I3 <> Imin/max3 I4 <> Imin/max4 T1 <> Tmin/max1 T2 <> Tmin/max2 T3 <> Tmin/max3 Reference to parameter See above, signal 0 See above, signal 0 (140), (142), (77), (79) (140), (142), (77), (79) (140), (142), (77), (79) (140), (142), (77), (79) (140), (142), (77), (79) (140), (142), (77), (79) (140), (142), (77), (79) (140), (142), (77), (79) (20) , (141), (143), (78), (80) (20) , (141), (143), (78), (80) (20) , (141), (143), (78), (80) (20) , (141), (143), (78), (80) (20) , (141), (143), (78), (80) (20) , (141), (143), (78), (80) (20) , (141), (143), (78), (80) (20) , (141), (143), (78), (80) Assignment measured values, Thresholds general parameters s.a. signal no.112 s.a. signal no.112 s.a. signal no.112 s.a. signal no.112 s.a. signal no.112 s.a. signal no.112 s.a. signal no.112 s.a. signal no.112 s.a. signal no.112 s.a. signal no.112 s.a. signal no.112 s.a. signal no.112 ©2011. ELTEK DEUTSCHLAND GmbH. Description Fuse, monitored via fuse monitoring board Fuse, monitored via fuse monitoring board Internal digital input Internal digital input Internal digital input Internal digital input Internal digital input Internal digital input Internal digital input Internal digital input External digital input via CAN-Bus External digital input via CAN-Bus External digital input via CAN-Bus External digital input via CAN-Bus External digital input via CAN-Bus External digital input via CAN-Bus External digital input via CAN-Bus External digital input via CAN-Bus General measured values, voltage 1 General measured values, voltage 2 General measured values, voltage 3 General measured values, voltage 4 General measured values, voltage 5 General measured values, voltage 6 General measured values, current 1 General measured values, current 2 General measured values, current 3 General measured values, current 4 General measured values, temperature 1 General measured values, temperature 2 General measured values, temperature 3 Eltek_UM_UPC3_V1.30_&_V1.31_E_R1.1 DC Controller UPC3 V1.30.166 to V1.31.170 User manual Page 68 of 76 Signal no. 125 126 127 128 129 130 131 132 133 134 135 136 137 138 139 140 141 142 143 144 145 146 147 148 149 150 151 152 153 154 155 156 157 158 159 160 161 162 163 164 165 166 167 168 169 170 171 172 173 Signal text T4 <> Tmin/max4 T5 <> Tmin/max5 T6 <> Tmin/max6 Vbatt < Vmin(B1) Vbatt < Vmin(B2) Vbatt < Vmin(B3) Vbatt < Vmin(B4) Vbatt < Vmin(B5) Vbatt < Vmin(B6) Vbatt < Vmin(B7) _not used(B8) Vbatt > Vmax(B1) Vbatt > Vmax(B2) Vbatt > Vmax(B3) Vbatt > Vmax(B4) Vbatt > Vmax(B5) Vbatt > Vmax(B6) Vbatt > Vmax(B7) _not used (B8) Vbat < Vwarn(B1) Vbat < Vwarn(B2) Vbat < Vwarn(B3) Vbat < Vwarn(B4) Vbat < Vwarn(B5) Vbat < Vwarn(B6) Vbat < Vwarn(B7) --Vbat > VmaxR(B1) Vbat > VmaxR(B2) Vbat > VmaxR(B3) Vbat > VmaxR(B4) Vbat > VmaxR(B5) Vbat > VmaxR(B6) Vbat > VmaxR(B7) --T > Tmax (Batt1) T > Tmax (Batt2) T > Tmax (Batt3) T > Tmax (Batt4) T > Tmax (Batt5) T > Tmax (Batt6) T > Tmax (Batt7) --Asymmetrical(B1) Asymmetrical(B2) Asymmetrical(B3) Asymmetrical(B4) Asymmetrical(B5) Asymmetrical(B6) Reference to parameter s.a. signal no.112 s.a. signal no.112 s.a. signal no.112 (58) (58) (58) (58) (58) (58) (58) Description (56) (56) (56) (56) (56) (56) (56) Exclusively for number of batteries ≥ 1 Exclusively for number of batteries ≥ 2 Exclusively for number of batteries ≥ 3 Exclusively for number of batteries ≥ 4 Exclusively for number of batteries ≥ 5 Exclusively for number of batteries ≥ 6 Exclusively for number of batteries ≥ 7 (57) (57) (57) (57) (57) (57) (57) Exclusively for number of batteries ≥ 1 Exclusively for number of batteries ≥ 2 Exclusively for number of batteries ≥ 3 Exclusively for number of batteries ≥ 4 Exclusively for number of batteries ≥ 5 Exclusively for number of batteries ≥ 6 Exclusively for number of batteries ≥ 7 (59) (59) (59) (59) (59) (59) (59) Vmax Vmax Vmax Vmax Vmax Vmax Vmax Battery Battery Battery Battery Battery Battery Battery Exclusively for number of batteries ≥ 1 Exclusively for number of batteries ≥ 2 Exclusively for number of batteries ≥ 3 Exclusively for number of batteries ≥ 4 Exclusively for number of batteries ≥ 5 Exclusively for number of batteries ≥ 6 Exclusively for number of batteries ≥ 7 (41) (41) (41) (41) (41) (41) Exclusively for number of batteries ≥ 1 Exclusively for number of batteries ≥ 2 Exclusively for number of batteries ≥ 3 Exclusively for number of batteries ≥ 4 Exclusively for number of batteries ≥ 5 Exclusively for number of batteries ≥ 6 ©2011. ELTEK DEUTSCHLAND GmbH. General measured values, temperature 4 General measured values, temperature 5 General measured values, temperature 6 Exclusively for number of batteries ≥ 1 Exclusively for number of batteries ≥ 2 Exclusively for number of batteries ≥ 3 Exclusively for number of batteries ≥ 4 Exclusively for number of batteries > 5 Exclusively for number of batteries ≥ 6 Exclusively for number of batteries ≥ 7 Rec off, excl. for number of batteries ≥ 1 Rec off, excl. for number of batteries ≥ 2 Rec off, excl. for number of batteries ≥ 3 Rec off, excl. for number of batteries ≥ 4 Rec off, excl. for number of batteries ≥ 5 Rec off, excl. for number of batteries ≥ 6 Rec off, excl. for number of batteries ≥ 7 Eltek_UM_UPC3_V1.30_&_V1.31_E_R1.1 DC Controller UPC3 V1.30.166 to V1.31.170 User manual Page 69 of 76 Signal no. 174 175 176 177 178 179 180 181 182 183 184 185 186 187 188 189 190 191 192 193 194 195 196 197 198 199 200 201 202 203 204 205 206 207 208 209 210 211 212 213 214 215 216 217 218 219 220 221 222 Signal text Asymmetrical(B7) _not used (B8) Fuse open (B1) Fuse open (B2) Fuse open (B3) Fuse open (B4) Fuse open (B5) Fuse open (B6) Fuse open (B7) _not used (B8) Battery oper(B1) Battery oper(B2) Battery oper(B3) Battery oper(B4) Battery oper(B5) Battery oper(B6) Battery oper(B7) _not used (B8) Relay1.Q Relay1.Q' Relay2.Q Relay2.Q' Relay3.Q Relay3.Q' Relay4.Q Relay4.Q' Vload < Vmin Vload > Vmax Vload < Vmin_INV Vload < Vmin_DCC Insulation error Insul. mea. runs REC Error REC No CAN REC Redundancy REC Load REC Load distrib DCC Error DCC No CAN DCC Redundancy DCC Load DCC Load distrib INV Error INV No CAN INV Redundancy Boost ch Timeout Boost charge Battery test Battery test err Reference to parameter (41) Description Battery Battery Battery Battery Battery Battery Battery Exclusively for number of batteries ≥ 1 Exclusively for number of batteries ≥ 2 Exclusively for number of batteries ≥ 3 Exclusively for number of batteries ≥ 4 Exclusively for number of batteries ≥ 5 Exclusively for number of batteries ≥ 6 Exclusively for number of batteries ≥ 7 (72) (72) (72) (72) (72) (72) (72) Exclusively for number of batteries ≥ 1 Exclusively for number of batteries ≥ 2 Exclusively for number of batteries ≥ 3 Exclusively for number of batteries ≥ 4 Exclusively for number of batteries ≥ 5 Exclusively for number of batteries ≥ 6 Exclusively for number of batteries ≥ 7 Exclusively for number of batteries ≥ 7 Virtual relay 1, set via SNMP Virtual relay 1, set via SNMP, output inverted Virtual relay 2, set via SNMP Virtual relay 2, set via SNMP, output inverted Virtual relay 3, set via SNMP Virtual relay 3, set via SNMP, output inverted Virtual relay 4, set via SNMP Virtual relay 4, set via SNMP, output inverted (65) (64) (66) (67) (101), (73) (14) (30) (33) (15) (16) Boost charge Boost charge Battery test Battery test ©2011. ELTEK DEUTSCHLAND GmbH. Insulation error Insulation measuring runs Rectifier error Rectifier no CAN receiption Redundancy error Rectifier load limit Number of rectifiers > 1 DC/DC converter error DC/DC converter no CAN receiption DC/DC converter redundancy error DC/DC converter load limit Number of DC/DC converter > 1 Inverter error Inverter no CAN receiption Inverter redundancy error Boost charge time limit reached Boost charge active Battery test active Battery test interrupted with error „undervoltage“ Eltek_UM_UPC3_V1.30_&_V1.31_E_R1.1 DC Controller UPC3 V1.30.166 to V1.31.170 User manual Page 70 of 76 Signal no. 223 224 225 226 227 228 229 230 231 232 233 234 235 236 237 238 239 240 241 242 243 244 245 246 247 248 249 250 251 252 253 254 255 256 257260 261 262 263 264 265 266 267 268 269 270 271287 Signal text Fan (boost chge) Counter cell 1 Counter cell 2 Difference Ah Lim Load current Capacity low A Capacity low B LVD active PLD1 active PLD2 active Tsensor lim Batt Tsensor limit Fan Rack: Error Fan Rack: No CAN STS: Error state STS: No CAN MMB: Error state MMB: No CAN BMB: Error state BMB: No CAN DEB: Error state DEB: No CAN RB: Error state RB: No CAN FMB: Error state FMB: No CAN UMD2: ErrorState UMD2: No CAN UMD1: ErrorState UMD1: No CAN RD1: Error state RD1: No CAN RDP: Error state RDP: No CAN Reference to parameter Counter cells Counter cells Capac.-calculator Capac.-calculator LVD/PLD function LVD/PLD function LVD/PLD function Description Fan boost charge Signal counter cell 1 Signal counter cell 2 Load current is greater than adjusted limit, e.g. 80% Battery capacity A Battery capacity B Fan rack Fan rack --1.L1 V<>Vmin,max 1.L2 V<>Vmin,max 1.L3 V<>Vmin,max 2.L1 V<>Vmin,max 2.L2 V<>Vmin,max 2.L3 V<>Vmin,max ------Diesel operation mains monitoring mains monitoring mains monitoring mains monitoring mains monitoring mains monitoring MM board 1 L1 < Vmin or < Vmax MM board 1 L2 < Vmin or < Vmax MM board 1 L3 < Vmin or < Vmax MM board 2 L1 < Vmin or < Vmax MM board 2 L2 < Vmin or < Vmax MM board 2 L3 < Vmin or < Vmax (4) --- ©2011. ELTEK DEUTSCHLAND GmbH. Eltek_UM_UPC3_V1.30_&_V1.31_E_R1.1 DC Controller UPC3 V1.30.166 to V1.31.170 User manual Page 71 of 76 5 Compatibility of version V1.30 compared to V1.31 If a configuration of an UPC3 V1.30 shall be written into an UPC3 V1.31 (or vice versa from V1.31 to V1.30), the configuration is converted by the configuration software „MMT“. Before writing the MMT visually shows which values could not be imported and due to this must be set by the user. For details see the manual of the MMT please. 5.1 Configuration of an UPC3 V1.30 to be written to an UPC3 V1.31 • Parameter „Battery test start at: year“ (see parameter 106e ), „Boost charge start at: year“ (see parameter 115b) >> The type has been changed. Due to this these data have to be reset manually if necessary. • Text general parameters (section 3.4.8.5): >>The allowable length of the text is different. Therefore the text is not overtaken and has to be reconfigured if necessary. • Module ID texts (section 3.4.8.8): Installation date of BM board. Currently up to six BM boards can be used. 5.2 Configuration of an UPC3 V1.31 to be written to an UPC3 V1.30 • Parameter „Battery test start at: year“ (see parameter 106e ), „Boost charge start at: year“ (see parameter 115b) >> The type has been changed. Due to this these data have to be reset manually if necessary. • Text general parameters (section 3.4.8.5): >>The allowable length of the text is different. Therefore the text is not overtaken and has to be reconfigured if necessary. • Module ID texts (section 3.4.8.8): Installation date of BM board. Currently up to two BM boards can be used. 5.3 New available parameters at V1.31 • Parameter BM-Type, see 3.4.1.2 “CAN devices count“. • Parameter “Run up with slope” is adjustable (enable/disable) by customer, see 3.4.1.1 “Main set” ©2011. ELTEK DEUTSCHLAND GmbH. Eltek_UM_UPC3_V1.30_&_V1.31_E_R1.1 DC Controller UPC3 V1.30.166 to V1.31.170 User manual Page 72 of 76 6 Technical specifications UPC3 and UPC3S Type UPC3-24 UPC3-48/60 UPC3-110 UPC3-220 Article code 301-003-498.02 301-003-598.02 301-003-798.02 301-003-898.02 Type S (small version) UPC3-24S UPC3-48/60S UPC3-110S UPC3-220S Article code 301-003-497.02 301-003-597.02 301-003-797.02 301-003-897.02 Supply voltage range 18VDC-35VDC 35VDC-75VDC 80VDC-160VDC 180VDC-300VDC Voltage measuring range 0-100VDC 0-100VDC 0-300VDC 0-300VDC Current measuring range 0-60mV (shunt value programmable) Power consumption approx. 3W Voltage measuring inputs 3; display accuracy 0.5% ±1digit Current measuring inputs 1x ±60mV; 2x 0- 60mV; display accuracy 1% ±1digit Temperature measuring input 2x (sensor KTY81-220) Digital inputs 8 (isolated) LCD display 2x 16 characters; background lighted LED indications Operation (green); System OK (green); Isolation (red); Alarm (red) Relay outputs 6 (isolated; max. 0.5A @ 60VDC); expandable with CAN node DCC-RB6 to max. 12 relays Interfaces: USB interface USB connector CAN interface Proprietary CAN protocol LVD/PLD–drive 3x optocoupler output for control of max. 3pcs. LVD relay or 1pc. LVD and 2pcs. PLD relay Modem connection Internal analogue modem socket (modem board optional) SNMP connection Internal SNMP adapter socket (SNMP adapter optional) Controller functions Desired value for compensation of charge voltage, boost charge voltage, battery test voltage; boost charge mechanism (power, voltage and time related), LVD control, PLD control; time controlled battery test; charge current limitation; dropping diode (counter cell) control (2 stages), manual charge, system test Monitoring functions Entire battery voltage, unsymmetrical battery voltage, battery charge current, battery operation; isolation fault (internally switchable via software), battery voltage low, battery voltage high, CAN-Bus status, CAN connected module status; external alarm loops Event history function Yes; active fault text message; flash based stack memory of last 250 faults/events with time stamp Battery test memory Yes; storage of last 3 battery test results; storage of the last battery test curve RTC with time and date Yes Control buttons 4; UP/DOWN/ENTER/ESC Main processor 16Bit Fujitsu Languages German, English, Swedish; other versions loadable on demand Ambient temperature Operation: -20°C to +55°C; non condensing; Storage: -40°C to +85°C Cooling Convection cooling Climatic conditions according to IEC 721-3-3 class 3K3/3Z1/3B1/3C2/3S2/3M2 Max. installation altitude ≤ 1500m Audible noise <30dBA Type of construction (small version) ¼ x 19“, 3U (1/6 x 19’’, 3U) Dimensions (Dimensions small version) 106.3/133/326.5 mm (71/128/280 mm) W/H/D Weight (Weight small version) approx. 1.8kg (approx. 1.3kg) ©2011. ELTEK DEUTSCHLAND GmbH. Eltek_UM_UPC3_V1.30_&_V1.31_E_R1.1 DC Controller UPC3 V1.30.166 to V1.31.170 User manual Page 73 of 76 Type of enclosure / Protection class IP20 (front panel) / 1 Colour Front panel: RAL 7035; neutral, black print RAL 9005 CE conformity yes Compliance to safety standards EN60950-1; VDE0100 T410; VDE0110; EN50178; EN60146 Compliance to EMC standards EN55011/22 class “B“; EN61000-4 T2-5 Connections 1x DIN41612-M-connector 2x32-pole 6.1 Options Article code Designation 302-UP3-MMT.00 Configuration software “Multi Management Tool” (MMT) 302-003-RDD.00 Remote display for door mounting; connection via CAN interface 302-003-RDMD.00 Remote display with mimic diagram for door mounting; connection via CAN interface 302-DCC-CB1.00 Connection board CONB_HS_01 302-DCC-0MM.00 Mains monitoring board 1/3 phase; DIN rail module; connection via CAN interface 302-DCC-0BM.00 Battery monitoring board DCC-BMB (for one additional battery string; U, U/2, I, T); DIN rail module. A maximum of six DCC-BMB modules is applicable 302-DCC-DI8.00 Signalling board with 8 digital alarm inputs; DIN rail module; connection via CAN interface 302-DCC-0RB.00 Relay board with 6 isolated signalling outputs; DIN rail module; connection via CAN interface 302-DCC-0FM.00 Fuse monitoring board (20 fuses, 24-60 VDC, 1-pole); open frame 302-UP3-SMP.00 SNMP adapter ; plug-in board; connection via Ethernet 10Base-T 302-UP3-0SW.02 SNMP (Win) monitoring software 302-UPC-MOB.00 Mod-Bus adaptor 300-UPC-PRO.00 Profi-Bus adaptor 302-UP3-0AM.00 Analog modem; plug-in board; connection via analogue phone line; Western RJ11 302-UP3-0SW.01 Analog modem remote software 302-TMP-KTY.04 Temperature sensor KTY81-220 T092 including a connecting cable, 4 m in length; 2 wires à 0,34 mm² ©2011. ELTEK DEUTSCHLAND GmbH. Eltek_UM_UPC3_V1.30_&_V1.31_E_R1.1 DC Controller UPC3 V1.30.166 to V1.31.170 User manual Page 74 of 76 6.2 Dimensional drawings UPC3 & UPC3S Module dimensions UPC3 Module dimensions UPC3S ©2011. ELTEK DEUTSCHLAND GmbH. Eltek_UM_UPC3_V1.30_&_V1.31_E_R1.1 DC Controller UPC3 V1.30.166 to V1.31.170 User manual Page 75 of 76 7 Known bugs (V1.30) • • • • The texts of “General parameters” (measure values) should have a maximum number of four characters. Otherwise the UPC abbreviates the text randomly. At “Modem pass word” only the first three characters are checked. At “Battery test” the first and final data set is not stored. Repetition interval of battery test is interrupted after UPC reset. ©2011. ELTEK DEUTSCHLAND GmbH. Eltek_UM_UPC3_V1.30_&_V1.31_E_R1.1 Supplier: FAX Email Internet ELTEK DEUTSCHLAND GmbH BU Industrial Schillerstraße 16 D-32052 Herford + 49 (0) 5221 1708-210 + 49 (0) 5221 1708-222 [email protected] http://www.eltek.com 2011. ELTEK DEUTSCHLAND GmbH. All rights reserved.