1
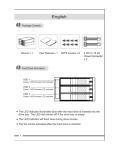
2009
THE FORCE
70000
Mini Advanced Combat Technologies A01
Operational User Manual
p/n 73004
ALC679
ASC579
Y888
For tanks, armored vehicles and land military applications
1
Have an IMPACT in your tanks
2009
This manual will provide the best and simplest description of operating the unit.
Applications are only limited to your imaginations
INDEX
Getting to know
miniACT A01 introduction
Fire Power
Precautions
---------------------------------------------------------------------- 3
---------------------------------------------------------------------- 5
---------------------------------------------------------------------------------- 6
Operations
Battle Mode
1 Life Setting
--------------------------------------------------------------------------------- 7
2 Lives Setting
--------------------------------------------------------------------------------- 8
Destruction Mode
--------------------------------------------------------------------------------- 9
Test Mode
------------------------------------------------------------------------------- 10
Range Extension Mode ------------------------------------------------------------------------------- 11
Specification
------------------------------------------------------------------------12
2
Have an IMPACT in your tanks
2009
GETTING TO KNOW
miniACT A01
P1 Hi-LUX LED
P2 Socket for IR emitter LED
Indicator (red) when setting different modes
Indicator (green) when switched ON
7.2V battery connector
P3 External push button switch with connector for firing IR emitter LED or programming
3
Have an IMPACT in your tanks
2009
Internal micro push button switch for firing IR emitter LED or programming
Mode selector switch
P5 Socket for battle unit receiver
Power switch
P4 Connector, to Tamiya MFU CN2
This kit includes:
miniACT A01
-- 1
HI-LUX LED
-- 1
Push Button Switch -- 1
Optional parts required:
IMPACT Battle Unit p/n 73003
miniACT A01 has 4 functions that can be selected:
1. Battle Mode
2. Destruction Mode
3. Test Mode
4. Range Extension Mode
miniACT will still be able to fire even when Battle Unit Receiver is not plug in.
miniACT will still be able to receive even when IR emitting LED is not plug in.
miniACT will only work when the optional parts are connected, it will not work by itself,
except for Range Extension Mode
4
Have an IMPACT in your tanks
2009
Fire Power
Y888 IR Code
When a Tank is hit by Y888 IR code, 1/2 of its set life is deducted.
Tank will be destroyed if hit twice, regardless of tank’s setting.
For example, if a tank set to HEAVY/MEDIUM/LIGHT, it will be destroyed if hit 2 times
IMPACT and Tamiya DMD+MFU systems will be able to receive and react to Y888.
ALC679
This is the default code found in all Tamiya tanks.
When a Tank is hit by ALC679 IR code, 1 count of the set life is deducted.
IMPACT and Tamiya DMD+MFU systems will be able to receive and react to ALC679.
ASC579
When a miniACT is hit by ASC579 IR code, 1/3 of its ONE life is deducted.
For example, if a miniACT is set to 2 lives, it will be destroyed after receiving 6 hits.
If a miniACT is set to 1 life, it will be destroyed after receiving 3 hits.
Only IMPACT systems will be able to receive and react to ASC579.
Tamiya DMD+MFU will not be able to receive and react to ASC579, yet.
Life count of system is reference to total number of ALC679 hitting a target to destroy.
IMPACT and Tamiya systems will be able to do accurate accumulative count of hits received
when different combinations of IR codes are emitted.
5
Have an IMPACT in your tanks
2009
PRECAUTIONS
ALWAYS take out the battery when the unit is not in use or when storing.
ALWAYS turn OFF the power when the battery is connected and when unit is temporary not in
used.
ALWAYS turn OFF the power first when selecting to a new mode. Changing to a new mode
with the power ON, might cause damage to the unit’s electronics.
Do not use used unqualified and/or poor quality battery.
Do not force in the connectors into the sockets when it does not go in smoothly. All connectors
have a key so that there is only one direction that it can go in.
This is not a waterproof unit, do not use it in environment where there is water and or in
ship/submarine model.
6
Have an IMPACT in your tanks
2009
OPERATION
BATTLE MODE (1 Life)
Turn Power Switch to OFF.
Plug in a 7.2V battery.
Plug in the Battle Unit’s Receiver 5pin connector into P5.
Plug in the Battle Unit’s IR emitter LED 2pin connector into P2.
Select MODE switch to 1.
Press either the external or internal push button while turning ON the Power Switch.
When LED at IR FIRE is flashing, push button can be released.
IR FIRE will flash once, turns off for a while, flash once, the cycle goes on.
miniACT is now in BATTLE MODE at 1 Life.
The firing of IR emitter LED can be done by either pressing the external or internal push button
switch.
It needs 2 seconds to fire the next shot.
When the infrared LED is fired, HI-LUX LED (P1) will flash, simulating a barrel fired. This
LED can be installed in any of the model’s weapon.
If you do not wish to use this function, the LED can be disconnected and the system will still
work.
The Battle Unit Receiver will not receive hit signal from its own infrared LED.
miniACT will be destroyed when hit 1 time by Y888 and/or ALC679 IR Code.
miniACT will be destroyed when hit 3 times by ASC579 IR Code.
When miniACT is destroyed, IR FIRE will turn off and Receiver LEDs will flash continuous.
To reset, turn OFF and program from start again.
7
Have an IMPACT in your tanks
2009
BATTLE MODE (2 Lives)
Turn Power Switch to OFF.
Plug in a 7.2V battery.
Plug in the Battle Unit’s Receiver 5pin connector into P5.
Plug in the Battle Unit’s IR emitter LED 2pin connector into P2.
Select MODE switch to 1.
Turn the Power Switch ON. The PWR LED will light up.
IR FIRE will flash 2 times, turns off for a while, flash 2 times, the cycle goes on.
miniACT is now in BATTLE MODE at 2 Lives.
The firing of IR emitter LED can be done by either pressing the external or internal push button
switch.
It needs 2 seconds to fire the next shot.
When the infrared LED is fired, HI-LUX LED (P1) will flash, simulating a barrel fired. This
LED can be installed in any of the model’s weapon.
If you do not wish to use this function, the LED can be disconnected and the system will still
work.
The Battle Unit Receiver will not receive hit signal from its own infrared LED.
miniACT will be destroyed when hit 1 time by Y888 IR Code.
miniACT will be destroyed when hit 2 times by ALC679 IR Code.
miniACT will be destroyed when hit 6 times by ASC579 IR Code.
When miniACT is destroyed, IR FIRE will turn off and Receiver LEDs will flash continuous.
To reset, turn OFF and program from start again.
8
Have an IMPACT in your tanks
2009
DESTRUCTION MODE
Turn Power Switch to OFF.
Plug in a 7.2V battery.
Plug in the Battle Unit’s Receiver 5pin connector into P5.
Plug in the Battle Unit’s IR emitter LED 2pin connector into P2.
Select MODE switch to 2.
Turn the Power Switch ON. The PWR LED will light up.
IR FIRE LED will light up continuously.
miniACT is now in DESTRUCTION MODE.
The firing of infrared LED can be done by either pressing the external or internal push button
switch.
In DESTRUCTION MODE, it can only fire ONE time. After firing ONE time, it will not able
to fire any shot again. The Receiver LEDs will not flash after firing ONE shot
When the infrared LED is fired, HI-LUX LED (P1) will flash, simulating a barrel fired. This
LED can be installed in any of the model’s weapon.
If you do not wish to use this function, the LED can be disconnected and the system will still
work.
The Battle Unit Receiver will not receive hit signal from its own infrared LED.
miniACT will be destroyed when hit 1 time either from Y888 or ALC679 or ASC579 IR Code.
When miniACT is destroyed, IR FIRE will turn off and Receiver LEDs will flash continuous.
To reset, turn OFF and program from start again.
9
Have an IMPACT in your tanks
2009
TEST MODE
Turn Power Switch to OFF.
Plug in a 7.2V battery.
Plug in the Battle Unit’s Receiver 5pin connector into P5.
Plug in the Battle Unit’s IR emitter LED 2pin connector into P2.
Select MODE switch to 2.
Press either the external or internal push button while turning ON the Power Switch.
PWR LED will light up.
When LED at IR FIRE is flashing, push button can be released. IR FIRE is now flashing
continuously.
It is now in TEST MODE
When the external or internal push button switch is pressed, its own Receiver LEDs will flash.
This is a test that the infrared LED and the Battle Unit Receiver are both working.
When the external or internal push button switch is pressed, if its own Battle Unit receiver
LEDs do not flash, either the infrared LED or the Receiver is not working.
Replace either the infrared LED or the Receiver and test again.
When the external or internal push button switch is pressed, the IR emitter LED signal will have
effective hit on others’ working Battle Unit Receiver systems that are within range.
When the Receiver receives infrared LED signal from other system, the Battle Unit Receiver
LEDs will flash, showing that a signal is received.
In TEST MODE, there is unlimited times that the infrared LED can fire and unlimited times the
Battle Unit Receiver can receive signals.
When the IR emitter LED is fired, HI-LUX LED (P1) will flash, simulating a barrel fired. This
LED can be installed in any of the model’s weapon.
HI-LUX LED (P1) can be disconnected and the system will still work.
10
Have an IMPACT in your tanks
2009
RANGE EXTENSION MODE
In this mode, miniACT is an interface between Tamiya MFU and tank’s infrared LED.
Effectively it has about 10% more firing range.
Turn Power Switch to OFF.
Use a 2way battery connector to power miniACT and DMD together.
In order to work, miniACT and DMD must share the same GROUND.
Plug in a 7.2V battery.
Boxed in dashes are the 3 connections need not to be used:
P1, P3, P5
Plug in the Battle Unit’s infrared LED 2pin connector (from the tank) into P2.
Plug in P4 2pin connector to Tamiya MFU CN2 socket.
Plug to Tamiya MFU CN2
Select MODE switch can be at 1 or 2, it has no effect in this mode.
Place miniACT in a suitable location inside the tank.
When DMD and miniACT are power ON, IR emitter range will have extra range when tank is
fired in normal operation.
When the tank is destroyed, miniACT does not need to be reset.
11
Have an IMPACT in your tanks
2009
SPECIFICATIONS
Operational Voltage: 7.2V ~ 8.0V
Current rating: 180mA (using 7.2V battery @ no load)
Flash Unit: Hi-LUX LED, Life Hr >40,000 hours
Infrared Emitter LED code
Receiving: ALC679, ASC579, Y888
When hit by ALC679 IR Code, Receiver LEDs will flash 6 times, 1 life will be deducted
When hit by ASC579 IR Code, Receiver LEDs will flash 3 times, 1/3 life will be deducted
When hit by Y888 IR Code, Receiver LEDs will flash 8 times, immediate 0 life, regardless
Emitting:
Operational temperature range: -20°C ~ 45°C
Storage temperature range: -35°C ~ 40°C
Weight: 52g
Functions & Settings at one glance
-- OFF ---
-- OFF ---
-- OFF ---
, flash once, turn off, flash once, cycle goes on
, flash 2 times, turn off, flash 2 times, cycle goes on
Lights up continuous
Flash continuous
LIFE COUNT counting confirmed hits from ALC679 IR Code
12
Have an IMPACT in your tanks