Transcript
Congratulations on purchasing
this product
PGWU-61B
PGWX-61B
PGXG-61B
Quick Setup Guide
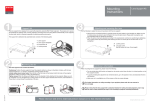
Packaging Contents
1
(EU/US/CH)
user
manual
AAA (2x)
Lens Assembly A
2
1
3
2
Remove protective covers
from both ends of the lens
before starting assembly.
Lens Assembly B
3
Click!
2
3
4
Pull
forward
1
Pull the lever towards the front
while sliding in the lens.
Rear Cover
4
Loosen 3 screws to remove rear cover
and gain access to the inputs panel.
Ceiling Mount*
160
125
5
30
M6x1 depth 8
(4x)
Unit Weight: 18 kg max.
Please check the manual of your
supportsystem for compatability
216,2
241,2
*(Ceiling mount system is not included)
Input Cables
6
(See User Manual for detailed info on Inputs)
Remote Control
7
Quick Keys
Feedback LED
Menu - UP
Menu - RIGHT
Menu - DOWN
Menu - OK
Menu - LEFT
(for Remote and keypad)
Quick Key 1
Push Menu-UP twice
for instant ‘Picture Mute’
Quick Key 2
Home/Menu
Power
On/StandBy
Push Menu-OK for
quick access to the
Focus/Zoom Menu
Battery Lid
(Slide down
to open)
Starting Projector
8
IR Position
Front
IR Position
Rear
OFF/STBY
1 sec
1 sec
1 sec
1 sec
1 sec
ON
Error
During Start-up
Status Led
OSD Lite Menu
9
INPUT
BRIGHTNESS
ASPECT RATIO LENS FOCUS
KEYSTONE
LANGUAGE
CONTRAST
LENS ZOOM
COLOR
LENS SHIFT
i
M
INFO
MODE
i
SERVICE
ADVANCED
10
INPUT
BRIGHTNESS
CONTRAST
COLOR
ASPECT RATIO
LENS FOCUS
LENS ZOOM
LENS SHIFT
KEYSTONE
LANGUAGE
INFO
MODE
SERVICE
ADVANCED
Toggle between input sources
adjust lamp brightness level
adjust image contrast
adjust image colour
modify image aspect ratio
adjust lens focus
adjust lens zoom
adjust lens shift
adjust keystone
select language
information on lamp status
normal/eco/power
service information
see user manual
Important Info
For more information and Maintenance Guidelines,
check the Detailed User Manual on:
http://www.barco.com/en/products-solutions/projectors
R5905602-00 MAN QSG PG-series
- Remove the lens before transporting the projector.
- To save lamp lifetime, first switch the projector to standby mode
and wait two minutes, then switch off the main power.
- Ensure that the projector is operating with clean filters.
- Do not block the ventilation in -and outlets.
- Using the projector at a non recommended tilt angle will reduce the lifetime of the lamps
or create unexpected behaviour of the unit.
- Laser light can cause severe damage to the DMD. This damage is not covered by warranty.