1
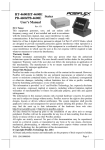
INSTALLATION GUIDE FOR WALL
MOUNT KIT OF PP-8000 SERIES
Rev. Original
KIT PART NUMBER: 39776001010
KIT CONTENT (Besides this guide):
Drill pattern on wall
103
80 mm
101
102
Fig-1 Kit content besides this guide (Printer not included)
ITEM PART NUMBER
DESCRIPTION
Q’TY
101
10642035162
Self Tapping Screw 3.5φ-16L
2
102
10241000021
Plastic Plug
2
103
19770201010
Paper Roll Shaft
1
KIT APPLICATION: This kit can be used to hang Posiflex thermal POS
printer PP-8000 series for wall-mount application
INSTALLATION
1.
Please first determine a suitable area on a rigid wall surface to support
firmly the weight of the printer for its wall mount application. In this area,
the environmental condition should be adequate for a reliable service of the
printer. Considerations include sufficient ventilation and effectively
protected against unwanted contamination. Keep the printer away from
direct sunshine, excessive heat or moisture. Please then follow the
Printer Wall Mount Installation Guide 1
P/N:19770901010
2.
3.
4.
5.
preparation procedures described below. Drill 2 holes 3.15” or 80 mm apart
at same height on the rigid wall. Hole diameter should be 1/4” or 6.35 mm
each. Hole depth should be at least 1 and 3/16” or 30 mm. Please then insert
one plastic plug into each hole leaving the flat end with hole of the plastic
plug at the outside opening of the hole on wall. Use a hammer to tap the
plastic plug in gently if necessary. Insert the attached screws into the plastic
cotter and screw in but leaving about 7 mm or
9/32” of screw neck exposed from wall
surface. These 2 screws will then be used for
hanging the printer.
Wall Mount
Please note that on bottom of the printer, there
Hanging Holes
are 2 holes 80 mm apart for hanging the
printer over the screws on wall as indicated in
the upper right picture. Hang the printer onto
the wall with the 2 screw heads going into
these 2 holes.
Now, push the hood release button of the
printer, the hood will now fully
open. Insert the paper roll shaft in
Paper
the paper roll and put the whole
Roll
paper roll inside the printer into
the guides on both sides till it
Shaft
holds in position for wall mount
(103)
application as indicated in lower
right picture. Close the hood and
tear off the excessive paper.
To prevent any confusion as a
Guide
result from different paper roll
position in wall mount application,
please change in service window
DIP switch 1 position 5 to ON. So that the printer won’t respond to host as
“busy” just by paper near end signal caused by this position change. Of
course you may also leave this setting unchanged and do the sensor position
adjust carefully for the specific paper roll used particularly for wall mount
application according to the User’s Manual of PP-8000 series.
Please make all necessary cable connections to the printer, then the printer
is ready for wall mount operation.
2