1
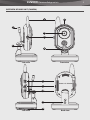
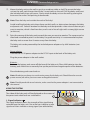
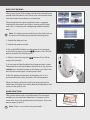
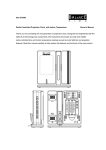
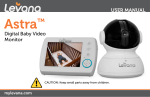
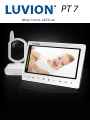
LUVION
Premium Babyproducts
http://www.v812.ru/
PT 7
1
2
INSTRUCTION MANUAL
TABLE OF CONTENTS
INTRODUCTION ....................................................................................................................................... 2
SAFETY INSTRUCTIONS . ........................................................................................................................ 2
CONTENTS OF PACKAGE. ....................................................................................................................... 3
OVERVIEW OF PARENT UNIT ................................................................................................................. 6
OVERVIEW BABY UNIT............................................................................................................................. 7
GETTING STARTED. .................................................................................................................................. 8
USING THE SYSTEM . ............................................................................................................................... 9
MENU OPTIONS ....................................................................................................................................... 11
BABY UNIT PAIRING ................................................................................................................................ 14
QUAD FUNCTION .................................................................................................................................... 14
TROUBLESHOOTING ............................................................................................................................... 15
TECHNICAL SPECIFICATIONS ................................................................................................................. 15
INTRODUCTION
Thank you for purchasing the Luvion PT 7. Now you can see and hear your baby or even more
babies by using up to three additional camera’s.
Please retain your original dated sales receipt for your administration. For service and warranty issues
you will always be asked for a copy of the receipt. For warranty issues you can contact your Luvion
dealer or your local Luvion distributor. More information can be found on www.luvion.com.
This user manual provides you with all information necessary for a safe and easy use of this baby
monitor. Before using the Luvion PT 7 we ask you to thoroughly read this user manual. We ask for
your special attention for the safety instructions.
LUVION
SAFETY INSTRUCTIONS
-
Keep small parts away from children.
This product is not a toy. Do not allow children to play with it.
This product is not intended as a substitute for adult supervision.
Check carefully whether or not you are using the right power adapter for both the parent and
baby unit.
Only use the original supplied power chargers.
Do not use the product in humid conditions or nearby water.
Only use the product between 10°C en 35°C.
Always keep the cords of the power adapters at least 1 meter away from the baby.
Do not try to open the product. This must be done by a qualified person.
LUVION
3
Premium Babyproducts
Batteries
-- Charge the battery of the parent unit for some hours until it’s fully charged. The battery is
fully loaded when the charging light colours green.
-- We advise you always to use the main power for the baby unit. Should there be no main
power around, we advise you to use non-rechargable batteries for the baby unit. Should you
decide to use batteries, make sure that the power adapter is not connected to the camera.
The baby unit has no charging function for rechargable batteries.
-- To avoid damage to the batteries, please do not expose the baby monitor to temperatures
higher than 40°C. Please remove the optional batteries from the baby unit if you do not use
the product for more than 1 month.
CONTENS OF PACKAGE
The system includes the following components:
- 1 x baby unit (camera)
- 1 x parent unit (monitor)
- 1 x power adapter for the parent unit
- 1 x power adapter for the baby unit
- 1 x RCA cable for connecting the parent unit to the television
- 1 x wall plugs and screws
Check your package to confirm that you have recieved the complete system, including all components listed above.
Baby unit
Parent unit
Power adapters
(parent unit & baby unit)
RCA cable Screws
& Plugs
4
OVERVIEW OF PARENT UNIT (MONITOR)
1
2
12
MIC
3
4
5
6
7
8
9
10
11
Front view
13
14
15
16
17
18
19
25
24
20
21
23
22
Back view
LUVION
5
Premium Babyproducts
OVERVIEW OF BABY UNIT (CAMERA)
3
7
1
4
5
2
6
Side view
Front view
8
9
10
5
11
Side view
12
Back view
6
OVERVIEW OF PARENT UNIT (MONITOR)
1.
2.
3.
4.
5.
Coloured LEDs The green LED indicates that the monitor is switched on. The green/red
LEDs indicate the volume level of the camera (from low to high).
Microphone Recieves sound from the area around the parent unit and transmits it to the
baby unit. This will only happen when the Talk back button is pressed.
Play/Stop button Press this button to start or stop the baby unit playing a lullaby.
Next button Play the next lullaby. There are three different lullabies available.
Zoom The video can be set at normal or double size by pressing the zoom button. When
the video is in double size mode, the
buttons can be used to view the parts
outside the parent unit screen. Press the zoom button again to return to normal size. In the
double size mode 2x is displayed at the top of the screen.
Note: There is no sound in the zoom mode. Exit the zoom mode to restore the sound.
6.
7.
8.
9.
10.
11.
12.
13.
14.
15.
16.
17.
18.
Left (A) button Press left (A) to automatically switch between multiple cameras. The
screen changes channel every 3 seconds. Use in a menu to move your selection to the left
Down (-) button Press down (-) to decrease the volume. Use in a menu to move your
selection down.
OK button To confirm your selection in a menu press OK.
Up (+) button Press up (+) to increase the volume. Use in a menu to move your selection
up.
Right (M) button Press right (M) to switch manually between multiple cameras. Use in a
menu to move your selection to the right.
Menu button Press this button to enter the main menu. Press menu again to exit the menu.
LCD screen Displays the video from the baby unit.
Talk button Press this button to speak through the baby unit. The
icon will then be
displayed on screen. When multiple baby units are used, you will speak through the unit
currently being displayed on the screen.
Antenna Recieves the video and sound from the baby unit.
Quad button Press this button to display the video of all 4 cameras simultaneously. Press
the button again to exit the Quad mode. In the Quad mode, the screen displays cam 1, cam
2, cam 3 and cam 4 for each channel. When there is no signal from the baby unit or the
signal is too weak the screen will display “out of range” on the corresponding channel.
Nightlight button Press this button to remotely turn on/off the night
1 2
light on the baby unit (when multiple baby units are used the nighlight
3 4
of the unit currentlly being displayed on the screen will be turned on/
off ). When the nightlight is on, an indication icon will be displayed on
the screen.
VID OFF button Press the video button to switch to the sound only mode. In this mode
the screen is turned off. Press the button again to return from the sound only mode to the
sound and video mode.
Scan button When this button is pressed, the screen is turned off. During this time the
parent unit will continuously scan the baby unit (or multiple baby units). When a sound is
detected, the parent unit will become active. The screen is turned back on, now you can
see what happens in the baby room. You can adjust the sound sensitivity for this detection
with the rotary knob at the side of the camera. After the parent unit has detected sound
it will take about 5 seconds to switch back to the scan mode. Except when the sound is
LUVION
Premium Babyproducts
7
continously detected. In that case the monitor will be activated for another 5 seconds.
There are 2 reasons to use the scan button: 1- to prevent you from being disturbed by the
bright LCD screen, or 2- to save energy. Press the scan button again to deactivate the scan
mode.
19. Speaker Produces the sound from the baby unit.
20. AV out Audio-video socket which allows you to connect a television or monitor to the
parent unit, using the RCA cable.
Note: When the RCA cable is connected the screen of the parent unit will be turned off.
Charging indication LED The LED is red when the built-in battery is being charged and
turns green when it is fully charged.
Foot Enables you to position the parent unit on a flat surface.
Battery compartment This compartment allows the battery to be replaced. Only use
original Luvion batteries.
DC in Connect the included DC 5V power adapter to power and/or charge
the parent unit.
27. On/Off button Turns the parent unit ON or OFF.
21.
22.
23.
24.
25.
26.
OVERVIEW OF BABY UNIT (CAMERA)
1.
2.
3.
4.
5.
6.
7.
8.
Temperature sensor Measures the temperature.
Pair button The pair button is located at the back of the baby unit. It enables you to
reconnect the baby and parent unit or to connect additional baby units.
Camera antenna Sends and recieves signals to/from the parent unit.
Lens / Infrared light These LEDs are automatically activated when the room gets darker
and enable you to monitor the baby under no/low light conditions. The infrared LEDs do
use a lot of energy and can therefore empty the batteries more quickly.
ON/OFF button Turns the baby unit ON or OFF.
Microphone Recieves sounds from the area near the baby unit and transmits it to the
parent unit.
Night light Press this button to turn on the night light. The night light can also be turned
on/off remotely with the parent unit’s night light button.
Sensitivity To adjust the sensitivity of the camera. A lower sensitivity means that sounds
recieved by the baby unit need to be louder to be transmitted to the parent unit. A higher
sensitivity means that at a low sound level the sounds will be transmitted to the parent unit.
Note: If you wish to monitor every sound. Go to Menu Auto Mute and select NO. This will activate
an “open channel”.
9. ECO switch Allows you to set a lower transmitting power. This will save energy.
10. Volume To increase or decrease the volume of the lullabies.
11. DC 5V power Enables you to connect the baby unit to the electricity grid.
Note: The baby unit also works on 4 AA batteries (not included). Do not leave the batteries in
the baby unit when you use it with the power adapter.
12. Battery compartment Open this compartment to place 4AA batteries to power the baby unit.
8
GETTING STARTED
Parent unit
1. Carefully unpack the parent unit.
2. Place the parent unit in a place that has clear reception with the baby unit.
3. Plug the DC 5V power adapter into the DC 5V input at the side of the parent unit. Plug the
power adapter in the wall socket.
The parent unit will start to charge; the charging indication LED will now turn red.
Leave the parent unit to charge prior to the first time use until the built-in rechargable
battery is fully charged. The charging indication LED will turn green when the battery is
fully charged.
Note: Do not remove the power adapter during the initial charging process. After the initial
charge, charge the parent unit as required.
If you wish to view the baby unit video on a larger screen, connect the included RCA cable
to a TV or monitor. Connect the Video IN (yellow) and the Audio IN (white) plugs to the TV
or monitor. Connect the other plug to the AV OUT input located at the back of the parent
unit.
Note: The use of the AV output is for convenience only. When it is used in combination with
a large screen TV or PC monitor, the video might be grainy as the camera limits the video
resolution to VGA (640 x 480 pixels). This is not a product defect.
For the best video quality use the PIP (Picture in Picture) function of your TV or PC monitor. It
enables you to concurrently watch TV and look at the video of the parent unit.
Note: Please make sure that the A/V Out (see settings) is set in accordance with your TV or PC
monitor. You can choose between NTSC or PAL.
Baby unit
Before installing the baby unit, carefully plan where and how it will be positioned, and where you
will route the cable of the power adapter.
Before starting permanent installation, verify the reception of the baby unit video on the parent
unit. Verify this when both the baby unit and the parent unit are placed in their preferred
positions.
1. Carefully unpack the baby unit.
Note: If you are installing baby units that did not come with the initial system (separately
sold baby units), please look at the baby unit pairing section of this manual for details on
installation.
LUVION
9
Premium Babyproducts
2. Mount the baby unit on the wall or put it on a cabinet, table or shelf. To mount the baby
unit on the wall, mark the position of the 2 screw holes on the wall. Drill the holes and insert
the included wall plugs and screws. Firmly attach the baby unit on the wall by placing the
base over the screws and pushing it downwards.
Note: Place the baby unit outside the reach of the baby!
Avoid installing the baby unit where there are thick walls, or obstructions between the baby
and parent unit. Select a location for the baby unit that provides a clear view of the area you
want to monitor, which is free from dust, and is not in line-of-sight with a strong light source
(or the sun).
3. Point the camera of the baby unit towards the area you want to monitor. The camera can be
tilted and swivelled to point it at the baby. For good sensitivity it is recommended to place
the baby unit no more than 3 meters away from the baby.
The baby unit can be powered by the included power adapter or by 4AA batteries (not
included).
Power adapter
Connect the DC 5V power adapter to the DC 5V input at the back of the baby unit.
Plug the power adapter in the wall socket.
Batteries
Remove the battery pack cover off the base of the baby unit. Place 4AA batteries into the
battery pack. Make sure to correctly line up the positive and negative poles of the batteries.
Place the battery pack cover back on.
Note: We advise you always to use the main power for the baby unit. Should there be no main
power around, we advise you to use non-rechargable batteries.
Note: Should you decide to use batteries, make sure that the power adapter is not connected to
the camera!
USING THE SYSTEM
25°C
Cam 1
The video of the baby unit will be displayed on the screen of
the parent unit when both are switched on.
1
1. Signal indicator
The signal indicator shows the strength of the signal being
recieved from the baby unit. One or no bars indicates a poor
signal and 4 bars indicate a strong signal (see table below).
2
3
4
5
6
10
2. Channel indicator
The channel indicator displays the current channel. Press the button to switch between the
available baby units. To automatically switch between the channels press the button.
3. Nightlight indicator The nightlight
indicator is displayed when the nightlight
on the baby unit is turned on.
4. Sound indicator
When the volume
has been decreased to mute, the mute icon
will be displayed on the screen. Use the
button to increase the volume.
Signal strength
Indicator Warning
Perfect
None
Good
None
Fair
None
Low
Out Of Range
No Signal
Out Of Range
5. Talk indicator
This icon appears
when the talk button is pressed. You can now talk through the baby unit.
6. Room temperature indicator
The room temperature indicator indicates the temperature measured by the baby unit. Make
sure the temperature sensor of the baby unit is pointed away from the camera to enable more
accurate measurements.
OUT OF RANGE WARNING
When the baby unit is positioned too far from the parent
unit, the warning message Out of Range will appear on the
screen of the parent unit and the video will start to flicker.
When there is no connection between the baby and the
parent unit, the screen of the parent unit will be black and
display the warning message Out of Range. Try bringing the
parent and baby units closer together to restore the video.
Out Of Range
Note: If this does not help, try pairing the baby and parent unit. See baby unit pairing section.
ADJUST THE VOLUME
Cam 1
The baby unit volume can be adjusted by using the
buttons when viewing the video of the baby unit.
Press the button to decrease the volume, and press the
arrow to increase the volume. When the volume is set to
one bar (lowest setting) the volume is muted. The sound
icon
will then appear on screen.
25°C
Volume indicator
The volume indicator will be displayed when you change the volume.
Note: The volume cannot be changed in the zoom mode (2x is displayed on the screen)!
LUVION
Premium Babyproducts
11
MENU OPTIONS
Press the menu button on the parent unit to display the menu on the screen. Use the
buttons to navigate through the menu. Press the OK button to confirm a setting.
MAIN MENU
The main menu contains 4 submenus:
- Pairing - Use the pairing menu to connect (extra) baby
units to the parent unit.
- Brightness - In this submenu you can adjust the
brightness of the screen.
- Auto Mute - Auto mute is a feature where you can choose between a so called “open channel”,
or the sound activated option. Using the sound activated mode, you will only hear you baby
when there is a certain amount of sound. The sensitivity for this level of sound detection can be
adjusted by turning the rotary knob located at the side of the baby unit.
- Settings - In this submenu you can set the alarm volume, temperature alert parameters,
temperature display unit, the TV system for AV output and the screensaver. It is also possible to
reset the parent unit to default factory settings.
PAIRING
The system comes with a baby unit that has already been
paired with the parent unit. The pairing function gives each
baby unit a seperate channel on the parent unit (with a
maximum of 4 baby units). This is necessary for configuring
additional baby units.
Use the
buttons to select the desired pairing channel, and press the OK button to begin the
pairing process. For more information see baby unit pairing section.
Note: It is highly recommended to pair the baby units to the parent unit before permanently
mounting them.
BRIGHTNESS
The brightness of the screen can be adjusted with the
buttons. The button makes the screen lighter and the
button makes the screen darker.
12
AUTOMUTE
Auto mute is a feature where you can choose between
a so called “open channel”, or for the sound activated
option. Using the sound activated mode, you will only
hear you baby when there is a certain amount of sound.
The sensitivity of for this level of sound detection can be
adjusted on the side of the baby unit.
The advantage of the sound activated mode is that you will not hear any background sound and
that you will only be alerted if there is certain sound in the baby room. Should you prefer to hear
the sound of the baby room continuously, a so called “open channel”, then this option can be
chosen in this menu by selecting NO.
SETTINGS
The settings menu contains 5 submenus:
1. Temperature alert
2. Temperature Display
3. A/V Out
4. Screensaver
5. Default
1. Temperature Alert
You can use this menu to set the temperature range of the
temperature alert. When the temperature is outside this
range, a warning sound will be emitted.
Use the
buttons to select the minimum and
maximum temperature, then use the
buttons to
set the temperature value. After successfully setting the
temperature range, select On and then press OK to confirm
the settings.
Select OFF to disable the temperature alert.
2. Temperature display
Select the temperature unit you want to use. You can
choose between degrees Celcius or degrees Fahrenheit.
Note:
Because the temperature sensor is located next to the
(warm) camera, the measured temperature can deviate
slightly from the room temperature. The temperature
displayed on the screen is about 1-2 degrees Celcius higher
than the room temperature.
LUVION
Premium Babyproducts
3. A/V Out
This menu lets you choose the TV system for AV Out. You can
choose between NTSC or PAL.
4. Screensaver
Four images are stored in the system. You can select one to
display it on the screen of the parent unit in SCAN mode.
Or you can select Blank screen to make the screen black in
SCAN mode.
5. Default
Select Yes to reset the parent unit to factory default settings.
All menu settings will then be reset.
Note: Pairing settings will not be affected by a reset. Baby
unit(s) will remain paired with the parent unit.
13
14
BABY UNIT PAIRING
The system comes with a baby unit that has already been
paired with the parent unit. These units will communicate
with each other once they are switched on.
The pairing function gives each baby unit a seperate
channel on the parent unit (with a maximum of 4 baby
units) this is necessary for configuring additional baby
units.
Note: It is highly recommended to pair the baby units to
the parent unit before permanently mounting them.
1. Switch the baby unit on.
2. Switch the parent unit on.
3. Press the MENU button on the parent unit. Navigate
to the Pairing menu using the
buttons. Press the OK
button to enter the Pairing menu.
4. Select a channel using the
accept the channel.
buttons. Press OK to
5. A message will be displayed on the parent unit screen.
The parent unit will count down from 30 to 0. You have to
shortly press the Pair button on the baby unit within this
time to successfully pair it to the parent unit.
If the Pair button on the back of the baby unit is not
pressed within this time, the units will not be paired.
When the baby and parent unit have been paired, the
video from the baby unit will be directly displayed on the
screen of the parent unit.
QUAD FUNCTION
The system comes with a quad function. This function
enables you to watch the video from 4 cameras at the
same time. Press the quad button to activate it. Press the
button again to exit it.
Note: There is no sound in the quad mode!
LUVION
Premium Babyproducts
TROUBLESHOOTING
If you have any problems with the Pt 7, there is often a quick and simple solution.
Please try the following:
Problem
Solution
No video from the baby
unit
1. Check all connections to the baby unit. Make sure the power adapter
is plugged in.
2. Make sure that both the baby and parent unit are switched on.
3. Make sure that the baby unit is in range of the parent unit.
4. When you are using batteries, try replacing them.
5. Pair the parent unit with the baby unit (see chapter on pairing)
The video is dropping/
Out of Range message
1. Move the baby unit closer to the parent unit.
2. Try repositioning the baby and/or parent unit to improve the
reception.
3. Place the antenna of the parent unit in the vertical position.
4. Pair the parent unit with the baby unit (see chapter on pairing)
Audio problems
1. Make sure that the volume on the TV is switched on.
2. Make sure that there is sound within range of the baby unit
microphone.
3. Make sure the parent unit is not in the zoom or quad mode.
4. If the unit emits a loud screeching noise, move the baby and parent
unit further apart.
The video is or has become
choppy
The video may become choppy when a lower frame rate is experienced
(i.e. 10 frames per second instead of 20 frames per second).
1. Try moving the baby unit closer to the parent unit.
2. Remove obstructions between the baby and parent unit.
3. Place the antenna of the parent unit in the vertical position.
The video appears to be
grainy when using the AV
out function to view the
video on a large screen TV/
monitor
The use of the AV output is for convenience only. When it is used in
combination with a large screen TV or monitor, the video might be
grainy as the camera limits the video resolution to VGA (640 x 480
pixels). This is not a product defect.
1. For the best video quality use the PIP (Picture in Picture) function of
your TV or monitor. Check your TV or monitor product manual to see if
this feature is available on your TV or monitor.
2. View the video on a smaller screen TV or monitor.
TECHNICAL SPECIFICATIONS
Parent unit
Recieving frequency range
2.400GHz ~ 2.482GHz
Data rate
1.5 Mbps
Recieving sensitivity
-81dBm
Demodulatie type
GFSK with FHSS
Resolution
H: 480 V: 234
Viewing angle
H: 70° V: 65°
15
16
Power requirement
5V DC ±5%
A/V Output / Resolution
VGA 640x320 / 15FPS, QVGA 320x240 / 30FPS
Alarm sensitivity
80dB ±10% (1M)
Power consumption
800mA Max without charging
1200mA with charging
Operating temp range
-10° ~ 60° C (14°F ~ 140°F)
Operating humidity
0 ~ 85% RH
Baby unit
Transmit frequency range
2.400GHz~2.485GHz
Data rate
1.5 Mbps
Transmitting power
14dBm (TYP)
Modulation type
GFSK with FHSS
Transmitting distance
300m (50m in-house)
Image sensor type
1/4” Color CMOS Image Sensor
Effective Pixels
H: 640 V: 480
Image processing
Motion JPEG
Image resolution / frame rate
H: 640 V: 480 / 30FPS Max
AES
On 1/2000 ~ 1/20 sec
White balance
Yes
AGC / Range
On / 0dB~24dB
Lens
4.9mm / F2.8
Viewing angle (diagonal)
60°
Minimum illumination
2.5 LUX (IR Off ), 0 LUX (IR On)
IR LED / Night vision range
8 LEDs / 850nm, 5m (with IR LED)
Power requirement
5V DC ±5%
Power consumption
330mA MAX (with Night Light)
250mA (without Night Light)
Operating temperature
10°C ~ 40°C (50°F ~ 104°F)
Operating humidity
0% ~ 85%
Environmental rating
-10° ~ 60° C (14°F ~ 140°F)
http://www.v812.ru/