1
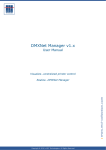
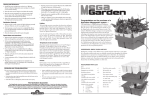
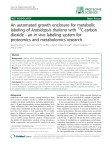
USER MANUAL for PLANT PHOTONICS Led Grow Lights
User Manual
for
90 watt, 140 watt,
210 watt & 280 watt
LED Lights - Amethyst DS v1
Best Led Grow lights on the Market. www.plantphotonics.com. Copyright© Plant Photonics 2013. All rigths reserved.
1
USER MANUAL for PLANT PHOTONICS Led Grow Lights
Thank you for purchasing your Plant Photonics light. It has
been designed and built to provide you with a lifetime of
service. Please read the following instructions to get the best
from your light.
V E RY I M PO R TAN T !
Your new Plant Photonics light can produce 2
spectrum’s which are designed for the vegging
and flowering stages of your plants life cycle.
YOU MUST SWITCH THE LIGHT OFF
BEFORE CHANGING THE SPECTRUM!
Failure to do so may lead to failure of the leds and
will void your warranty!
Best Led Grow lights on the Market. www.plantphotonics.com. Copyright© Plant Photonics 2013. All rigths reserved.
2
USER MANUAL for PLANT PHOTONICS Led Grow Lights
140 Watt Led Light component's diagram
Best Led Grow lights on the Market. www.plantphotonics.com. Copyright© Plant Photonics 2013. All rigths reserved.
3
USER MANUAL for PLANT PHOTONICS Led Grow Lights
280 Watt Led Light component's diagram
Best Led Grow lights on the Market. www.plantphotonics.com. Copyright© Plant Photonics 2013. All rigths reserved.
4
USER MANUAL for PLANT PHOTONICS Led Grow Lights
Table of contents
1. Light Maintenance
2. Setting Up Your Light
3. Using Your Light
4. Hint And Tips
5. Trouble Shooting
1. Light Maintenance
Your light should be kept clean for best performance and quieter operation.
Never use harsh chemicals or solvents to clean your light. Use a soft dry or
SLIGHTLY damp cloth or a small paint brush. Clean the top of the light after
every grow cycle and insure the fan blades are clean. A layer of dust on the
top of the light will cause it to operate at a higher temperature and dirt
building up on the fans will cause them to become noisy and eventually fail. If
kept clean they should last at least 10 years. Clean the lens with a dry micro
fibre cloth. If you have splashed chemicals or nutrient solution on the lens, use
a damp cloth to remove the splash, then gently dry the lens.
Best Led Grow lights on the Market. www.plantphotonics.com. Copyright© Plant Photonics 2013. All rigths reserved.
5
USER MANUAL for PLANT PHOTONICS Led Grow Lights
2. Setting Up Your Light
• 90 Watt and 140 Watt Lights
In the box you have 1 led light panel and 1 mains lead with the correct mains
plug for your region on one end and a small white connector on the other.
Carefully plug the mains lead connector into the mains lead socket on the light
until the 2 retaining clips snap into position. Please check it is the right way
around and never use force, the connector should go in easily! You will notice
that the mains lead has a D ring and a split ring attached to it. This is the stress
relief which protects against the cord being pulled out of the socket (please see
photo A below). Decide which side of the light you want the mains lead to go
and attach the split ring to the attachment point on that side of the light. The
attachment point is a small hole drilled in the upright support for the power
supplies at the back of the light. There is one on each side so you can route the
mains lead to which ever side is most convenient.
Best Led Grow lights on the Market. www.plantphotonics.com. Copyright© Plant Photonics 2013. All rigths reserved.
6
USER MANUAL for PLANT PHOTONICS Led Grow Lights
• 210 Watt and 280 Watt Lights
In the box you have 2 led light panels, 1 mains lead with the correct mains
plug for your region on one end and a small white connector on the other, 1
panel inter connection cable with a small white connector on each end and 1
loose plastic connector with no metal pins.
Each panel has 2 sockets. ANY of these sockets can be used for the mains lead
or the panel inter connect. Decide which of the 4 sockets is most convenient
(closest to where yo want the mains lead to be. Carefully plug the mains lead
connector into the mains lead socket on the light until the 2 retaining clips
snap into position. Please check it is the right way around and never use force,
the connector should go in easily!
You will notice that the mains lead has a D ring and a split ring attached to it.
This is the stress relief which protects against the cord being pulled out of the
socket. Attach the split ring to the attachment point on the side of the light
closest to the socket you have the mains lead plugged into (please see photo A
below). The attachment point is a small hole drilled in the upright support for
the power supplies at the back of the light. There is one on each side so you
can route the mains lead to which ever side is most convenient.
Best Led Grow lights on the Market. www.plantphotonics.com. Copyright© Plant Photonics 2013. All rigths reserved.
7
USER MANUAL for PLANT PHOTONICS Led Grow Lights
Then plug one end of the panel inter connection lead into the other socket on
the panel and plug the other end into whichever socket on the other panel you
want.
Finally, snap the loose connector into the remaining empty socket on the
panel, this covers the pins to protect against any change of the user receiving
an electric shock (please see photo B below).
3. Using Your Light
• Hanging Your Light
Your light should be hung in the centre of the area you want it to cover. For
mature plants, the light should be about 30 cm above the plants, BUT if you
have been using another light and are replacing it with a Plant Photonics light
part way through the grow cycle it is advisable to put the light 40 to 50 cm
above the plant to begin with, then lower over the next few days. This is
because our new light is extremely powerful and your plants may need some
time to get used to the higher light levels.
Best Led Grow lights on the Market. www.plantphotonics.com. Copyright© Plant Photonics 2013. All rigths reserved.
8
USER MANUAL for PLANT PHOTONICS Led Grow Lights
• Selecting the correct Spectrum and Power Level.
Your light has 3 different modes which are controlled by 2 switches.
1) Low Power or Eco Vegging Mode. This mode gives a normal vegging
spectrum, but at a reduced brightness of about 2/3 normal. This is great
for seedlings, cuttings and small plants which do not need the lights
full power. To select this mode, use the BLACK switch near the mains
lead. Select ECO for low power and HIGH for full power. NOTE – It
makes no difference whether the RED spectrum switch is set to
Vegging or Flowering, when the BLACK switch is set to ECO you will
get ECO Vegging. When the BLACK switch is set to HIGH you will get
whatever spectrum the RED switch is set to. See the table below.
2) High Power Vegging Mode. This mode gives you a Vegging spectrum
at the full rated power of your light. To select this mode set the BLACK
switch to HIGH and the RED switch to Vegging. Note – If you need to
change the setting of the RED switch, YOU MUST SWITCH THE
LIGHT OFF FIRST!
3) High Power Flowering Mode.
This mode gives you a Flowering
spectrum at the full rated power of your light. To select this mode set
the BLACK switch to HIGH and the RED switch to Flowering. Note –
If you need to change the setting of the RED switch, YOU MUST
SWITCH THE LIGHT OFF FIRST!
Best Led Grow lights on the Market. www.plantphotonics.com. Copyright© Plant Photonics 2013. All rigths reserved.
9
USER MANUAL for PLANT PHOTONICS Led Grow Lights
Spectrum
Red Switch
Black Switch
Low Power/Eco Vegging
Either setting.
ECO
Full Power Vegging
Vegging
HIGH
Full Power Flowering
Flowering
HIGH
• Timers and Extension cords
Your light can be used with any type of timer; mechanical or electronic.
I recommend not using more than 560 watts of led lights per timer. If you have
more than this, I recommend using more than 1 timer and setting the timers so
they come on at slightly different times. This is to avoid the possibility of the
inrush current blowing a fuse or circuit breaker. Although the lights draw
very little power when they are on, when they are first switched on they create
what is called an 'inrush current'. This is a short period (about 1/100) of a
second where the power supplies draw a large amount of power as they
charge their capacitors and stabilise.
Having said that, I would always recommend buying a decent timer as it will
be more reliable and last longer.
I recommend you do NOT use any extension cords or multi-plugs which have
a power on light or lighted switch. These seem to allow a tiny trickle of power
through (possibly via ground leakage) which is enough to make the leds glow
slightly when the light is switched off! If you see this problem, simply change
your extension cord for a plain one and the leds won't glow!
Best Led Grow lights on the Market. www.plantphotonics.com. Copyright© Plant Photonics 2013. All rigths reserved.
10
USER MANUAL for PLANT PHOTONICS Led Grow Lights
4. Hint And Tips
•
Keep your lights as close to the plants as possible while still covering
the grow area.
•
Change the spectrum from Vegging to Flowering a week before you cut
the hours. This will cause faster flowering. A good time to do it is when
you change the fertilizer to a flowering one.
•
Change back to the vegging spectrum for the last 2 weeks of flowering.
This will give you the highest quality results. It is the same as the way
many growers go back to MH for the last 2 weeks, to increase resin
production and improve taste.
•
Use less nutrients/fertilizer than usual. Hydro growers will notice they
will only need to top up about half as often as usual. Usually the plants
will do better with a much lower EC than you needed with normal
lights. This also means plants grown under leds require less flushing.
5. Trouble Shooting
Your light has been built using top quality materials and is designed to run for
many years. In the unlikely event of a fault the following information will help
you to overcome or diagnose most faults. Please be careful at all times and do
not attempt anything you do no feel confident in doing.
• One of the fans has stopped.
If all of the leds are still working carefully unplug the fan, then plug it back in.
If it doesn’t work the fan needs to be replaced.
Please contact us for a
replacement fan.
Best Led Grow lights on the Market. www.plantphotonics.com. Copyright© Plant Photonics 2013. All rigths reserved.
11
USER MANUAL for PLANT PHOTONICS Led Grow Lights
• Several rows of leds are not working.
Check that the BLACK switch near the mains lead is set to HIGH. With the
light unplugged operate both the RED and BLACK switches a couple of times,
ensure that the BLACK switch is set to HIGH.
◦ If this has not fixed it then:
a) Unplug the light and carefully unplug and then replace all of
the connectors (2 per power supply) from the power supplies
to the light.
◦ If this has not fixed it then:
The following requires that the user has some basic electrical/DIY skills. If
you don’t, DO NOT attempt this, either ask a friend with the required skills
or contact me.
Do ONE of the following:
a) Use a test meter set to DC volts and a minimum range of 100 Volts DC.
You can also use one of the cheap electrical test pens with a small light
instead of the meter. With the light unplugged, unplug the low voltage
DC connectors (those are the WHITE cables) from the light. Plug the
light in and check the voltage from each power supply. The voltage
should read approximately 90V. The exact reading is not important as it
will vary slightly between power supplies. DO NOT PLUG THE
CONNECTORS BACK IN WITH THE LIGHT TURNED ON! If you
find you have a faulty power supply, please contact us for a
replacement.
b) Remove all 2/3 power supplies, but not the fans. Plug one back in (both
connectors) and plug the light in. If some leds light, that power supply
is ok. If no leds are lit, unplug the light and repeat, this time using a
Best Led Grow lights on the Market. www.plantphotonics.com. Copyright© Plant Photonics 2013. All rigths reserved.
12
USER MANUAL for PLANT PHOTONICS Led Grow Lights
different power supply. If the leds light this time, then the first power
supply was faulty. When you have identified a power supply that
works, use it to test the remaining leds by plugging it into the remaining
1/2 power supply sockets on the light, remembering to unplug the light
before changing the power supplies. If all the leds work, the problem is
a faulty power supply. Test the remaining power supplies one at a time
to locate the faulty unit. Contact me for a replacement power supply. If
all the power supplies test out OK and a section of the leds are still not
lighting you have a faulty led and the unit will have to be returned for
repair.
• One led is not lit.
The led is faulty. If all the other leds are lit it means that the faulty led is still
conducting electricity. The only way to repair a faulty led is to send it back to
Plant Photonics for repair. However the light will continue to work perfectly
with one faulty led and the reduction in power output will be tiny, you will
never notice the difference. Operating the light with 1 faulty led will not harm
the light in any way. It is up to you whether you want to have it repaired. If
you are using the light for growing, I would suggest waiting until the grow is
finished. If you are near the end of your warranty, just email me informing me
of the fault and I will allow you to return it at a later date and still repair it
under warranty!
Best Led Grow lights on the Market. www.plantphotonics.com. Copyright© Plant Photonics 2013. All rigths reserved.
13
USER MANUAL for PLANT PHOTONICS Led Grow Lights
•
The whole light is dead.
Don't Panic! This is VERY unlikely to be serious as it would mean that all 3
power supplies have failed at the same time. Unless you have been hit by
lightning it means something like a loose wire in the plug or a faulty timer.
(UK customers only, please check the fuse in the mains plug).
Plug the light directly into the mains socket. If the light comes on then the fault
is in any extension cords or timers etc. the light was plugged into. If it doesn’t
come on, unplug it from the mains and remove and replace the mains cable
from the light. Plug it in and try it. If it still doesn’t come on check the wiring
in the plug for a loose wire. Check that the circuit breaker/fuse for that wall
outlet is ok in your fuse/breaker panel. Try a different socket in another room.
If all this fails, please contact me.
Best Led Grow lights on the Market. www.plantphotonics.com. Copyright© Plant Photonics 2013. All rigths reserved.
14