1
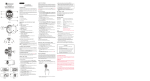
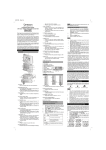
Pillbox Timer with Pulsemeter
Model: PMP238
User Manual
P/N: 086L002053-161 EN REV1
1/10
GB
PILLBOX TIMER WITH
PULSEMETER
7. EL back light
8. Low-battery indicator
MODEL: PMP238
DESCRIPTION AND FUNCTION OF
PARTS [FIG. A]
INSTRUCTION MANUAL
A. LCD
- Multi-function display
INTRODUCTION
Congratulations on your purchase of the easy-to-use
Pillbox timer with Pulsemeter (PMP238).
B. [
This product combines several unique features to assist
individuals when taking medication. Features include a
medication timer with alarm, a touch-sensitive pulsemeter,
a digital clock and electro-luminescent (EL) back light.
C. [PULSE] Button
- Sets the unit in pulse-display mode
- Returns unit to a previous mode from Pulse mode
The PMP238’s trouble-free qualities are enhanced through
the product’s small size, it’s lightweight, and pillbox
design.
D. [MODE] Button
- Alternates between clock and timer displays
- Initiates settings changes
FEATURES
1.
2.
3.
4.
5.
6.
P/N: 086L002053-161 EN REV1
2/10
E. Pulse Sensor
- Detects and displays a person’s pulse rate
Pillbox storage
User select 12 or 24-hour clock
Pulse monitor
Countdown timer
Timer alarm
12 /24 hr. real-time clock
PMP238 EN.P65
ADV] Button
- Activates EL back light
- Increases values when setting the clock or timer
F. [ST/ SP] Button
- To start or stop the timer
1
1
G. Battery Compartment
- One (1) CR2032 3V lithium cell
4/7/06, 10:42 AM
GB
GETTING STARTIED
BATTERY INSTALLATION
1. Using a coin, carefully twist open the back panel.
2. Insert one (1) CR2032 3V lithium cell or equivalent
3. Replace the battery compartment door.
2
PMP238 EN.P65
P/N: 086L002053-161 EN REV1
3/10
2
Once batteries are inserted into the unit, the user will hear
a beeping sound and all segments of the LCD will briefly
illuminate. The display will be set to factory values which
is 12:00:00AM for time and 0:00:00 for the timer. The
current time will require manual setting.
4/7/06, 10:42 AM
GB
A low-battery icon [
changing.
To alternate between the clock and timer display:
Press MODE.
To access the pulse display:
Press PULSE.
To exit the pulse display:
Press PULSE.
] indicates that the batteries require
Note: If not disposed properly, batteries can be
harmful. Protect the environment by taking
exhausted batteries to authorized disposal
stations.
THE CLOCK
MEDICATION STORAGE
This device has a pillbox. Use the compartment for storing
medication.
In clock display the unit will show the time. The time can
be displayed in a 12-hour or 24-hour format as hours,
minutes and seconds.
WEARING THE PILLBOX
Using the attached cord, the device can be secured to
clothing.
12-hour Display
GENERAL OPERATION
To set the current time:
1. Enter clock display.
ABOUT DISPLAY MODES
Note: If the countdown timer is displayed, press
[MODE] to enter the clock mode. From pulse mode,
press [PULSE] to exit pulse mode followed by
[MODE] to toggle between clock and timer display.
This unit has a display for the time, a display for a timer
and a pulsemeter display.
Timer Display
Pulse Display
24-hour Display
2. In clock mode, press and hold [MODE] for two
seconds. The 12-hour value will flash.
Clock Display
3
PMP238 EN.P65
P/N: 086L002053-161 EN REV1
4/10
3
4/7/06, 10:42 AM
GB
THE TIMER
3. Press [
ADV] to make a selection between 12-hour
and 24-hour format.
The timer can count down from a pre-set time. The unit will
count down from a maximum time of 29-hours, 59-minutes
to zero. In count-down timer mode, once the unit reaches
zero it will stop and an alarm will sound.
4. Press [MODE] the hour digits will flash.
5. Press [
ADV] to advance the numbers until the
appropriate hour digit is displayed.
To indicate that the unit is in timer mode a [
will be displayed .
Note: Holding down the button will increase the
value rapidly.
] timer icon
6. Press [MODE], the minute digits will flash.
ADV] to advance the numbers until
7. Again, press [
the appropriate minute digit is displayed.
To set the timer:
8. Press [MODE], the “seconds” will flash.
1. Enter timer display.
ADV].
9. To adjust the “seconds” to zero, press [
Note: If the clock is displayed, press [MODE] to
enter the timer mode. From pulse mode, press
[PULSE] to exit followed by [MODE] to toggle
between clock and timer displays.
10. Press [MODE] to exit the setting mode.
The clock is now set.
Note: If no buttons are pressed for 60-seconds during
the clock-setting function, the unit will
automatically exit the clock-setting mode.
2. To set the timer, press and hold [MODE] for 2 seconds.
The hour digits will flash.
3. Press [
ADV] to advance the hour digits to the
desired time.
4. Press [MODE] and the minute digits will flash.
4
PMP238 EN.P65
P/N: 086L002053-161 EN REV1
5/10
4
4/7/06, 10:42 AM
GB
To clear the timer:
1. Press and hold [MODE] for 2-seconds. The digits will
return to zero and the hour digits will flash.
5. Press [
ADV] to advance the minute digits to the
desired time.
The timer is now set.
2. Without entering a number for the hours, press [MODE]
again. The Minute digits will flash.
Note: If no buttons are pressed for 60-seconds during
the timer-setting function, the unit will
automatically exit the timer-setting mode.
3. Press [MODE] a final time to exit the timer-setting
mode.
To start the timer:
-
The timer is now cleared.
Press [ST / SP]. The timer will start.
To reset the timer to its originally set time:
- Press and hold [ST / SP] for 2-seconds. The display
will return to its originally set time.
Note:
- When the timer reaches 0:00:00 a beeping alarm will
activate to indicate that the timer has completed its
cycle. The alarm will last for one (1) minute. After
one minute, the alarm will continue to make one
short beeping sound once every two-minutes. To
stop the alarm, press any button and the timer will
automatically reset to the original timer setting.
THE PULSEMETER
A person’s pulse rate indicates the number of times that
the heart beats within a given amount of time. This unit
calculate how many times a heart will beat in one minute.
Monitoring pulse rate can be useful for determining
appropriate medication.
- When the timer is active, the timer icon will appear
and be flashing on the pulse-mode display and the
clock display.
How to use the pulsemeter:
1. In either clock or timer display, press [PULSE], the
display will show a heart .
To stop the timer:
-
Press [ST / SP]. The timer will pause until [ST / SP] is
pressed again.
5
PMP238 EN.P65
P/N: 086L002053-161 EN REV1
6/10
5
4/7/06, 10:42 AM
GB
5. To exit pulse-mode display, press [PULSE] followed
by [MODE] to toggle between clock and count-up /
down timer modes.
2. Position your right index finger so that the padded
portion over the pulse sensor .
THE ELECTRO-LUMINESCENT BACKLIGHT
The electro-luminescent (EL) back light illuminates the
LCD for easy nighttime viewing.
For nighttime viewing:
Sensor
Press [
ADV]. The LCD will illuminate for approximately
5-seconds.
3. Maintain a steady position, holding too forcefully or
too lightly may result in an incorrect reading.
Note: During the 5-second interval when the EL
backlight is active, press any button and the back
light will remain on. The light will remain for 5seconds from the last press.
4. Running bars
will be displayed first to show detection in progress.
After several seconds a pulse rate will be displayed.
Note: When your finger is positioned properly, the
heart icon on the display will flash. This indicates
that the unit is reading a pulse. The unit will display
the number of beats per minute of your heart.
- Make sure the fingertip has covered the sensor area.
If, for some reason, the unit cannot read a pulse, it
will automatically return to the previous display
mode after 2 minutes.
- Rest lightly the fingertip on the sensor. Avoid seeing
fingernail turns white that means you are pressing too
hard on the sensor.
Press [PULSE] and try taking your pulse again.
- Allow 10-15 seconds to get stable measurement.
TIPS TO TAKE ACCURATE
MEASUREMENT
6
PMP238 EN.P65
P/N: 086L002053-161 EN REV1
7/10
6
4/7/06, 10:42 AM
GB
- Rest at least five minutes before taking measurement.
Even slight motion may cause biased result.
MAINTENANCE
1. Do not immerse the unit in water. If the unit comes in
contact with water, dry it immediately with a soft lintfree cloth.
- Keep calm during measurement.
- Ring, etc. on the finger may restrict normal blood
circulation. Remove such object before measurement.
2. Do not clean the unit with abrasive or corrosive
materials. Abrasive cleaning agents may scratch the
plastic parts and corrode the electronic circuit.
- Avoid using the device in the environment with strong
light sources (e.g. direct sunlight) or electromagnetic
emitting units (motor, TV, car engine, mobile phone
etc).
3. Do not subject the unit to excessive: force, shock,
dust, temperature, or humidity. Such treatment may
result in malfunction, a shorter electronic life span,
damaged batteries, or distorted parts.
- Too cold, dry or wet fingertip will cause inaccurate
measurement.
- Always keep the fingertip clean before measurement.
Grease or dirt on the fingertip will cause inaccurate
measurement.
4. Do not tamper with the unit’s internal components.
Doing so will terminate the unit’s warranty and may
cause damage. The unit contains no user-serviceable
parts.
- Person who has thick fingertip skin, severe arrhythmia,
arteriosclerosis or other circulatory problems will have
biased result using the device. These users are not
advised to make reference from the reading.
5. Only use new batteries as specified in this instruction
manual.
6. Read this instruction manual thoroughly before
operating the unit.
7
PMP238 EN.P65
P/N: 086L002053-161 EN REV1
8/10
7
4/7/06, 10:42 AM
GB
SPECIFICATIONS
Operating modes : Clock mode, timer mode
and pulse mode
Real -time clock
: 12 hour / 24 hour with hour,
minute and second display
Timer
: Maximum, 29 hours, 59 minutes
Pulse range
: 40 to 237 bpm
Power source
: 1 x CR2032 3V lithium cell
Dimensions
: 16 (D) x 56 (W) x 88 (L) mm
Weight
: 37.5 g (approximate)
CAUTION
•
The content of this manual is subject to change
without further notice.
•
Due to printing limitation, the displays shown in
this manual may differ from the actual display.
•
The contents of this manual may not be repro
duced without the permission of the manufacturer.
8
PMP238 EN.P65
P/N: 086L002053-161 EN REV1
9/10
8
4/7/06, 10:42 AM
!"#$%&'
!
8. !"#
PMP238
A. B. [
!"#$
ADV ] !"#
!"#$%"&"'()*
C. [ PULSE ] D. [ MODE ] !"#$%&'()*+,-./
1.
2.
3.
4.
5.
6.
!"#$%&'
!"#$%&'()*+$%
!"#$%
!"#$
E. !"
12 24 !"
!
! "
!
12 24 !"#$%
!"#
!"
!" !" !"#( PMP238) !"#$%&'()*+,- !"#$%&'()*+,-./ !"#$%&'()*+,-./0&12)
!"#$%&
&"#'()*
!"
!"#$%
F. [ ST/SP ] !"#$%&
G. 1
P/N: 086L002053-161_SC REV1
1/7
7. CR2032 3V 2
P/N: 086L002053-161_SC REV1
2/7
!"#
!"#$%&' !
!"#$%&'()
1. !"#$%&'()*+,-./0
2. ! CR2032 3V 3. !"
!"#
!"#$%&'()**+#,-./0
!"#$ !"#$%&'
!"0:00:00 !"#$%& [
] !"#$%
!"#$%&
[ MODE ] !"#$%&!'#$(
[ PULSE ] !"#$%
!"#$%& [ PULSE ]
!"#$%&'()*+,%
!"#$%&'( )*+,
!
!
!"#$%&'()*+$,
!"#$%&'()!"*+, 1 2 !" 2 4 !"#$%&'$(
12 !"#$%&'()*+,-.
!"#
!
!"#$
!"#$%&'!"()&*!"(+,-.
!
!"
!
!"#
!"#$%&'()*+ [ MODE ]
!"#$%&'()*+,%&-
[ PULSE ] !"#$%&'()*
!"#$%&'
!
3
P/N: 086L002053-161_SC REV1
3/7
!
2. 24 !"#$%&
1. !
!"#$%$& [ MODE ] !" 12hr
!"#$
12:00:00AM
3. ![
ADV ] 12 4. [ MODE ]
5. [
ADV ] 24
!
!"#$%&'() !"#$%
2959 ! !"#$% !"#$%&'()*
!"#$%&'"(
!"#$%&'()*+,-
!"#$%&'()
!"#$%&'()*+,-./0 [
6. [ MODE ]
7. [
ADV ] 8. [ MODE ] 9. [
10. ADV ] !"#$%&'()*
!"#$%&'"(
!"#$%&'()
!"#$%!&
! [ MODE ] !"#
!"#$
1. !"#
!"#$%&
!"#$%&' 60 !"#$%&'() [ MODE ] !"#$%&'()*#$+,
[ PULSE ] !"#$%&'()*+
!"#
!"#$%&'()*+,
!"#$%&
2. [ MODE ] 3. [
ADV ] 4. [ MODE ]
4
P/N: 086L002053-161_SC REV1
4/7
!"#$%&'()*+
!"#$%&'"(
!"#$%&'()*
]
!"#$%&'"(
!"#$%&' 60 !"#$%&
1. [ MODE ] !" !"#$%&'()*
!"#
2. !"#$%&'()*+,
!"#$%
[ ST/SP ] !"
2 !"#$%&'()
!"#$%&'()*&+
!"#$%&'()*+,
!"#$
!"#
%&'()*+,-
$%&'(
!"#$%&'()
5
!"#$
!"#
!"#$%&'()*+,-./0'12
!"#$% 1 !"#$%&' !"#$%&'()*
!"#$%
[ ST/SP ]
!"# !"#$
1. !"#$
[ST/SP]
P/N: 086L002053-161_SC REV1
5/7
!"#$%&'()*+",
!"#0:00:00 !!"#$%
!"#$%&' !"#$2
!"#$%&'
!"#$%&
[ ST/SP ] !"#$%
!"#$%&'()*+,- [ MODE ]
!"#$%&'()
3. [ MODE ]
5. [
ADV ] !"#$%
!"#$%&!"'() [ PULSE ]
!
2. !"#$%&'()*+,-
!"#
!"#$%&'()*+,
!"#
[
Sensor
!"#$%
. !"#$%&'(
!
!"#$%&'($)*5
!"#$%&'()*+,-.
!"#$%&'()*+,
!"#$%&'()*+,-./
!"#$ !"#$%&'
!"#$ 60 !"#$%&'
1. !"#$%&' !"#$%&'(
!"#$%&'()*+
[ PULSE ] !"#
5. [ PULSE ] [ MODE ] !"#$%&'()*+,-.
!"#$%&'()
!"#$%&
!
2. !"#$%&'()*+,-./(012
'"#()
6
P/N: 086L002053-161_SC REV1
6/7
!"#$%& 5 !"#$%&'()*+, !"-
. !"#$%&'()*+,-./-0'1
ADV ]
!"#$%&'()*+, !"-.
!"#$%&'($)* 5 !
3. !"#$%&$'()*+,-./01!
. !"#$%&'()*+,-./0123
! !"#$%&'%()*
. !"#$%&'()*+
. !"#$%&'()*
12 24 !"
!""
59 !"#!$%&'
!" 29 !"# 40 237 1 16 55 88 mm
37.5 !"#$%&'()*+,
!"#$%&'()*+'(,-.
!"#$%&'()*+,-./0
!"#$%&
!"#$%&'()*+,-
!
2032 3V w w w. o r e g o n s c i e n t i f i c . c o m
Oregon Scientific Inc.
Tualatin, Oregon USA
7
P/N: 086L002053-161_SC REV1
7/7
!"#$%&'
PMP238
A. !"#(
!"#$%&'()*+,-
B. [
!"#$%&'()*+,-./
!"#$%&'()*+,-./&01)!
!"#$%
!"#$%&'()*+
,-.
3. !
5. !
!"#
!"#$%"&"'()*
!"#$%&'
!"#$%&'()*+$%
!"#$%
!"#$
&"#'()*
!"
!"#$%
F. [ ST/SP ] !"#$%&
G. !"#$%
1
P/N: 086L002053-161_TC REV1
1/7
"
6. 12 24 !"#$
ADV ] E. !"
!
4. !"
D. [ MODE ] !"
2. 12 24 !"#
C. [ PULSE ] 1. !"#
!"Oregon Scientific
PMP238)
!
8. !
7. CR2032 3V 2
P/N: 086L002053-161_TC REV1
2/7
!"#
!"#$%&' !
!"#$%&'()
1. !"#$%&'()*+,-./0
2. ! CR2032 3V 3. !"
!"#
!"#$%&'()**+#,-./0
!"#$ !"#$%&'
!"0:00:00 !"#$%
[ MODE ] [ PULSE ] !"#$%& [
] !"#$%&
!"#$% [ PULSE ] !"#$%&'()*+,%
!"#$%&'( )*+,
!
!
!"#$%&'()*+$,
!"#$%&'()!"*+, 1 2 !" 2 4 !"#$%&'$(
12 !"#$%&'()*+,-.
!"#
!
!"#$
!"#$%&'!"()&*!"(+,-.
!
!
!"#
!
!"#$%&'()*+,%&-
[ PULSE ] !"#$%&'()*+
!"#$%&'
!
3
P/N: 086L002053-161_TC REV1
3/7
24 !"#$%&'()* [ MODE ] 2. !"
!
!"#$%&
1. !"#$%&!'#$(
!"#$%&
!"#$%$ [ MODE ] !" 12hr
!"#$%
12:00:00AM
3. [
ADV ] 4. [ MODE ] 5. [
ADV ] 12 24
!
!"#$%&'() !"#$%
2959 ! !"#$% !"#$%&'()*
!"#$%&'(#)
!"#$%&'()*+,
!"#$%&'()
!"#$%&'()*+,-./0 [
6. [ MODE ] 7. [
ADV ] !"#$%&'()*+
!"#$%&'(#)
8. [ MODE ] !"#$%&'()*
9. [
ADV ] !"#$%&"'
10. [ MODE ] !"#$
!"#$%
1. !"#
!"#$%&
!"#$%&' 60 !"#$%&'( [ MODE ] !"#$%&'()*#$+
[ PULSE ] !"#$%&'()*
!"#
!"#$%&'()*+,
!"#$%&'(
2. [ MODE ] !"#$%&'()*+,
3. [
ADV ] 4. [ MODE ] 4
P/N: 086L002053-161_TC REV1
4/7
!"#$%&'(#)
!"#$%&'()*+
]
ADV ] !"#
!"#$%&'(#)
!"#$%&' 60 5. [
!"#$%&
1. [ MODE ] !" !"#$%&'()*
!"#
2. !"#$%&'()*+,- [ MODE ]
!"#$%&'()*
!"#$%&'()*+,
3. [ MODE ] !"#$%
[ ST/SP ] !"
2 !"#$%&'()
!"#$%&'()*&
!"#$%&'()*+,
!"#$
!"#
!"#$
[ST/SP]
%&'()*+,-
$%&'(
5
!"#$
!"#
!"#$%&'()*+,-./0'12
!"#$% 1 !"#$%&' !"#$%&'()*+
!"#$%
!"#$%&'()
!"#$ !"#$
1. [ ST/SP ]
P/N: 086L002053-161_TC REV1
5/7
!"#$%&'()*+",-
!"#0:00:00 !!"#$%
!"#$%&' !"#$2
!"#$%&'
!"#$%&
[ ST/SP ] !"#$%
!"#$%&!"'( [ PULSE ] !
2. !"#$%&'()*+,-
!"#
!"#$%&'()*+,
!"#
[
Sensor
!"#$%
. !"#$%&'(
!
!"#$%&'($)*5
!"#$%&'()*+,-.
!"#$%&'()*+,
!"#$%&'()*+,-./
!"#$ !"#$%&'
!"#$ 60 !"#$%&'
!"#$%&'()*+
[ PULSE ] !"#
5. [ PULSE ] [ MODE ] 1. !"#$%&' !"#$%&'(
!
2. !"#$%&'()*+,-./(012
!"#$%&'()*+,-.
!"#$%&'()
3. !"#$%&$'()*+,-./01!
!"#$%&'!(#$)*
6
P/N: 086L002053-161_TC REV1
6/7
!"#$%&' 5 !"#$%&'()*+, !"-.
!"#$%&'($)* 5 !
!"#$%&'()*+, !"-
. !"#$%&'()*+,-./-0'1
ADV ] . !"#$%&'()*+,-./0123
! !"#$%&'%()*
. !"#$%&'()*+
. !"#$%&'()*
12 24 !"
!""
59 !"#!$%&'
!" 29 !"# 40 237 1 16 55 88 mm
37.5 !
2032 3V 7
P/N: 086L002053-161_TC REV1
7/7
!"#$%&'()*+,-
!"#$%&'()*+'(,-.
!"#$%&'()*+,-./0
!"#$%&
!"#$%&'()*+,-.