1
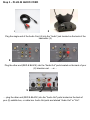
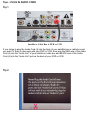
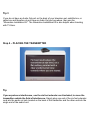
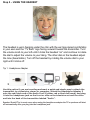
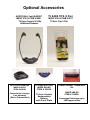
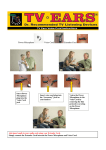
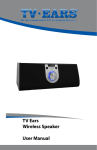
The Original System Installation Instructions
Step 1 - Contents
Remove items from box:
1
2
3
Headset
4
5
6
(2) Transmitter, (3) Headphone Adapter, (4) Audio Cord, (5) A/C Adapter (6) Alternative
Installation Kit.
Step 2 – PLUG IN A/C ADAPTER
5
2
Plug the A/C Adapter (5) into standard 110 volt electrical outlet and plug the other end into
the“12v” jack located on the back of the transmitter (2). NOTE: System will not work
if unplugged from electrical outlet.
Step 3 – PLUG IN AUDIO CORD
4
2
Plug the single end of the Audio Cord (4) into the "Audio" jack located on the back of the
transmitter (2).
8
Plug the other end (RED & BLACK) into the "Audio Out" ports located on the back of your
(8) television set……or….
9
…..plug the other end (RED & BLACK) into the "Audio Out" ports located on the back of
your (9) satellite box, or cable box. Audio Out ports are labeled "Audio Out" or "Out".
Tips – PLUG IN AUDIO CORD
Tip 1
Satellite or Cable Box to DVD or VCR
If you chose to plug the Audio Cord (4) into the back of your satellite box or cable box and
you want TV Ears to also work with your DVD or VCR, then plug the RED wire of the Audio
Cord (4) into the "Audio Out" of your satellite or cable box and BLACK wire of the Audio
Cord (4) into the "Audio Out" port on the back of your DVD or VCR.
Tip 2
Tip 3
If you do not have an Audio Out port on the back of your television set, satellite box, or
cable box and therefore do not have an Audio Out port anywhere, then use the
"Alternative Installation Kit". The Alternative Installation Kit is also helpful when traveling
with TV Ears.
Step 4 – PLACING THE TRANSMITTER
Tip
If you experience interference, use the six foot extender cord included, to move the
transmitter outside the field of interference. Simply plug one end of the six foot extender
cord into the audio out jack located on the back of the transmitter and the other end into the
single end of the audio cord.
Attention Plasma Screen TV Owners
Plasma screen television sets create a field of disturbance that may interfere with the TV Ears
system. We offer a 6 foot Extension Cord which can work with either the Audio Cord or the
Multi-Use Power Microphone. This Extension Cord allows you to move the TV Ears
Transmitter / Charger away from the plasma screen and outside the field of disturbance.
This field of disturbance is usually no more than five feet in front of the plasma screen.
It is recommended that you position the TV Ears Transmitter / Charger on a table near
where you are seated for clear transmission and easy access to the Transmitter / Charger.
Many people without plasma screens use this option for convenience also. Another option is
to position the Transmitter / Charger well out to the side of the plasma screen.
Using the Extension Cord is Easy
The Extension Cord plugs onto the single end of the Audio Cord or the Multi-Use Power
Microphone and then into the Transmitter / Charger where it says Audio. (See
photograph below)
The total length of the combined cords is 12 feet, which should be plenty of length to position
the Transmitter / Charger near where you are seated. If you need more length or continue
to experience interference, please call and we can assist you. (1-888-883-3277)
Please remember that the Transmitter / Charger must also be plugged into a power outlet
with the AC Adapter at all times. This may require the use of your own regular extension cord
from the power outlet.
Step 5 – USING THE HEADSET
The headset is worn
The headset is worn hanging under the chin with the ear tips placed comfortably
in your ears and the “TV Ears” logo facing outward toward the transmitter. Turn
the volume knob to your left until it clicks the headset “on” and continue to rotate
the dial to adjust the volume to your liking. The other dial on the headset adjust
the tone (base/treble). Turn off the headset by rotating the volume dial to your
right until it clicks off.
Tip 1: Headphone Adapter
3
4
2
Use this option if you are traveling and want a quick and simple way to attach the
transmitter to a television, stereo or computer. Attach the Headphone Adapter 3
onto the red/black end of the Audio Cord 4 (either red or black will work) and plug
it into the headphone jack on the front or side on the television set and the other
end into the back of the transmitter labeled “Audio”.
Speaker Shutoff Tip: In most cases when using the headphone adapter the TV’s speakers will shut
off automatically after you plug into the headphone jack.
Step 6 – CHARGING THE HEADSET
Your headset comes pre-charged with enough battery power for 10 minutes of use. It is
recommended that you charge your headset for 12 hours before using it more than 10
minutes. To charge the Headset (1) place it into one of the charging cradles on top of the
Transmitter (2).
NOTE: The headset (1) will last up to 10 hours on a full charge. Once the Headset has
undergone its initial 12 hour charge it will fully recharge in 1 hour. The internal rechargeable
battery should be replaced when it fails to hold a charge.
Step 7 – REPLACING THE EAR TIPS
The Headset (1) comes with a set of “TV Ears Tips” installed on the headset. When the tips
become dirty or frayed they should be replaced. To replace the tips: First remove the old
tips by pulling them off with your fingers or using the specially designed “Tip Remover”
which is part of the ear tip tray.
1
2
3
Additional Ear Tips can be purchased separately
Optional Accessories
ADDITIONAL 2nd HEADSET
MSRP $79.95 ITEM #10021
TV Ears Original 95 KHz
Additional Headset.
SEAT SIDE CHARGER
MSRP $49.95
ITEM #10020
Conveniently charges
Two Headsets
(Not a Transmitter)
TV EARS TIPS (5 Pair)
MSRP $19.95 ITEM #10111
TV Ears Tips 5 Pair
TV EARS BATTERY
MSRP $19.95
ITEM # 10100
TV Ears Original
Replacement
Battery
with Front Plate
Power Stacker Transmitter
Kit
MSRP $89.95
ITEM # 10026
Increases Coverage up to
1500 square feet
FREQUENTLY ASKED QUESTIONS
Q1: What color should the charging light be when charging a headset?
A1: The charging light should glow green while a headset is in the front slot; red while a headset is in the back slot,
and Amber (Reddish-Green) while there are headsets in both the front and back charging slots.
Q2: Where can we buy Optional Accessories and TV Ears Tips?
A2: TV Ears Tips can be purchased on our website, www.TVEars.com, or through our customer service line at
(888) 883-3277 or at an authorized TV Ears Dealer.
Q3: How long will the batteries last on a full charge?
A3: After the initial 12 hour charge the batteries in our TV Ears system are designed to last up to 10 hours
Q4: What is the lifetime of the batteries?
A4: The batteries are designed to last between 1– 2 years depending on use.
Q5: How do I Charge the headset?
A5: Gently place the TV Ears headset in the charger cradle of the transmitter for 1 hour.
Q6: Can I overcharge the headset?
A6: Our TV Ears Headset is not able to be overcharged.
Q7: I plugged in the AC Adapter and there is no green light?
A7: The charging light will only come on when a headset is placed in the charging cradle of the transmitter. It should
come on green if you place a headset into the front charging slot.
Q8: I plugged the Audio Cord into the ports on the front of my TV why don’t I hear any Audio?
A8: Any Audio ports on the front of your television are Audio Inputs and are not compatible with our system. Audio
Outputs are located on the back of a television, and are clearly labeled Audio Out.
Q9: The Foam Rings on my ear tips came off and I can’t get them back on.
A9: If the foam ring of the ear tips has come off then you would need to order replacement ear tips. Those can be
ordered Online (www.TVEars.com) or over the phone at (888) 883-3277.
Q10: I walked into the next room and I can’t hear the television anymore, is this normal?
A10: TV Ears uses Infrared technology in our TV Ears Systems, which requires a direct Line of Sight in order for
you to receive a clear Audio Sound.
Q11: Will the lights ever change colors once the headset is charged?
A11 No. The charging light should remain a constant color as long as the headset is placed in the charging slot.