1
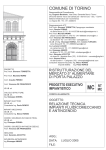
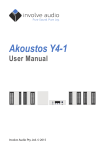
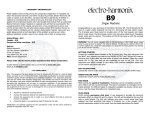
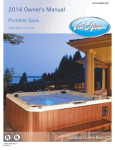
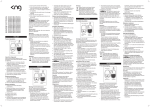
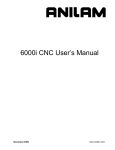
Brand Style Guide
User Manual
October, 2012 - 0.1
Table of Contents
The Company......................................................... ii-1
The Message.......................................................... iii-1
The Logo............................................................... iv-1
Sub brand Logo’s................................................................iv-2
Proper use.........................................................................iv-3
Typography............................................................ iv-4
Colours.................................................................. v-1
Website................................................................. vi-1
Technical specifications........................................................vi-2
Sitemap............................................................................vi-3
Logging in..........................................................................vi-4
Navigating.........................................................................vi-5
Menu pop-ups....................................................................vi-6
Dialogues..........................................................................vi-7
Content types.....................................................................vi-8
Creating content overview....................................................vi-9
Input types overview.........................................................vi-12
Attaching files to content...................................................vi-14
Formatting text - overview.................................................vi-15
Formatting text - anchors..................................................vi-16
Formatting text - links.......................................................vi-17
Formatting text - images...................................................vi-18
Formatting text- tables......................................................vi-20
Split teaser from content...................................................vi-22
Table of Contents
i-1
Table of Contents
i-2
Create News....................................................................vi-23
Create Page.....................................................................vi-24
Create Brand....................................................................vi-25
Create Product.................................................................vi-26
Create Reference..............................................................vi-28
Create Reference picture....................................................vi-29
Content management........................................................vi-30
Update options.................................................................vi-32
Editing content.................................................................vi-33
Translating content...........................................................vi-34
The Company
The Company
ii-1
The Message
The Message
iii-1
The Logo
The Logo
iv-1
Sae ventur mo occat as quos il
id quid mintiis sundipsum quia
voles dolor accaborem entis
magnis aliciis essum iunt.
Ficium sinum andenih itiostrum
harum re occae aspis res et
haria delesti atiatus ditatem
qui coressundem ipissi ut lam
qui dollaboratus dolute nimaior
estotatur seriatem corpos excepero etur as necusa nobisquid
et pa parum quidebis is sequiae
cearum nonem intus dolo que
consequi ommo mod magnistet
moluptat faceatem eaquae
perum invella velitae ceaquae
vendis mincid eatus voloria
esequidendis acea dolore velliquo etur, quasperum rem con
cor anti que mod mo tet in res
corem ut laut autecti cum id ex
et exped ullentur rae pratur?
Ga. Deribus, consequam, accus
nita dolorest omnimo deriberio
quis excearum reperfere remqui
officab ius, sitissunda incimi,
velenis et pore consers pedignimaxim endis ut fugitis con
remperf eritamet parcia sitas
explitet dolenihit re pelitib ust.
The Logo
iv-2
Sub brand Logo’s
There are four sub brand logo’s:
REPROCOVER, REPROBOX,
REPROGARDEN and REPROTILE.
These logo’s must be used according the same rules as the
main brand logo.
The Logo
iv-3
Proper use
REPR
REPR
REPR
REPR
COM
COM
COM
COM
Typography
iv-4
Typography
Font family:
Verdana
Regular CAPS
x-height: 82pt
x-height: 125pt
Colours
Colours
v-1
Primary Colour
Secondary Colour
Pantone 349 EC
Pantone 2955 EC
C91 M12 Y92 K44
R0 G105 B60
HTML#00693C
C100 M60 Y10 K53
R0 G60 B105
HTML#003C69
100%
R0 G105 B60
HTML#00693C
100%
R0 G60 B105
HTML#003C69
90%
R25 G120 B79
HTML#19784F
90%
R25 G79 B120
HTML#194F78
80%
R51 G135 B99
HTML#338763
80%
R51 G99 B135
HTML#336387
70%
R76 G150 B118
HTML#4C9676
70%
R76 G118 B150
HTML#4C7696
60%
R102 G165 B138
HTML#66A58A
60%
R102 G138 B165
HTML#66A58A
50%
R127 G180 B157
HTML#7FB49D
50%
R127 G157 B180
HTML#7F9DB4
40%
R153 G195 B177
HTML#99C3B1
40%
R153 G177 B195
HTML#99B1C3
30%
R178 G210 B196
HTML#B2D2C4
30%
R178 G196 B210
HTML#B2C4D2
20%
R204 G225 B216
HTML#CCE1D8
20%
R204 G216 B225
HTML#CCD8E1
10%
R229 G240 B235
HTML#E5F0EB
10%
R229 G235 B240
HTML#E5EBF0
Colours
v-2
Pantone 716 EC
C0 M63 Y99 K0
R236 G122 B8
HTML EC7A08
Pantone 1797 EC
C2 M98 Y85 K7
R196 G38 B46
HTML C4262E
Website
Website
vi-1
Website
vi-2
Technical
specifications
Available (sub)domains:
CMS language modules:
http://www.reprocom.eu
http://www.reprocom.be
http://www.reprocom.org
http://reprocom.eu
http://reprocom.be
http://reprocom.org
Webserver specifications:
English
Dutch
French
Russian
CMS extensions:
CCK
http://drupal.org/project/cck
Apache
Internationalization
PHP 5.3.10
Views
GD Library 2.0
ImageCache
256MB memory limit
MySQL 5.1.61
Tested browsers:
http://www.apache.org
http://www.php.net
http://www.boutell.com/gd
http://www.mysql.com
http://drupal.org/project/i18n
http://drupal.org/project/views
http://drupal.org/project/imagecache
Opera 12.02
http://www.opera.com
CMS core:
Drupal 6.26
http://drupal.org
JQuery 1.3.2
http://jquery.com
JQuery UI 1.7.3
http://jqueryui.com
Google Chome 22.0.xx
http://www.google.com/chrome
Safari 5.0.4
http://www.apple.com/safari
Firefox 14.0.1
http://www.mozilla.org/firefox
Website
vi-3
Home
Recycling
Products
REPROCOVER
RC Product 1
RC Product 2
RC Product ...
REPROBOX
RB Product 1
RB Product 2
RB Product ...
REPROGARDEN
RG Product 1
RG Product 2
RG Product ...
News
REPROTILE
RT Product 1
News item 1
RT Product 2
News item 2
RT Product ...
News item ...
References
Reference pict. 1
Reference pict. 2
Reference pict. ...
Contact
Sitemap
Website
vi-4
Logging in
To log in go to
www.reprocom.eu/user/login.
Click ‘Log in’ to proceed. You
will be redirected to your personal profile-page.
User name:
Password:
Website
vi-5
Navigating
1. Main user menu - This is a
menu pop-up. Here you can find
all links for administrative tasks.
2. Dialogue pop-ups - these
windows communicate messages from the system. More
details about dialogue pop-ups
can be found in the “Dialogues”section.
3. Minimized pop-ups - popup windows can be minimized,
maximized and dragged across
the screen.!
4. Pop-up controls - with
these buttons you can minimize,
maximize or re-arrange all windows together.
Minimizing, maximizing and dragging
windows use javascript functionality.
See technical specifications for a list of
compatible browser versions.
Website
vi-6
Menu pop-ups
These windows are for navigating trough the administrative
section of the website. Which
menu’s appear depends on the
page you are currently on and
your access level.
Unlike dialogue windows, which
appear centered, menu popups appear where they where
located last time you visited the
page. If the window was minimized or closed, it will be reset
to the last maximized position.
When you accidently close a
window, you can recall it by
reloading the page.
Website
vi-7
Dialogues
1. Help - On some pages, help
is available.
2. Status Message - These
windows provide extra information on the performed action.
3. Warning - These windows
appear when an error occurred,
but the system can carry on.
Though some revision is required!
4. Error - These windows appear when an error occurred
and the system can’t carry on.
If you just provided input, make
sure you followed the input
rules.
Help windows appear minimized, while Status-, Warningand Error windows appear
maximized. Last named can be
closed by clicking “OK”.
Website
vi-8
Content types
There are five different content
types: News, Page, Product,
Reference and Reference picture. To get an overview of
all content go to: Administer
» Content management »
Content.
This is the starting point for
managing all content. See section “Content management” for
more details on how to manage
content.
Website
vi-9
Creating content
overview
To create new content go to
Create content in the main user
menu. You will land on a page
where you can choose which
content type you want to create. A short description gives
more information about the
content type.
After choosing a content type
you will be redirected to a page
where you can fill in the fields.
What fields are available, depends on the content type, but
they all have a mandatory title
and a not mandatory body field.
Website
vi-10
The different settings when adding content:
1. Language - Here you
choose the language the content you add is in. Setting this
option is important for translation.
2. Disable rich-text - This
option lets you toggle between
a WYSIWYG-editor and HTML.
3. Input format - Here you
can choose which WYSIWYGeditor you want to use.
4. Revision information When this is checked, this content will be duplicated instead of
altered when changes are made
in the future.
5. Comment settings - Here
you can choose whether visitors
and/or users can comment on
this content.
6. File attachments - Here
you can add files for download
to your content.
Website
vi-11
7. Authoring information Here you can set the author and
date. The current logged in user
is set as the author by default,
but can be changed. If the date
is left blank, the current date
and time will be used.
8. Publishing options - Here
you can specify whether the
content is publishedi, promoted
to the front pageii and whether
the content is stickyiii.
Not all options are always available, this depends on the content type and your access level.
Content will only be visible for visitors when it is published. Promoted to
frontpage is fairly obvious, but remember that, though the option might be
available, it doesn’t mean it will show
up on the front page. This depends on
the content type. Sticky means that this
content will show up on top in overview
lists, neglecting the normal sort order.
Handle with care; if every item is sticky
in a list, things can get messy!
Website
vi-12
Input types overview
Every content type has its own
input fields and every field has
one of several input types.
The different input types are:
1. Single line text - A single
line with no lay out.
2. Autocomplete text - Here
you enter one of existing valid
values. When you start typing
all according values will drop
down in a list. The grey circle in
the right indicates that it is an
autocomplete field.
3. Drop Down - Choose one
of the list.
4. Selection list - Choose one
or multiple (by ctrl-clicking multiple options) from the list.
5. Radio select - Choose one
of the list.
6. Checkboxes - Select one
or more from the list.
Website
vi-13
7. Upload - Interface for
uploading a file or deleting an
uploaded.
8. Reference - A reference to
other content. This will always
be a dropdown or autocomplete
field, containing the Titles of all
proper content. In case of an
autocomplete field, make sure
you pick an item of the list, otherwise an error will raise.
9. Rich text - A text field for
longer texts. This text can be
formatted. There are two ways
of formatting text: in plain html
or with a WYSIWYG editor. See
“Formatting text” sections for
more details on formatting text.
Website
vi-14
Attaching files to
content
You can attach files to most of
the content types.
To do this click on the “Choose
file” button (1.) and navigate
on your hard drive (2.) to the
file to choose it. Click on the
“Attach” button (3.) to start the
upload (4.).
When your upload is finished
you see an overview of the attached files (5.). Here you can
specify a description. The “List”
box will be checked by default.
All files with “List” checked on,
will be displayed in a list below
the content. Checking “List”
off is useful when you attach
images to place in the content
body text, but don’t want them
to show up in the attachment
list. See “Formatting text - images” section for more details
on this specific subject.
When “Delete” is checked, the
file will be deleted upon saving.
Website
vi-15
Formatting text overview
1. Bold
2. Italic
3. Underline
4. Striketrough
5. Align left
6. Center
7. Align right
8. Justify
9. List
10.Numbered list
11.Undo
12.Insert link
13.Insert anchor
14.Insert image
15.Superscript
16.Subscript
17.Quote paragraph
18.Paragraph styles
19.Insert table
20.Split teaser
Website
vi-16
Formatting text anchors
Anchors are bookmarks in your
text you can link to.
To create an anchor place your
cursor on the desired location in
your text and click the anchor
button. An anchor properties
window will pop up where you
must specify a unique name for
your anchor.
After clicking “OK” an anchorsymbol appears where you
placed your cursor. This logo
is only visible when editing the
content.
Website
vi-17
Formatting text - links
To insert a link in your text, select the text you want to make
a link and click the link button.
A new window will pop up where
you can set up the link. There
are three types of links: to an
url (1.), to an anchor (2.) and
to an email address(3.).
When you create a link to a url,
you can specify the target (4.)
where the link will open.
When you create a link to an
anchor you can choose one of
the anchors in your text in the
anchor dropdown.
When you create a link to an
email address you have to
specify an email address. A subject and message body are not
required.
In the advanced tab (5.) you
can specify special HTML and
CSS values. If you do not have
the necessary HTML skills, it is
best to leave the default settings here.
Website
vi-18
Formatting text images
To place a picture in your text,
place your cursor on the desired place in the text. Click the
“Insert image” button. Specify
the location of the picture in
the URL field!. You can specify
an alternative text. Although
not required, it is highly recommended to specify an alternative text. This text appears
when the picture can’t load.
There are also some basic formatting options you can specify.
You can only insert images who
already exist somewhere on the net, either on the Reprocom site, either on an
external site. Inserting an image from
your hard disk is a two step process:
uploading the image as an attachment to the content, then inserting the
image in the text. The location of the
image can be found in the attachments
overview. See section “Attaching files to
content” for more details.
Website
vi-19
In the “Link” tab you can specify
a URL and a target if you want
your image to be a link.
In the “Advanced” tab you can
specify more settings for your
image. For some of the settings
some basic HTML knowledge is
required. A hint is to change basic settings in the “Image info”
tab, and see how it affects the
settings in the “Advanced” tab.
Website
vi-20
Formatting texttables
To place a table in your text,
place your cursor on the desired place in the text. Click the
“Insert table” button.
In the “Table Properties” window
you can specify columns, rows
and headers. You can also specify a caption and a summery.
In the “Advanced tab” you can
specify additional HTML and CSS
properties.
Website
vi-21
If you right click on a cell in the
table you get a context menu
where you can add or delete
rows and columns, split or
merge cells or delete the table.
You can also pop up the table
properties.
If you choose “Cell properties”
in the “Cell” submenu, you can
specify formatting properties of
the cell.
Website
vi-22
Split teaser from
content
The teaser of content is the first
part of the body text that is
used as an introduction, visible
on overview pages. Default the
system decides where to split
content and teaser, but whit this
function you can decide yourself
where to split.
To to this, place your cursor on
the desired location in your text
and click the “Split teaser” button.
Website
vi-23
Create News
This content type only has a
Title field and a Body field.
Although the Body field is not
mandatory, it is advised to fill in
the Body for News-content, as
otherwise an empty News-item
would be created.
Website
vi-24
Create Page
A Page is structural the same
as news. The only real difference is that Pages have comments turned off by default and
news have them turned on by
default. The practical difference
between the two is that news
is meant for short news-feeds,
whereas pages should be seen
more as static pages, with long
therm content which will not be
changed dramatically often.
Website
vi-25
Create Brand
A Brand has a Description instead of a Body field. As with
the Body fields, the Description
field is not mandatory.
A Brand has only one extra
field: the Brand logo. This is a
mandatory field. Choose a file
to upload. Allowed files are png,
jpg or jpeg files. The minimum
resolution for these pictures is
300px x 200px, the maximum
file size is 2MB.
New Brands shouldn’t often be
created; the four main brands
already exist in the system.
Website
vi-26
Create Product
There are two ways to reach
this page. The first way is via
the Add content page or the
Main user menu. The second
way is via the Brand overview
(when clicked on a brand logo
on the products page).
How you enter this page will affect the availability of the Brand
field.
When this page is entered via
the menu, this field is available.
A valid Brand must be entered
correctly, or an error will raise.
However, when you start typing,
the available options will show.
When this page is entered via a
Brand overview page, the Brand
option will not be editable and
filled in with the Brandname of
the reference page (the page
you where previously on).
Website
vi-27
Other fields for Products are:
Type, Class - Dropdown
lists.
Code - A textual product
code.
Height, Height adjustable,
Width, Depth, Inside diameter - A whole number, centimetre Must be between 1 and 200.
Weight, Weight lid - A
decimal number, accurate to
three figures after the decimal,
in kilogram.
Datasheet - Upload a pdffile with the datasheet. Maximum 20MB.
Price exc. VAT - The net
price of the product in Euro.
VAT rate - VAT rate to be
included.
Picture - Upload a product
shot of the product.
Website
vi-28
Create Reference
A Reference content type has
only a Title and an optional
Description. A Reference acts
as a “container” or “group” for
pictures. Eg.: a reference with
name “Ref X” could be a container for “Picture A”, “Picture
B” and “Picture C” while “Ref Y”
could be a container for “Picture
M”, “Picture N” and “Picture O”.
See “Create Reference picture”
section for more details.
Website
vi-29
Create Reference
picture
Besides a Title and a Body field,
a Reference picture has two
additional fields: Reference and
Picture.
The Reference field works in a
similar way as the Brand field
for a Product. It’s availability
depends on how you entered
the page (via Main user menu
or via References page).
The second additional field is a
picture upload. Maximum file
size is 5MB, no resolution restrictions, but the file must be
png, jpeg or jpg.
Website
vi-30
Content management
Go to: Administer » Content
management » Content in the
Main user menu. This screen
has two main parts: the controls
(1. to 7.) and an overview table
(columns 8. to 13.).
With 1. to 6. you can filter the
table for a better overview.
1. status - Filter the content
list by its status (published,
sticky, ...)
2. type - Filter the content by
its content type (Product, News,
...)
3. Language - Filter the content by language.
4. Filter/Refine - When no
filter is applied, this button
marks “Filter” When one is applied, it marks “Refine”. Each
time you click “Refine” the selection will be narrowed down,
eg. when you first filtered out
only News, changed your selec-
Website
vi-31
tion criteria to “Published” and
clicked refine, you will only keep
published News items.
5. Undo - Remove the last applied filter.
6. Reset - Remove all filters.
7. Update options - See next
section for more details.
8. Title column - The title of
the content.
9. Type column - The content
type.
10.Author column - The author of the content.
11.Status column - The status
(published / unpublished).
12.Language column - The
language the content is in.
13.Operations column - A
link to edit the content.
Website
vi-32
Update options
With this option you can execute an action on all the selected content. In the example
the first three rows are selected. The selection box on the left
in the title row is a shortcut to
select all visible rows.
Publish / Unpublish - Publish or unpublish content.
Promote or Demote - Promote content to the front page
or remove from the front page.
Make sticky - Make content
prior to other content to appear
on top of lists.
Remove stickiness - Remove priority on content.
Delete - Delete the selected
content.
Website
vi-33
Editing content
To edit content you click on
the “edit” link on the content
management page (ref. section “Content management”).
Another way is to go to the
most specific page for the
content you want to edit. From
there, click on the “Edit” tab
below the content title. You will
be redirected to the edit page
where you can adjust the fields
you want.
If “Create new revision” is
checked on, the content will be
copied to a new entry when you
click “Save”. The new entry will
include the adjustments you
made. The original, without the
adjustments, gets unpublished
automatically.
Website
vi-34
Translating content
The four languages for which
an interface is provided, are
English, Dutch, French and
Russian.
To switch between languages,
click on the flags on the top left
in the header.
Content in a different language
or content that is language
neutral, will not be shown on
the overview pages or menus.
This means that content that is
not translated will be hidden for
the visitor. The content stays
accessible through a direct link
though, but untranslated.
To go to the translation menu
click on the “Translate” tab.!
On this screen you can see to
what languages the content has
been translated to.
This tab is only available when the
original content has a language assigned to it. The tab is not available for
“Language neutral” content.
Website
vi-35
From the translation menu
of content you can click “add
translation”. You will be redirected to a “create content” page.
To make it easier to keep consistency, the fields are already
filled in with values from the
original language. You should
replace the values with values
properly translated.