1
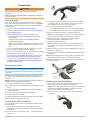
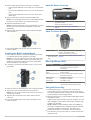
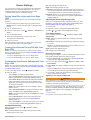
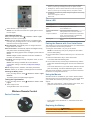
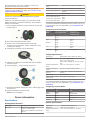
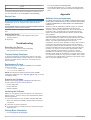
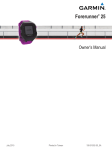
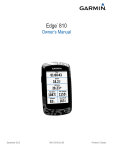
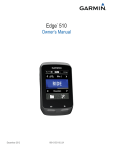
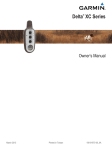
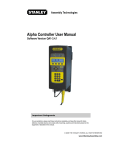
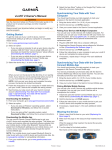
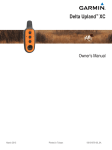
Varia™ Bike Lights Owner’s Manual August 2015 Printed in Taiwan 190-01906-00_0A All rights reserved. Under the copyright laws, this manual may not be copied, in whole or in part, without the written consent of Garmin. Garmin reserves the right to change or improve its products and to make changes in the content of this manual without obligation to notify any person or organization of such changes or improvements. Go to www.garmin.com for current updates and supplemental information concerning the use of this product. Garmin , the Garmin logo, ANT+ , and Edge are trademarks of Garmin Ltd. or its subsidiaries, registered in the USA and other countries. Garmin Connect™, Garmin Express™, and Varia™ are trademarks of Garmin Ltd. or its subsidiaries. These trademarks may not be used without the express permission of Garmin. ® ® ® This product is ANT+ certified. Visit www.thisisant.com/directory for a list of compatible products and apps. ® M/N: A02666, A02669 Table of Contents Introduction.....................................................................1 Getting Started ............................................................................ 1 Charging the Device ................................................................... 1 Installing the Out-Front Mount .................................................... 1 Installing the Seat-Post Mount .................................................... 1 Installing the Multi-Location Mount ............................................. 2 Varia HL Device Overview .......................................................... 2 Varia TL Device Overview .......................................................... 2 Bike Light Status LEDs ............................................................... 2 Using the Device Key ................................................................. 2 Device Settings............................................................... 3 Pairing Varia Bike Lights with Your Edge 1000 .......................... 3 Turning Varia Devices On and Off with Your Edge 1000 ........... 3 Customizing Varia Device Settings with Your Edge 1000 .......... 3 Configuration Settings ............................................................ 3 Adjusting the Beam Angle During a Ride .............................. 3 Turn Signal Settings ............................................................... 3 Light Network Settings ........................................................... 4 Testing the Light Network ...................................................... 4 Wireless Remote Control ............................................... 4 Device Overview ......................................................................... 4 Status LED .................................................................................. 4 Pairing the Remote with Your Varia Device ............................... 4 Using the Mounts ........................................................................ 4 Replacing the Battery ................................................................. 4 Device Information......................................................... 5 Specifications .............................................................................. 5 Headlight Specifications ......................................................... 5 Taillight Specifications ........................................................... 5 Remote Specifications ........................................................... 5 Device Care ................................................................................ 6 Cleaning the Device ............................................................... 6 Troubleshooting............................................................. 6 Resetting the Device ................................................................... 6 Thermal Safety Shutdown .......................................................... 6 Replacement O-rings .................................................................. 6 Support and Updates .................................................................. 6 Updating the Software ................................................................ 6 Getting More Information ............................................................ 6 Appendix......................................................................... 6 Software License Agreement ...................................................... 6 Index................................................................................ 7 Table of Contents i Introduction WARNING See the Important Safety and Product Information guide in the product box for product warnings and other important information. Always consult your physician before you begin or modify any exercise program. Getting Started You can use the Varia HL (headlight) and Varia TL (taillight) alone, with the optional wireless remote, or with your compatible Edge device. This list provides an overview of the installation and setup tasks. • Charge the device (Charging the Device, page 1). • Install the headlight using the out-front mount (Installing the Out-Front Mount, page 1). • Install the taillight using one of the included mounts: ◦ Install the seat-post mount (Installing the Seat-Post Mount, page 1). ◦ Install the multi-location mount (Installing the MultiLocation Mount, page 2). TIP: If you are using two taillights as turn signals, you can install two multi-location mounts on the seat stays of your bike. • If you are using the wireless remote, install it on your bike stem or handlebar (Using the Mounts, page 4). • If you are using the wireless remote, pair the devices (Pairing the Remote with Your Varia Device, page 4). • If you are using a compatible Edge device, pair the devices (Pairing Varia Bike Lights with Your Edge 1000, page 3). • If you are using a compatible Edge device, customize the bike light settings (Customizing Varia Device Settings with Your Edge 1000, page 3). ® 3 If necessary, remove the two screws on the top of the mount Â, rotate the connector, and replace the screws to change the orientation of the mount for an Edge device. 4 Place a rubber pad around the handlebar: • If the handlebar diameter is 25.4 mm, use the thicker pad. • If the handlebar diameter is 31.8 mm, use the thinner pad. 5 Place the handlebar connector around the rubber pad. NOTE: You should align the contours on the rubber pad with the grooves on the inside of the handlebar connector. 6 Adjust the mount on the handlebar so the headlight is mounted horizontally, parallel to the road. 7 Replace and tighten the screw. NOTE: Garmin recommends a torque specification of 7 lbfin. (0.8 N-m). You should check the tightness of the screw periodically. 8 Align the notches on the top of the headlight with the tabs on the bottom of the mount. 9 Press up slightly and turn the headlight clockwise until it locks into place. 10 If installing an Edge device, align the tabs on the back of the Edge device with the notches on the top of the mount. 11 Press down slightly and turn the Edge device clockwise until it locks into place. ® Charging the Device NOTICE To prevent corrosion, thoroughly dry the USB port, the weather cap, and the surrounding area before charging or connecting to a computer. The device is powered by a built-in lithium-ion battery that you can charge using a standard wall outlet or a USB port on your computer. NOTE: The device does not charge when outside the approved temperature range (Specifications, page 5). 1 Pull up the weather cap from the USB port. 2 Plug the small end of the USB cable into the USB port on the device. 3 Plug the large end of the USB cable into an AC adapter or a computer USB port. 4 Plug the AC adapter into a standard wall outlet. 5 Charge the device completely. The status LED flashes green while charging. The status LED is solid green when charging is complete. Installing the Seat-Post Mount 1 Select a secure location to mount the taillight where it does not interfere with the safe operation of your bike. NOTE: You should mount the device as high on the seat post as possible for optimal light visibility. Verify there is clear space (no obstructions) behind the device. 2 Use the hex key to remove the screw À from the seat-post connector Á. Installing the Out-Front Mount You can use the out-front mount to install both an Edge device and a headlight. 1 Select a secure location to mount the Edge device and headlight where they do not interfere with the safe operation of your bike. 2 Use the hex key to remove the screw À from the handlebar connector Á. Introduction 1 3 Place a rubber pad around the seat post, if necessary: • If the seat post diameter is 27 to 28.6 mm, use the thicker pad. • If the seat post diameter is 30.4 to 31 mm, use the thinner pad. • If the seat post diameter is 31 to 31.8 mm, do not use a rubber pad. Place the seat-post connector around the rubber pad. 4 NOTE: You should align the contours on the rubber pad with the grooves on the inside of the seat-post connector. 5 Replace and tighten the screw. NOTE: Garmin recommends a torque specification of 7 lbf-in. (0.8 N-m). You should check the tightness of the screw periodically. 6 Align the tabs on the back of the device with the seat-post mount notches Â. Varia HL Device Overview À Á Device key Select to cycle through the headlight pairing, intensity, and pattern modes. Hold to turn the device on and off. Status LED View device status (Bike Light Status LEDs, page 2). Varia TL Device Overview 7 Press down slightly and turn the device clockwise until it locks into place. À Device key Installing the Multi-Location Mount 1 Select a secure location to mount the taillight where it does not interfere with the safe operation of your bike. NOTE: You can mount the device on your seat post, helmet, backpack, or other location. Garmin recommends that you enable the deceleration indicator only when mounting the device vertically on your seat post. 2 If necessary, select the correct rubber pad À for your seat post shape. 3 Place the mount on the seat post or other mounting location. 4 Attach the mount securely using one or two bands Á. NOTE: You can use the hooks on the center of the mount  if using only one band. 5 Align the tabs on the back of the device with the mount notches Ã. 6 Press down slightly and turn the device clockwise until it locks into place. 2 Á Select to cycle through the taillight pairing, intensity, and pattern modes. Hold to turn the device on and off. Status LED (visible View device status (Bike Light Status LEDs, above the device page 2). key) Bike Light Status LEDs LED Activity Status Solid red An error occurred while charging. The device shut down to prevent overheating. Alternating blue and green The device is uploading settings from Garmin Express™. Alternating blue and red An error occurred while uploading settings from Garmin Express. Flashing green The battery is charging. Solid green Charging is complete. Flashing red The battery is low. Flashing blue The device is in smart mode and can be controlled by a paired wireless remote. Using the Device Key 1 Hold the device key for 1 second to turn on the device. The first time you turn on the device, it enters smart mode. The status LED flashes blue. The device can be controlled by a paired wireless remote or Edge device. 2 Select the device key to cycle through the bike light intensity and pattern modes. Taillight modes include smart mode, high, medium, low, and flash. Headlight modes include smart mode, overdrive, high, medium, low, and flash. NOTE: Taillight medium and flash modes are available on the Varia TL 300 device only. Headlight overdrive and flash modes are available on the Varia HL 500 device only. 3 Hold the device key for 2 seconds to turn off the device. The next time you turn on the device, it enters the last-used operating mode. Introduction Device Settings You can remotely control your Varia devices and customize settings using your compatible Edge device. This section contains instructions for the Edge 1000 device. Other compatible Edge devices use similar settings. Pairing Varia Bike Lights with Your Edge 1000 Before you can pair the devices, you must update the Edge software. 1 Bring the Edge device within range (3 m) of the sensor. NOTE: Stay 10 m away from other ANT+ bike lights while pairing. 2 Turn on the Edge device. 3 From the home screen, select > Sensors > Add Sensor > Varia. 4 Turn on the Varia device. 5 Select the Varia device key to enter smart mode. The status LED flashes blue. 6 Select your sensor. When the sensor is paired with your Edge device, the status icon appears solid on the connections page. ® Turning Varia Devices On and Off with Your Edge 1000 Before you can turn Varia devices on and off with your Edge device, you must pair the devices (Pairing Varia Bike Lights with Your Edge 1000, page 3). • To turn on all paired lights, turn on your Edge device. • To turn off all paired lights, turn off your Edge device. Customizing Varia Device Settings with Your Edge 1000 Before you can customize Varia device settings with your Edge device, you must pair the devices (Pairing Varia Bike Lights with Your Edge 1000, page 3). 1 From your Edge device, select > Sensors > Varia. 2 Select an option: • Select Enable to enable the light network. • Select Configuration to set the light intensity mode for all lights in your network (Configuration Settings, page 3). • Select Beam Angle to automatically adjust the headlight beam angle based on the rate of speed. Higher beam angles are used at high speeds, and lower beam angles are used at low speeds. NOTE: This setting appears when a headlight is paired with the device. • Select Turn Signal Setup to configure turn signals when using two taillights (Turn Signal Settings, page 3). NOTE: This setting appears when two taillights are paired with the device. • Select Light Network to view device information and customize each light in your network (Light Network Settings, page 4). • Select Test Lights to check that each light in your network is set up correctly (Testing the Light Network, page 4). Day: Sets the light intensity for day. Night: Sets the light intensity for night. Power Save: Automatically adjusts the light intensity based on the remaining battery life of the bike light. When battery life is low, the light intensity is reduced to prolong battery life. Individual: Allows you to customize the light intensity and pattern mode for each light in your network (Light Network Settings, page 4). Adjusting the Beam Angle During a Ride Before you can adjust the beam angle during a ride, you must disable the automatic beam angle setting (Customizing Varia Device Settings with Your Edge 1000, page 3). 1 Go for a ride. 2 Swipe the screen to view the bike lights data screen. 3 Select or to adjust the headlight beam angle. Turn Signal Settings From your Edge device, select > Sensors > Varia > Turn Signal Setup. Enable: Allows the paired Edge device to assign and control turn signals. Auto Cancel: Automatically cancels the turn signal after making a 90° turn. NOTE: Your paired Edge device must have GPS turned on in order to use the Auto Cancel setting. Right: Assigns the right turn signal. Left: Assigns the left turn signal. Assigning Turn Signals When using two taillights, you must indicate which light is the left turn signal and which light is the right turn signal. 1 Pair two taillights with your Edge device (Pairing Varia Bike Lights with Your Edge 1000, page 3). 2 From your Edge device, select > Sensors > Varia > Turn Signal Setup. 3 Select Right, and select a taillight to assign it as the right turn signal. When two taillights are paired, the Edge device assigns the second taillight as the left turn signal automatically. 4 If necessary, select Left, and select the second taillight to assign it as the left turn signal. Signaling a Turn with Your Edge 1000 WARNING The Varia device is not a substitute for other bike safety measures, such as hand signals, deferring to posted signs and conditions, and using good judgement. Before you can signal a turn with your Edge device, you must install two taillights (Installing the Multi-Location Mount, page 2) and assign turn signals to them (Assigning Turn Signals, page 3). 1 Go for a ride. 2 Tap the screen to view the timer overlay. Configuration Settings From your Edge device, select > Sensors > Varia > Configuration. Auto: Automatically adjusts the light intensity based on the ambient light or time of day. Device Settings 3 À Taillight key. Select to signal a left turn when using two taillights. Hold to cycle through the taillight intensity and pattern modes. Á Headlight key. Select to switch between low beam and high beam. Hold to cycle through the headlight intensity and pattern modes.  à Taillight key and power key. Select to signal a right turn when using two taillights. Hold to turn all lights on and off. Status LED. Status LED 3 Select the left or right turn signal. NOTE: You can select the same turn signal again to cancel the turn signal. Light Network Settings From your Edge device, select > Sensors > Varia > Light Network, and select a paired light. Enable: Turns on the light and allows you to control the light remotely with your Edge device. You can disable a light to disconnect it from the light network. Motion Activated: Automatically turns on the light when the Edge device is in motion. Auto Deceleration: Automatically adjusts the taillight intensity and pattern when decelerating sharply. NOTE: This setting appears when a taillight is paired with the device. NOTE: Taillight medium and flash modes are available on the Varia TL 300 device only. Light Mode: Sets the light intensity and pattern mode, or turns off the light. NOTE: This setting is available when the Individual configuration setting is selected (Configuration Settings, page 3). About: Displays device, software, and battery information. Remove: Allows you to delete a paired light from the network. Checking the Battery Level From your Edge device, select > Sensors > Varia > Light Network. The battery level for all paired lights appears. Testing the Light Network 1 From your Edge device, select > Sensors > Varia > Test Lights. 2 Select a light to test. The light blinks when it is connected. LED Activity Status Flashing green Searching for a paired device. Alternating red and green Attempting to pair with a device. A turn indicator is on. 12 rapid green flashes Successfully paired with a device. Solid red Pairing failed or the connection was lost. 12 rapid red flashes A paired device entered power conservation mode. The light intensity is automatically adjusted to prolong battery life. Flashing red One or more of the paired devices has a low battery. Pairing the Remote with Your Varia Device The first time you connect the Varia remote to your Varia device, you must pair the remote with your device. 1 Bring the remote within 1 m (3 ft.) of the device. NOTE: You must stay 10 m (33 ft.) away from other ANT+ sensors while pairing. 2 On the Varia device, hold the device key for 1 second to turn it on. 3 Select the Varia device key to enter smart mode. The status LED starts flashing blue. 4 On the Varia remote, hold two keys simultaneously until the status LED starts alternating green and red, and release the keys. The remote searches for your Varia device. After the remote pairs successfully, the status LED flashes green 12 times. After the remote is paired, it connects to your device whenever the device is in range and turned on. Using the Mounts Several mounts are available for your remote, either included with the product or as an optional accessory. The mounts allow you to attach the remote to your body, your bike, or other objects. • Align two of the notches À with the sides of the mount, and press the remote into the mount until it clicks. Wireless Remote Control Device Overview • Press gently on the release tab Á, and lift the remote from the mount. Replacing the Battery WARNING Do not use a sharp object to remove batteries. Keep the battery away from children. 4 Wireless Remote Control Never put batteries in mouth. If swallowed, contact your physician or local poison control center. Replaceable coin cell batteries may contain perchlorate material. Special handling may apply. See www.dtsc.ca.gov /hazardouswaste/perchlorate. CAUTION Contact your local waste disposal department to properly recycle the batteries. Before you can replace the battery, you must have a small Phillips screwdriver, a small flat screwdriver, and a CR2032 lithium coin-cell battery. 1 Using a Phillips screwdriver, remove the three screws from the back plate À. Operating temperature range From -15° to 50°C (from 5° to 122°F) Charging temperature range From 0º to 40ºC (from 32º to 104ºF) Radio frequency/protocol 2.4 GHz ANT+ wireless communications protocol Water rating IEC 60529 IPX7* Varia HL 500 LED luminous 600 lm flux and peak illuminance 95 lx Varia HL 501 LED luminous 300 lm flux and peak illuminance 65 lx *The device withstands incidental exposure to water of up to 1 m for up to 30 min. For more information, go to www.garmin.com /waterrating. Headlight Light Intensity Modes 2 Remove the back plate from the remote. 3 Wrap the end of a small flat screwdriver with tape. The tape protects the battery, battery compartment, and contacts from damage. 4 Carefully pry the battery from the back plate. Intensity Mode Varia HL 500 Illuminance Varia HL 501 and Luminous Flux Illuminance and Luminous Flux Overdrive 600 lm 95 lx Not applicable High 400 lm 70 lx 300 lm 65 lx Medium 250 lm 50 lx 200 lm 50 lx Low 150 lm 30 lx 150 lm 35 lx Flashing 600 lm 95 lx Not applicable Taillight Specifications Battery type Rechargeable, built-in lithium-ion battery Battery life Up to 4 hr. in high mode Up to 14 hr. in flash mode Flash mode is available on the Varia TL 300 only Operating temperature range From -15° to 50°C (from 5° to 122°F) Charging temperature range From 0º to 40ºC (from 32º to 104ºF) Radio frequency/ protocol 2.4 GHz ANT+ wireless communications protocol 5 Install the new battery into the back plate with the positive side facing down. 6 Verify the gasket Á is fully seated in the groove. Water rating IEC 60529 IPX7* Varia TL 300, 301 LED luminous flux 22 lm (typical in high mode) *The device withstands incidental exposure to water of up to 1 m for up to 30 min. For more information, go to www.garmin.com /waterrating. 7 Replace the backplate, aligning the post  with the gap in the circuit board Ã. 8 Replace and tighten the three screws. Taillight Light Intensity Modes Intensity Mode Varia TL 300 Luminous Varia TL 301 Luminous Flux Flux High 22 lm 22 lm Medium 14 lm Not applicable Low 7 lm 14 lm Flashing 28 lm Not applicable Specifications Braking 35 lm 35 lm Headlight Specifications Remote Specifications Battery type Rechargeable, built-in lithium-ion battery Battery type User-replaceable CR2032, 3 V Battery life Up to 2.5 hr. in high mode Up to 5 hr. in flash mode Flash mode is available on the Varia HL 500 only Battery life Up to 1.5 yr. at 1 hr./day Operating temperature range From -10° to 50°C (from 14° to 122°F) NOTE: Do not overtighten. Device Information Device Information 5 Radio frequency/protocol 2.4 GHz ANT+ wireless communications protocol Water rating 5 ATM* *The device withstands pressure equivalent to a depth of 50 m. For more information, go to www.garmin.com/waterrating. Device Care NOTICE Do not store the device where prolonged exposure to extreme temperatures can occur, because it can cause permanent damage. Avoid chemical cleaners, solvents, and insect repellents that can damage plastic components and finishes. Secure the weather cap tightly to prevent damage to the USB port. Cleaning the Device 1 Wipe the device using a cloth dampened with a mild detergent solution. 2 Wipe it dry. Troubleshooting Resetting the Device You can reset the device if it stops responding. Hold the device key for 8 seconds. Thermal Safety Shutdown To prevent overheating, the Varia device may turn off when operated at a high intensity in warm, stagnant air. The status LED is red until the device cools down. You should use the device outdoors. • Go to www.garmin.com/learningcenter. • Go to http://buy.garmin.com, or contact your Garmin dealer for information about optional accessories and replacement parts. Appendix Software License Agreement BY USING THE DEVICE, YOU AGREE TO BE BOUND BY THE TERMS AND CONDITIONS OF THE FOLLOWING SOFTWARE LICENSE AGREEMENT. PLEASE READ THIS AGREEMENT CAREFULLY. Garmin Ltd. and its subsidiaries (“Garmin”) grant you a limited license to use the software embedded in this device (the “Software”) in binary executable form in the normal operation of the product. Title, ownership rights, and intellectual property rights in and to the Software remain in Garmin and/or its thirdparty providers. You acknowledge that the Software is the property of Garmin and/or its third-party providers and is protected under the United States of America copyright laws and international copyright treaties. You further acknowledge that the structure, organization, and code of the Software, for which source code is not provided, are valuable trade secrets of Garmin and/or its third-party providers and that the Software in source code form remains a valuable trade secret of Garmin and/or its third-party providers. You agree not to decompile, disassemble, modify, reverse assemble, reverse engineer, or reduce to human readable form the Software or any part thereof or create any derivative works based on the Software. You agree not to export or re-export the Software to any country in violation of the export control laws of the United States of America or the export control laws of any other applicable country. Replacement O-rings Replacement bands (O-rings) are available for the standard mount in two sizes: • 1.3 × 1.5 × 0.9 in. AS568-125 • 1.7 × 1.9 × 0.9 in. AS568-131 NOTE: Use Ethylene Propylene Diene Monomer (EPDM) replacement bands only. Go to http://buy.garmin.com, or contact your Garmin dealer. Support and Updates Garmin Express (www.garmin.com/express) provides easy access to these services for Garmin devices. • Product registration • Product manuals • Software updates Updating the Software Before you can update your device software, you must have a Garmin Connect™ account, and you must download the Garmin Express application. 1 Connect the device to your computer using the USB cable. When new software is available, Garmin Express sends it to your device. 2 Follow the on-screen instructions. 3 Do not disconnect your device from the computer during the update process. Getting More Information • Go to www.garmin.com/intosports. 6 Troubleshooting Index A accessories 6 B bands 6 battery charging 1 life 4 replacing 4 C cleaning the device 6 customizing the device 3 D device, care 6 E Edge 3, 4 G Garmin Express registering the device 6 updating software 6 I installing 1, 2 K keys 2, 4 M maps, updating 6 mounting the device 1, 2, 4 O O-rings. See bands P pairing 3 remote control 4 product registration 6 R registering the device 6 remote control 3, 4 pairing 4 replacing the battery 4 resetting, device 6 S settings 3, 4 software, updating 6 software license agreement 6 specifications 5 T troubleshooting 6 U updates, software 6 USB 6 W wireless devices 4 Index 7 www.garmin.com/support +43 (0) 820 220230 + 32 2 672 52 54 0800 770 4960 1-866-429-9296 +385 1 5508 272 +385 1 5508 271 +420 221 985466 +420 221 985465 + 45 4810 5050 + 358 9 6937 9758 + 331 55 69 33 99 + 39 02 36 699699 (+52) 001-855-792-7671 0800 0233937 +47 815 69 555 00800 4412 454 +44 2380 662 915 (+35) 1214 447 460 +386 4 27 92 500 0861 GARMIN (427 646) +27 (0)11 251 9999 +34 93 275 44 97 + 46 7744 52020 +886 2 2642-9199 ext 2 0808 238 0000 +44 (0) 870 8501242 +49 (0) 89 858364880 zum Ortstarif - Mobilfunk kann abweichen 913-397-8200 1-800-800-1020 © 2015 Garmin Ltd. or its subsidiaries