1
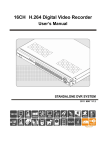
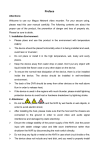
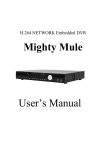
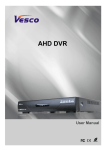
WHITE
User Manual
Inspire White HD-SDI DVR Range
Contents
• Logging in to DVR
• Using the front panel
• Using infrared remote
• Using a mouse
• Mouse playback toolbar
• Timebar
• Live view
• Playback
• Quickplay
• Browse playback
• Playback by time
• Playback by event
• Playback by timebar
• Playback control
• Copy to CD/DVD or USB
• Using COP Player 2 software
• Smartphone viewing setup
• Smartphone viewing
• Application controls
• Connecting via PC
• DVR settings
• DVR log
• Copy over network
• Playback over network
• Talkback
• PTZ control
4
5
6
7
8
9
10
11
12
13
14
15
16
17
18
23
25
26
27
28
29
30
31
32
33
34
3
User Manual
Inspire White HD-SDI DVR Range
Logging into the DVR
A user may be required to login to the DVR to be able to use any of the features. To do
this follow the procedure below:• Front panel
• Mouse
• IR Remote
Press Menu button
Enter password (Default 888888)
Right click
click Menu Icon
Enter password (Default 888888)
Press Menu button
Enter password (Default 888888)
On the login screen you can change the user name that you wish to log in as, press
OK and use up /down keys to select from the drop down box or the mouse to change
selection.
The password can be entered by using the number keys on the front panel or the virtual
keyboard using the mouse.
After entering the password press OK to log in.
4
User Manual
Inspire White HD-SDI DVR Range
Using the front panel
The front panel functions are common for all types of Inspire DVR.
04-WhiteHD
C
A
POWER
1
2
3
4
5
6
7
8
9
0
B
G
OK
F
E
COPY
PTZ
MENU
INFO
MUTE
BACK
D
NETWORK
DISPLAY
EVENT
HDD
L
K
J
I
H
M
08-WhiteHD and 16-WhiteHD
A
B
E
D
H
I
DISPLAY
OK
MENU
POWER
C
A.
B.
C.
D.
E.
F.
G.
H.
I.
J.
K.
L.
M.
N.
O.
F
1
2
3
4
5
6
7
8
9
10
11
12
13
14
15
6
16
BACK
PTZ
MUTE
COPY
INFO
G
K
HDD
J
L
Navigation buttons
OK button
Power button
Play & pause button
Menu button
PTZ button
Copy button
Display button
Back button
Mute button
Info button
Number buttons
Information lights
USB port
CD-DVD eject
NETWORK
RECORD
M
N
O
Move around menu screen, control PTZ cameras
Confirm and accept options
Switch on / off DVR (requires password)
Playback and pause recorded video
Access engineer menu (requires password)
Enable / disable PTZ mode
Access the copy menu
Change the format of the main display
Go back one step in menu or stop playback
Mute / enable audio & mute alarm
Display installer information
Select individual channels
Display status of HDD, Network, Event
Mouse or copy device(plus versions only)
Open CD-DVD tray (plus versions only)
5
User Manual
Inspire White HD-SDI DVR Range
Using infrared remote
The IR remote functions are common for all types of Inspire DVR.
A.
B.
C.
D.
E.
F.
G.
H.
I.
J.
K.
L.
M.
Navigation buttons
OK button
Power button
Play & pause button
Menu button
PTZ button
Copy button
Display button
Back button
Mute button
Info button
Number buttons
Stop button
Move around menu screen, control PTZ cameras
Confirm and accept options
Switch on / off DVR (requires password)
Playback and pause recorded video
Access engineer menu (requires password)
Enable / disable PTZ mode
Access the copy menu
Change the format of the main display
Go back one step in menu or function
Mute / enable audio & mute alarm
Display installer information
Select individual channels
Stop playback of recorded video
6
User Manual
Inspire White HD-SDI DVR Range
Using a mouse
The mouse functions are common for all types of Inspire DVR. A mouse can be used to
control all functions of the DVR.
B
A
A.
B.
A
Left mouse button
Right mouse button
B
C
D
E
F
G
Double click to zoom to full screen
Display mouse tool bar (requires password)
H
I
J
K
L
M
N
O
P
Mouse tool bar
A.
B.
C.
D.
E.
F.
G.
H.
I.
J.
K.
L.
M.
N.
O.
P.
Q.
Access engineer menu
Access playback menu
Access the copy menu
Audio on/off / mute alarm
Digital zoom
Enable / disable PTZ mode
Display installer information
Take Snapshot
Display single channel full screen
Display 4 channels
Display 6 channels (8 and 16 channel DVR only)
Display 8 channels (8 and 16 channel DVR only)
Display 9 channels ( 8 and 16 channel DVR only)
Display 10 channels (16 channel DVR only)
Display 13 channels (16 channel DVR only)
Display 16 channels (16 channel DVR only)
Start sequence display
In PTZ mode the mouse can also be used to control the movement of the PTZ camera.
7
Q
User Manual
Inspire White HD-SDI DVR Range
Mouse Playback Toolbar
There are two types of mouse playback toolbars available, Basic and Timebar.
Basic mouse toolbar
A
A.
B.
C.
D.
E.
F.
G.
H.
I.
J.
K.
L.
M.
N.
O.
P.
Q.
R.
S.
B
C
D
E
F
G
H
I
J
K
L
Switch to single channel view
Switch to 4 channel view
Switch to 9 channel view
Switch to 16 channel view
Decrease playback speed
Change playback direction to backward
Change playback direction to forward
Pause/Play
Stop playback
Increase playback speed
Move forward 60 minutes
Move backward 60 minutes
Move forward 30 minutes
Move backward 30 minutes
Move forward 10 minutes
Move backward 10 minutes
Enter digital zoom mode
Copy video
Exit playback
8
M
N
O
P
Q
R
S
User Manual
Inspire White HD-SDI DVR Range
Timebar
L
H
J
I
H
G
F
E
D
A
A.
B.
C.
D.
E.
F.
G.
H.
I.
J.
K.
L.
B
C
Channel number
Playback area (double click to switch playback to this time)
Zoom out time bar
Restore time bar to 24 hour
Zoom in time bar
Navigate across time bar
Switch to full screen video
Input specific playback time and date
Current playback time
Select record types to display in time bar
Select cameras to playback
Select date to search
9
User Manual
Inspire White HD-SDI DVR Range
Live View
To change the multiscreen view on the display press the “Display” key. Pressing the
display key multiple times will cycle through all the available screen layouts. If using the
USB mouse right click the mouse button and select the desired multiscreen view from the
mouse menu.
To bring up a camera full screen:
DVR Front Panel
Press desired camera number key
Infra Red Remote
Press desired camera number key
Mouse
Using left mouse button double click the desired camera channel or right click to display
multiscreen view.
Using the USB mouse the layout of the multiscreen views can be altered. To move a
camera channel to a different location on screen, click the left mouse button on desired
camera and hold the button down. Drag the camera to another location and release
left mouse button. The camera channel will now move to the desired location. If another
camera channel was already in the desired screen location the two camera channels
will simply swap places.
To enter digital zoom:
DVR Front Panel
In multiscreen use Arrow keys to select desired camera, press OK key to enter digital zoom
mode. Use Arrow keys to move around screen. To exit digital zoom mode press Back key.
In single screen view press OK key to enter digital zoom
Infra Red Remote
In multiscreen use Arrow keys to select desired camera, press OK key to enter digital zoom
mode. Use Arrow keys to move around screen. To exit digital zoom mode press Back key.
In single screen view press OK key to enter digital zoom
Mouse
In multiscreen view mode click Left mouse button to select camera then click Digital
Zoom button on mouse tool bar.
In single screen view click Digital Zoom button on mouse tool bar.
Click Left mouse button and hold to move to different area of the screen.
10
User Manual
Inspire White HD-SDI DVR Range
Playback
To enter the playback menu press the “Play/Pause” button on the DVR front panel or IR
remote. If using USB mouse right click to display the mouse toolbar and click the “Play”
button.
There are five playback modes available on the Inspire White range of DVRs.
Quickplay
Quickly playback from a short time ago by inputting the amount of
minutes to playback from. Quickplay can playback from 1 minute
to 99 minutes.
Browse Playback
Browse playback is designed for playing back a specific date from
midnight and quickly navigating between hours.
Playback by Time
Use playback by time to playback a specific date and time
Playback by Event
Search the DVR event log for all events occurring between a specific time range. Event results will be displayed in a list with an
option to playback.
Playback by Time Bar Time bar playback displays a much more advanced interface
for reviewing footage. This option is only available when using a USB
mouse and will not appear in the playback menu if a USB mouse is
not being used.
11
User Manual
Inspire White HD-SDI DVR Range
Quickplay
The quickplay feature is a playback method designed to make playing back footage
from a short time ago faster.
The default setting for quickplay is 5 minutes, this can be changed from 1-99. If the
minutes are changed the DVR will remember this setting until a power off has occurred.
Front panel
Use Up and Down arrow keys to navigate to
the playback option.
Press Right arrow key to select minutes option.
Input desired amount of minutes using
number keys.
Press Left arrow key to highlight Quickplay
button.
Press OK key to start playback.
Mouse
Click minutes box to bring up virtual
keyboard.
Use virtual keyboard to input desired amount
of minutes.
Click Quickplay button to start playback
12
IR Remote
Use Up and Down arrow keys to navigate to
the playback option.
Press Right arrow key to select minutes
option.
Input desired amount of minutes using
number keys.
Press Left arrow key to highlight Quickplay
button.
Press OK key to start playback.
User Manual
Inspire White HD-SDI DVR Range
Browse Playback
The browse playback feature will playback from midnight on a chosen date.
The default setting for browse playback is the current date. If the date is changed the
DVR will remember this setting until a power off has occurred.
Front panel
Use Up and Down arrow keys to navigate to
the playback option.
Press Right arrow key to select day, month or
year option.
Input desired day, month, year using number
keys.
Press Left arrow key to highlight Browse
playback button.
Press OK key to start playback.
Mouse
Click day, month or year box to bring up
virtual keyboard.
Use vitural keyboard to input desired date.
Click Browse playback button to start
playback.
13
IR Remote
Use Up and Down arrow keys to navigate to
the playback option.
Press Right arrow key to select day, month
or year option.
Input desired day, month, year using
number keys.
Press Left arrow key to highlight Browse
playback button.
Press OK key to start playback.
User Manual
Inspire White HD-SDI DVR Range
Playback by Time
The Playback by Time feature can be used to playback a specific time and date.
The default setting for playback by time is the current date. If the date is changed the
DVR will remember this setting until a power off has occurred.
DVR Front Panel
Press Arrow keys to navigate menu
Press Number keys to input desired time and date
Highlight Play button and press OK to playback time
Infra Red Remote
Press Arrow keys to navigate menu
Press Number keys to input desired time and date
Highlight Play button and press OK to playback time
Mouse
Click time and date boxes to bring up virtual keyboard.
Use vitural keyboard to input desired date and time.
Click Play button to start playback.
Available Times
Displays the available times stored on the hard drives.
Start Time is the earliest date and time stored on the hard drives. End Time is the latest date and time stored on the hard drives.
14
User Manual
Inspire White HD-SDI DVR Range
Playback by Event
The Playback by Event feature will list events such as Motion detect, Video loss and Alarm
input triggers recorded on the DVR.
DVR Front Panel
Infra Red Remote
Press Arrow keys to navigate menu
Press Number keys to input desired start and end time to search
Press OK key on Event Type to display drop down list
Select which Event Type to search and click OK
Use Arrow keys to highlight View Log
Press OK key to display results
Use Up and Down Arrow keys to highlight individual event file
Use Left and Right Arrow keys to change page
With file highlighted press OK key to play
Press Arrow keys to navigate menu
Press Number keys to input desired start and end time to search
Press OK key on Event Type to display drop down list
Select which Event Type to search and click OK
Use Arrow keys to highlight View Log
Press OK key to display results
Use Arrow keys to highlight individual event file
Use Left and Right Arrow keys to change page
With file highlighted press OK key to play
15
User Manual
Inspire White HD-SDI DVR Range
Mouse
Click time and date boxes to bring up virtual keyboard.
Use vitural keyboard to input desired start and end times
Click Event Type option to select event type to search.
Click View Log button to display results.
Double click Left mouse button on event file to playback.
Use Arrow buttons on bottom of search window to change page
Search Options
Available Times
Displays the available times stored on the hard drives. Start Time is the earliest date and time
stored on the hard drives. End Time is the latest date and time stored on the hard drives.
Event Type
The type of event to display in the event list. Options are Motion, Alarm or Video Loss
Playback by Timebar
The Playback by Timebar option is a more advanced option for reviewing recordings.
To use this playback function a USB mouse must be used and the Playback by Timebar
option selected from the playback menu.
For more information on the playback by timebar mouse controls see page 9.
16
User Manual
Inspire White HD-SDI DVR Range
Playback Control
To control the various playback functions, you can use the following steps:
DVR Front Panel
Press Arrow keys to change playback speed and direction.
Press Display keys to cycle through multiscreen views
Press Number keys to display channel full screen
With video paused press Left and Right arrow buttons to step by frame
When in full screen on single camera press OK key to enter digital
zoom
Press Copy key to copy current position in playback to an external
device.
Press Back key to exit playback.
Infra Red Remote
Press Arrow keys to change playback speed and direction.
Press Display keys to cycle through multiscreen views
Press Number keys to display channel full screen
With video paused press Left and Right arrow buttons to step by frame
When in full screen on single camera press OK key to enter digital
zoom
Press Copy key to copy current position in playback to an external
device.
Press Back key to exit playback.
Mouse
Right click to display mouse menu.
Double Left click camera channel to display full screen.
Double Left click mouse again to return to multiscreen.
17
User Manual
Inspire White HD-SDI DVR Range
Copy to CD/DVD or USB
The DVR is capable of copying recorded footage to the internal CD/DVD or to a USB
memory stick, HDD or external CD/DVD writer.
Copy by Time
DVR Front Panel
Press Arrow keys to navigate menu
Use Number keys to input desired date
Use Number keys to inputs time range to copy in Start and End time
fields.
Highlight Backup button and press OK to proceed to the next step.
Infra Red Remote
Press Arrow keys to navigate menu
Use Number keys to input desired date
Use Number keys to inputs time range to copy in Start and End time
fields.
Highlight Backup button and press OK to proceed to the next step.
Mouse
Click time and date boxes to bring up virtual keyboard.
Use vitural keyboard to input desired time range to copy.
Click Backup button to proceed to the next step.
18
User Manual
Inspire White HD-SDI DVR Range
Copy by Event
DVR Front Panel
Press Arrow keys to navigate menu
Press Number keys to input desired start and end time to search
Press OK key on Event Type to display drop down list
Select which Event Type to search and click OK
Use Arrow keys to highlight View Log
Press OK key to display results
Use Up and Down Arrow keys to highlight individual event file
Use Left and Right Arrow keys to change page
With file highlighted press OK key to select for copying.
With all desired files selected highlight Backup button and press OK to
proceed to the next step.
Infra Red Remote
Press Arrow keys to navigate menu
Press Number keys to input desired start and end time to search
Press OK key on Event Type to display drop down list
Select which Event Type to search and click OK
Use Arrow keys to highlight View Log
Press OK key to display results
Use Up and Down Arrow keys to highlight individual event file
Use Left and Right Arrow keys to change page
With file highlighted press OK key to select for copying.
With all desired files selected highlight Backup button and press OK to
proceed to the next step.
19
User Manual
Inspire White HD-SDI DVR Range
Mouse
Click time and date boxes to bring up virtual keyboard.
Use vitural keyboard to input desired start and end times
Click Event Type option to select event type to search.
Click View Log button to display results.
Click Left mouse button on event file to mark for copying.
Use Arrow buttons on bottom of search window to change page.
With all desired files selected click Backup button to proceed to the
next step.
Search Options
Available Times
Displays the available times stored on the hard drives. Start Time is the earliest date and
time stored on the hard drives. End Time is the latest date and time stored on the hard
drives.
Event Type
The type of event to display in the event list. Options are Motion, Alarm or Video Loss
Copy by Playback
DVR Front Panel
Press Arrow keys to navigate menu
Press Number keys to input desired time and date
Highlight Play button and press OK to playback time
Press Copy key to automatically add the current playback position
for copying.
Infra Red Remote
Press Arrow keys to navigate menu
Press Number keys to input desired time and date
Highlight Play button and press OK to playback time
Press Copy button to automatically add the current playback position
for copying.
Mouse
Click time and date boxes to bring up virtual keyboard.
Use vitural keyboard to input desired date and time.
Click Play button to start playback.
Select Copy option to automatically add the current playback
position for copying.
20
User Manual
Inspire White HD-SDI DVR Range
Starting the Copy
Multiple time ranges can be added to the list and copied at the same time.
DVR Front Panel
Press Arrow keys to navigate menu
Select device to copy to (use Arrow keys and OK key)
Select file type (use Arrow keys and OK key)
Select desired cameras to copy (use Arrow keys and OK key)
Highlight Copy button and press OK to start the copy
Infra Red Remote
Press Arrow keys to navigate menu
Select device to copy to (use Arrow keys and OK key)
Select file type (use Arrow keys and OK key)
Select desired cameras to copy (use Arrow keys and OK key)
Highlight Copy button and press OK to start the copy
Mouse
Select device to copy to
Select file type
Select desired camera to copy
Click Copy button to start the copy
Copy Options
Device
Select whether backing up to Disk or USB media
File Type
This is the stream type. “Main Stream (AVI) is the HD stream, each
camera backed up will be individual which means each camera
has to be played back seperately on a PC. “Sub Stream (COP)” is a
DVD quality stream, all cameras are contained in one file and can be
viewed at the same time using the Cop Player 2 software.
21
User Manual
Inspire White HD-SDI DVR Range
Copy Player
This option will only appear when performing a Sub Stream backup,
you choose whether to copy the Cop Player 2 software or not.
Select Camera
Select which camera to copy
NO.
Position number of the copy entries in the queue.
Start Time
The time the copy will start for each copy entry in the queue
End Time
The end the copy will start for each copy entry in the queue
Size
This is the individual size of each copy entry in the queue
Selection Box
Selects whether or not the entry should be included the copy
Add
Add another time range to the copy queue
Delete
Delete copy entry from the queue
Erase
Format the copy device
Copy
Start the copy
22
User Manual
Inspire White HD-SDI DVR Range
Using COP player 2 software
When making a backup to CD/DVD or via USB media if the file format chosen is Cop then
the Cop Player 2 software is vital in order to playback the recordings.
After inserting the disk or USB media containing the copied recordings into a PC double
click the Cop Player 2 icon. This will run the Cop Player 2 software.
To open a file containing recordings click on the Open File icon
Click on the file that you wish to playback and then click Open
The Cop player software will now open and display the selected video file.
23
User Manual
Inspire White HD-SDI DVR Range
To bring a camera up full-screen, double click on desired camera or use the full-screen
icon on the right hand side of the viewer.
If required, the recordings can be converted to AVI format, this will enable them to be
played back in most viewing applications such as Windows Media Player.
To do this click on the video camera icon at the bottom of the viewer.
Select the camera channel you would like to convert and if you wish to include audio.
Then click next.
When prompted, select a destination for the new AVI file to be saved.
The AVI window will disappear and once the AVI conversion is complete the viewer will
display a window to confirm it was completed successfully.
There are also options to save a Snap Shot or Print Image in the bottom right of the
viewer.
24
User Manual
Inspire White HD-SDI DVR Range
Smartphone viewing setup
All Inspire DVRs can be viewed on smartphones if they are connected to the internet.
Requirements
Apple iPhone /iPad or smartphones using Android operating system
GPRS, 3G or Wi-fi connection
DVR connected to the internet
Access to phone App store
Connecting
Connect the DVR to the internet.
Install application
Using the smartphone connect to your phones app store/market place.
iPhone/iPad
Search for TMeye+, download and install this application (it’s free).
Android
Search for TMeyePro, download and install this application (it’s free).
•
•
Once installed run the application and add your DVR settings
Click connect to connect the DVR
25
User Manual
Inspire White HD-SDI DVR Range
Smartphone viewing
Viewing the DVR
This guide shows how to connect using an Android smartphone, but all smartphone apps
require the same information to connect to the DVR.
Start TMeye App
Press Settings button
Start App
Press
Settings
Click Add
Enter device name (for your reference)
Enter the IP address of the DVR in to Address: (example 84.92.95.178)
Enter the mobile port number in to PORT: 7050 (this is the DVR default)
Enter a user ID and password
Default user ID:
Admin (case sensitive)
Default password: 888888
Press Save and you DVR settings will be saved
Click DVR on device list
Select camera to view
On the free applications, you can only view live images one channel at a time.
26
User Manual
Inspire White HD-SDI DVR Range
Application Controls
A
C
A.
B.
C.
D.
E.
F.
G.
B
D
E
F
PTZ control
Select channel to view
Start live view
Take a snapshot
Settings
App information
View next/previous channels
27
G
User Manual
Inspire White HD-SDI DVR Range
Connecting via PC
Note: Viewing on a Apple Mac currently not supported.
Connecting via Windows PC
To start, open up Internet Explorer and type the DVR IP address into the address bar and
press enter. (e.g. http://192.168.0.100)
When connecting to the DVR for the first time, installation of the DVR Activex control is
required. Usually a pop-up bar will appear.
Right click on the pop-up bar and choose install.
Note: Depending on internet explorer security settings the ActiveX control may not install,
for further advice contact your network administrator.
Once the ActiveX is installed correctly the user should be presented by the Inspire Log On
screen.
To log in the user must type both their Username and Password into the required fields.
Note: Default Username is Admin (case sensitive)
Default Password is 888888
Once the required fields have been entered click login button.
28
User Manual
Inspire White HD-SDI DVR Range
Live Images
Once logged into the DVR the user will be presented with the live images screen.
D
E
F
C
G
B
H
A
I J K L M N O P Q R S
A. Relay Control
B. Camera & Stream Type Selection
C. Settings
D. Playback
E. Local Settings
F. Information
G. Logout
H. PTZ Control
I. Switch to full screen
J. Single channel view
K. 4 channel view
L. 8 channel view
M. 16 channel view
N. Audio on/off
O. Talkback on/off
P. Digital Zoom
Q. Take Snapshot
R. Close stream
S. Stop local record
DVR settings
The device parameters feature allows the user to change settings that are saved on the
DVR such as record settings, event settings and more.
29
User Manual
Inspire White HD-SDI DVR Range
DVR log
The DVR keeps a log of events such as illegal power downs, motion detection events,
alarm input triggers and more.
The user can search for specific times or type of events using the options at the top of the
window.
The log can also be exported to the remote PC as a html file. This enables the user to be
able to copy the log to a removable device or even email it.
Note: Searching the full or large sections of the log may take several minutes dependant
on amount of event entries.
Local record over network
If, when viewing the camera images over the network the user would like to save the live
stream to the PC, the user can use the Local Record feature.
To use Local Record click the Local Record button, the destination path and duration
of the file can be set in the Local options. Local Record can be stopped at any time by
clicking the Stop Local Record button.
Note: Local record files are saved as .mp4 files and can be played back in standard
media player software.
30
User Manual
Inspire White HD-SDI DVR Range
Copy over network
If there are recordings on the DVR HDD(s) that need to be retrieved remotely this can be
done using the copy feature.
To use the copy feature:
Enter playback mode
Select camera, date and click “Query”
Click the
icon
Enter required start and end times
Click “Refresh” to estimate file size
Click “Browse” to choose a location to save the file to.
Click Start Download to start the remote copy.
Full administrator rights may be required and UAC (User Account Control) must be
disabled when copying over a network.
31
User Manual
Inspire White HD-SDI DVR Range
Playback over network
The viewing of recordings stored on the DVR HDD(s) can be done using the Playback
feature.
Camera
Selection
Available
Times
Select
Date
Playback
Controls
Timebar
To playback images select a camera to play from the camera selection panel. Select a date
from the calendar, Highlighted dates indicates that there is recorded footage available, no
highlight indicates there is no recordings available. Once the date is selected click “Query”,
the time bar should now populate.
Double click a time in the time bar to play it.
The colour of the time bar indicates the type of record available.
Blue
Red
Yellow
Grey
Continuous recording
Alarm input recording
Motion detection recording
No recorded footage
32
User Manual
Inspire White HD-SDI DVR Range
Talkback
Duplex Talkback
The DVR features a full duplex talkback system. When a microphone is connected to the
Line Input and a broadcast unit is connected to the audio output of the DVR click the
Talkback button.
Once Talkback has been selected the audio stream from the DVR Line Input will be
played through speakers or a headset connected to the remote PC.
Broadcast
If a microphone is also connected to the PC then when the user talks their voice will be
broadcast out through the DVR audio output.
Audio
The DVR can support up to sixteen microphones (model dependant). To listen to the
audio from a required channel, select the channel in full-screen. The audio will now
be played through the remote PCs speakers or headset, providing microphones are
connected to the audio inputs of the DVR.
Note: It is not possible to use duplex talkback or broadcast when using audio
microphones with camera inputs.
33
User Manual
Inspire White HD-SDI DVR Range
PTZ control
The DVR web browser supports control of PTZ cameras if connected and programmed in
the DVR.
To use the PTZ feature single click on desired camera.
It is recommended to only use PTZ control when viewing the Sub Stream.
PTZ Speed
Select the speed in which the PTZ camera moves
Note: This may be limited by the capabilities of the PTZ camera connected
◄►▲▼ Pan or Tilt the camera
Zoo Zoom the PTZ camera in or out
Iris Open or close the iris (this will make the image brighter or darker)
Focu Adjust focus far or near
Turn on the PTZ wiper blade (compatible models only)
Preset
Select preset position then click Go to move to position or Set to save
current position as selected preset number.
34