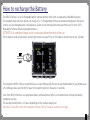
1
iX3M Dive Computer
User Manual
ver. 1.1
Warning!
To receive all updates of this manual and notice of future
updates of the “iX3M” by e-mail, please send a message writing
“iX3M”
to the following address: [email protected]
This service is highly recommended
and it is completely free of charge.
For further support, have a look at the tutorial videos
soon available on www.ratio-computers.com
For assistance by mail write to [email protected]
2
Think Green
If possible do not print this manual.
Use your tablet or your PC to consult it .
If you have to print this manual, follow the WWF® guide showing how to save
paper and which type to use.
http://www.wwf.it/tu_puoi/vivere_green/ecoconsigli/ecoconsigli_in_ufficio/
3
CONTENTS
Introduction
The RATIO iX3M outside the Water:
Importan Warnings
General Warnings
7
Danger Warning 9
Diving with Mix 11
Limits of diving computers
12
Care and Maintenance
12
Computer’s technical characteristics 14
Hardware 14
Certification 14
Software
15
Summary of technical characteristics
How to recharge the Battery
Diving in cold or freezing waters
DAN DL7
20
Privacy
20
17
19
16
The main screen 21
The RATIO iX3M Menu
MAIN MENU 26
25
DIVE SET for RATIO iX3M Deep
27
DIVE SET for RATIO iX3M Tech+ & iX3M Reb
28
DIVE SET for RATIO iX3M Tech+ & iX3M Reb
29
Deco Stop for RATIO iX3M Tech+ & iX3M Reb 32
CCR Settings for RATIO iX3M Tech+ & iX3M Reb 33
MIX Table 34
Diluent Table for RATIO iX3M Tech+ & iX3M Reb 35
Dive Alarms 36
NDL (Non Decompression Limit) Planner 37
Decompression Planner 38
Logbook
39
SYSTEM SETTINGS
40
Display Set 41
General Set (ora e data) 42
PC Mode (how to connect the iX3M to PC)
Reset to Default (reset the factory data) 43
Compass settings (Compass) 44
Model, serial number and operative system.
SWITCH OFF (Manual switching off ).
45
Compass
46
42
45
4
CONTENTS
The RATIO iX3M when diving
Dive Screen 48
Main Data 48
Current dive’s profile:
51
Tissues saturation when diving:
The diagram represents the 16 tissues which are
taken into consideration by the two decompressive
algorithms (BUL or VPM).
51
The yellow lines represent the nitrogen levels .
The green lines represent the helium levels (if present) 51
Decompression Chart: 52
Compass when diving53
Applications when diving
Mix change during the dive
54
55
Setting change during the dive 56
The iX3M in GAUGE mode
5
Introduction
Thank you for having purchased the RATIO® computer.
RATIO®, with the quality of its products, always stands by you to guarantee comfort, leisure and safety when diving.
The RATIO® computer that you have purchased is extremely innovative, with a software allowing you to carry out both
recreational and technical dives.
The RATIO® iX3M computer includes decompressive algorithms supporting, according to the different models, Air Nitrox,
Normoxic Trimix dives (iX3M DEEP), Trimix and CCR (iX3M TECH + and iX3M REB) and its processor calculates in real time
your dive’s specific deco profile; all this ensure calculation flexibility and your personal safety.
Check periodically the presence of possible updates of this manual on web site www.ratio-computers.com
The manual version (e.g. 1.0) is shown on its cover.
6
Importan Warnings
General Warnings
It is necessary read this manual carefully before using the computer RATIO®. A wrong use of this computer or its accessories
will nullify the warranty and could cause permanent damages to the device and/or its accessories.
• The diving computer DOES NOT replace an adequate diving training and should be used only by those divers who have
been opportunely trained.
• The RATIO® computer is an ausiliary instrument to the dive, so it is compulsory having always an appropriate diving chart
in order to carry out the decompression phase in case the device is malfunctioning.
• Diving involves risks relating to decompression disease, Oxygen toxicity and other risks relating to the diving itself. Even
a careful reading of this manual and the use of this device don’t prevent possible dangers. Anyone who doesn’t know or
doesn’t accept consciously these risks, must not dive with iX3M computer.
• Diving has some intrinsic risks which cannot never be completely eliminated.
No computer or diving chart can guarantee that the risk of Decompression Disease (DD) or Oxygen toxicity to the central
nervous system don’t exist, even if the diver follows meticulously and accurately the indications given by the computer or
the diving chart.
• The computer cannot take into consideration the individual physiological variations which might change day by day. For
this reason it is good practice to use the device in a conservative and preventive way, remaining within the limits indicated
by the computer, to minimize the risks of DD and Oxygen toxicity to the central nervous system.
7
• The computer doesn’t replace the learning of the diving decompression charts which we recommend to have always as
backup along with a depth gauge and a watch.
• It is forbidden to share a unique computer for two divers while diving; every diver must have his/her device at his/her
wrist, which can give information to him/her only.
• It is forbidden to dive with a computer which has not taken into consideration the previous dives a diver made; the
computer calculation CANNOT use unknown data or take into consideration dives which it has not done.
8
Danger Warning
The computer IS NOT meant for a PROFESSIONAL use.
The computer is meant exclusively for a sport, recreational or technical use.
• A use which is not compliant to what has been said above, could expose the diver to an increasing risk of incurring in the
Decompression Disease (DD). For this reason we discourage its use in case of professional or commercial dives, unless it is
used as an operator’s further support device.
• Before diving it is necessary to check the battery authonomy. DO NOT dive if the battery level is at 30% or at lower
percentages; make sure that the screen doesn’t show malfunctioning signs. It must be read clearly.
• Check always that settings are the ones desired. Don’t let the computer be manipulated by someone else before diving. In
this case, check that settings are the ones you desire.
• Consider that our body experience changes everyday. The computer cannot take into consideration all these changes. If
you don’t feel at your best physical conditions or if you feel physical problems, don’t dive.
• Avoid all behaviours increasing the risks connected to the DD such as rapid ascents, yo-yo dives, violation of compulsory
decompressive stops, dives with too close surface intervals and any behaviour which is contrary to the common sense and
to the training received.
• This device doesn’t allow its use without having the due skill, given by a specific training.
The failure to comply with the basic rules of diving exposes the diver at death danger.
9
• We recommend to do dives within the safety curve, to reduce the risks inherent to the Decompression Disease (DD).
• We recommend dives not deeper than 40 mt or according to the oxygen percentage contained inside the tank.
Maximum PPO2 1,4 BAR
• Respect the ascent speed recommended by the device; an excessive ascent speed exposes the diver to death danger.
• The computer calculates the total ascent time but this could be longer than the one visualised, according to some
parameters calculated by the computer during the whole dive. Trying to ascend at the correct speed and respect the
visualised depth of the stops helps to respect this time.
• Respect always the No FLY Time: it is forbidden to take a plane if the No FLY Time icon is still visible on the screen.
Remember to plan the last dive of the series taking into consideration the advices given by DAN (Divers Alert Network).
• Even respecting all expected intervals, the current Hyperbaric Medicine cannot exclude the onset of the Decompression
Disease in a plane after diving .
10
Diving with Mix
Setting the gas portion contained in the tank, the computer will take into consideration only whole numbers. So, for
example, in case of a verified gas percentage of 32,8% the value to be setted will be the lowest, that is 32%.
Do not round off at the higher value since this would underestimate the Nitrogen calculation.
• Check the setting of the max PpO2 and never exceed the value of 1,4 BAR.
• DO NOT DIVE without having checked the tank content with instruments that have been declared as trustworthy.
Ensure that the gas set on the computer matches with the one contained inside the tank you are going to use for diving.
The Nitrox-Trimix-CCR dives need a specific training, DO NOT dive without having received the due training.
Passing the PPO2 set and advised maximum limit imposes an ascent at minor depths and in case the CNS (Central Nervous
System) has values very close to the maximum limit, a reduction to O2 exposure is recommended.
• Use the diving computer only after having read the User’s Manual in all its parts making sure to have understood its
functioning.
In case of doubts or questions, address yourself to your instructor or to your dealer before diving.
•It is essential to know that every diver is fully responsible of his/her safety.
• Diving with gas mixes involves different risks in comparison with those made with standard air. A suitable training is
necessary to learn to identify and avoid these risks, which are not immediately recognisable. Such risks concerns serious
injuries or death.
11
Limits of diving computers
The computer takes into consideration the most updated safety guide lines, nevertheless, it is always necessary to know
that such studies are theoretical and elaborated to reduce, not to avoid, the risk of Decompression Disease (DD).
At the moment, the Hyperbaric Medicine doesn’t allow to eliminate totally the risk of DD.
Care and Maintenance
• Keep the computer clean and dry. Do not expose the computer to chemical agents, alcool included.
To clean the computer, use exclusively fresh water, removing all salt sediments. Leave the compuer dry naturally, without
using cold or warm air jets.
• Do not expose the computer to the sun directly or to heat sources higher than 50°C. Store the computer in a fresh
(5°C-25°C) and dry place.
• Do not attempt to open, modify or repair the computer by yourself. You must always address to a RATIO dealer.
• Do not put the computer inside a hyperbaric chamber.
The computer is designed for a reading precision of +/- 2%
(the precision level required by the EC laws is +/- 3.5%. )
12
The EC laws require that the unit is checked periodically from the reading precision, depth and time point of view.
• Warranty falls if the computer is opened by a not authorised assistance centre.
• The RATIO iX3M computer is designed to be waterproof in sea water but, at the end of every dive, it must be well rinsed in
fresh water and it must not be dried exposing it at the direct sun light or at heat sources.
• Make sure that there is no humidity signs inside the screen.
ATTENTION: Do not try to open the computer for any reason.
Any problem, turn to a RATIO® authorised center or to RATIO® directly.
13
Computer’s technical characteristics
Hardware
The computer is fully built in POM C with Makrolon cover, allowing an extreme resistance to hits and to corrosion.
The screen is provided with a Display TFT 100%; its matrix has 320x240 pixel resolution
Particular commitment has been put in developping a navigation system allowing the diver to have an easy and intuitive
access to all settings.
- Weight: 260gr
- Sensor’s precision warranty: 130 mt.
- Maximum Depth: 300 mt.
- Absolute Pressure Measure precision
min
max
p = 0 .. 5bar
-20 mbar
+20 mbar
p = 0 .. 10bar
-40 mbar
+20 mbar
p = 0 .. 14bar
-100 mbar
+20 mbar
Sensor’s maximum error in measuring the temperature: -2 / +6°C
Certification
The compuer’s hardware have received CE e EN13319 certifications.
14
Software
Algorithm: The computer uses either the Bühlmann ZHL-16B model or the VPM-B model. Every computer can be set up
on one algorithm or the other, at the user’s discretion.
For RATIO iX3M Deep: Operating on level systems it is possible to set up the conservatism desired.
For RATIO iX3M Tech+ ed iX3M Reb: Using the Bühlmann ZHL-16B algorithm there is the possibility of an exact choice of
the Gradient Factors. Using the VPM-B algorithm there is the possibility of an exact choice of the inert gases’ critical bubble
radius.
Software’s characteristics
ASM: Adaptive Sigmoidal Model: it optimises decompressive calculations in case of ripetitive dives.
Extra Deep Stops: The computer expects the possibility to insert the Extra Deep Stops .
Violation control: it controls in a clever way the diver’s behaviour during his/her ascent and it advises him/her to use the
diving charts only if the decompressive algorithm is not valid anymore.
Disabling Violation control: it prevents that the RATIO iX3M gives up working weather or not the diver follows the
indications given by the device. (For expert divers only. The safety system inactivation is recorded in the Logbook).
15
Summary of technical characteristics
Tissues saturation update in dive mode: 1 second
Tissues saturation update in sleep mode: 1 minute.
Number of stored diluent gases:
iX3M Deep: 3 gases
iX3M Tech+: 10 gases
iX3M Reb: 10 gases +3 diluents
Memory: 100 diving hours.
Maximum diving time: 1999 minutes.
Adaptative logic intuitive software.
Automatic adjustment to altitude
Connection to PC: USB cable / Bluetooth
Updatable Operative System (OS).
GNSS (Global.Navigation.Satellie.System) integrated multi-satellite navigation system (GPS, GLONASS, Beidou, Quasi-Zenith)
(WELL NOTE: the satellite signal does not pass through the water surface)
Alarms: Acoustic, Visual and Vibration
Battery: Rechargeable, with an autonomy of 20-50 diving hours.
16
How to recharge the Battery
The RATIO iX3M has a Li-Ion rechargeable battery without memory effect, with an autonomy of 20-50 diving hours.
The autonomy data which are shown can change of +/- 15% depending on the environmental temperature, the device
settings, the installed applications, the operative system version, the back light setting and the use of its inner (GPS Bluetooth)or external (Analyser) peripheral devices.
ATTENTION: A complete charge cycle is necessary before the device first use.
The recharge is to be carried out by connecting the device to your PC by its USB cable or connecting it at any USB port
To recharge the RATIO iX3M we recommend to use a wall USB plug (like the one of your mobile/tablet). If you decide to use
a PC USB plug, make sure that the PC doesn’t interrupt the electricity flow once in stand-by.
Even if the RATIO iX3M has a new generation battery without memory effect, we recommend to recharge the battery
completely, anyway.
The average recharge time is 4-5 hours depending on the residual charge level.
Attention: Do not dive when the computer indicates 30% of charge or a lower percentage.
17
When connecting the USB cable to recharge the device, the symbol => will appear in the watch screen within 45 seconds.
It means that recharging procedure is in progress. When the recharge is finished the symbol => will disappear.
Once the battery charge is finished, even if the device remains connected to the plug, the computer automatically
interrupts the electricity flow. In case the device is left in charge more than necessary (e.g. all night long), you could find it
switched off. You can check the computer charge level pressing any button; the battery percentage can be visualised on
the screen’s left upper corner.
If the device is in charge and any button is pressed for more than 10 minutes, the back light is reduced to the minimum, to
allow a faster recharge cycle.
If the recharge cycle is not completed, the battery indicator might not be precise until the next complete recharge cycle is
carried out.
After having installed one APP or having updated the operative system, we recommend to carry out a complete battery
charge cycle. After every update the RATIO iX3M always shows the sentence “battery out of power, recharge”.
Attention: Do not leave the device completely out of power for a long period (e.g. 6
months); this may damage the battery.
18
Diving in cold or freezing waters
The RATIO iX3M can be used even in case of dives in cold or freezing waters (<3°C); however, the exposure at particularly
low temperatures, may affect negatively on the battery residual voltage.
When diving in cold or freezing waters, the battery voltage may decrease more rapidly than normal. So, we recommend to
recharge the battery before diving in extreme conditions.
ATTENTION: when diving in cold or freezing waters (<3°C) recharge the device at 100% or make sure that there is at
least 50% of battery power.
ATTENTION: Diving in cold or freezing waters (<3°C) requires a specific training.
19
DAN DL7
The RATIO iX3M is 100% compatible with the program for gathering data DAN DL7 of DSL Level 5
The DAN DL7 is a format owned by DAN, which summarizes all necessary information which are
needed for the studies, arranging them to be sent directly to DAN Europe’s central database.
All these data include, besides the diving profile, also information relating to the diver (fitness
excercices, the medicines he/she ingested etc) and to the dive itself (possible problems, thermal
conditions etc).
100%
compatible
with
DAN DL7
Contributing to the data gathering is easy: you just have to fill in all fields relating to the program DAN DSL (Diving Safety
Laboratory) inside the Divelogger, export them in the format DAN DL7 and send them by e-mail to:
[email protected]
Give your diving profiles to the Research!
The profile of a dive made with a self breathing device contains extremely important information, such as the time spent in
the depth, the ascent speed, how many dives enter in decompression, how many dives contain deep stops etc.
Giving our own diving profiles to the Research means to give a great help to DAN’s scientists who, with great dedication
and passion, are trying to render the diving activity more and more safe.
Privacy
Unless you send your data, neither the RATIO iX3M nor the Divelogger will send anything automatically.
20
The RATIO iX3M outside the Water:
The main screen
To switch the RATIO iX3M on, press any button.
The RATIO iX3M switches off automatically after 10 minutes of tatal inactivity.
After diving the RATIO iX3M activates the Sleep mode modality: after 10 minutes of inactivity it switches the screen off and
deactivates all processes which are not useful for the post-diving de-saturation calculation .
21
First line:
In the first line of the introductory screen the RATIO iX3M shows:
- Battery indicator (on the top left side)
the RATIOiX3M uses a colour code to advise you on its battery status
Green colour (100%->50%): Everything is ok
Yellow colour (50%->20%): Alert (do not make extremely demanding
dives or in cold or freezing waters)
Red colour (<20%): Battery almost dead, recharge as soon as possible.
ATTENTION: Do not dive if the computer shows <20% battery.
- Time (on the top right side)
While diving the RATIO iX3M shows the current time.
Once outside the water the computer shows the second time zone you have set on
top right side (if different from the main one)
The RATIO iX3M can run up to 2 different time zones..
(eg. if we are in a country with a different time zone of our homeland’s, it is possible
to set both times on the RATIO iX3M)
22
Second line:
- Atmospheric Pressure expressed in millibar (on the left)
The Atmospheric pressure is the one present in any point of the terrestrial atmosphere. It is measured in millibar (mbar)
Attention: after diving, owing to the humidity on the sensor’s location, the read pressure might be slightly lower than the
real one.
- Weather forecast (in the middle): the blue lines indicate the
atmospheric pressure, the higher they are, the higher is the atmospheric
pressure shown, so the best weather is supposed to be. The weather forecast
is based on the monitoring of the atmospheric pressure during the previous 18
hours. The altitude changes involve an atmospheric pressure change. An altitude
change (+/- 50 mt) may cause inaccuracies in the weather forecast.
After an altitude change of +/- 50 mt, the weather forecast will be reliable again
after 3/5 hours at the new altitude.
Attention: after diving, the humidity in the sensor’s area may compromise the weather forecast.
Temperature (on the right): the temperature measured by the RATIO iX3M is the device’s case temperature itself. For
this reason, when wearing it at your wrist, it will measure a higher temperature than the environmental one.
To measure the temperature outside the water, unwear the computer and wait at least 20 minutes.
When diving, up to 5 minutes might be necessary to measure the correct temperature.
23
Third line:
- Barometric alitmeter (on the left)
The height above the sea level is calculated on the basis of the barometric pressure.
Attention: The altitude detection through the barometer can be affected by the presence of humidity in the sensor area.
In case of case of bad weather or after diving, the error might also be of +/-80m.
For more precise altitude measurements, use the RATIO iX3M’s “GPS” application.
- Main time (in the middle): Expressed in hh:mm in 24 hrs format
- Current Lunar phase (on the right): Expressed in figures, it indicates the
days passed from the last new moon. The visible moon is indicated by an
icon.
The lunar phases are the same all over the world.
Fourth line:
- Date (on the left): expressed in day/month/year
- No fly, Desat, Surf time (on the right): These data appear only when 48
hours have passed after the last dive.
24
The RATIO iX3M Menu
DIVE MODE
MAIN MENU
DIVE SET
DECO STOP
CCR SET
MIX TABLE
DIL TABLE
ALARM
PLANNER
LOGBOOK
A
B
C
D
COMPASS
SYSTEM SET MENU
DISPLAY
GENERAL SET
PC MODE
DEFAULT
COMPASS
SENSOR BOARD
INFO
SWITCH OFF
APP MENU
C
CHRONO
MAGMETER
MIX ANALYZER GPS
PITCH ROLL LUXMETER
MOON PHASE
25
MAIN MENU
From the main screen, press button A to have access to the menu.
Use buttons A-B-C-D as described in the picture to navigate in the menu.
The selected entry is indicated in red.
(According to your RATIO iX3M model, some entries might not be visualized.)
A
MAIN MENU
DIVE SET
DECO STOP
CCR SET
MIX TABLE
A
B
DIL TABLE
ALARM
PLANNER
LOGBOOK
C
Do you know what?:
You can change the RATIO iX3M’s menu colour, titles
and data from the menu DISPLAY.
D
EXIT ENTRA SU GIU
26
For iX3M Deep only
To reach this menu from the main screen
press in sequence:
DIVE SET for RATIO iX3M Deep
To navigate the menu, follow the clues in the picture.
Algorithm: Select the decompressive algorithm you want to use for your dive.
A B
BUL: Bühlmann ZHL-16 B
VPM: VPM-B
DIVE SETTINGS
ALGORITHM:
PS:
S. STOP TIME:
S.STOP DEPTH:
DEEP STOP:
WATER:
DIVE MODE:
A
B
SALT
SCUBA
C
EXIT NEXT +
ENTRY
DIVE SETTINGS
ALGORITHM:
PS0:
S. STOP TIME:
S.STOP DEPTH:
DEEP STOP:
WATER:
DIVE MODE:
A
B
BUL
0
3
5
OFF
C
EXIT NEXT +
ENTRY
D
_
VPM
0
3
5
OFF
SALT
SCUBA
D
_
Attention: if you have a RATIO iX3M Tech+ or a RATIO iX3M Reb go to the next page.
PS: The RATIO iX3M Deep conservatism can be changed on pre-set levels
from 0 to 5. The levels matches with the following figures:
Bühlmann ZHL-16 B (gradients)
0 = 93/93
1 = 90/90
2 = 80/80
3 = 75/75
4 = 90/30
5 = 89/20
VPM -B (Critical bubble radius)
standard conservatism
maximum conservatism
0 = 0.5
1 = 0.55
2 = 0.6
3 = 0.7
4 = 0.8
5 = 0.9
Do you know what?:
A higher conservatism will make the device makes its calculation in a more precautionary way .
Generally speaking, it is recommended to increase the conservatism if you feel an excessive tiredness after your
last dive.
A hyperbaric doctor can advice you on how to set the conservatism according to your clinic status.
27
For iX3M Tech+ iX3M Reb
To reach this menu from the main
screen press in sequence:
DIVE SET for RATIO iX3M Tech+ & iX3M Reb
To navigate this menu follow the clues in the picture on the left.
Algorithm: Select the decompressive algorithm you want to use for your dive.
BUL: Bühlmann ZHL-16 B
VPM: VPM-B (go to the next page)
A B
If the chosen Algorithm is BUL:
GFL/GFH: set the Gradient Factor Low (GFL) e Gradient Factor High (GFH).
DIVE SETTINGS
ALGORITHM:
GFL/GFH:
S. STOP TIME:
S.STOP DEPTH:
DEEP STOP:
WATER:
DIVE MODE:
A
B
Attention: The GFL can NEVER be higher than the GFH.
BUL
93/93
3
5
OFF
SALT
SCUBA
C
EXIT NEXT +
ENTRY
D
_
It is possible to set the GFH from 20% to 100% ( 20% < GFH < 100% )
It is possible to set the GFL from 20% to GFH ( 20% < GFL < GFH )
Do you know what?: You can keep pressed the buttons C or D to change the iX3M data more rapidly.
ATTENTION: To change the Gradient Factor’s value a suitable theoretical
knowledge is needed.
DO NOT CHANGE THE GRADIENT FACTOR WITHOUT HAVING
RECEIVED A SUITABLE TRAINING.
The RATIO iX3M is not responsible for damages to people or objects due to a wrong
setting of such parametres.
Do you knwo what?:
If you have any doubts on your device’s setting, you can set the company’s parametres from the menu DEFAULT
Do you know what?:
Generally speaking, reducing the GFH involves a computer increasing conservatism. The GFL’s reduction
involves a shift towards a major depth of the first compulsory decompressive stop.
Do you know what?:
With the RATIO iX3M it is possible to change the value GFL/GFH while diving, to manage possible emergencies.
28
For iX3M Tech+ iX3M Reb
To reach this menu from the main
screen press in sequence:
DIVE SET for RATIO iX3M Tech+ & iX3M Reb
To navigate this menu follow the clues in the picture on the left.
Algorithm: Select the decompressive algorithm you want to use for your dive.
BUL: Bühlmann ZHL-16 B
VPM: VPM-B
A B
If the chosen Algorithm is VPM:
R0: sets the Critical Bubble Radius’ value.
It is possible to set R0 from 0.4 to 1.0
DIVE SETTINGS
ALGORITHM:
R0:
S. STOP TIME:
S.STOP DEPTH:
DEEP STOP:
WATER:
DIVE MODE:
VPM
0.50
3
5
OFF
SALT
SCUBA
Do you know what?: You can keep pressed the buttons C or D to change the iX3M data more rapidly.
ATTENTION: To change the Critical Bubble Radius’ value a suitable theoretical
knowledge is needed.
DO NOT CHANGE THE CRITICAL BUBBLE RADIUS WITHOUT
HAVING RECEIVED A SUITABLE TRAINING.
The RATIO iX3M is not responsible for damages to people or objects due to a wrong
setting of such parametres.
A
B
C
EXIT NEXT +
ENTRY
D
_
Do you knwo what?:
If you have any doubts on your device’s setting, you can set the company’s parametres from the menu DEFAULT
Do you knwo what?:
Generally speaking, the increasing of the R0 involves your computer’s conservatism increase.
Do you knwo what?:
With the RATIO iX3M it is possible to change the value R0 while diving, to manage possible emergencies.
29
S. STOP TIME: It sets the Safety Stop’s time in minutes.
To reach this menu from the main
screen press in sequence:
You can set the time from 0 to 9 minutes (if 0 the Safety Stop is omitted)
A B
Do you know what?:
The different diving Institutions can recommend different times for the Safety Stop. Ask your Instructor or your
diving Institution for the value to be set.
S. STOP DEPTH: It sets the Safety Stop’s depth.
You can set the Safety Stop’s depth between 3 and 9 metres.
DIVE SETTINGS
ALGORITHM:
GFL/GFH:
S.STOP TIME:
S.STOP DEPTH:
DEEP STOP:
WATER:
DIVE MODE:
A
B
C
EXIT NEXT +
ENTRY
BUL
93/93
3
5
OFF
SALT
SCUBA
D
_
The Safety Stop is carried out at the lower metre of the depth you have set .
(eg. if S.STOP DEPTH= 5 the stop is carried out from 5.9 metres)
The Safety Stop is recommended only for dives deeper than 9 metres.
The timer is re-set if the depth of 9 metres is passed again.
Do you know what?:
If in the dives with deco, a deco stop is set between 10 and 1 mt, the Safety Stop is automatically omitted.
DEEP STOP: It selects if use the Deep Stops and which algorithm is to be used to
calculate the DEEP STOPS:
OFF: Deep Stop unabled
STD: Standard Method (half of the max. depth for 2,5 minutes)
PYLE: Pyle Method (ask your instructor for the Pyle Method)
30
WATER: It sets the kind of water (SALT= Sea water, FRESH= lake water)
To reach this menu from the main
screen press in sequence:
Do you know what?:
A B
The diving computers measure the water pressure converting it in depth by using the water density as a
constant.
Without the WATER setting, a depth of 10 mt in salted water is calculated as 10,3 mt in fresh water.
Without the setting SALT/FRESH the depth reading could be distorted.
DIVE MODE: It sets the favourite kind of dive.
In case you enter water with the device switched off or in the main screen:
DIVE SETTINGS
ALGORITHM:
GFL/GFH:
S.STOP TIME:
S.STOP DEPTH:
DEEP STOP:
WATER:
DIVE MODE:
A
B
C
EXIT NEXT +
ENTRY
BUL
93/93
3
5
OFF
SALT
SCUBA
SCUBA: the iX3M begins a dive with tanks
GAUGE: the iX3M begins a dive with depth gauge.
FREE: the iX3M begins a free dive.
Attention: For safety reasons, it is NOT possible to set the FREE mode as main
mode if at least 12 hours have passed from your last SCUBA or GAUGE dive. The
RATIO iX3M sets automatically the SCUBA mode if trying to force the dive with
the main mode set on FREE.
D
_
31
For iX3M Tech+ iX3M Reb
To reach this menu from the main
screen press in sequence:
To navigate the menu follow the instructions in the picture on the left.
The whole dive profile is divided in 3 depth zones.
A D B
STEP 1:
DEPTH 1:
STEP 2:
DEPTH 2:
STEP 3:
Deco Stop for RATIO iX3M Tech+ & iX3M Reb
First Zone: from the surface to depth DEPTH1.
Second Zone: from DEPTH1 to DEPTH 2.
Third Zone: from DEPTH2 to the maximum depth reached during the dive
DECO STOP
3.0
15.0
3.0
48.0
5.0
For every depth zone it is possible to specify which decompression step to use to
calculate the different stops in that zone by the parametres STEP1, STEP2, STEP3.
example:
<-- see the settings in this picture
With this settings, for depths over 48mt the stops will be spaced out of 5 mt
between them; the stops included between 48 mt and 15 mt will be spaced out of
5 mt while the stops between 15 mt and the surface will be spaced out of 3 mt.
A
B
C
EXIT NEXT +
ENTRY
D
_
Do you know what?: To force the last stop to a preset depth (eg. 6mt) you can set STEP1=6mt and
DEPTH1=6mt
Do you know what?: You can keep pressed the buttons C or D to change the iX3M data more rapidly.
STEP parametres can be modified with step of 0.5mt.
DEPTH parametres can be modified with step of 1.0mt.
Do you know what?:
If you have any doubts on your device’s setting, you can set the company’s parametres from the menu DEFAULT
32
For iX3M Tech+ iX3M Reb
CCR Settings for RATIO iX3M Tech+ & iX3M
Reb
To navigate the menu follow the instructions in the picture on the left.
To reach this menu from the main
screen press in sequence:
A D D B
CCR MODE:
ON= CCR enabled in scuba mode.
OFF= Deactivated.
CCR SETTINGS
CCR MODE:
SETPOINT LOW:
SETPOINT MED:
SETPOINT HIGH
SETPOINT LOW: Range 0.40 a 1.60 (Step 0.05). It is the starting setpoint.
OFF
0.70
1.00
1.40
SETPOINT MED: Range 0.40 a 1.60 (Step 0.05)
SETPOINT HIGH: Range 0.40 a 1.60 (Step 0.05)
Attention: Enable the Rebreather mode (CCR) only for dives with rebreather.
The CCR mode is not suitable for dives in open circuit!
A
B
C
EXIT NEXT +
ENTRY
D
_
Attention: Diving with Rebreather requires a specific training. Diving with
Rebreather without a suitable training or without the due caution can cause
injuries or death.
Refer to your Rebreather instructor to get instructions on how to set the SET POINT
Do you know what?: You can keep pressed the buttons C or D to change the iX3M data more rapidly.
33
To reach this menu from the main
screen press in sequence:
iX3M Deep
A
D B
iX3M Tech+
iX3M Reb
A
D D D B
MIX 1
21
0
1.40
56
NEXT =>
A
B
C
EXIT NEXT +
ENTRY
D
_
MIX 2
It is possible to set up to 10 mixes (3 for RATIO iX3M Deep).
Use the command NEXT => to pass to the next MIX
ATTENION: Mix 1 is always the starting one.
Min. 7% Max. 100%
HE%: It Indicates the Helium % contained inside the mix.
Min. 0% Max. 95% (Max. 50% for iX3M Deep and only in MIX 1)
ATTENTION: The mix cannot be higher than 100%
(e.g. if He% is 0 press D if you set He% at 95% the O2%will be automatically set at 5%)
PpO2: It Indicates the PpO2 to be used with the selected mix.
It can be modified at a step of 0.05bar
MOD: It indicates maximum depth for the mix you have created.
The MOD is automatically calculated anytime that the O2% or HE%
or PpO2 are modificated
MIX TABLE
O2%
HE%:
PPO2:
MOD:
DECO:
To navigate the menu follow the instructions in the picture on the left.
O2%: It Indicates the Oxygen % contained inside the mix.
MIX TABLE
O2%
HE%:
PPO2:
MOD:
MIX Table
50
0
1.60
22
NO
NEXT =>
DECO: It indicates if the mix has to be used as decompressive or not.
If set on YES the device considers the mix change in the calculation
of decompression at the depth indicated by the MOD
If set on NO the Mix table is deactivated
Do you know what?: With the iX3M you can enable/deactivate the MIX while diving. This is particularly useful
A
B
C
EXIT NEXT +
ENTRY
D
_
in case of loss of one decompressive gas or if you forgot to set the device correctly before diving!
Do you know what?: You can keep pressed the buttons C or D to change the iX3M data more rapidly.
34
For iX3M Tech+ iX3M Reb
To navigate the menu follow the instructions in the picture on the left.
To reach this menu from the main
screen press in sequence:
A D D D D B
ATTENTION: The diluents are active ONLY if the CCR mode is ON
ATTENTION: The diluent 1 is always the starting one.
DILUENT TABLE
O2%:
HE%:
MOD:
DILUENT 1
15
55
96
NEXT=>
A
B
C
EXIT NEXT +
ENTRY
Diluent Table for RATIO iX3M Tech+ & iX3M
Reb
D
_
It is possinble to set up to 3 diluents.
Use the command NEXT => to pass to the next diluent
O2%: It Indicates the Oxygen % contained inside the mix.
Min. 7% Max. 100%
HE%: t Indicates the Helium % contained inside the mix.
Min. 0% Max. 95%
MOD: It indicates maximum depth for the mix you have created.
The MOD is automatically calculated anytime that the O2% or HE%
are modificated
Attention: Enable the Rebreather mode (CCR) only for dives with rebreather.
The CCR mode is not suitable for dives in open circuit!
Attention: Diving with Rebreather requires a specific training. Diving with
Rebreather without a suitable training or without the due caution can cause
injuries or death.
Refer to your Rebreather instructor to get instructions on how to set the correct
diluents.
35
Dive Alarms
To reach this menu from the main
screen press in sequence:
iX3M Deep
A
iX3M Tech+
iX3M Reb
A C
To navigate the menu follow the instructions in the picture on the left.
D D B
The RATIO iX3M is equipped with colour visual, acoustic and vibrating alarms
C C
B
Do you know what?: The RATIO iX3M is the first dive computer in the world with a vibrating alarm
Do you know what?: You can change the visual alarm colour from the menu DISPLAY
Acoustic: It activates/deactivates the acoustic alarm. (“bip”)
DIVE ALARMS
ACOUSTIC:
VIBE:
ASC SPEED:
MOD:
DECO VIOL:
TIME
DEPTH:
A
B
C
EXIT NEXT +
ENTRY
Vibe: It activates/deactivates the vibrating alarm.
YES
NO
YES
YES
YES
0
0m
D
_
ASC Speed: It activates/deactivates the alarm in case of too fast ascent.
MOD: It activates/deactivates the alarm in case of passing the MOD
of the mix you are currently breathing
Deco Viol: It activates/deactivates the alarm of violation of a compulsory
decompression stop. if a DEEP STOP or a SAFETY stop is violated the
alarm is not activated since they are not compulsory.
Time: It indicates the time in minutes (max. 360 minutes) that once it is
passed either the acoustic or vibrating alarm is activated. (Attention: for
this kind of alarm it is not possible to activate the visual one). If it is set
at 0 the alarm is deactivated.
Depth: It indicates the time in minutes (max. 300 mt) that once it is
passed either the acoustic or vibrating alarm is activated. (Attention: for
this kind of alarm it is not possible to activate the visual one). If it is set
at 0 the alarm is deactivated.
36
To reach this menu from the main
screen press in sequence:
A C
C
B
NDL (Non Decompression Limit) Planner
To navigate the menu follow the instructions in the picture on the left.
The RATIO iX3M integrates a complete planner for square dives for both BUL & VPM
PLANNER
DEPTH:
18m
TIME:
Attention: To modify the dive parametres set the device as desired entering the
menu DIVE SET and the menu MIX
10
DEPTH: Set the dive’s maximum depth.
TIME: Set the desired bottom time.
EVALUATE
B
A
C
EXIT NEXT +
ENTRY
D
_
Do you know what?: You can keep pressed the buttons C or D to change the iX3M data more rapidly.
Evaluate: it starts the simulation (wait until the word “processing” disappears)
If the dive is within the safety parametres:
PLANNER
DEPTH: 18m
TIME: 10
NDL: 44
CNS: 6%
OTU: 16
MIX QTY:
NDL: Remaining non decompression time (after the time you have set).
CNS: % of accumulated CNS.
OTU: % of accumulated OTU.
MIX QTY: Mix value expressed in litres which is presumably needed for the
562 LT
dive.
A
EXIT
B
C
D
ATTENTION: The gas used quantity is purely approximate and referred to a standard use. Take
into consideration the information given by Diving Institution you belong to about the quantity
of gas to be used.
37
To reach this menu from the main
screen press in sequence
A C
C
B
Decompression Planner
To navigate the menu follow the instructions in the picture on the left.
The RATIO iX3M integrates a complete planner for square dives for both BUL & VPM
PLANNER
DEPTH:
40m
TIME:
20
EVALUATE
A
B
C
EXIT NEXT +
ENTRY
D
_
DEPTH: TIME: RTIME: MIX:
0
0
33
21/0
3
4
29
50/0
6
4
24
50/0
9
1
23
50/0
40
20
20
21/0
EXIT
B
C
<=
For DEPTH, TIME and EVALUATE make reference to “NDL Planner” (previous page)
Do you know what?: You can keep pressed the buttons C or D to change the iX3M data more rapidly.
PLANNER
A
Attention: To modify the dive parametres set the device as desired entering the
menu DIVE SET and the menu MIX
D
=>
If the dive is outside safety parametres:
DEPTH: It indicates the decompression stop depth (in metres if not modified)
TIME: It indicates the decompression stop duration (in minutes)
RTIME: It indicates the run time (time from the dive’s beginning) to the
decompression stop
MIX: It indicates the mix used to calculate the decompression (to be set in
menu MIX)
Press D to pass to the next screen to visualize CNS e OTU.
ATTENTION: the planner uses 18 mt/min as descent speed and 9 mt/min as ascent speed for
the decompression calculations .
ATTENTION: The function Planner doesn’t carry out the profile “validation”, i.e. it doesn’t
consider a possible excess of CNS, limits on mixes’ volumetric availability, a possible isobaric
counterdiffusion due to a mix change or the MOD of a possible used mix.
To plan a technical dive properly, a suitable training is necessary.
Make reference to your instructor or to the Diving Istitution you belong to in case of doubts
about planning a dive.
38
Logbook
To reach this menu from the main
screen press in sequence
A C
To navigate the menu follow the instructions in the picture on the left.
The first visualized dive is the most recent one.
B
Do you know what?: The dive diagram shown in the RATIO iX3M’s Logbook is in HD and exploits at
maximum the device screen’s definition.
N: Dive’s number, beginning time and date.
N 54
LOGBOOK
12:10
MODE:OC
TEMP: +18°C
A
B
EXIT EXIT
11.06.15
RT:
39:
MAX: 41.1m
CNS: 5%
OTU:
15
BUL: 93/93
MIX: 21/0
C
<=
D
RT: RunTime (dive’s duration)
MAX: Maximum reached depth
CNS: Accumulated CNS %
OTU: Accumulated OTU
BUL(/VPM): Selected algorithm and conservativism factor
MIX: Main used mix (bottom mix)
MODE: Dive mode (OC= Open Circuit, CC=Rebreather)
TEMP: Minimum recorded temperature
=>
39
SYSTEM SETTINGS
From the main screen press B buttons to have access to the menu.
Use buttons A-B-C-D as described in the picture to navigate the menu.
The selected entry is indicated in red colour.
(According to your RATIO iX3M model some entries might not be visualized)
B
SYSTEM SET MENU
DISPLAY
COMPASS
GENERAL SET INFO
PC MODE
SWITCH OFF
DEFAULT
A
B
C
Do you know what?:
You can change the RATIO iX3M menu, headlines
and data colours from the menu DISPLAY.
D
EXIT ENTER UP DOWN
40
Display Set
To reach this menu from the main
screen press in sequence:
B
To navigate the menu follow the instructions in the picture on the left.
B
LEVEL: RatioiX3M luminous intensity. From 1 to 15
MODE: It activates/deactivates the automatic (AUTO) or manual (MAN)
back light mode. (if AUTO the LEVEL parametre is ignored).
DISPLAY SET
BACKLIGHT
LEVEL: 15
MODE: AUTO
DIVE:
DATA:
LABEL:
ALARM:
LOW:
MED:
HIGH:
MENU:
TITLE: ITEM:
SEL:
A
B
C
EXIT NEXT +
ENTRY
D
_
ATTENTION: the light sensor is located in the screen’sleft lower corner. Do not cover it.
ATTENTION: the screen’s brightness affects considerably the device’s autonomy. We recommend to set AUTO.
COLOR CODE: The RATIO iX3M allows you to change the colour of the screen data .
DATA: Dive data colour.
LABEL: Dive parametres labels’ colour.
LOW: the colour for the low priority or low risk warnings.
MED: the colour for the medium priority or medium risk warnings.
HIGH: the colour for the hight priority or high risk warnings..
TITLE: the Menu headlines colour.
ITEM: the different menu’s parametres colour.
SEL: the colour of the selected parametre inside a menu.
Do you know what?:
f you have any doubts on your device’s setting, you can set the company’s parametres from the menu DEFAULT
41
To reach this menu from the main
screen press in sequence:
B
D B
GENERAL SET
1:00
1:00
16:22:00
24
02.07.15
m/°C
UTC:
UTC2:
TIME:
FORMAT:
DATE:
UNITS:
A
B
C
EXIT NEXT +
ENTRY
D
D
D B
PC MODE
S/N : 000000
CABLE: READY
BT: READY
A
To navigate the menu follow the instructions in the picture on the left.
UTC: Main time zone (0:00 Greenwich)
UTC2: Secondary time zone
Attention: in the Logbook only the UTC is registered, not the UTC2)
TIME: It changes the time hh:mm:ss (seconds can be only reset)
FORMAT: It sets the time format (24hr o 12hr)
DATE: It sets the date
UNITS: it sets the metric or imperial unit of measure .
_
To reach this menu from the main
screen press in sequence:
B
General Set (ora e data)
PC Mode (how to connect the iX3M to PC)
To connect the iX3M to the PC install the DiveLogger (available free of charge in the
web site www.divesystem.com/ratio)
1. Open the Divelogger on a PC or MAC and select the iX3M model
2.Activate the PC mode on the iX3M
3. Connect the USB cable to the iX3M and to the PC or Mac
4. Press “Settings” in the Divelogger and select the COM port
(usually the PC gives COM the higher value)
5. Press “Connect”i
In case of connectivity problems, see the video tutorial available in the “Support”
section of the web site www.ratio-computers.com
EXIT
42
Reset to Default (reset the factory data)
To reach this menu from the main
screen press in sequence:
B
To navigate the menu follow the instructions in the picture on the left.
D D D B
SETTINGS: Yes/No. It resets all menu entries to the factory settings.
The command SETTING resets all menu and
settings (MIX, Alarms, Colours etc.) It doesn’t reset the diver’s
tissues saturation.
TISSUES: Yes/No. It resets the diver’s tissues saturation. .
DEFAULT
ATTENTION
SETTINGS:
TISSUES:
Attention: NEVER EVER reset the tissue saturation if the device is always used by the
same person! This doesn’t allow the computer to carry out a correct decompressive
calculation. !
NO
NO
EXECUTE: It carries out the reset of the entries set as YES.
EXECUTE
A
EXIT
B
NEXT
ENTRY
C
+
The reset of the
( screen’s colours can be done pressing “exit” button)
D
_
WARNING - DANGER
DO NOT reset the tissue saturation (TISSUES=YES)
if the device will be always used by the same person!!!
This may cause the risk of injuries, even lethal.
It is possible to reset the tissue sauturation only if the iX3Ml
device will be used by a person who does not have carried out dives during
the previous 48 hours .
ATTENTION!
A possible tissue saturation reset is recorded permanently
in the RATIO iX3M Logbook.
The user will be fully responsible of the tissue saturation reset..
43
Compass settings (Compass)
To reach this menu from the main
screen press in sequence:
B
C
C C
To navigate the menu follow the instructions in the picture on the left
B
DECLINATION: The declination is meant to compensate the difference
between the geographic and the magnetic north; this factor
.can be found visiting dedicated web sites.
DIRECTION: EAST/WEST. The direction is meant to indicate the direction of
the magnetic field’s declination.
COMPASS SET
DECLINATION:
0.0
DIRECTION:
EAST
CALIBRATE
START
A
B
NEXT
EXIT ENTRY
C
+
D
_
Do you know what?:
You can deepen your knowledge about the compass’ Direction and Declination on:
https://en.wikipedia.org/wiki/Magnetic_declination
CALIBRATE: Calibrate the compass. (see pictures below)
ROTATE
TILT
COMPASS SET
COMPASS SET
DECLINATION:
0.0
DECLINATION:
0.0
DIRECTION:
EAST
DIRECTION:
EAST
CALIBRATE
ROTATE
CALIBRATE
TILT
Turn slowly and constantly on a
flat surface .
Turn the iX3M slowly and
constantly on its vertical axis.
For a correct survey, carry out the calibration far from magnetic field sources i (PC, TV, light poles etc.)
44
To reach this menu from the main
screen press in sequence:
B
D D B
INFO
Model, serial number and operative system.
To navigate the menu follow the instructions in the picture on the left.
In this page you can visualize: Model name, serial number (S/N) and the installed
operative system version (FW).
In case you need assistance for your RATIO iX3M these data are important..
RATIO
IX3M XXXX
S/N:00000
FW: APOS 3.0.0/005
A
EXIT
To reach this menu from the main
screen press in sequence:
B
D B
SWITCH OFF (Manual switching off ).
The RATIO iX3M switches off automatically after a certain inactivity period..
However, you can also switch the device off manually.
If the device is in charge, the command will be executed only once the charge is
finished.
If the device is still carrying out the tissue desaturation after a dive, the command
“switch off “ deactivates all systems which are not essential.
Nevertheless, the device goes on to carry out the desaturation calculation.
45
Compass
To reach this menu from the main
screen press in sequence:
To navigate the menu follow the instructions in the picture on the left
C
Compass resolution: 1°
Compass accuracy: +/-1°
0°
W.NW. N.NE. E
REC
DIR
180°
0°
A
EXIT
C
D
APP ROUTE
MENU
ATTENTION:
The Compass works correctly
only if its calibration has been
done correctly.
See paragraph: COMPASS
Do you know what?:
The RATIO iX3M is provided with the most innovative compass. Check always a compass’ resolution and
accuracy before entrusting it your route .
When in “Compass” mode the iX3M shows::
DIRECTION (on the top centre): the current direction expressed in
degrees (°)
GRAPHIC COMPASS (on the centre): graphic compass with route
indications.
Direction in route (+/- 5° in comparison with the one set with D)
It indicates the direction to follow to find the route you have set
Reciprocal direction (+/- 5° in comparison with the set reciprocal route )
DIR: Current set route
REC: Reciprocal of the set route
Do you know what?:
The RATIO iX3M’s 3D compass is compensated by 2 accelerometres. The iX3M can compensate your arm’s grade
automatically up to an angle of 85° from the horizontal position.
46
The RATIO iX3M when diving
To navigate the menu follow the instructions in the picture on the left.
When the iX3M is in the main screen or if it is switched off, it activates the dive mode automatically, once a certain depth is
passed.
To dive in GAUGE or FREE mode, select the desired mode with button D before starting your dive.
Do you know what?:
With the iX3M you can set the default mode that the device must activate automatically before starting to dive, by selecting either Dive with tank (default), or Diving
with Rebreather (for iX3M TECH+ and iX3M REB only), or GAUGE or FREE from the menu DIVE SET.
ADDITIONAL DATA
B
SETTINGS
C
D
COMPASS
OC SET
MODE:
MIX:
GFL/GFH:
OC
21/0 ACT
93/93
47
Dive Screen
Main Data
{
BATTERY: (on left top) residual battery % .
TIME: (on right top) main time zone time.
{
Current depth: (left) With colour alarm code when passing the gas MOD,
mandatory stop and depth alarm.
Dive Mode: (centre) Type of dive and used algorithm:
OC= Open Circuit, CCR=Rebreather
BUL= Bühlmann ZHL-16 B, VPM= VPM-B
Dive Time: (right) Runtime in minutes:seconds
{
If in Non Decompression Limit
NDL: time in minutes in which it is possible to remain at the current
depth without passing the safety parametres, without needing
mandatory decompressive stops. In general, we always
recommend to remain within the safety parametres.
If in Decompression:
TTS: (Left) Time-to-surface. Total ascent time.
STOP: (Centre) Next mandatory stop depth.
TIME: (Right) Minutes relating to the next safety stop.
48
If Safety Stop is activated:
If the Safety Stop (recommended for any kind of dive) is activated, it will be
shown on the computer’s central line during the ascent starting from a depth
of 9 m.
Do you know what?:
You can customize the Safety Stop’s duration and depth from the menu DIVE SET
If Deep Stop is activted:
If the function Deep Stop has been activated, this is visualized 5 m before the
actual required depth on the screen’s central line and will be removed (if not
carried out) 5 m after the required depth.
In case the Deep Stop is carried out in NDL dives, the NDL time will remain
visible on the screen’s right part with black background.
If the Deep Stop is carried out in dives with mandatory decompression stops
(not recommended), the Deep Stop information on white background are
visualized at the place of STOP and TIME data.
The Deep Stop is not mandatory and in case it is omitted even after having set it, it
does not affect on the iX3M correct decompressive calculation.
Do you know what?:
Thanks to its Real Time algorigthm, the iX3M can adjust itself to the diver’s behaviour automatically, in case the
Deep Stop is carried out, not carried out at all or even partially carried out.
49
{
MIX: Mix currently used (it flashes in red if in the set of the scheduled mixes
a better mix is available)
PP02: O2 partial pressure of the currently breathed mix
ASC: Ascent or descent speed expressed in mt/min (or ft/min)
Low alarm level: if the ascent speed is >8 mt/min
Medium alarm level: if the ascent speed is >9 mt/min
High alarm level:if the ascent speed is >10 mt/min
D
FOLLOWING
DATA
Pressing the button D you will visualize
{
{
TEMP: Current water temperature
AVG: Average dive’s depth
MAX: Maximum reached depth
D
FOLLOWING
DATA
GF (R0)(PS): Set conservatism (Gradients, Critical Bubble Radius or livels)
OTU: accumulated OTU
CNS: accumulated CNS
D
FOLLOWING
DATA
50
To reach this menu from the main
screen press in sequence:
D D D
Current dive’s profile:
Current depth: (left) with coloured alarm code when passing the gas MOD,
the mandatory stop and the depth alarm.
Dive Mode: (centre) Kind of dive and used algorithm:
OC= Open Circuit, CCR=Rebreather
BUL= Bühlmann ZHL-16 B, VPM= VPM-B
Dive Time: (right) Runtime in minutes:seconds
Diagram: Current dive profile in HD
D
FOLLOWING
DATA
To reach this menu from the main
screen press in sequence:
D D D D
Tissues saturation when diving:
The diagram represents the 16 tissues which are taken into consideration by the
two decompressive algorithms (BUL or VPM).
The yellow lines represent the nitrogen levels .
The green lines represent the helium levels (if present)
The blue line represents the environment pressure in the surface at the dive’s
beginning.
The different tissues’ saturation, represented by the yellow/green lines, represents
the inertial partial pressure in comparison to the environment pressure on the
surface .
D
FOLLOWING
DATA
In case of deco, the “pilot” tissue of that precise moment is highlighted by a red
rectangle .
51
Decompression Chart:
To reach this menu from the main
screen press in sequence:
This menu is available only if during diving you have accumulated decompression.
D D D D D
IIn this menu it is possible to visualize all decompression stops and the Mix that can
be used among the ones expected for the current dive status.
The Decompressive Stops are updated in Real Time.
For every mandatory Decompressive Stop the iX3M shows: :
Stop
Depth
D
FOLLOWING
DATA
Stop
Time
Suggested
Mix
The possible Safety Stop and Deep Stop, since they are not mandatory, are not
shown in the Decompressive Chart, even if they will be suggested to the diver
during his/her dive.
52
Compass when diving
To reach this menu from the main
screen press in sequence:
To navigate this menu follow the instructions shown in the picture on the left.
C
Compass resolution: 1°
Compass accuracy: +/-1°
29.6m
2:28
W.NW. N.NE. E
DIR
0°
A
EXIT
0°
REC
180°
C
D
MENU ROUTE
APP
ATTENTION:
For a correct compass
functioning it must be calibrated
correctly.
See chapter: COMPASS
Do you know what?:
The iX3M has a highly innovative compass. Check always a compass’ resolution and accuracy before entrusting
it your route.
When in Compass mode, the iX3M shows::
Current depth (on top left): Expressed in metres (or feet if ft)
RunTime (on top right): Expressed in Minutes : Seconds
Direction (on bottom centre): Current direction expressed in degreees (°)
Graphic Compass (on centre): Graphic compass with route indication.
Direction in route (+/- 5° from the one set with D)
Direction to follow to find the route initially set (right or left)
Direction in reciprocal (+/- 5° from the reciprocal of the set route)
DIR: Route currently set
REC: Reciprocal of the route that has been set.
Do you know what?:
The iX3M electronic 3D compass is compensated with 2 accelerometres. The iX3M can compensate
automatically your arm’s inclination until an angle of 85° from the horizontal position.
53
Applications when diving
To reach this menu from the main
screen press in sequence:
To navigate this menu follow the instructions shown in the picture on the left..
C C
When diving, it is possible to use the following Applications:
APP MENU
m
29.6
2:
28
CHRONO
MAGMETER
MIX ANALYZER
GPS.
.
.
.
NW
NE E
W ROLLN LUXMETER
PITCH
MOON PHASE
0°
DIR
0°
A
B
REC
C
CHRONO (Cronometer)
PITCH&ROLL (Level)
MOON PHASE (Moon’s calendar)
MAGMETER (Magnetometer)
LUXIMETER (Luximeter)
GPS ( It is necessary to come to surface to allow the iX3M to link to satellites;
the GNSS signal doesn’t cross the water’s surface.
180°
Do you know what?:
D
Do you know what?:
EXIT ENTER UP DOWN
The iX3M is provided with a GNSS receiver with “hot start”which can download automatically the map of the
satellites in orbit allowing the iX3M to check only the part of sky where the satellite is located.. Thanks to this
peculiarity, the iX3M needs only 5 seconds to connects itself to the satellite after the previous connection.
GNSS means Global.Navigation:Satellite.System and indicates all satellite systems available at the moment (GPS;
GLONASS; QZSS; SBAS; BEIDOU).
Do you know what?:
In the iX3M the GPS acronym has been used for communication and intuitivity reasons, however, the satellite
system used by the iX3M is better in comparison with the one of GPS alone..
It is not possible to use during diving::
MIX ANALYSER
The manual of the single applications is available on the web site
www.divesystem.com/ratio in the section “Support”
54
Mix change during the dive
To reach this menu from the main
screen press in sequence:
CB
ATTENTION: possible only if a
a better mix is available.
If besides the bottom mix in the mix chart, decompressive mixes are set as well, the
computer will warn the user when it’s the right moment to change the mix, making
the MIX area (on bottom left of the main screen) flash in red.
Pressing the button B you have access to the screen CHANGE MIX (only if a better
mix is available and the MIX paramtre flashes)
To confirm the mix change select YES (in red) and press B
To refuse the mix change select NO (in red) with C or D e press B
To confirm the mix change press
in sequence from the dive screen when the word MIX flashes
A
B
C
D
OK CHANGECHANGE
CB
C
To refuse the mix change press
in sequence from the dive screen when the word MIX flashes
B
B
C
Do you know what?:
It’s possible to “refuse”. the mix change simply ignoring the change notice given by the iX3M
55
Setting change during the dive
To reach this menu from the main
screen press in sequence:
To navigate this menu follow the instructions shown in the picture on the left
CB
MODE: OC/CCR (only for iX3M Tech+ and iX3M Reb)
MIX: Mix percentage %O2/%He and mix’ status.
ACT: Mix that we are currently breathing
YES: Active mix but that we are not currently breathing
NO: Deactivated mix
GFL/GFH (R0 se VPM): It modifies the gradients Low and High if BUL or the
Critical Bubble radius if VPM.
(if iX3M Deep PS: if modifies the conservatism level)
OC SET
MODE:
MIX:
OC
21/0 ACT
GFL/GFH:
93/93
Press button
A
B
C
SAVE AND FOL- +
EXIT LOWING-
D
_
any time to save the modifications and go back to the Dive mode .
To know how to modify the parametres MIX and GFL/GFH (R0)(PS) make reference
to the section DIVE SET of this manual.
Attention: in the following pages we will explain how to modify the MIX and
the algorithm settings during the dive.
However remember always that:
To modify the Gradients and the Critical Bubble Radius a suitable training is
necessary!
To use more than one Mix when diving a suitable training is necessary!
DO NOT modify these parametres if you have not received such training!
56
Mix change during the dive
ATTENTION: The use of more mixes requires
a suitable training.
To navigate this menu follow the instructions shown in the picture on the left
DO NOT use mixes without having received
a suitable training!
OC
BUL
30.41
15: 6
2:
25.0m
TTS
STOP
TIME
PP02
MIX
Set the MIX as ACT to FORCE the Gas change
(in the example to pass from 21/0 a 50/0)
ASC
1.40
21%
Press button B to select the MIX (the selection is in red)
Press button C to browse the Mixes previously set
Press button B to browse the menu
Press button C to set the selected gas (in the example 50/0):
0.0
B
Set the MIX as YES to activate the MIX
(which will be suggested in the most suitable moment to make the change)
B
Set the MIX as NO to deactivated the MIX
(for example in the case a stage tank doesn’t work)
OC SET
MODE:
OC
MIX:
21/0 ACT
GFL/GFH:
93/93
Press button A at any time to save the selection and go back to dive.
ATTENTION: it is possible to force the mix change also beyond the MOD of the mix itself.
To force a Mix an adequate theorethical base is needed. Do NOT force the mix if not
necessary.
B
B
In the example a forced mix chnage from 21/0 to 50/0
OC SET
MODE:
OC SET
OC
MIX:
21/0 ACT
GFL/GFH:
93/93
C
MODE:
C
MIX:
50/0 YES
GFL/GFH:
93/93
B
MODE:
B
MODE:
OC
MIX:
50/0 YES
GFL/GFH:
93/93
C
C
25.0m
OC SET
OC SET
OC
C
C
OC
MIX:
50/0 ACT
GFL/GFH:
93/93
A
TTS
OC
BUL
STOP
15: 6
MIX
50%
PP02
1.40
30.48
TIME
2:
ASC
0.0
A
SAVE AND
EXIT
57
Change Conservatism during the dive
ATTENTION: To modify the GF or the R0 an
adequate training is necessary.
Do NOT modify hte GFor the R0
if you don’t have received it!!
50.7m
TTS
OC
BUL
STOP
To navigate this menu follow the instructions shown in the picture on the left.
In the example it is shown the value GFL/GFH; if you have chosen the VPM algorithm sarà the R0
will be visualized (for the iX3M Deep you’ll visualize the conservatism levels). The procedure to
modify the parametres is the same:
15:41
Press button B to select the GFL
Press button C (+) or D (-) to set the desired GFL
TIME
51: 24 1:
OTU
GF
CNS
4
20/70
(Remember that the GFL must never ever be higher than GFH)
2
Press button B to select the GFH and press button C (+) or D (-) to set the desired
GFH.
Press button A at any time to save the selection and go back to the dive.
B
B
Do you know what?:
OC SET
MODE:
Reduce the algorithm conservatism is particularly useful to handle possible emergencies during the dive.
If, for any reason, we have not enough gas necessary to the ascent, it is possible to decrease the algorithm
conservatism to reduce TSS as much as possible .
OC
MIX:
21/0 ACT
GFL/GFH:
20/70
(Note the decreasing of TSS inthe first and in the last screen on the example)
In the example a Gradient change from 20/70 to 93/93
B
B B B B
OC SET
MODE:
OC SET
OC
MIX:
21/0 ACT
GFL/GFH:
20/70
C
+
D
_
MODE:
C
MIX:
21/0 ACT
GFL/GFH:
20/93
B
MODE:
B
B
B
B
50.7m
OC SET
OC SET
OC
MODE:
OC
MIX:
21/0 ACT
GFL/GFH:
20/93
C
OC
MIX:
21/0 ACT
GFL/GFH:
93/93
A
TTS
+
D
_
STOP
15:48
TIME
20: 12 1:
GF
93/93
C
OC
BUL
OTU
4
CNS
2
A
SAVE AND
EXIT
58
The iX3M in GAUGE mode
Use the Gauge mode as described in the example on the left.
0.0m
0:00
GAUGE
TIMER
AVG DEPTH
0.0m
0:00
ASC
TEMP
MAX
0.0
+20.3°C
B
0.0m
C
RESET THE AVERAGE
DEPTH
(AVG DEPTH)
D
RESET THE TIMER
COMPASS
ATTENTION: To use the iX3M in GAUGE mode an adequate training is
necessary!
To start the dive in GAUGE mode select the desired mode with button D and start
the dive.
If you want that the iX3M recognize the GAUGE mode as default (and start the dive
in GAUGE mode even if we start diving with the computer switched off ) see the
DIVE SET section of this manual.
Do you know what?:
With the iX3M you can set the default mode that the device must activate
automatically when entering water between Dive with tank (default), Dive with Reb (only for
iX3M Tech+ and iX3M Reb), GAUGE or FREE from the menu DIVE SET.
Do your know what?:
The iX3M calculates in background the tissue saturation and desaturation also in GAUGE mode
using a .fake Mix with a high inert contents.
If after a dive in GAUGE you want to to carry out a dive in OC using the iX3M decompressive
calculations, the iX3M will consider the new dive as the next repetitive of the day
Well note:
Even if the iX3M carries out the decompressive calculation. in background, they cannot be
visualized on the screen and they don’t even affect the GAUGE mode.
59
Warning!
To receive all updates of this manual and notice of future
updates of the “iX3M” by e-mail, please send a message writing
“iX3M”
to the following address: [email protected]
This service is highly recommended
and it is completely free of charge.
For further support, have a look at the tutorial videos
soon available on www.ratio-computers.com
For assistance by mail write to [email protected]
60
© 2015
The reproduction, even partial, without stated approval is severely prohibited
RATIO® Computers.