1
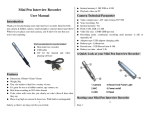
Spy Pen User’s Manual
General View
1- mic 2- lens 3- Shutter button 4- LED status indicator 5- reset
6- mode switch (left Video record, right photo)
7- USB
Product introduction
This pen not only can write, but also has a built in digital video recorder and camera. This stylish design has
a concealed USB drive with a built in Li-ion battery. Twist the base of the pen to write and press the shutter button
(3) to take pictures or video.
Operation Instruction
1. Startup, Record Video or Take Pictures:
Quick press of the Shutter button will turn on the
camera and you will notice the led indicator (5) will flash for about 5 seconds. When the LED status
indicator changes from Yellow to Blue the camera is ready to use.
2.
Recording Video: In Video Record mode the switch (6) will be to the far left. After the initial
setup, a quick press of the shutter button will begin recording video and the LED status indicator (4) will
change from Blue to Yellow. Press the shutter button again to stop recording and the LED status
indicator will change from Yellow back to Blue to indicate standby.
For continuous recording, the
camera will save the file once after each 90 minutes and keep recording until the battery is fully drained
or if the camera is turned off manually.
Every time you start and stop the unit from recording the files
will be saved as separate video files.
3.
Photo mode: In Photo mode the switch (6) will be to the far right. After the initial setup, The LED
status indicator (4) will remain lit Blue.
A quick press of the shutter button (3) will take a picture and the
LED status indicator (4) will flash Yellow to show that the image has been taken.
4.
Switching modes:
In order to switch modes, please unscrew the top of the camera from the pen. Now you will be able to
see a small switch (6) located above the USB (7). By placing the switch to the right the unit is in photo
mode.
By placing the switch to the far left the unit will be in Video record mode.
5.
Turning off the unit: Press and hold the Shutter button (3) until the status indicator LED (4) shuts
off, this indicates that the unit has shut down.
6.
Connecting to a computer: You can connect the unit to a computer in the OFF or STANDBY
state (the LED status indicator will remain lit Yellow). Allow your computer to locate the camera. Now
you will be able to download the files.
7.
Charging: Plug in the unit using the supplied AC adapter or using your USB of your computer. The
LED status indicator will flash yellow signifying that the battery is low.
If the units battery runs low
during a recording, the camera will save the file "and turn off automatically.
8.
Please charge the unit.
Built in Battery: the camera is provided with the built-in hi-capacity lithium battery. The battery has
no memory effect and can be charged at anytime, but it is recommended to be charged fully the first five
initial uses.
9.
This will maximize the battery capacity and allow it to operate longer.
Time setting: the camera can display the recording time on the video file in the format of
Year-month-day-hour: min: second. Such time can be set up as below:
a.
Create a notepad file with the extension name ".TXT" and enter a time as shown in the format
2008-07-15 16:10:28. Such time is your current local time. Please check the text formatting
carefully to ensure a correct format.
b.
Name the newly created text file as "userconfig.txt".
c.
Connect the Pen Camera with a computer and copy "userconfig.txt" into the root directory of USB
Disc after the appearance of USB Disc on the screen.
d.
Disconnect the unit and start up the Pen Camera, the time setting is accepted after the completion
of the initial setup.
10. Reset: If you are finding that the unit is not responding properly, it may need to be reset. Please locate
the reset button (5) on the back of the unit. In order to press the reset button a small thin object must
be inserted.
erased.
Please note that by resetting the unit all pictures and videos that are on the unit will be
It is recommended that you off load all pictures and videos prior to reset.
11. Writing with the Pen: In order to use the pen as a writing instrument you must rotate the base of
the pen to extend the ink cartridge.
www.cobradigital.com