1
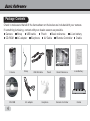
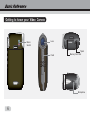
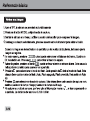
Http://cobradigital.com/download.php
ENGLISH
Basic Reference
Congratulations on your selection of this camera!
The basic reference provides you with the general
information you need to start using it.
CONTENTS
Safety Precautions.................................................... E-2
Quick Reference....................................................... E-3
General Guide........................................................... E-8
Trouble Shooting....................................................... E-22
1
Safety Precautions
Should you ever notice smoke or a strange odor coming out of the camera, immediately
turn it off.
You should be responsible for the damage to the camera or materials caused by your
improper operation to the Digital camcorder!
Do not expose the Digital camcorder to moisture and make sure no water get into the camera.
Do not attempt to modify this Digital camcorder!
Do not operate the Digital camcorder when you are driving.
2
FEATURES
5.1Mega pixels CMOS sensor, up to 12 Mega pixels Interpolated resolution
2-inch TFT color LCD monitor screen
Long battery life
8x digital zoom
32MB internal flash memory, support max. 4GB SD card or MMC card
This camera can play high quality MPEG-4 movie and Music
Record DVD quality MPEG-4 video
10seconds or 20seconds self-timer
PICT print
Slide show
WEB cam
3
Package Contents
Check to make sure that all of the items shown on the below are included with your camera.
If something is missing, contact with your dealer as soon as possible.
Li-ion battery
Strap
Pouch
Camera
USB cable
Basic reference
Earphone
AC adapter
AV Cable
Remote Controller
Cradle
CD-ROM
Camera
CD-ROM
4
Strap
AC-adapter
USB /AVcable
Pouch
Earphone
Basic Reference
Li-ion Battery
Remote Controller
Cradle
Getting to know your Camera
Shutter Button
WT Button
Display Button
Menu Button
Mode Button
Power Button
Direction
Button
USB Port
TV/Music Port
5
Getting to know your Video Camera
Macro
Switch
Lens
Flash
Tripod
Memory Card Slot
Microphone
6
Remote Controller
7
Loading the battery into the camera
1.Slide the battery cover and unload it .
2.Align the [+-] mark on the battery with [+-] mark on the camera and slide the battery into the
camera.
3.Close the battery cover.
Using a Memory Card
1.The camera has 32MB built-in memory for recording.
2.The camera support 4GB SD card or MMC card.
Note:
When there is a memory card inserted, it will be the top priority for saving data. If you want to
store in the built-in memory, please remove the memory card first .
Be sure to orient the card correctly when insert it. Never try to force a memory card into the
slot when you feel resistance.
8
Using Memory Card
While the camera cannot read the memory card, please clean metal interface softly with soft
cloth and then reload.
Never remove a card from the camera while the camera is working. Doing so can cause the file
save operation to fail, and even damage the memory card.
Monitor Screen
5M
0001/0018
Capture mode
Flash mode
White Balance
Self-timer
Power capacity
Macro mode
SD card
Image quality
Resolution
EV value
Counter
5M
0001/0018
9
Recording an image
1.Open TFT , the camera will be on automatically.
2.Press the MODE button, and choose the capture mode.
3.Point the camera at the subject, and use the monitor screen to compose the image.
4.Holding the camera still, gently press the shutter to release button.
When the image shown on the screen turning left, indicating the image is recorded.
In standby mode, press [MENU] , you can select the white balance, EV Shift, resolution etc.
press [MENU] back to standby mode.
Before recording, press the WT button can zoom in or zoom out. This cause the zoom indication
to appear on the display.
Press
to select the flash mode. Each press
of cycles the flash mode. This camera has three
modes of flash: Auto, Flash off, Flash on.
Press
to select the mode of capturing. This camera has four modes of capturing : single,
continuous, 10sec Self-timer and 20 sec self-timer.
When shooting a close subject, please turn the macro switch to
display. The distance of macro is 0.20m~0.30m.
10
, an icon will appear on the
Capture Tab Menu
Setup Tab Menu
12M
3264X2448
8M
2592X1944
5M
2048X1536
3M
1024X768
1M
11
Recording a video
1.Press the MODE button, and choose the video mode.
2.Press the SHUTTER to release button fully to start video recording. A red dot and the recording
time will appear on the display. Press SHUTTER again to stop video recording.
Note:
1.In recording mode, press the WT button can zoom in or zoom out.
2.In standby mode, press [MENU] , you can select the white balance, EV Shift, resolution etc .
press [MENU] back to standby mode.
3.When shooting a close subject, please turn the macro switch to
, an icon will appear on
the display. The distance of macro is 0.20m~0.30m.
Video Tab Menu
Sunny
Cloudy
Tungsten
Fluorescent
12
Recording voice
1.Press the MODE button, and choose the voice mode.
2.Press the SHUTTER release button fully to start voice recording. The recording time will
appear on the screen. Press SHUTTER again to stop recording.
Playback
1.Press the MODE button, and choose the playback mode.
2.Press
until the image you want to display.
when the file is video or audio, press [SHUTTER] to play, press [SHUTTER] again to stop.
press MENU to enter edit menu.
In playback mode, you can enter MENU to delete files.
In playback mode, you can use
to select pictures and video files to playback, and use
to zoom in and zoom out the picture.(specific operations follow the indication on monitor screen.)
13
Play Tab Menu
Music Mode
1.Press the MODE button, and choose
Play the files circularly
the music mode.
2.Press
to choose the downloaded
music file which you want to play, press
Repeat the current file
Play all file one time
[SHUTTER] to play, press [DISPLAY] to
pause, and press [SHUTTER] again to stop.
14
Adjust the volume
Note:
When you copy music from PC to your camera or SD card, please choose mass storage in PC
mode, and connect your camera and computer via the USB cable. Then you can creat a music
file under this path My Computer/Removable Disk/MP3, and copy the music you downlo aded
from your PC into this file.
PC Mode
1.Press the MODE button, and choose PC mode.
2.Press
to choose PC mode or Mass Storage. When you choo se PC mode, you can set
your camera as a web cam. When you choose mass storage, you can set your camera as a
removable disk to download pictures or music files.
15
HOW TO CONNECT WITH A PRINTER
You can print the picture directly via a PictBridge printer. Power up the camcorder, and enter PLAY
BACK mode, please choose the picture which one will be printed. Then press [MENU] button, enter
print menu, please use the USB cable connect your camcorder and the printer, and it will print the
picture automatically.
HOW TO CONNECT WITH A TV
You can enjoy your pictures and video on TV.
1.Turn on your camcorder and TV.
2.Use the supplied AV cable to connect the TV to camcorder.
3.Press down the direction button to review the pictures and video on TV.
HOW TO CONNECT WITH A COMPUTER
1.Have the camcorder and computer on.
2.Choose the USB mode in setup mode and then use the USB cable to connect the computer and
camcorder. You can download pictures and video files to your computer.
Note:
Before connecting your camera with computer, you should set your camera in mass storage of USB
mode.
16
Downloading photos/video to the PC
Instructions to install USB driver and application software to your computer. Please read the
following instruction carefully before installing driver program.
1. Please insert the software CD into the CD driver befor e connecting the camera to the comp uter
( thi s CD is atta ched in t he pack age.) and the insta ll program will run automatically. ( If the CD-ROM
driver resists to run automatically.) Please double-click Bdvdarun. Exe in the CD root folder).
2.Installtion mass storage driver and PC camera driver.
Select the icon of
Install Windows ME/2000/XP Driver , the installation could be finished as the
indication shown on the screen.
Turn the camera into the PC cam era mode, connect the camera to the computer with the USB cable
attached in the package.
The computer could recognize the camera automatically and finish the setting. If the dialog box
This installing program is not authorized by Microsoft, Go on or Not Pops up, click the
installing
go on
to finish the installation.
If the op erating system is windows98, please pull out the USB cable . The system will identify the
camera automatically and also finish the setting. You can use the camera as a moveable Flash Disk.
17
Downloading photos/video to the PC
Note:
If there is something wrong with the automatic installation, you could also finish the installation
manually according to the guide to install the hardware. The corresponding driver program could
be found in the drivers\manual folder in the CD root folder. Please read
help file readme. Txt
in this folder.
3.After finishing the installation of mass storage driver and PC camera driver, please reboot your
camera.
a. Set your camera to mass storage by entering [MODE] button.
b. Connect your camera to computer with USB cable.
c. Find out your photos/video files under this path DCIM/ 100 COACH/ Removable Disk/My
computer.
d. Copy your photos/video files to the desktop.
18
Instaling tools software on your computer
1.Insert the CD into the CD-ROM driver. This will automatically launch the menu application,
which displays a menu screen on your computer.
2.Install program for editing photo. Follow the instructions that appear on your computer
screen. Then you can design the beautiful album with your photos.
3.Install program for edit ing video. Follow the instructions that appear on your computer screen.
And edit video freely and can produce your own VCD yourself.
4.Install program for editing converting movie format, after converted the format of movie to
MPEG4 which is downloaded from internet or other place, then you can enjoy the movie by
camera freely.
19
How to convert movie to MPEG-4 format and play
Use the procedures in the section to install the software from the bundled CD-R OM to you computer.
Select install Media converting in the CD-ROM to install the software for converting video
file to MPEG-4 format.
1.Run the Media Converter , and choose a source file which comes from your computer to
convert, then select the path which you want to save the MPEG-4 movie. Click setting
button. After setting, click convert button at right below of the window, you will begin to
convert the source file.
20
How to convert movie to MPEG-4 format and play
2.You can find out the MPEG-4 files in the path you have chosen at the first step.
3.Set your camera to Mass Storage, and use the USB cable to connect your camera and computer.
4.Copy the MPEG-4 files to the memory card. The right path is DCIM\100 COACH\document.
5.Reboot the camera and set it to play mode, you can enjoy the movie.
Note:
In playback mode, press [SHUTTER] to browse the movie and press [SHUTTER] again to pause.
If you want to fast or slow the playing speed or adjust volume of playing , you can press
[SHUTTER] to pause playing and press [DISPLAY] button, then use direction to adjust the speed
and volume.
21
TROUBLE SHOOTING
memory card is loaded, camera cannot record.
Memory card is locked. Please unlock it.
Memory card is full. Please transfer the files you want to keep to your computer and
then delete files from memory, or use a different memory card.
Image is not record when the shutter button is pressed.
The camera is not in the capture or video mode. Please press [video] or [capture]
button to enter the currently selected recording mode.
Flash unit is being charged. Please wait until the flash unit finished charging.
Memory card is full. Please transfer the files you want to keep to your computer
and then delete files from image memory, or use a different memory card.
The color of the photo taken is not normal.
Please reset the white balance.
22
TROUBLE SHOOTING
The image is too dark or too bright.
Please reset the EV SHIFT.
The flash does not fire.
Flash off is selected as the flash mode. Please select a different mode.
The date displayed is not correct.
Please reset the date and time in setup mode.
Can not print the photos.
The camera is not in the print mode. Please set the camera as print mode and
check the connection of USB.
7750-000491-001