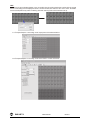
1
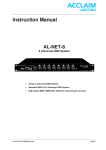
DMX - NET 8
User Manual
Table of Contents
Part I: About DMX-NET 8
Part II: X-Soft-Net(Holding System) Operation
(1) Setup Operation
(2) Mapping Operation
(3) X-Net Configure software Operation
(4) How to playback preset Scenes by running X-Software &
DMX Trigger Operation with Light-Mouse
Part I
About DMX-NET 8
About 8 Universal DMX System(DMX-NET 8)
Introduction:
Thank you for your purchasing the WORK 8 Universal DMX System(DMX-NET 8). To optimize the performance
of this product, please read these operating instructions carefully to familiarize yourself with the basic
operation of this system. The WORK DMX-NET 8 is simple to use, 8 Universal DMX System. All system
components & software have been tested at the factory before being shipped to you. These software include
X-mapping & X-Software. Before use this system, please backup them in your computer, then simply connect
the LAN-cable(RJ 45) between your DMX-NET 8 and your computer, then you're ready to go!
The 8 Universal DMX system should includes the following:
1 DMX-NET 8
1 X-Mapping software
1 X-Software software
This instruction manual includes the following contents:
Part I: About 8 Universal DMX System(X-NET-8)
Part II: X-Mapping software operation guide
Part III: X-Software software operation guide
Unpacking:
TheDM X-NET-8 has been thoroughly tested and shipped in perfect working condition. Please take a few minutes
to carefully inspect the system carton for damage that may have occurred during shipping. If the carton
appears to be damaged, carefully inspect each system component for damage, in the case that damage is
found, please contact our customer support center, listed below, for further instructions.
There are no user serviceable parts inside this unit. Do not attempt any repairs yourself, doing so will void your
manufactures warranty. In the unlikely event your unit may require service, please contact your nearest Botex
dealer.
Do not discard this carton in the trash, please recycle when ever possible.
Upon unpacking, carefully inspect your unit for any damage that any have occurred during shipping. If damage
may have occurred, do not plug the unit in, please contact your dealer as soon as possible.
Main Features:
Caution!
The newest Artnet, 8 Universal DMX System.
Standard DMX-512 and High Speed DMX-1000K(1M) protocol compatible.
With network control, supporting TCP/IP, Artnet and CL100M protocol.
Fixed built-in 128 memory CHIP allows to hold DMX data files.
Up to 32 Shows can be created, assigned and updated by configuring X-Net Configure Software on
PC platform.
With a real-time record function.
Astronomical time color schedule event table.
All output channels can be patched with any of input.
DMX trigger function available with DTC-512 or X-Trigger-USB.
Power input of AC100~240V, 50/60Hz.
Fuse protection with F3.15A 250V 5x20mm
Main Technical Data:
Supporting DMX-512 and DMX-1000K(1M) protocol
DMX Output:
(DMX-512 protocol control)
512 channels per connector,
total 8* 3-pin XLR DMX connector,
total 512 x 8 channels
Dimensions:
High Speed DMX-1000K(1M) protocol control
2048 channels per connector,
total 8* 3-pin XLR DMX connector,
total 2048x8 channels
19''/1U(482 x 205 x 44 mm)
DMX NET 8
USER MANUAL
PAGE 1
Controls & Functions:
Front Panel View
ArtNet encoder:
To activate and set SubNet and Universe of ArtNet. And use Universe encode to set the starting number of the
existing node's Universe.
Power Indicator:
To indicate the work status of the unit.
Ethernet port:
With RJ 45 standard network port.
Link/Data Indicator:
To indicate the status of network linking and data linking.
Link/Data Indicator:
To indicate the status of network linking and signal/data linking.
250K/1000K indicator:
To indicate the signal output of 8 Universe DMX uses standard DMX-512 protocol or high speed DMX-1000K.
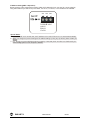
Work Mode Selector(SW1~2):
To select and activate the Control Protocol as you desire;
SW1
SW2
Control Protocol
OFF
X
ArtNet Protocol
ON
X
CL100M Protocol
SW1
SW2
OFF
ON
Special Note:
1.Under ArtNet protocol, you MUST firstly set your PC's IP address of "2.016.0.3", and Subnet mask addressing
of "255.0.0.0"
2.Under CL100M protocol, the Configuration software from WORK will be available. You MUST firstly
set your PC's IP address of "172.16.0.3", and Sub mask addressing of "255.255.255.0".
3.Once you-reset Sw1 or Sw2 if you need, you MUST restart your DMX-Net-8
.
(How to set your PC's IP addressing and Subnet mask addressing, please refer to "Configuring Ethernet card".)
DMX Trigger Interface(XLR male connector):
To feature DMX trigger function which is used to control Show by connecting Light-Mouse.
(For further information, please refer to its accompanying user manual.)
DMX Channel Selection, DMX Value & Functions Table
DMX Channel Selection
DMX Values & Functions
Starting Channel
0 ~2, select Scene_1;
3~5, select Scene_2;
6~8, select Scene_3;
........
252~254, select Scene_85
Starting Channel
+1
0~85 to Pause;
86~170 to Play;
171~255 to allow to Stop.
Starting Channel
+2
0~127 to Normal Output,
129~255, allow to Blackout.
1. DMX starting Channel is available to be set by operating X-Net Configuration software.
2. For Downloading DMX data files, Editing Show and Event Triggering, please refer to user manual of XNet-8 Configuration Software.
DMX Interface(1~8 DMX Universe):
To output DMX control signal
Back Panel View
Fuse Holder:
To mount the fuse of F3.15A, 250V 5*20mm
DMX NET 8
USER MANUAL
PAGE 2
IP Address Setting(SW1~3 Operation):
Before using the node, please set the existing X-Net-8's IP addressing from 172.16.0.[0]~172.16.0.[255] by
using SW1~SW3 as you desired. As per X-Net-8, 172.16.0.0, 172.16.0.3, 172.16.0.255 are not available.
SW1
SW2
SW3
456
456
456
23
9 01
23
78
78
9 01
78
23
Set IP:
9 01
[0~255]=
A*100+B*10+C
A=0~2
B=0~9
C=0~9
Special Notice:
1. When A*100+B*10+C exceeds 255, the IP address of the node will be set to 172.16.0.250 automatically.
2. When you change the protocol setting and IP address setting by using any dip-switch, please restart your
device.
3. It is strongly recommended that the amount capacity of 200,000 pixels controlled over distributed by the
entire holding system of one computer is allowed.
DMX NET 8
USER MANUAL
PAGE 3
Part II
X-Soft-Net holding System
& Operation Guide
DMX NET 8
USER MANUAL
PAGE 4
How To setup!
Configuring your computer Ethernet card before installing
To use DMX-Net-8 to drive LED lightings, such as PUZZLED PCB VIDEO, LED LINE VIDEO, etc. from WORK as
needed with X-Software software operation. Before using X-Software software, it is advisable to firstly
configure your computer Ethernet card. The process is very simple and is described as the below instructions.
It is necessary to set two parameters, the IP address and the Subnet Mask.
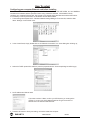
1. These settings are adjusted in the Windows Network Settings Dialogue. To access this, select the Start
Menu -Settings- Control Panel menu.
2. In the Control Panel, simply double-click on the ''Network Connection'' icon. A new dialog box will bring up;
3. Select the TCP/IP protocol line and then press the properties button. A new setup dialog box will bring up;
4. Set IP address and Subnet mask:
172.16.0.3
255.255.0.0
If you want to select X-Net-8 to drive your LED fixtures, you must type the
number of 172.16.0.3 in the IP address blank bar. To type the number of
255.255.0.0 in the Subnet mask blank bar.
5. Press the OK button to finish your setting, not need to restart the computer.
DMX NET 8
USER MANUAL
PAGE 5
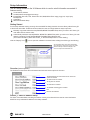
Setup Information
This is a setup software in the X-Software which is used to set all information as needed. It
features mainly;
To set Node IP Address
To edit/Create Events(trigger time setup)
Events(Flash files-*swf, *GVI, Video Files-*AVI,*WMV, MPAG Files-*mpeg,*mpg,*mlv, *mp2,*mp3)
Backup/Load
Create GVI
DMX Control Mode Setup
Getting Started
For the setup software working correctly, all events MUST be firstly placed in the scene library called "Scene_lib"
of the X-Soft main folder. To add scenes as needed, the user can simply follow two ways to process;
Manually copy these selected scenes(Falshfiles,MPAG Files,MPAG Files) which you wish to the "Scene_lib"
main folder with the mouse action.
Automatically load these events(Falshfiles, MPAG Files, MPAG Files) which you wish to he "Scene_lib" main
folder by operating "Event(Falshfiles,MPAG Files,MPAG Files) Backup/Load" .
(For further information, please see Section_3: "Events Backup/Load" for events loading.
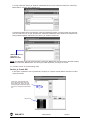
Click the "Setproj" icon (
) icon to open this software in the main folder. A dialog box will bring up as following;
All events(Flash files, Video Files, MPAG Files)
which have been copied to the "Scene_lib" folder
will automatically be listed and display in the
Source Components Presentation List.
Source Components
Presentation List
Overview (menu options)
The illustration below shows the main features and main sub menus options in the menu.
To add IP address of nodes which will be used in the
system as needed
To create events as needed.
To copy files as needed.
To create Gvi as needed.
To set DMX control/trigger as needed.
N/C
Exit from the software
Section_1: Node IP Address Setup
For these connected Nodes controlling the fixtures correctly, all nodes which are used to control the fixtures
MUST be set up individual IP address in this Setup software.
DMX NET 8
USER MANUAL
PAGE 6
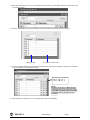
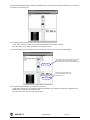
1a. Click the ''Show IP set Form'' icon, a IP setup dialog box will bring up to add IP address of nodes which will
be used as needed.
1b. Enter a valid integer value of node quantity which will be used as needed in the entire system.
Node quantity
IP address of each node
1c. Enter an actual IP address of each node in IP Address bar. The actual IP address of each node is provided
by us and labeled on the back of the node.
172.16.0.1
NOTE:
All nodes IP addresses MUST be kept
consistent with ones, which are set by
using SW1~3 operation. And 172.16.0.0,
172.16.0.3 and 172.16.0.255 are not
available.
1d. After clicking the ''Save Set'' icon, all settings will be saved automatically.
DMX NET 8
USER MANUAL
PAGE 7
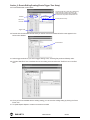
Section_2: Events Editing/Creating(Events Trigger Time Setup)
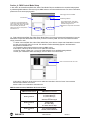
2a. Events Edit/Create mode enables.
All events(Flash files, Video Files, MPAG Files)
which have been copied to the "Scene_lib"
folder will automatically be listed and display
in the Source Components Presentation List.
Calendar
Source Components
Presentation List
PC time(real-time clock)
Start Time
End Time
Trigger mode
2b. Double-click the selected Event file which you wish as a scene as needed till its file name appears in the
below Active Window.
Active Window
2c. Select trigger mode which you wish to trigger existing event, consisting Day mode and Weekly mode.
2d. Click the "StartTime" icon to set Start time for the existing event as well as the "EndTime" icon to set End
time.
2e. Once you've been satisfied with the existing setting, you can save the existing setting by clicking the "Save
Event" icon.
2f. To repeat Step2b~Step2e to create more events as needed.
DMX NET 8
USER MANUAL
PAGE 8
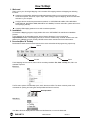
2g. Clicking the "Display Events" icon allows the user to preview these events which have been completed,
and they will appear with individual start time and end time in the destination component list.
Destination Components
Presentation List
All events(Flash files, Video Files, MPAG Files)
which have been edited completely will be listed
and appear with individual start time and end time
in the Destination Components Presentation List.
2h. Click the "Exit" icon to exit the existing mode.
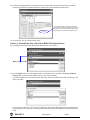
Section_3: Events(Flash files, Video Files, MPAG Files) Backup/Load
3a. Events(Flash files, Video Files, MPAG Files) Backup/Load mode enables.
Main Program Folder
3b. In the CopyFile option, the main program folder is a drop down menu, consists of the Scene_lib(Scene
library) folder. And point the main folder, then click the "Scene-lib" folder.
1.Click the "Backup File" icon to backup these Flash files, Video Files, MPAG Files which are existing in the
“Scene_lib" folder.
2.In this option, it allows the user to load more Flash files, Video Files, MPAG Files from other places to the
"scene_lib" folder for events use. For adding more Flash files, Video Files, MPAG Files, simple follow these
steps;
DMX NET 8
USER MANUAL
PAGE 9
2.1.Firstly, select the "Scene_lib" folder as a destination which the user load more Flash files, Video Files,
MPAG Files to, and click the "Load File" icon.
2.2 Define the folder with more Flash files, Video Files, MPAG Files which you wish to load, then secondly
click the "load File" icon. Do this, all Flash files, Video Files, MPAG Files in this folder can be loaded to the
Setup software together and saved in the "Scene _lib" folder for events use.
Additional Flash files,
Video Files, or
MPAG Files folder
NOTE: It is advisable not to load these Flash files, Video Files, MPAG Files owning the same name with existing
Flash files, Video Files, MPAG Files in the "Scene_lib" folder. Otherwise, it is easy to be in fault.
3c. Click the "Cancel" to exit the existing mode.
Section_4: Create GVI
In this option, it allows the user to prefabricate, compress, or compose several different events as one GVI
to play as needed.
In this option, All events(Flash files,
Video Files, MPAG Files) which have
been copied to the "Scene_lib" folder
will automatically be listed and appear
in the Source Components Presentation
List.
Source Components
Presentation List
Preview Area
DMX NET 8
USER MANUAL
PAGE 10
4a. Select one Event(Flash files, Video Files, MPAG Files) in the Source Component Presentation List, and click
the "Add" icon for dummy GVI.
4b. To repeat the above step to add more events for dummy GVI as needed.
In this option, click the "Insert" icon to insert events between two events as needed.
Click the "DEL" icon to delete events which you want to cancel.
4c. Input a new GVI name in the file name bar, and click the "Save" icon to save the existing setting.
All events(Flash files, Video Files, MPAG Files)
which have added will be listed and appear
in the Destination Components Presentation List.
Destination Components
Presentation List
All GVI which have created will
be listed and appears in the GVI
presentation list.
GVI Presentation List
4d. To repeat to Step4a~Step4c to create more GVI for use.
In this option, double-click the GVI file in the GVI presentation list to select GVI till its name appears in the "
FileName" bar, all events in the selected GVI
Click the "Exit" icon to exit from the existing mode.
DMX NET 8
USER MANUAL
PAGE 11
Section_4: DMX Control Mode Setup
In this mode, all scenes/Events(Flash files, Video Files, MPAG Files) are available to be controlled and playback
by addressing DMX address. And user may use DMX values to control the desired scenes. For further information,
please refer to the accompanying table:
DMX Trigger function available
Preview Area
In this option, All events(Flash files,
Video Files, MPAG Files) which have
been copied to the "Scene_lib" folder
will automatically be listed and
appear in the Source Components
Presentation List.
Set Starting Address
All events(Flash files, Video Files,
MPAG Files) which have added will
be listed and appear in the
Destination Components Presentation
List.
Destination Components
Presentation List
Source Components
Presentation List
1a. Firstly add all events(Flash files, Video Files, MPAG Files) in the Source Components Presentation List to the
Destination Components Presentation List which you wish to control by DMX. The user can follow these below
simply processes to add.
1.1 Select one event(Flash files, Video Files, MPAG Files) in the Source Components Presentation List which
you wish, and click the "Add" icon to add. The desired one will automatically appear in the Destination
Components Presentation List.
1.2 To repeat the above step to add more events for DMX control.
In this option, it allows up to 85 scenes can be added and controlled.
1.3 Enter an integer number from 1~512 in the "DMX Address" bar to set DMX starting address.
1.4 After your confirmation with these settings, click the "Save" icon to store them.
Each event is deemed as one scene.
In this option, it allows up to 85 scenes can be added and controlled. Click the "Insert" icon to add the
selected event between two events.
Click the "DEL" icon to delete the selected event.
DMX Channel Selection, DMX Value & Functions Table
DMX Channel Selection
DMX Values & Functions
Starting Channel
0 ~2, select Scene_1;
3~5, select Scene_2;
6~8, select Scene_3;
........
252~254, select Scene_85
Starting Channel
+1
0~85 to Pause;
86~170 to Play;
171~255 to allow to Stop.
Starting Channel
+2
0~127 to Normal Output,
129~255, allow to Blackout.
DMX NET 8
USER MANUAL
PAGE 12
How To Map!
1. Welcome!
Thank you for your choosing X-Mapping of an innovative LED mapping software. X-Mapping has following
functions:
Create a mock map which defines the relationship between pixels on your computer screen and the
actual device panels, bars, dots, chips or strips. After creating a map in X-Mapping, allows it to download
and store in your computer.
Configure the Art-net devices parameters as needed, i.e. PUZZLED PCB VIDEO, LED LINE VIDEO
PUZZLED PCB, SUPERDOT RGB, DMX-NET 8 from WORK (For further information, please refer to their
accompanying manual).
Creating LED mapping patterns for use with X-software operation.
2. Installation
To install the X-Mapping program, simply double-click on the ''SETUP.EXE'' file and follow its installation
process.
The X-Mapping can be uninstalled via the ''Add or Remove Programs'' in the Control Panel.
Important Note: All files ''LED Mapping Document'' which are created newly are ONLY located in the main
folder for the X-Mapping to work correctly. NEVER remove these new files from their folder location.
3. Overview(Menu & Toolbar)
The illustration below shows the main features of the menu and toolbar while programming a pixel map.
Menus
Tool bar
Zoom
The X-Mapping has four menus, three of which are always available: File, View and Help, but, Edit is not
available at present.
File Menu:
The File menu options included New, Open, Save, Save As, and Exit. The three commonly used menu
commands for opening and saving files are duplicated as buttons in tool bar;
New,Open,Save
View Menu:
View Menu allows to display/hide the Toolbar and the Status bar, or move the Work Grid.
DMX NET 8
USER MANUAL
PAGE 13
Help Menu:
Help Menu will bring up a dialog box that includes the existing version number of the software.
Zoom drop down menu can be used to move from 20% to 100% within the work grid.
4. Customizing Work Grid and Device Setup
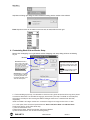
Directly click ''X-Mapping'' icon to get started, and the X-Mapping main setup dialog will show as following
for you.
Work Grid
Add New Node is an option that is
used to add new node as needed,
respectively entering its name, total
output ports and total channels per
port.
*NOTE:
For conveniently working, all nodes
have been added and set up by
default.
Node Used features to
enter a value of the nodes
quantity which is possible
to be used as needed.
(If you just want to use four
DMX-NET 8, you MUST
enter "4" in the blank.)
Select Node is a drop down
menu that selects a desired.
The existing selected node
information will display in the
"Add New Node" option.
4.1. Before building a pixel map, it is advisable to check how many pixels all devices will occupy when placed
to customize Work Grid. The Work Grid is large grey area to built a pixel map. The Width is horizontal pixel,
the Height is vertical pixel. And entering the Width and Height values are to customize Work Grid size,
respectively.
NOTE: the Width is an integer number from 1 to 800, the Height is an integer number from 1 to 600.
4.2. In this option, there are several optional features: Node used,Select Node and Add New Node.
To add a new device, simply follow these step;
1) Click the "Add Device" icon.
2) Enter Device Name, Output Port Number and Channel Number.
3) Click the "Save Device" icon to save the existing setting.
DMX NET 8
USER MANUAL
PAGE 14
5. Customizing Dummy Devices
In the Edit/Add... option, it allows the user to choose, create or modify devices library list as needed
Device Select is a drop down menu that displays existing device or Edit/Add option.
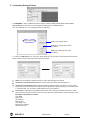
Click the "Edit/Add" icon, a new dialog will show as following;
Fixture Library List
Adds a new dummy device
Modifies an existing device which
you wish to
Deletes an existing device which
you wish to
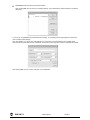
5.1. Click the "Add Device" icon, bring up a setup dialog box. The number of horizontal pixels and vertical
pixels must be entered, same with the actual device's pixels.
Name can be modified for different groups or unique device designs as needed.
Horizontal and Vertical Pixels define the overall number of pixels in the existing device.
Horizontal and Vertical Skip define the offset between adjacent pixels in the device, can be used to
skip a pixel within the device when it's placed on the Work Grid. Instead of having 5 consecutive pixels
in a standard 5x5, you can have 5 pixels skipping one pixel in between.
Scan Order is a drop down that displays device scan order, defines the direction and order in which
the pixels are connected. A specific scan order may reflect the requirements of actual connection order.
Examples of standard scan orders...
Left->Right
Right->Left,
Top->Bottom,
Bottom->Top,
Left->Right->Left,
Bottom->Top->Bottom,
Top->Bottom->Top.
DMX NET 8
USER MANUAL
PAGE 15
Total Pixels show the device pixels's information.
After clicking OK, You can save your existing settings. And created device will be existing in the device
library list.
5.2. If you're not satisfied these created devices's setting, or something else wrong happens, it allows the
user to modify these settings.
Click the "Modify" icon, bring up a setup dialog box. The number of horizontal pixels and vertical pixels,
horizontal and vertical skips can be re-entered, as well as its scanning order can be re-selected as needed.
After clicking OK, You can confirm and save your modification.
DMX NET 8
USER MANUAL
PAGE 16
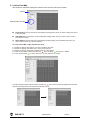
6. Create a Pixel Map
After all devices and fixtures settings are finished, access to built a pixel map as needed.
Toolbar
Existing Device Info Tab
Device Select is a drop down menu that displays existing device which you wish to assign the device
to the Pixel Map.
Node Address is a drop down menu that displays existing nodes which you wish to use to control
your devices actually.
Select Output is a drop down menu that displays existing output port of selected node which you
wish to use to control your devices actually.
To create a Pixel Map, simply follow these steps;
6.1. Select an existing device which you wish to create a pixel map.
6.2. Select an existing node which you to use to control device.
6.3. Select an existing output port of selected node to control device.
6.4. Click the grey area in Work Grid till Arrow(
)turn red, Grid(
)turn green in Toolbar.
6.5. Then click the Grid(
) to array device's pixels and create the pixel map.
6.6. After placing the pixel map as needed, click Arrow(
) then click the pixel map assign devices pixels
direction according to the scan order which has been set up.
DMX NET 8
USER MANUAL
PAGE 17
HINT:
In the event of some mistakes happen, user can modify them by pointing the device number with the mouse
action. A new dialog box will display and enter a correct number, then click the ''OK'' icon to save. You MUST
ensure overall pixels array order is matching with their scanning order which has been set up.
6.7. To repeat Step5.3.-5.6 to assign more output ports of the selected device.
6.8. To repeat Step6.2.-6.7 to assign more same nodes to control the fixtures.
DMX NET 8
USER MANUAL
PAGE 18
6.9. After you're satisfied with overall settings, you can click the ''Convert Map Address'' icon to convert the
pixel map addresses.
Program Rate
6.10.and click the '' Save(
)'' icon in the Toolbar save in the main folder as a LEDMap file for X-Software
operation. It is advisable to save the LEDMap document in the main folder to for working correctly.
DMX NET 8
USER MANUAL
PAGE 19
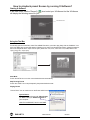
How to playback preset Scenes by running X-Software?
Starting X-Software
In the main folder, click the "Runproj"(
) icon to start your X-Software. And the X-Software
will display the following screen for you;
Presentation Area
Using the Tool Bar
Manual Mode
To manually open the Flash files, Video Files, MPAG Files which you wish to play, firstly click the "MANUAL" icon
and a new dialog box (screen) will appear, indicating you to select your desired Event files in a flash file selection,
then move the pointer to the "open" icon to open. (Flash files-*swf, *GVI, Video Files-*AVI,*WMV, MPAG Files*mpeg,*mpg,*mlv, *mp2,*mp3)
Auto Mode
To click the AUTO icon to run the current desired events automatically.
Stop Running Events
To click the "STOP" icon to stop temporarily the present desired events.
Playing Events
To click "PLAY" icon to continue to run the Events which have been stopped just before.
Special Notice:
When you play the Scenes with Video format,
you MUST close your Hard Acceleration of
your computer.
HOW TO CONFIGURE, See the next PAGE
DMX NET 8
USER MANUAL
PAGE 20
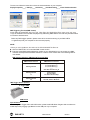
The user can follows the below flow to close the hard acceleration of your computer:
Display Properties____> Settings____>advanced____>troubleshooting____>close Hard Acceleration
DMX Triggering Function(DMX Control)
In this mode, all scenes(Flash files-*swf, *GVI, Video Files-*AVI,*WMV, MPAG Files-*mpeg,*mpg,*mlv, *mp2,
*mp3) are available to be controlled and playback by addressing DMX address. And user may use DMX values
to control the desired scenes.
Before any DMX trigger operation, please ensure all of connections among of your DMX- NET 8
or Light-Mouse) with your computer are be connected properly.
NOTE:
1.When you use Light-Mouse, the version of the X-Soft-Net MUST be Rev1.04.
Click the "DMX CTRL" icon to activate DMX Control function.
Enter the proper DMX starting addressing number as your desired before you can operate your DMX
controller. And sequential three DMX channels to control a scene. Please refer to the following table for
more details;
DMX Channel Selection, DMX Value & Functions Table
DMX Channel Selection
DMX Values & Functions
Starting Channel
0 ~2, select Scene_1;
3~5, select Scene_2;
6~8, select Scene_3;
........
252~254, select Scene_85
Starting Channel
+1
0~85 to Pause;
86~170 to Play;
171~255 to allow to Stop.
Starting Channel
+2
0~127 to Normal Output,
129~255, allow to Blackout.
DMX Trigger Device Optional:
X-Trigger-USB
USB version
Special Notice:
Before using DMX Trigger device with USB version, please install USB Driver Program with accordance to
hinted steps when plugging Light-Mouse into the USB port of your computer.
DMX NET 8
USER MANUAL
PAGE 21
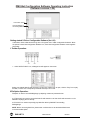
DMX-Net Configuration Software Operating Instruction
(Software version:1.00)
Enter frame value
Enter IP address of
the existing DMX-Net-8
Getting started X-Driver Configuration Software (Ver1.00)
In Windows, click the Start button and go to the "Programs" then "X-Net Configuration Software". Move
the pointer to the X-Net Configuration Software icon, the X-Net Configuration Software screen appears
hereinafter:
1.Toolbar Operation:
1.1 Click "OPEN FLASH" icon, a dialogue box will appear on the screen.
Select your desired flash file with extension .swf and click "OPEN" icon to open, click the "Play" icon to play
the flash, "Pause" icon to temporarily terminate and "Stop" icon to end.
2.FileOption Operation:
FileOption is used to control RGB lightings by adjusting contents of presentation bar.
2.1"Fileconvert" icon used to convert the flash file with extension .swf into the file with extension .scn for
DMX-NET 8 playing the one directly.
2.2"Preview" icon used to temporarily play flash files effect by DMX-NET 8 controlling
RGB lightings.
NOTE: Before converting flash files, please enter a valid number to set the desired flash frame
in the ConvertSet Option.
DMX NET 8
USER MANUAL
PAGE 22
3.Show Option Operation:
In the option, user can assign the SHOW in DMX-NET 8.
3.1"DIR" icon use to have files in DMX-NET 8 readout and list.
3.2"Read" icon used to read pointed file in DMX-NET 8.
3.3"Write" icon used to write files with extension .scn into DMX-NET 8.
3.4"Del" icon used to delete pointed files in DMX-NET 8.
3.5"Format" icon used to clear up all files in DMX-NET 8.
3.6"Edit Show" icon used to start and edit the SHOW in DMX-NET 8. It is necessary to
click the icon for SHOW readout in DMX-NET 8.
And hereinafter is before clicking "Edit Show" icon, these icons in the "Edit Show " option is empty.
3.7User can set up DMX initial address for DMX-NET 8 controller receiving in DMX
Address bar and amendment upon requirement.
3.8How to Edit Show?
3.8.1Clicking the DOWN Arrow of "Edit Show" icon to select your desired show.
3.8.2Select the file in the left list and click ">" icon to invoke the desired file for your desired show.
3.8.3And repeat Step 3.8.2 add up more files for your desired show.
3.8.4And user can delete your unwanted files for your desired show by clicking "<" icon after pointing the
selected files.
3.8.5Clicking the "Inset" icon to invoke the same file with the previous for your desired show.
3.8.6And clicking the "Save" icon to save your desired show in memory.
3.8.7And repeat Step 3.8.1~3.8.6 to edit other desired shows.
3.8.8At last, user can download edited shows to DMX-NET 8 by clicking the "Download
All Shows" icon.
DMX NET 8
USER MANUAL
PAGE 23
4.Event Edit Option:
In this option, the user can call up Time Trigger Mode for SHOW by editing show events to DMX-NET 8
including Weekly Mode, Daily Mode and Date Mode.
How to Edit show events?
4.1To select your desired time trigger modes.
4.2And select your desired trigger shows.
4.3Then click the "ADD" icon to edit the desired time.
4.4And click the Down Arrow under the "Event Start" icon to select the starting time of your desired show.
4.5Then secondarily click the Down Arrow under the "Event Start" icon to select the closing time of your
desired show.
4.6And these edited events can be saved in memory by clicking the "Save" icon.
4.7And repeat Step4.1~Step4.6 to edit other shows events.
4.8After these events are finished, user can download edited shows events to your X-Net-8 by clicking the"
DownLoad Event" icon.
4.9In like manner, user can read these desired shows events in X-Net-8 and amend upon requirement.
4.10And the user can update your DMX-NET 8 system time by clicking the "Set Time" icon.
DMX NET 8
USER MANUAL
PAGE 24
Equipson, S.A.
www.equipson.es
[email protected]