1
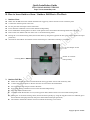
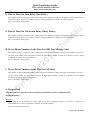
Quick Installation Guide LCD GSM ALARM SYSTEM LH http://www.usmartbuy.com A. Manipulation Specification 1. Arming Arming means all-around guarded when there is no person at home. All detectors are working. Once something triggers any of the detectors, the alarm sets off. 2. Home arming (Partial arming) Home arming means that when there is someone at home, for the sake of security, it is needed to make the outside doors, windows, balconies, and around detectors working. But, it is also needed to avoid the person at home from triggering the domestic detectors to alert wrongly. At this time, we choose home arming, letting some detectors work and the others not. 3. Disarming Disarming means that when control host sets off, it can stop the alerting or makes the system on the disarmed status. After disarming, even triggering detectors can NOT make the control host alert, except the detectors in emergency zone or emergency key in the remote control. 4. Emergency alerting When emergency happens, press on the emergency key on the remote control, keypad or panic button. 5. Default password Default administrator password: 6666 Default user password: 1234 B. Host Installation: DO NOT INSERT THE SIM CARD INTO THE CONTROL HOST WHILE THE CONTROL HOST IS TURNED ON OR WORKING 1. 2. 3. 4. 5. 6. 7. 8. Normally the sensors in the big box have been coded (learned) to the host. For additional sensors, please refer to the user manual or sections below for how to code (learn) sensors to the host Make sure the SIM card PIN code and password are turned off Insert the SIM card in to the slot at the back of the host and metal contact of the SIM card must be down Connect small wired siren to back of the host. Red wire to “15 BZ+” and black wire to “14 BZ-” Connect the power at back of the host Turn on the switch at the back Wait for initialization for a while If “ ” shows on the LCD and “Signal” LED on the host is blinking for every second, it means the host has found the GSM signal. Otherwise, please check if the SIM card has been installed properly Copyright @ 2013 shield4u Quick Installation Guide LCD GSM ALARM SYSTEM LH http://www.usmartbuy.com C. How to Code/Learn Sensors to The Host: It is recommended to turn off all sensors first and then only turn on the sensor which needs to be learned. After each successful learning, please turn off the learned sensor and then turn on the next sensor which needs to be learned. 1. Remote control (key fob) coding Press 6666# on the host keypad “SET” LED on the host is blinking Enter 21# LCD displays series number (1 to 05, totally can add 5 remote controls) Trigger remote control by pressing a key Voice “coding completed” to indicate the successful operation LCD shows the next group number Trigger another remote control to code. Press *# to exit the setting status 2. PIR coding: Please note, PIR warms up for 60 seconds after the switch at the side is turned on. During the warming-up period, the LED on the PIR will be blinking, but it will not be triggered by motion or send any signal to host. Turn on the switch at side of the PIR Wait 60 seconds for warming up Press 6666# on the host keypad “SET” LED on the host is blinking ¹Enter 23 Enter zone number (can be 02 to 99) press # The corresponding zone number shows on the LCD Trigger the PIR Voice “coding completed” to indicate successful operation. After that please turn off coded sensor and start from ¹ to code another sensor or press *# to exit the setting status 3. Door/Window gap sensor coding: Open the door sensor case and install the battery Press 6666# on the host keypad “SET” LED on the host is blinking ¹Enter 23 Enter zone number (can be 02 to 99) Press # The corresponding zone number shows on the LCD Trigger the door sensor by pressing the button on the front Voice “coding completed” to indicate successful operation. After that please turn off coded sensor and start from ① again to code anther sensor. After that please turn off coded sensor and start from ¹ to code another sensor or press *# to exit the setting status 4. Smoke detector coding: Install the battery Press 6666# on the host keypad “SET” LED on the host is blinking ¹Enter 23 Enter zone number (can be 02 to 99) Press # The corresponding zone number shows on the LCD Trigger the smoke sensor by pressing and hold the test button Voice “coding completed” to indicate successful operation After that please turn off coded sensor and start from ¹ to code another sensor or press *# to exit the setting status Copyright @ 2013 shield4u Quick Installation Guide LCD GSM ALARM SYSTEM LH http://www.usmartbuy.com D. How to learn Outdoor Siren / Outdoor Bell Box to The Host: 1. Outdoor Siren Make sure all PIRs have been turned off and do not trigger any sensors and do not use remote key fobs Connect the external power to the siren Do not press the anti-tamper switch at the back Press down the red button to turn on the internal backup battery Press and hold the learning button as shown in the picture below and release the learning button after one beep LED on the siren flashes and siren enters into 15 seconds learning status During the 15 seconds learning status, disarm the alarm by using the keypad on the host (press disarm button and input password) The LED on the outdoor siren flashes 2 times with 2 beeps to indicate the learning is successful Anti-tamper switch Learning Button Switch for internal backup battery 2. Outdoor Bell Box Make sure all PIRs have been turned off and do not trigger other sensors and remote key fobs Connect the external power to the box and wait 10 seconds for the initialization Do not press the anti-tamper switch at the back Press down the big red button to turn on the internal backup battery Press the small red button once All lights inside the bell box are on (not only power LED) and box enters into 30 seconds learning status During the 30 seconds learning status, disarm the alarm quickly by using the keypad on the host TWICE (press disarm button and input password, then press disarm button and input password) The LEDs in the bell box flashes 5 times to indicate the learning is successful Copyright @ 2013 shield4u Quick Installation Guide LCD GSM ALARM SYSTEM LH http://www.usmartbuy.com Switch for internal backup battery Learning Button Anti-tamper switch E. How to Reset Outdoor Siren / Bell Box: 1. Outdoor Siren Press and hold the Learning Button as shown in the picture above Release the Learning button after the second beep. After reset, the outdoor siren is disconnected from the host 2. Bell Box Keep pressing the small learning button for 10 seconds and release The LEDs in the box flash once to indicate the successful operation Copyright @ 2013 shield4u Quick Installation Guide LCD GSM ALARM SYSTEM LH http://www.usmartbuy.com F. How to Turn On Arm Delay (Exit Delay) Press 6666# on the host keypad “SET” LED on the host is blinking Input 33 Input two digits delay time (can be 00~99 seconds) Press # to confirm Voice “setting completed” to indicate successful operation. Press *# to exit the setting status G. How to Turn On The Alarm Delay (Entry Delay): Press 6666# on the host keypad “SET” LED on the host is blinking Input 34 Input two digits delay time (can be 00~99 seconds) Press # to confirm Voice “setting completed” to indicate successful operation. Press *# to exit the setting status H. Preset Phone Numbers in the Host for SMS Text Message Alert Press 6666# on the host keypad “SET” LED on the host is blinking Enter two digits series number (can be 49 ~ 50, each group number stores one phone number) Input phone number Press # to confirm Voice “setting completed” to indicate successful operation. Press *# to exit the setting status I. Preset Phone Numbers in the Host for Call Alert Press 6666# on the host keypad “SET” LED on the host is blinking Enter two digits series number (can be 51 ~ 56, each series number stores one phone number) Input phone number Press # to confirm Voice “setting completed” to indicate successful operation. Press *# to exit the setting status J. Keypad lock After this feature is turned on, the user password (default is 1234) is required before arming/disarming. Turn on: Press 6666# on the host keypad “SET” LED on the host is blinking Press 40 Press 1 Press # to confirmed Voice “setting completed” to indicate successful operation. Press *# to exit the setting status Copyright @ 2013 shield4u Quick Installation Guide LCD GSM ALARM SYSTEM LH http://www.usmartbuy.com Turn off: Press 6666# on the host keypad “SET” LED on the host is blinking Press 40 Press 0 Press # to confirmed Voice “setting completed” to indicate successful operation. Press *# to exit the setting status K. Changing Password Change User Password Press 6666# on the host keypad “SET” LED on the host is blinking Input 38 Input new 4 digits password Press # to confirm Voice “setting completed” to indicate successful operation. Press *# to exit the setting status Change Administrator Password Press 6666# on the host keypad “SET” LED on the host is blinking Input 39 Input new 4 digits password Press # to confirm Voice “setting completed” to indicate successful operation. Press *# to exit the setting status L. Alarm Reset Enter 0321456987 and press # to confirm All the LED indications will be on for few seconds and hear a beep Important Note: Normally the sensors in the big box have been coded to the host. For additional sensors, please refer to the user manual or section C above for how to code sensors to the host More information please refer to the user manual Copyright @ 2013 shield4u