1
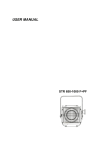
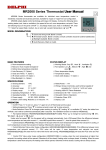
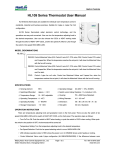
HL2025 Series Touch Pad Thermostat User Manual
HL2025 Series Touch Pad fan coil unit thermostats are designed to control the room
temperature in air-conditioning fan coil unit system or dust pipe channel system.
HL2025 series thermostats with microprocessor and big LCD display. It shows the
following items: working status (cool, heat or ventilation), fan speed, room temperature,
set-point temperature etc. Keys include on/off ( ),mode (
adjustment ),fan speed ( ) and temperature
( MODEL DESCRIPTION
HL2025
Y:
Control
DA/DA2:
DA: Control 2-wire valve; DA2: Control 3-wire valve,
damper
to
open
or
close
T:
DB/DB2:
the
valve
with
the
fan
still
running.
L:
Blue backlight.
E:
Auto Restart(Restart the working status of
DB:Control 2-wire valve; DB2: Control 3-wire
valve, When the temperature reaches the set-point,
it
FCV2:
Clock and timing on/off. Blank is invalid.
T74: 7 days programming. Blank is invalid
When the temperature reaches the set-point, it will
close
).
will
close
both
the
valve
and
last 6 seconds before power off). Blank is
fan.
invalid.
Control 4 pipe fan coil units, Control heating and
cooling
valves
and
3-speed
fan,
when
the
temperature reaches the set-point, it will close the
valves with the fan still running.
BASIC FEATURES
STATUS DISPLAY
Working Status: Cooling , Heating or Ventilation
Room temperature setting
Manual or auto 3-speed changeover
Fan Speeds: low
,Mid
Defrost (low temperature protection)
FCU valve status
Clock, Timer ( -T, Option )
Room temperature display
Clock ,7 days programmable ( -T74, Option )
Temperature setting display
Blue back light ( -L)
Clock ,week display
,High
or Auto
Keypad Lock (Option )
Auto Restart ( Option )
SPECIFICATIONS
Sensing element:
NTC
Control Accuracy: +1°C
Set-point range:
5°C to 35°C
Display range:
0~55°C
Operation environment: 0~45°C
Operating Humidity: 5~90%RH (non-condensing)
Key: Touch screen key+ soft touch key
Power Consumption : < 1W
Power supply: AC 85~260V, 50/60Hz
Display Accuracy: + 0.5°C
Wirings: Accepting 2 × 1.5 mm2 or 1 x 2.5mm2 wires
Switch current rating: Resistive: 2 A, Inductive: 1 A
Housing: PC + ABS Flame Retardant
Dimensions: 90 × 90 × 14.5 mm ( W × H × D )
Hole pitch: 60 mm ( Standard )
Protection Class: IP30
Clima-Flex, S.A. de C.V.
Av. Central #285 Parque Industrial Logistico / Delegación la Pila / C.P. 78422 / San Luis Potosí, México
Tel. 52 (444) 161-50-43
Facebook/clima-flex
@climaflexMéxico
OPERATION
»» On/Off : Press “
” to turn on, press “
»» Setting temperature: press “
” again to turn off thermostat and its output.
” to reduce temperature, press “
” to raise temperature (0.5°C changed each press)
»» Mode Selection: Press “ ” to change system working in cooling “ ”, heating “ ” or ventilation “ ”mode.(The
ventilation function is invalid for HL2025Y/YE)
»» Fan speed Selection (not for HL2025Y/YE): Press “
”to select
(Hi),
(Med),
(Low), AUTO(Auto).
In mode “AUTO”(Auto)”, the fan-speed changed automatically. Auto LOW-speed When the differential temperature
between room-temperature and setting-temperature exceed 1°C, Auto MED-speed When exceed 2°C, Auto HI-speed When exceed 3°C.
»» Control Damper (HL2025Y/YE): The damper will be open when room temperature is higher than set-point in cooling; room temperature is lower than set-point in heating, Otherwise the damper will be closed.
»» Control Motorized Valve under 2-pipe configuration (not for HL2025Y/YE): If the differential temperature between
room temperature and set-point exceed 1°C, FCU valve will be open; if room temperature and set-point are equal,
HL2025DA/DAE/DA2/DA2E will close the FCU valve with the fan still running, HL2025DB/DBE/DB2/DB2E will close both of valve and Fan.
»» Control FCU Valve under 4-pipe configuration (HL2025FCV2/FCV2E): In cooling, when the room temperature is higher than set-point, the cooling Valve will be opened. Otherwise it will be closed. Heating valve is always closed. In heating, When the room temperature is lower than set-point, the heating valve will be opened. Otherwise it will be closed. Cooling valve is always closed.
»» CLOCK CALIBRATION ( -T, -T74 )
»» Press “M” with four seconds till to display “hh:mm” and “hh” flash, press “
” or “
” to adjust hour, press “M”, “mm”
»» flash, press “
” or “
” to adjust Mon to Sun.
” or “
” to adjust minute; Press “M”, “week” flash, press “
»» TIMER FUNCTION SETTING ( -T )
»» Timer on/off function: Turn on or Turn off the thermostat according to customers setting
»» Timer on: Press “M”, till to display “ON” and “hh” all flash, press “
press “
” or “
” or “
»» Timer off: Press “M”, till to display “OFF” and “hh” which all flash, press “
flash, press “
” to adjust hour. Press “M”, “mm” flash, ” to adjust minute.
” or “
” or “
” to adjust hour. Press “M”, “mm”
” to adjust minute.
»» Canceling timer on: Press “M”, till to display “ON” and “hh” which all flash, press “
Press “M”, “mm” flash, press “
” or “
»» Canceling timer off: Press “M”, till to display “OFF” and “hh” which all flash, press “
Press “M”, “mm” flash, press “
” or “
” or “
” to adjust hour to “--:--”. ” to adjust minute to “--:--”.
” or “
” to adjust hour to “--:--”. ” to adjust minute to “--:--”.
»» 7 DAYS PROGRAMMING (-T74)
»» Divide each day of one week (7 days) into four events, set the temperature respectively to satisfy different room temperature requirements in different time.
»» Power On: Press “ ” and “ ” at same time for 3 seconds till displaying “SET”, ”1” and “MON”, to set the 7days
4periods programs based on the following table. When “hh” of “hh:mm” is flashing, ”▲”or ”▼” button to set the hours of programming time; Press “ ”, “mm” of “hh:mm” is flashing, “▲” or ”▼” button to set the minutes of programming time; Press“ ”, the programmable temperature is flashing, “▲” or”▼” to set the programmable temperature. Press“ ”, repeat the above steps to set up the 2~4 periods of Monday.
Clima-Flex, S.A. de C.V.
Av. Central #285 Parque Industrial Logistico / Delegación la Pila / C.P. 78422 / San Luis Potosí, México
Tel. 52 (444) 161-50-43
Facebook/clima-flex
@climaflexMéxico
Week
Period. No. 1
Period. No. 2
Period. No. 3
Period. No. 4
Starting Time/
Temperature
Starting Time/
Temperature
Starting Time/
Temperature
Starting Time/
Temperature
Mon
7:00
25°C
8:00
25°C
18:00
25°C
21:00
25°C
Tue
7:00
25°C
8:00
25°C
18:00
25°C
21:00
25°C
Wed
7:00
25°C
8:00
25°C
18:00
25°C
21:00
25°C
Thu
7:00
25°C
8:00
25°C
18:00
25°C
21:00
25°C
Fri
7:00
25°C
8:00
25°C
18:00
25°C
21:00
25°C
Sat
7:00
25°C
8:00
25°C
18:00
25°C
21:00
25°C
Sun
7:00
25°C
8:00
25°C
18:00
25°C
21:00
25°C
Repeat the above steps to set for TUE, WED, THU, FRI, SAT, SUN.
Keypad Lock Function
»» Keypad Lock: its keypad would be automatically locked in 30 seconds in case that no one uses the thermostat, so as to
prohibit other persons from operating the thermostat.
»» Keypad Unlock: Press“
”for 5 seconds to unlock (In case that no one uses the thermostat, its keypad would be
automatically locked in 30 seconds).
Low Temperature Protection Function
»» Turn off: When the room temperature is lower than 5°C, the thermostat would automatically turn on the fan and valve with
“
” showing, When the room temperature reaches to 7°C, the thermostat will automatically close the output.
Low Temperature Protection Setting
»» Turn off: press” ” and hold for 3 seconds, it will display “OF” or “ON”, press “▲” or “▼”button to adjust the
parameter. “OF” indicates low temperature protection invalid, “ON” indicates low temperature protection function valid. The
default is “OF”.
Temperature Adjustment
In case that the user wants the displayed temperature on the thermostat higher or lower than the real temperature(±5°C), the
following operations could be taken:
»» Turn off: press “▲” and “▼” at the same time for 3 seconds, it will display “XX °C” (not displaying the working model),
press “▲”or “▼” to adjust the temperature value, it will be automatically confirmed after 6 seconds.
Alarm
»» If the sensor has failure, the thermostat will close the fan and valve, displaying “E1” or “E2”.
E1: Sensor in short circuit alarm
E2: Sensor in open circuit alarm
It displays “HI” when the temperature is higher than 55°C, displaying “LO” when the temperature is lower than 0°C.
Clima-Flex, S.A. de C.V.
Av. Central #285 Parque Industrial Logistico / Delegación la Pila / C.P. 78422 / San Luis Potosí, México
Tel. 52 (444) 161-50-43
Facebook/clima-flex
@climaflexMéxico
Wiring Diagrams
1. Open the main control
panel: put the screwdriver
(3.5mm) into the block
4mm along the bevel.
Prize up, open the clips.
2. Take off the wires.
3. As per wiring diagram,
connect it with terminals,
fixed by the screwdriver.
4. Put the connected
thermostat onto the back
panel in the wall, then fix it
with the two screws in the
packing box.
5. Put the cover with 30
degree angle, then fix the
up two clips;
6. Push the places of the
two down clips, fix the
cover, and finish the
installation.
Clima-Flex, S.A. de C.V.
Av. Central #285 Parque Industrial Logistico / Delegación la Pila / C.P. 78422 / San Luis Potosí, México
Tel. 52 (444) 161-50-43
Facebook/clima-flex
@climaflexMéxico