1
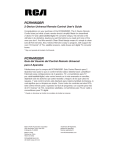
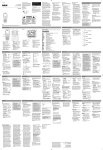
CHAMP™ E-PREP GEAR
E -P
REP GE AR
RCEP500FLR
Survival Lightstick
Owner’s Manual
What’s in this package?........................................................................... 1
Tour of the Survival Lightstick................................................................ 1
Before You Start: Charge Up the Survival Lightstick......................... 1
AM/FM/Weather Band Radios and NOAA Weather Alerts................. 1
Using AM/FM radio.................................................................................2
Using the weather band radio..............................................................2
Using the NOAA weather alerts...........................................................2
Flashlight....................................................................................................2
Lamp.............................................................................................................2
Distress Light/Siren..................................................................................2
Magnetic Base............................................................................................2
Solar Panel..................................................................................................2
Hand-Crank Charging..............................................................................2
USB Connection.........................................................................................3
To charge a phone from the Survival Lightstick............................3
Important Charging Notes.......................................................................3
Specifications.............................................................................................3
Limited 12 Month Warranty......................................................................3
Pour des instructions en français, se reporter à la page 4.
Para obtener instrucciones en español, consulte la página 9.
IMPORTANT SAFETY INSTRUCTIONS
PLEASE READ AND SAVE THIS FOR FUTURE REFERENCE
Some of the following information may not apply to your particular product; however, as with
any electronic product, precautions should be observed during handling and use.
• Read these instructions.
• Keep these instructions.
• Heed all warnings.
• Follow all instructions.
• Do not use this apparatus near water.
• Clean only with dry cloth.
• Do not install near any heat sources such as radiators, heat registers, stoves, or other
apparatus (including amplifiers) that produce heat.
• Only use attachments/accessories specified by the manufacturer.
• Refer all servicing to qualified service personnel. Servicing is required when the apparatus has been damaged in any way, such as powersupply cord or plug is damaged, liquid has been spilled or objects have fallen into the apparatus, the apparatus has been exposed to rain or
moisture, does not operate normally, or has been dropped.
ADDITIONAL SAFETY INFORMATION
• Apparatus shall not be exposed to dripping or splashing and no objects filled with liquids, such as vases, shall be placed on the apparatus.
• Do not attempt to disassemble the cabinet. This product does not contain customer serviceable components.
Precautions for the unit
• Do not use the unit immediately after transportation from a cold place to a warm place; condensation problems may result.
• Do not store the unit near fire, places with high temperature or in direct sunlight. Exposure to direct sunlight or extreme heat (such as inside a
parked car) may cause damage or malfunction.
• Clean the unit with a soft cloth or a damp chamois leather. Never use solvents.
• The unit must only be opened by qualified personnel.
Important battery information
Warning: Your product contains a battery and charging system which is designed to work in temperatures that do not exceed 50°C (122°F). Leaving
this product in a closed automobile or the trunk of an automobile where temperatures may exceed 50°C may result in permanent battery damage,
fire, or explosion. Please remove your product from the automobile when you exit, do not place your product in the trunk of your automobile, and do
not leave your product in any location where temperatures may exceed 50°C.
Ecology
Your product must be disposed of properly according to local laws and regulations. Because this product contains a battery, the product must be
disposed of separately from the household waste.
FCC Information
This device complies with Part 15 of the FCC Rules. Operation is subject to the following two conditions: (1) this device may not cause harmful
interference, and (2) this device must accept any interference received, including interference that may cause undesired operation.
Note: This equipment has been tested and found to comply with the limits for a Class B digital device, pursuant to Part 15 of FCC Rules. These
limits are designed to provide reasonable protection against harmful interference in a residential installation. This equipment generates, uses,
and can radiate radio frequency energy and, if not installed and used in accordance with the instructions, may cause harmful interference to radio
communications.
However, there is no guarantee that interference will not occur in a particular installation. If this equipment does cause harmful interference
to radio or television reception, which can be determined by turning the equipment off and on, the user is encouraged to try to correct the
interference by one or more of the following measures:
• Reorient or relocate the receiving antenna.
• Increase the separation between the equipment and receiver.
• Connect the equipment into an outlet on a circuit different from that to which the receiver is connected.
• Consult the dealer or an experienced radio/TV technician for help.
Changes or modifications not expressly approved by VOXX Accessories Corporation could void the user’s authority to operate the equipment.
Manufacturer/Responsible Party: 1-317-810-4880 (No technical/product support is available via this number. This
phone number is for regulatory matters only.)
For technical support, visit www.Champ-Eprep.com or call our consumer help line at 1-888-217-7900.
Industry Canada Regulatory Information
CAN ICES-3 (B)/NMB-3 (B)
Avis d’Industrie Canada
CAN ICES-3 (B)/NMB-3 (B)
Emergencies happen.
Be prepared. This Champ E-Prep 10-in-1 Survival Lightstick has multiple tools to help you in unforseen events.
What’s in this package?
Micro USB
• USB Type A to micro USB cable
• This user guide
• The Survival Lightstick
USB Type A
Tour of the Survival Lightstick
Distress Light
+ Siren
AM/FM and
Weather
Radio
Controls
Hand Crank
Charging
Reading
Lamp
Battery Indicator
Magnetic
Base
Flashlight
USB Charging
Power turns the radio on and off.
Menu switches between AM, FM, weather
radio, and alerts. Press and hold the Menu
button to access menu controls.
Reverse and Forward tune to different
radio stations or increase or decrease
the volume.
Lamp knob
SelfStanding
Base
Before You Start: Charge Up the Survival Lightstick
Before you use the Survival Lightstick for the first time, use the supplied USB to micro USB cable to charge its the battery
completely. Here’s how:
1. Find the USB Type A to micro USB cable included in this package.
Note: You can also use your own USB Type A to micro USB cable to charge the Survival Lightstick’s internal battery.
2. Plug the micro USB end of the cable into the micro USB port labeled “IN” on the side of the Lightstick.
3. Plug the other end of the USB cable into a USB power source (like a computer or a USB power adapter). The charging LED will
stay illuminated while the USB power source is connected. A full charge takes approximately 4 hours.
AM/FM/Weather Band Radios and NOAA Weather Alerts
The Survival Lightstick’s radio lets you listen to local weather band and NOAA weather alerts, as well as your local AM and FM
radio stations.
To turn the radio on/off: Press the Power key to turn the radio on/off.
To change between AM, FM, Weather Bands and Alert: Press the Menu key. The display screen will show which mode the radio
is in: FM, AM, WB (weather band), or AL (weather alert).
To increase or decrease radio volume: Press and hold the Menu key to access the volume control. Then press the Reverse key
to decrease or the Forward to increase the radio volume.
To reset the radio: Press and hold the Power key until the LCD screen goes blank. This resets all setting to their fatory defaults.
1
Using AM/FM radio
To tune to FM or AM radio frequencies: Press the Reverse or Forward key to go up or down through each radio frequency while
in FM or AM radio mode. Press and hold the Reverse or Forward to scan through frequencies until you find a station you desire.
Using the weather band radio
To tune to weather band radio frequencies: Press the Reverse or Forward key to go up or down through each radio frequency,
marked as different channels on the display screen.
CH1
162.400 CH5 162.500
CH2
162.425 CH6 162.525
CH3
162.450
CH7 162.550
CH4
162.475
Using the NOAA weather alerts
In weather alert mode, the Weather Radio waits on standby for a weather alert to be issued on the weather band you’ve chosen.
When it receives an alert, the Weather Radio’s siren and strobe will go off for 10 seconds, then switch to the weather band
station you’ve set so that you can hear details about the alert.
To use the NOAA weather alert: Put the radio in weather band mode (WB) and choose the weather band frequency you want to
monitor. Then press the Menu button once to enter alert mode. The weather band channel will flash on the display, which means
that the Weather Radio is monitoring that band for alerts.
To turn off the alert: Press Power to turn off the radio. If an alert is in progress, press any key in the radio section to stop it.
Note: Using the weather alert feature does drain the internal battery so you will need to be prepared to recharge internal battery
to be ready for emergency use again.
Flashlight
Press the flashlight button ( ) to turn the flashlight on and off. When the Survival Lightstick is fully charged, the flashlight
can work up to 9 hours consecutively. For every minute of hand-cranking at 120 RPM, the flashlight can work up to 6 minutes
consecutively.
Lamp
Turn the Lamp knob to adjust the brightness of the lamp.
Distress Light / Siren
Press and hold the distress button ( ) to turn the siren and light on. Press it again to turn both off.
Magnetic Base
The magnetic base sticks to the top or hood of your car in an emergency. Turn on the distress light and stick the magnetic base
to your car.
NOTE: Because the Survival Lightstick contains magnets, you should keep it away from items that are affected by magnetism.
Solar Panel
The solar panel charges the Survival Lightstick’s internal battery. Make sure this panel has the best exposure to direct sunlight
possible–its rate of charge is dependent on the amount of direct sunlight it receives.
Hand-Crank Charging
The hand crank charges the Survival Lightstick’s internal battery.
1. Open the hand crank.
2. Grip the Weather Radio with one hand the crank with the other.
3. Turn the handle rapidly (about 120 to 150 RPM).
IMPORTANT: Don’t force the hand crank. Make sure you turn from the handle only–don’t grab the entire crank. Never use
the hand crank when the Survival Lightstick is connected to a USB power source (like a computer or USB charger). This could
damage your power source.
2
USB Connection
On the side of the Survival Lightstick, there are two USB charging ports:
» a micro USB port for charging the Survival Lightstick’s internal battery (see “Before You Start: Charge Up the Survival
Lightstick” for info), and
» a regular-sized USB port for charging your mobile phone.
NOTE: Charging time will vary on your Sidekick’s Internal Battery if you are charging via USB power source or Hand Cranking.
NOTE: This USB port charges your mobile phone from the Lightstick’s internal battery only. The Survival Lightstick’s internal
battery must have a charge to be used as a power source to charge your mobile phone. You need to use your mobile phone cable
or the USB charging cable that came with the Survival Lightstick (if it has the same connections as included cable) to charge
your mobile phone.
IMPORTANT: The Survival Lightstick may not charge all models of mobile devices. Phone adapters are not included (you’ll have to
use the cable that came with the device).
To charge a phone from the Survival Lightstick:
1. Plug one end of your charging cable into the larger USB port on the side of the Survival Lightstick.
2. Plug the other end of your charging cable into the USB charging port on your device.
The Survival Lightstick’s mobile phone charging feature is intended to provide an emergency battery charge of your mobile
phone battery to 5% to 15% so you could make an emergency phone call. Percentage will vary due to your mobile phone and
Lightstick’s internal battery charge. If the Survival Lightstick’s internal battery runs out of charge, disconnect your mobile
phone USB cable from the Survival Lightstick and use the hand crank to give the internal battery enough charge to then return
to phone charging again. Note: The crank does not charge your mobile phone directly.
IMPORTANT CHARGING NOTES
• It’s important to keep your Survival Lightstick’s internal battery charged up for when you need it.
• Fully charge the Survival Lightstick’s internal battery every 3 months if you haven’t used it so you are ready to use it in case
of an emergency.
• The best way to charge the internal battery is by plugging the Weather Radio into a USB power source (like a computer).
However, if you find yourself without a charge during an emergency, you can use the hand crank to charge internal battery.
Precautions:
1. This product should not be used by children 8 years and under unless supervised by an adult.
2. Do not use or leave the Survival Lightstick in extreme cold or extreme heat or expose it to dusty or moist environments for
long periods.
3. Use a soft cloth dipped in a neutral detergent to clean this product if necessary. Do not use strong solvents to clean this
product.
4. Do not point the lamp or flashlight directly into anyone’s eyes.
Specifications
Built-in battery: 850mAh/3.7V Polymer-Li battery
LED: lifespan 10000hrs
Input power: DC 5.0V 500mA
Output power: DC 5.0V 500mA
For additional support, call our Consumer Help Line at 1-888-217-7900 or visit Champ-Eprep.com
Limited 12 Month Warranty
Voxx Accessories Corp. warrants that for 12 months from date of purchase, it will replace this product if found to be defective in
materials or workmanship. Return it to the address below for a replacement with a current equivalent. This replacement is the
company’s sole obligation under this warranty. ANY IMPLIED WARRANTY OF MERCHANTABILITY OR FITNESS FOR A PARTICULAR
USE IS DISCLAIMED. This warranty excludes defects or damage due to misuse, abuse, or neglect. Incidental or consequential
damages are disclaimed where permitted by law. This warranty does not cover product purchased, serviced or used outside the
United States or Canada.
U.S.A.: Audiovox Return Center, 150 Marcus Blvd., Hauppauge, New York 11788
CANADA: Audiovox Return Center, c/o Genco, 6685 Kennedy Road, Unit #3 Door 14, Mississauga Ontario L5T 3A5
3
©2014 Voxx Accessories Corp.
3502 Woodview Trace, Suite 220
Indianapolis, IN 46268
CHAMP-EPREP.COM
RCEP500FLR IB 00