1
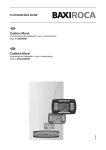
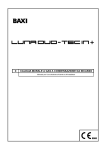
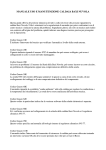
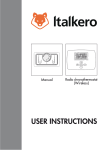
Installation Features and Remote Control Use
0
21
3
18
6
9
15
12
RC03
INDEX
16
USE & REMOTE CONTROL
PROGRAMMING
17
RC03 .................................................. 1
Remote Central Heating .................... 3
Display Information............................ 3
2
Functioning Mode.............................. 4
3
TIME/DATE Setting ........................... 5
4
Central Heating and/or Domestic Hot
Water enable ..................................... 6
5
Automatic, Manual, Off Functions ..... 7
6
Timed Functions................................ 9
7
Modification Set-Point Room
Temperature.................................... 12
8
Domestic Hot Water Temperature ... 13
9
Central Heating Circuit Temperature14
10 Enabling or Disabling Self-Learning 14
11 Enabling or Disabling....................... 15
Anti-Frost ................................................. 15
12 Enabling or Disabling Room
Temperature Sensor........................ 15
13 Reset with Reloading of Factory
Values 16
14 Central Heating Error Signals and
Block/Release from Remote............ 17
15 Room and Domestic Hot Water
Temperature.................................... 18
1
18
19
20
21
22
23
24
Room and Domestic Hot Water Setpoint Temperatures..........................19
Time Scheduling Profiles
Programming ...................................21
Time Scheduling Profiles .................24
Central Heating Circuit Information
Menu 25
Domestic Hot Water Circuit
Information Menu .............................26
Advanced Menu Information ............28
Regulation Algorithm Parameters
Menu 28
Warnings..........................................31
Remote Installation ..........................31
1
7 Load Timer Function (if it is in manual
mode) or Holiday (if it is in automatic
mode)
Remote Central
Heating
8 Enter into Programming Mode
(PROGR) or Information (INFO)
1
11
2
10
3
9
4
9 Only Domestic Hot Water Enabling –
Domestic Hot Water/Central Heating –
None
10 Domestic Hot Water Set-Point
Temperature Decrease
11 Domestic Hot Water Set-Point
Temperature Increase
8
7
6
5
Display Information
1 Functions Display
12 13 14 15 16 17
18 19
20 21
2 Room Set-Point Temperature
Increase
0
3 Room Set-Point Temperature
Decrease
4 Room Temperature Display /
Confirm Settings
5 Change Functions into Automatic or
Manual or Off (Stand-by)
6 Load Set Comfort (sun) or Economy
(moon)
28
27
21
3
15
9
18
6
12
26 25 24 23 22
12 Central Heating in OFF
13 Domestic Hot Water Function Enabled
(SHOWER mode in progress if blinking)
14 Domestic Hot Water Request
15 Central Heating Request
16 Central Heating Function Enabled
(ANTI-FROST in progress if blinking)
17 Data of CENTRAL HEATING
18 Communication REMOTE –
CENTRAL HEATING activated
19 Error or Service Request
20 COMFORT temperature in progress
(SUN)
21 ECONOMY temperature in progress
(MOON)
22 Boiler Flame Status – Central Heating
power modulation
23 OFF TIMED Function or HOLIDAY
MODE active
2
Functioning Mode
The Remote has three main operation
modes:
- Normal Operation (RUN)
- User Programming Mode (PROGR)
- Advanced Information Mode (INFO)
The first mode serves an ordinary use, it
executes pre-set functions and user requests.
By using the second mode, you can set time
and day of the week, then temperature
settings and time programs.
By using the third mode, you can set or
display the regulation parameters or the ones
related to the connected CENTRAL
HEATING.
The transition between Operating Modes
is performed as follows:
- User Programming Mode (PROGR)
24 TIMED function active
25 MANUAL/FORCED function active
26 AUTOMATIC/FORCED function active
27 Room Temperature decreasing
28 Room Temperature increasing
0
21
3
6
18
9
15
12
To shift from RUN to PROGR, briefly push
the
button,
text will scroll for few
seconds
To shift from RUN to INFO, push the
text
button for at least 3 seconds,
will scroll for few seconds
To return from PROGR to RUN, briefly
push the button,
text will scroll for
few seconds
To return from INFO a RUN, briefly push the
button,
text will scroll for few seconds
0
21
0
21
3
18
6
9
15
0
3
18
21
6
9
15
12
0
6
3
18
9
15
12
21
3
18
12
6
9
15
12
- Advanced Information Mode (INFO)
3
0
21
TIME/DATE Setting
3
6
18
9
15
12
Push
mode.
button to enter into programming
or
buttons, it is
By using
possible to change the blinking value
(Hours).
Push
or
buttons to select next
value (Minutes).
By using
or
buttons, it is possible
to set the blinking desired value (Day of
Week).
Push button to exit and return to run mode.
4
By using
or
buttons, it is
possible to change the blinking set value
(Minutes).
Push
or
buttons to select next
value (Day of Week).
Central Heating and/or
Domestic Hot Water enable
It is possible to enable or disable the Only
Domestic Hot Water and/or Central Heating
functions, by pushing
eventually
several times.
Only Domestic
(SUMMER)
Push
.
Hot
Water
enabled
0
21
6
Push
.
6
9
15
9
12
12
Central Heating/Domestic Hot Water
enabled (WINTER)
3
18
6
15
12
21
3
18
9
15
0
0
3
21
18
Special programs or enabled functions are
indicated by the presence of the following
icons:
-
Domestic Hot Water and Central
Heating Functions enabled.
Blinking Anti-frost Mode active.
Only Domestic Hot Water enabled.
Blinking Shower Mode active.
0
21
3
6
18
9
15
12
Central Heating and/or Domestic Hot
Water Functions disabled (STAND-BY)
Push
5
Automatic, Manual, Off
Functions
There are three main operating programs with
relating
sub-programs
of
the
chronothermostat: Automatic, Manual, Off:
.
- Automatic, room temperature has a
changing course which depends on the
time scheduling profiles and set points
(regulation thermal profile).
- Manual, room temperature is regulated at a
fixed user programmed set-point.
- Off, the central heating system is in
stand-by (eventually it activates, if the
temperature goes below the Anti-Frost
Mode when enabled).
Timed sub-programs:
- Automatic Forced, a timed temperature
is fixed until the next set point and it
works separately from the regulation
profile in use.
- Timed Manual, the system proceeds in
manual
function
mode
(userprogrammed
set-point)
for
a
programmable period of time and then
the temperature controller shifts to
Automatic Function mode.
- Timed Off or Holiday Mode, the system
keeps OFF mode for a programmable
period of time and then the temperature
controller shifts to Automatic Function
mode. The function in progress is
shown by the presence of the following
blinking icons (Timed functions) or
(Holiday).
0
0
21
21
3
18
6
9
15
3
18
6
9
15
12
12
0
21
3
18
6
9
15
12
Temperature Controller in Manual Mode
Push
.
0
0
3
21
18
21
6
9
15
12
3
6
18
9
15
12
Temperature Controller in Automatic
Mode
Temperature Controller in Off Mode
Push
.
Push
.
this sequence the Remote Control will
proceed to activate the AUTOMATIC
program.
0
21
0
21
3
18
6
9
15
12
3
18
6
9
15
12
Special programs or enabled functions are
indicated by the presence of the following
icons:
- Automatic Function
- + Automatic Forced Function
- Manual Function
- + Timed Manual Function
- Off
- + Timed Off
- + + Holiday Function
During the whole process, the remaining time
at the timed function ending will be shown on
the LCD. This period can vary between 10 –
90 minutes (MM: nn), it can be increased or
decreased of 10 minute steps, or it can be in
hours from 2 to 47 (HH: nn), with 1 hour
steps, or in days from 2 to 45 (GG: nn), with 1
day steps. In this case the timed function is
the HOLIDAY PROGRAM.
0
21
6
Timed Functions
0
21
3
6
18
9
15
3
18
9
15
12
12
From Automatic to Timed Off
By pushing
button, it is possible to
activate TIMED OFF or HOLIDAY
PROGRAM from the AUTOMATIC
function. In this case, the starting of that
function will be shown below through the
scrolling line
and time in minutes for
the function OFF, which can be pre-set
through the
and
buttons. After
0
21
3
18
9
15
12
From AUTOMATIC, push
button to
activate TIMED OFF function.
,
pushing
and
buttons,
after
.
0
21
3
6
18
0
9
15
0
21
12
21
3
18
Using
and
buttons, set time
period of TIMED OFF function.
6
9
15
3
18
6
9
15
12
12
0
0
21
3
21
3
6
18
18
6
9
15
12
9
15
12
It is possible to stop timed functions by
pushing
when desired.
From MANUAL, push
TIMED MANUAL function.
to activate the
From Manual to Timed Manual
From the MANUAL function you can
access the TIMED MANUAL function by
button.
pushing
0
21
3
6
18
9
15
12
It is also possible to stop the timed
functions linked to the setting of the room
temperature by selecting
to choose
the desired function.
During timed functions it is possible to
change the temporary setting through
During Timed Functions to change room
set-point temperature for timed period,
push
.
From Automatic to Forced Automatic
0
21
3
18
6
9
15
12
Use
and
or decrease
temperature.
the
buttons to increase
room set-point
From the AUTOMATIC function you can
access the FORCED AUTOMATIC function
by pushing
, so you can set the function for
example from a
temperature to an
temperature.
0
0
21
3
18
21
6
21
6
Push
to confirm the change.
Use
and
buttons for setting
the time period of TIMED MANUAL
function.
6
9
15
12
12
3
18
9
15
9
15
0
3
18
12
button, you can change for
to
.
By pushing the
example from
0
21
3
15
9
0
6
18
21
3
18
6
12
9
15
12
Another example
0
21
3
6
18
9
15
12
It is possible to change ROOM
TEMPERATURE by selecting
and
buttons, in order to have the
desired set-point value.
0
21
3
0
21
18
3
6
18
6
9
15
12
9
15
12
Push
to confirm and exit.
0
21
3
0
21
3
18
18
6
6
9
15
12
9
15
12
These
functions
and
ROOM
TEMPERATURE are kept until the next
programmed
SET-POINT
in
the
AUTOMATIC function. When it reaches
that set-point, the function will turn to
AUTOMATIC with the programmed
temperature setting.
By
using
,
the
FORCED
AUTOMATIC function can be interrupted
at any time.
7
Modification Set-Point
Room Temperature
From the manual mode it is possible to
change the ROOM SETTING in each
instance.
(increase) and
(decrease)
Push
buttons to change room set-point temperature
(ROOM SETTING).
Push
to confirm and exit.
Push
to load the COMFORT and
ECONOMY settings.
It is possible to change ROOM SETTING
in each instance, simply by selecting
and
buttons. The increase or
the decrease will be 1/10 degree and it
will be displayed for few seconds by
blinking text below
.
By keeping one of the two buttons
pushed, a faster variation can be
obtained in continuous acceleration.
Push
to confirm and exit.
Select
to load directly either the
COMFORT or the ECONOMY setting, by
pushing the same button more times.
0
21
3
6
18
9
15
12
0
21
0
3
21
3
15
9
0
18
6
9
15
18
21
6
12
3
18
6
12
9
15
12
8
Domestic Hot Water
Temperature
0
21
3
18
6
9
15
12
If you enable the domestic hot water
function icon
, Domestic Hot Water
temperature (DOMESTIC HOT WATER
SETTING) can be modified in each
instance by pushing the
and
buttons, in that case “
” (Hot
Water Set) message will flash for a few
seconds on the LCD.
The value of the setting can be adjusted
within a preset range depending on the
higher and lower limits allowed by the
central heating system.
Push
and
buttons to modify
DOMESTIC HOT WATER SET-POINT.
to confirm and exit.
Push
Domestic Hot Water Temperature in
progress on Shower Mode (second
domestic hot water temperature)
where it is enabled.
If you enable the domestic hot water icon
, Domestic Hot Water Temperature
Shower (Comfort Domestic Hot Water
Setting) can be started in each instance
by pushing the
or
buttons
and then push . In that case, “
”
message will flash for few seconds at the
bottom and icon
will flash at the top.
This is a timed function and it lasts 1
hour, it is shown by the presence of the
blinking icon
for all its duration time.
To reset the ordinary domestic hot water
or
temperature, push
stops
buttons and then push . Icon
to flash. Domestic hot water setting for
that function can be set within the
PROGR mode.
9
Central Heating Circuit
Temperature
If the Heating function
is enabled,
Heating circuit water temperature
(MAXIMUM SETPOINT RISC=CH SET
LIMIT) automatically calculated can be
limited in superior temperatures, in order
to prevent excessively high temperatures
within the system.
Keep pressed for at least 3 seconds to
go into INFO mode and enter into
menu.
0
21
3
18
6
9
15
12
By pushing
(increase) and
(decrease), you can modify the superior limit
for temperature within the Heating Circuit
(MAXIMUM SETPOINT
RISC=CH
SET
LIMIT), which value is associated with the
connected Heating system type .
Push
10
to exit and return to RUN MODE.
Enabling or Disabling SelfLearning
It is possible to enable/disable the SELFLEARNING function by entering into
INFO mode. Keep
pressed for at least
3 seconds to enter into INFO mode.
Keep pressed for at least 3 seconds to
enter into INFO mode.
Push
several times to enter into the
menu.
0
21
3
18
6
9
15
12
Push
several times to enter into the
menu.
Push
and
buttons to enable 1
or disable 0 the function.
Push to exit and return to RUN MODE.
12
Push
and
buttons to enable 1
or disable 0 the function.
Push to exit and return to RUN MODE.
11
Enabling or Disabling
Anti-Frost
It is possible to enable or disable the
ANTI-FROST protection function by
entering into INFO mode.
Enabling or Disabling
Room Temperature Sensor
It is possible to enable or disable the
section
of
the
TEMPERATURE
CONTROLLER of the REMOTE (room
temperature sensor) by entering into
INFO mode.
Keep pressed for at least 3 seconds to
enter into INFO mode.
LCD.
0
21
3
18
6
0
9
15
21
3
12
6
18
9
15
Push
several times to enter into the
menu.
12
Keep both buttons pushed for 6 seconds until
the COMPLETE system RESET (display
switch-off).
0
21
3
18
6
9
15
12
Push
and
buttons to enable 1
or disable 0 the function.
Push to exit and return to RUN MODE.
13
Reset with Reloading of
Factory Values
It is possible to return to the original factory
settings (temperature levels, time and
settings, etc…) firstly by pushing and holding
button, then immediately (within 2 seconds)
push also
button, until “
” appears on
To delete the settings, simply release
the buttons.
ATTENTION: After the operation all
individual settings will be lost and a new
operation mode will be set again, in case
other different settings are required
instead of factory values.
14
Central Heating Error
Signals and Block/Release
from Remote
If error persists, call technical assistance.
There are two main errors displayed by
the Remote.
If LOCK occurs, blinking icons
and
message, which
appear with the
alternate to
message every 2 seconds.
This means it is possible to lock-out the
system by pushing
button.
If ERRORS occur, blinking icons
and
appear with the
message.
LOCK - LOCK OUT
In the centre of the screen, a code related
to the error in progress is shown, followed
by letter E.
ERROR
When error ends, the system will automatically
reset the ordinary functioning.
Central Heating error may be occurred by
many different factors (for ex., low pressure or
lack of water in the heating circuit) – se e
b o o klet e qu ip pe d wit h t h e ce n t ral
h e a t in g.
In the centre of the screen, a code related to
the lock in progress is shown, followed by
letter E.
Push
button to release the central
heating.
Push button to enter into PROGRAMMING
mode.
0
21
3
18
6
9
15
12
0
21
3
6
18
Push
button to see the COMFORT
temperature set-point.
9
15
12
After pushing
button, the remote
sends the order to LOCK-OUT indicated
which
by the blinking button
alternates to the blinking message
every 2 seconds, until the central heating
turns automatically working ordinarily.
15
Room and Domestic Hot
Water Temperature
Once entered into the programming
menu, it is possible to
see the
COMFORT, ECONOMY (Reduced),
) and SHOWER
OFF (Anti-Frost
(Comfort
Domestic
Hot
Water)
programming menu by pushing
button repeatedly.
0
21
3
18
6
9
15
12
Push
button to see the ECONOMY
temperature set-point.
0
21
3
18
6
9
15
12
Push
button to see the
temperature set-point (Anti-frost
or Off Set.
OFF
)
16
Room and Domestic Hot
Water Set-point
Temperatures
The COMFORT Room temperature can
be set between 10°C and 35°C in
increments of 0,1°C. This is possible also
for the ECONOMY Room temperature.
Push
button to see the SHOWER
temperature set-point (Comfort Domestic
Hot Water setting) according to the
temperature set in the domestic hot
water.
The OFF temperature (Anti-Frost) can vary
between 0° C and 10° C by steps of
0,1° C each.
0
21
3
18
6
9
15
12
Push button to enter into PROGRAMMING
mode.
Push
button to exit and return to RUN
MODE.
0
21
3
18
6
To modify temperature settings, push
either
or
buttons.
button to save the new
Push
ECONOMY set-point value or to see the
OFF set-point value (Anti-Frost
)
or OFF Set.
9
15
12
Push
button to see the COMFORT
temperature set-point.
To modify temperature settings, push either
or
buttons.
Push
button to save the new
COMFORT set-point value or see the
ECONOMY set-point value.
0
21
3
18
6
To modify temperature settings, push either
or
buttons
Push
button to save the new OFF setpoint value or to see the SHOWER set-point
value (Comfort Domestic Hot Water Setting).
9
15
12
0
21
3
18
6
9
15
12
17
Time Scheduling Profiles
Programming
DAY/DAYS GROUP SELECTION
Once entered into programming mode by first
pressing and then
, it is possible to see
the DAY/DAYS GROUP selection menu.
From here can be displayed the associated
time programming menu which is related to
the Automatic functioning.
To modify temperature settings, push
either
or
buttons
Push
to save the changed
SHOWER set-point value.
By pressing
and
buttons, it is
possible to select a single day (from
Monday to Sunday) or a group of days,
to which the associated PROFILE or
TIME PROGRAM can be assigned as
defined below:
a) Single Day: MONDY (LU), TUEDY (MA),
WEDDY (ME), THUDY (GI), FRIDY (VE),
SATDY (SA), SUNDY (DO)
b) Group: MO-- F R (from Monday to Friday)
c) Group: SA-- S U (Saturday and Sunday)
d) Group: MO-- SA(from Monday to Saturday)
e) Group: MO-- S U (every day)
Push button to exit and return to RUN
MODE.
Push
button to select a single day or
group and by keeping it pressed you will
enter the menu relating to time settings,
about ON/OFF time definition.
Push button to enter into PROGRAMMING
mode.
0
21
3
6
18
9
15
12
0
21
Push
3
18
to enter into the first range of time.
6
SET ON/OFF TIME DEFINITION
9
15
12
Push
to enter into the DAY/DAYS
selection menu.
0
3
21
18
6
9
15
12
0
21
3
18
6
9
15
12
Push
and
buttons to select a
single day or days group.
Within a 24 hour period, it is possible to
define a maximum of 4 COMFORT ranges
(see Section 18) each setting is defined by an
ON/OFF period (ON, OFF).
If you use for example only 3 ranges in a
single day, you can set the ON, OFF times for
the fourth range at 24:00, so its management
will not be included.
At any moment you can exit from the
programming menu by pressing
button.
Once entered into the time range
programming menu, you can proceed by
using
and
buttons to define the
time of the first switching on
.
By pressing
button you can save that
time range and proceed to the first switching
off time setting
.
By
and
buttons you can
modify that time and by pressing
you can save it, then proceed to the time
of the second switching on. You can
repeat these steps until the last time of
the fourth switching off OFF4. Push
button to enter into the first range of time.
0
21
3
18
0
21
6
0
3
21
9
15
3
12
18
6
18
9
15
6
9
15
12
12
Push
and
buttons to modify
the first switching-on range of time.
0
21
3
18
Push
and
buttons to change
the second switching-on range of time.
button to save that time and
Push
select the second switching-off range of
time.
6
9
15
12
0
Push
to save that time and select
the first switching-off range of time.
Push
and
buttons to modify
the first switching-off range of time.
0
21
3
18
6
9
15
12
Push
button to save that time and select
the second switching-on range of time.
21
3
18
6
9
15
12
Push
and
buttons to change
the second switching-off range of time.
Push
to save that time and select
other ranges of time.
Push to exit and return to RUN MODE.
18
Time Scheduling Profiles
ON 2
20.0°C
TIME SCHEDULING represents the
course of the desired room temperature
within a 24hr period.
In this case, the display will show time
intervals in succession while temperature
is kept on a constant level.
Time scheduling allows a maximum of 4
COMFORT intervals within a 24hr period,
each one of them is shown by a
SWITCHING-ON (ON) and OFF (OFF)
time, higher than the previous one.
Example of time Scheduling in 3 Comfort
intervals (Standard Program Mon-Fri)
ON 4
OFF 4
TEMPERATURE
ON 1
OFF 2
OFF 1
ON 3
OFF 3
15.0°C
TEMPO
0:00
6:00
8:00
11:00 13:00
17:00
23:00 24:00
COMFORT: 6:00 --- 8:00, 11:00–13:00,
17:00–23:00
ECONOMY: 0:00 --- 6:00, 8:00–11:00;
13:00–17:00; 23:00 --- 24:00
Temp.
COMFORT
20.0°C
from 06:00 to 08:00,
from 11:00 to 13:00,
from 17:00 to 23:00
Example of time Scheduling in 1
Comfort interval (Standard Program
Sat-Sun):
Temp.
ECONOMY
15.0°C
from 00:00 to 06:00,
from 08:00 to 11:00,
from 13:00 to 17:00
from 23:00 to 24:00
Temp.
20.0°C from 06:00 to 23:00
COMFORT
Temp.
15.0°C from 00:00 to 06:00,
ECONOMY
from 23:00 to 24:00
ON 2...4
OFF 2...4
TEMPERATURE
20.0°C
ON 1
OFF 1
the value linked
parameter (layout).
to
the
displayed
If the parameter is not administered by
the central heating connected to the
Remote, some dashes will appear in
place of the value
.
15.0°C
Push
button and keep it pushed for at
least 3 seconds to enter into INFO mode.
TEMPO
0:00
6:00
23:00 24:00
COMFORT: 6:00 --- 23:00
ECONOMY: 0:00 --- 6:00, 23:00 --- 24:00
0
21
3
18
19
Central Heating Circuit
Information Menu
To enter into INFORMATION mode press
button for at least 3 seconds.
message will be shown on the LCD and
you are then in INFO mode, to exit briefly
press the same button .
To shift from one menu to another, just
press
. As the large flashing figures
appear on the LCD, by pressing
and
UP buttons it is possible to modify
6
9
15
12
Push
and
buttons to set the
maximum temperature to the heating
circuit (Max CH Water Set-Point)
Push
button to shift from one menu
to
another
(Boiler
Flow
Water
Temperature).
Push
button to pass from one menu
to another (Return Water Temperature).
Push button to exit and return to RUN
MODE.
Push
button to pass from one menu
to another (CH Set-Point Temperature).
Push
button to pass from one menu
to
another
(maximum
heating
temperature).
Push
button to pass from one menu
to
another
(minimum
heating
temperature).
20
Domestic Hot Water Circuit
Information Menu
- Real domestic hot water temperature in
message.
outlet:
- Temperature setting for hot water supply
(domestic hot water circuit set point),
message. Push
and
to
regulate the temperature.
Push button and keep it pushed for more
than 3 seconds to enter into INFO mode.
- Maximum temperature for hot water
supply (maximum domestic hot water
circuit set point),
message.
- Minimum temperature (minimum
domestic hot water circuit set point),
message.
Push
button to shift from one
menu to another.
0
21
3
18
Push
button to shift from one
menu to another.
6
9
15
12
Push
button to enter into
menu.
Push
another.
button to shift from one menu to
Push
button to exit and return to
RUN MODE.
21
Advanced Menu Information
- Level power/modulation of flame (0…100%),
PWR% message.
- Heating circuit water pressure (0,0…5,0bar),
P BAR message.
- Domestic
hot
water
flow
in
outlet
(0,0…16,0litri/min), F L/M message.
- Outside temperature
(-40…99°C), EXT°C message.
Push
button to shift from one
menu to another.
Push button and keep it pushed for more than
3 seconds to enter into INFO mode.
Push
button to shift from one
menu to another.
0
21
3
18
6
9
15
12
Push
button (several times) to enter
into PWR% menu.
Push
button to exit and return to
RUN MODE.
22
Push
another.
button to shift from one menu to
Regulation Algorithm
Parameters Menu
- External Sensor regulation constant
(eventually self-learning algorithm)
(0,5..6,5), K_REG message. By pushing
and
buttons you can set a value
and vary it according to the data processed
by the algorithm. A high value makes the
temperature rise within the heating circuit
(depending on the external temperature).
- Parameter building size for regulation
(1..10), BUILD message.
and
buttons allow the value setting. A high value
is associated with a building/heating system
with a high inertia in the temperature (i.e.:
large rooms with slow systems), otherwise a
low value is associated to small rooms or
systems with low inertia in the temperature
(convector heaters).
- Functioning (self-learning function), YSELF
message. By pushing
and
buttons you can set a value. “0” indicates
non-functioning, whereas “1” indicates
functioning.
- Functioning room temperature sensor,
and
AMBON message. By pushing
buttons you can set a value. “0”
indicates non-functioning, whereas “1”
indicates functioning. If the room
temperature sensor is disabled, the
regulation is possible using the central
heating set point directly.
- Functioning variable central heating
temperature according to the presence of
the external sensor, MODUL message. By
pushing
and
buttons you can
set a value. “0” indicates nonfunctioning, whereas “1” indicates
functioning.
- Functioning
Anti-Frost
function,
NOFR* message. By pushing
buttons you can set a
and
value. “0” indicates non-functioning,
whereas “1” indicates functioning.
Push button and keep it pushed for
3 seconds to enter into INFO mode.
0
21
3
18
6
9
15
12
Push
menu.
button to enter into K REG
Push
and
buttons to modify
value.
Push
button to shift from one menu
to another.
Push
value.
Push
another.
Push
Push
another.
and
button
buttons to modify
buttons to modify value.
to shift from one menu to
Push
value.
Push
another.
Push
Push
another.
and
button to shift from one menu to
and
buttons to modify value.
button to shift from one menu to
and
buttons to modify
button to shift from one menu to
Push
button to exit and return to
RUN MODE.
23
Warnings
Electrical installation must be
complied with technical regulations; in
particular:
- electrical conductors for the Remote
control connection to the heating
system must run through different
ductable units from the ones at a
voltage tension of 230V, because
powered by a low security voltage.
On no account, the manufacturer will
be responsible if all instructions and
precautions described in this booklet
are not observed.
24
Remote Installation
For a proper functioning, it is important that
the Remote control is installed far away
from places near air currents or heat, to
avoid that the temperature controller
registers temperature levels which are
different from the real room temperature.
Height from the floor should be
approximately of 1,5 meters.
fig.1
It can be fixed straight to the wall or
predisposed for mounting in flushmounted box with three outputs.
If it is fixed to the wall, this has to be
flat, without strains or tensions that
may cause troubles to its proper
functioning as time goes by.
fig.2
Electrical conductors for the Remote control
connection to the heating system must run
through different ductable units from the
ones at a voltage tension of 230V, because
powered by a low security voltage and their
length must be inferior to 50 meters.
1 Put a small straight blade screwdriver
into the slot as indicated in figure1 and
lever to release the remote control from its
base.
2 Fix the base to the wall or on the flushmounted box (figure 2)
-------------------------------------------------------------