1
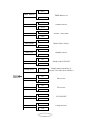
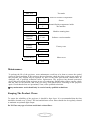
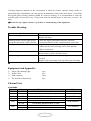
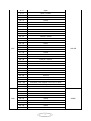
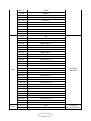
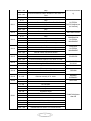
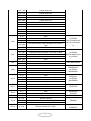
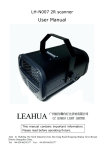
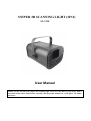
SNIPER 2R SCANNING LIGHT (3IN1)
SL-3130
User Manual
Thank you for choosing our sniper 2R scanning light (3in1). For the sake of your safety, Please
read and follow these instructions carefully and keep this manual in a safe place for future
reference.
Catalogue
Chapter
Page
Safe Usage Of The Product ------------------------------------------------------------------------------------------3
Install The Equipment -------------------------------------------------------------------------------------------------4
Fitting The Lamp--------------------------------------------------------------------------------------------------------4
Power Code Connection ----------------------------------------------------------------------------------------------4
DMX Connection ---------------------------------------------------------------------------------------------------- --5
DMX Terminator ----------------------------------------------------------------------------------------------------- --5
Function Set ----------------------------------------------------------------------------------------------------------- -- 6
Lamps starting address code calculation methods-------------------------------------------------------------6
Operation Menu ---------------------------------------------------------------------------------------------------------6
Maintenance --------------------------------------------------------------------------------------------------------- ----8
Keeping The Product Clean ---------------------------------------------------------------------------------------- -8
Trouble Shooting---------------------------------------------------------------------------------------------- ----------9
Equipment and Appendix------------------------------------------------------------------------------------------- --9
Channel List---------------------------------------------------------------------------------------------------------- ----9
Technical Parameters--------------------------------------------------------------------------------------------------16
☆Important
notice:
· In this instruction for use contains about the installment and the use aspect important information of the 2R sniper. When
installing and using, you need to look this usage instruction strictly.
· Before open the 2R sniper and if you want to do the repair work, please make sure the power source is at the separation
condition.
· Every unit is tested completely and packed properly by the manufacturer. Please make sure the packing and the unit are
in good condition before installation and use. Should there be any damage caused by transportation, consult your dealer
and do not use the unit. Any damage caused by improper use will not be assumed by the manufacturer or dealer.
Attention:
Unceasingly carries on the product improvement about our company the policy, in this instruction booklet
carries the data will have the possibility to be able to change in the future, when no longer separate notice change matters
concerned. Our company retains when the product improvement changes the related specification the authority. This
instruction booklet publisher cannot be responsible regarding this instruction booklet in information accuracy, also cannot
the related consequence which causes regarding these information be responsible.
2
SAFE USAGE OF THE PRODUCT
When unpacking and before disposing of the carton, check there is no transportation damage before
using the product. Should there be any damage caused by transportation, consult your dealer and do
not use the apparatus.
The product is for indoor use only, IP20. Use only in dry locations. Keep this device away from rain
and moisture, excessive heat, humidity and dust. Do not allow contact with water or any other
liquids.
The product is not designed or intended to be mounted directly on to inflammable surfaces
The product is only intended for installation, operation and maintenance by professional person.
The product must be installed in a location with adequate ventilation, at least 50cm from adjacent
wall surfaces. Be sure that no ventilation slots are blocked.
Do not product the beam onto inflammable surfaces, minimum distance is 12m.
Avoid direct exposure to the light from the lamp. The light is harmful to the eye.
Do not attempt to dismantle or modify the projector in any way.
Electrical connection must only be carried out by qualified personnel.
Before installation, ensure that the voltage and frequency of power supply match the power
requirements of the projector.
It is essential that each projector is correctly earthed and that electrical installation conforms to all
relevant standards.
Do not connect this device to any other types of dimmer apparatus.
Make sure that the power-cord is never crimped or damaged by sharp edges. Never let the
power-cord come into contact with other cables. Only handle the power-cord by the plug. Never pull
out the plug by tugging the power-cord.
Keep the light clean. Do not touch the light glasss with bare hands.
The product should always be installed with a secondary safety fixing. On the projector base brink,
there is a hole for the safety cord provided. It should be attached as shown in “installing the projector”
section.
The lamp used in this projector is a discharge lamp. After switching off don,t attempt to restart the
projector until lamp has cooled, this will require approx 15 minutes. Switching the lamp on and off at
short intervals will reduce the life of both the lamp and the projector. But occasional breaks will
prolong the life of the lamp and projector.
Never run the projector without a lamp.
The light shall be changed if it has become damaged or thermally deformed or reached its life limit.
Shields and lens shall be changed if they have become visibly damaged to such an extent than their
effectiveness is impaired, for example by cracks or deep scratches.
Exterior surface temperatures of the luminaire after 5 minutes operation is 70°
。
,
when steady state is achieved 140°
。
There is no user serviceable parts inside the projector, do not open the housing and never operate the product
with the covers removed.
If you have any questions, don’t hesitate to consult your dealer or manufacturer.
★Always disconnect from the mains, when the device is not in use or before cleaning it or
before attempting any maintenance work !
3
Install The Equipment:
Use 1pcs clamp and 1safety cord(need to purchase).Use clamp fix with light hook which in the
packing box with light, then use screw install to the bottom of lamp. Hang the fixture on the structure
and fasten the screws attached to each clamp. Make sure the light is installed reliable, and confirm
the light which you fixed is strong enough for hanging the light. Base on safety reason, please
according to the above picture using safety wire cross the light to make it strong enough again.
Warning!
1.Hook and clamp only use for hanging the light. Do not use clamp as a tool to move fixtures.
2.Base on safety reason, please use the safety cord which can afford the weight ten times of lamp
through Insurance hole for auxiliary hanging.
Fitting The Lamp:
.First removed the iron in the back of the light before fitting/replacing the lamp.
.Good quality bulbs are recommended
.Not charged to install or remove the light bulb.
.Do not touch the light glasss with bare hands
.Fit new lamp and close the back cover by fastening 4 fast-fit screws when finished lamp installation.
.Lamp work will reach a very high temperature, Vapor discharge lamp can not continue to supply this
physical characteristics, therefore, the power completely cool for 10 minutes before on the operation.
Failure to do so will lead to a high-pressure discharge and short circuit burned out the computer's
control panel components.
Notes: Unplug the light from power before lamp installation or replacement and wait for it to cool.
Power Code Connection:
Connect the power cord as follows:
L (live) =brown
E (earth) =yellow/green
N (neutral) =blue
Use the plug provided to connect the mains power to the projector paying attention to the voltage and
frequency marked on the panel of the projector. It is recommended that each projector be supplied
separately so that they may be individually switched on and off.
★It is essential that each projector is correctly earthed and the electrical installation conforms
to all relevant standards.
4
DMX Connection:
Connection between the controller and a projector and between one projector and another must be
made with a 2 core-screened cable, with each core having at least a 0.5mm diameter. Connection to
and from the projector is via cannon 3 pin (which are included with the projector) XLR plugs and
sockets. The XLR's are connected as shown in the figure above.
Note: Care should be taken to ensure that none of the pins touch the metallic body of the plug or each
other. The body of the plug is not connected in any way. The XLED 590 accepts digital control
signals in protocol DMX512 (1990).
Connect the controller’s output to the first fixture’s input, and connect the first fixture’s output to the
second fixture’s input and connect the rest fixtures in the same way. Eventually connect the last
fixture’s output to a DMX terminator as shown in the figure below.
DMX Terminator:
In the Controller mode, at the last fixture in the chain, the DMX output has to be connected with a
DMX terminator. This prevents electrical noise from disturbing and corrupting the DMX control
signals.
The DMX terminator is simply an XLR connector with a 120Ω (ohm) resistor connected across pins
2 and 3, which is then plugged into the output socket on the last projector in the chain. The
connections are illustrated below.
5
Function Set:
LCD Display
MENU DOWN UP
ENTER
Use button switch and LCD display, can set the address code and function code easily.
Check or modify lighting function settings, Press the MENU or ENTER button. LCD display panel will
display main menus. Function operation menu all have corresponding submenu . Each menu all represent
the specific functions of lamps, specific see below "operation menu" section.
Set or browse function setting of lamp, Press UP or DOWN key.
Press ENTER key to save your changes or to ENTER submenu, Press UP or DOWN can change value(Plus
or reduce number).
Lamps starting address code calculation methods:
The current code is equal to the starting address of lamps (lamps on a starting address code) +
(number of channels lamps) Description:
1: The first fixture in the starting address of the code is A001.
2: The number of basic channel controller, should be greater than, or the total number of channels
used lamps equal.
3: Note: When using any of the controllers, each with its own lighting should be the starting address
of the code, if the first fixture in the starting address of the code is set to A001, lighting channel
number 16CH; then the first two fixture in the starting address of the code is set to A017; the third
fixture in the starting address of the code is set to A033; and so on, (this is set up according to the
different needs of the console to be)
NOTE: Turn the lamp, press MENU key to display the dmx address;
Press ENTER to display the DMX address;
Press the UP or DOWN keys to set the value you can get;
And then press ENTER to confirm, will show the latest setting next time you save power.
Press the MENU button to return to the previous menu.
Operation Menu:
The control panel menu displays for a variety of types of computer special light design, equipped
with a variety of control functions, simple control. For some models fixtures no action, the
corresponding menu option is set invalid.
According to the following chart shows the menu will understand.
6
A001
DMX Address
DMX address set
A512
17Ch
Channel Mode
Channel choose
21Ch
Sound
Show Mode
Sound,Auto-mode
Auto
Master
Slave Mode
Master-Slave choose
Slave
No
Black Out
Standby choose
Yes
On
Sound State
Sound control ON/OFF
Off
Sound Sense
0--100
Sound control sensitivity (0
closed, 100 of the most sensitive)
No
Pan Inverse
Pan reverse
Yes
No
Tilt Inverse
Tilt reverse
Yes
On
Back Light
LCD ON/OFF
Off
On
Lamp On/Off
Lamp ON/OFF
Off
7
Auto Test
Test mode
---°C
When no connect Temperature
Sensor
-20--200°
C
Normal display temperature inside
the machine
Fixture Time
0--999
Machine running time
Firmware
Version
V1.01
Software version number
Temp.
No
Factory
Defaults
Factory reset
Yes
No
System Reset
Motor reset
Yes
Maintenance:
To prolong the life of the projector, some maintenance work has to be done to ensure the optical
system in good condition. If the projector does not function, check the fuses on the power socket of
the projector, they should only be replaced by fuses of the same specification. Should these be
damaged, call a qualified technician before replacement. The projector has thermal protection
device that will switch off the projector in case of overheating. Should either of these operate, check
that the fans are not blocked, and if they are dirty, clean them before switching on the projector
again. Check that the fans are operational, if not, call a qualified technician.
☆Any maintenance work should only be carried out by qualified technicians.
Keeping The Product Clean:
To ensure the reliability of the projector, it should be kept clean. It is recommended that the fans
should be cleaned every 15 days. The lens and dichroic colour filters should also be regularly cleaned
to maintain an optimum light output.
Do NOT use any type of solvent on dichroic colour filters.
8
Cleaning frequency depends on the environment in which the fixture operates: damp, smoke or
particularly dirty surroundings can cause greater accumulation of dirt on the unit's optics. A soft cloth
and typical glass cleaning products should be used for cleaning. It is recommended to clean the
external optics at least once every 15 days and clean the internal optics at least once every 60 / 90
days.
☆Do not use any organic solvent, e.g. alcohol, to clean housing of the apparatus.
Trouble Shooting:
Problem
The scanning light doesn’t switch on.
Answer
Check the fuse the power socket
Replace the lamp
Although shines, but the light doesn’t
Check the digital start address and also check the
accept the instruction of the controller. connection situation of the communication control line
The ligh only can work intermittently. Inspect the power supply and voltage is whether normal.
Make sure the fan is working well or fans and their
filters not blocked
Defective projection
Make sure the lamp is within its life limit
Remove dust or grease from the lenses.
The beam appears dim
heck the optics is clean or the lens in good condition(not
cracked)
Replace with a new lamp of the specified type and rating.
☆Other maintain work should by the specialist which has the experience to carry on.
Equipment and Appendix:
☆
☆
☆
☆
Sniper 2R scanning Light
Power Cable
XLR connector
The Product of Instruction
1pcs
1pcs
1unit
1pcs
Channel List:
21CH MODE
Channel
Value
Function description
Value
CH1
0---255
Pan Movement
PAN
CH2
0---255
Pan Movement Fine[16 bit]
PAN FINE[16 BIT]
CH3
0---255
Tilt Movement
TILT
CH4
0---255
Tilt Movement Fine[16 bit]
TILT FINE[16 BIT]
0---7
No Function
8---255
Pan Shaking Movement Slow To Fast
0---7
No Function
8---255
Tilt Shaking Movement Slow To Fast
CH5
CH6
9
PAN SHAKING
TILT SHAKING
CH7
CH8
0---2
Open
3---4
Open + Color1
5---6
Color1
7---9
Color1 + Color2
10---11
Color2
12---13
Color2 + Color3
14---15
Color3
16---18
Color3 + Color4
19---20
Color4
21---22
Color4 + Color5
23---24
Color5
25---27
Color5 + Color6
28---29
Color6
30---31
Color6 + Color7
32---33
Color7
34---36
Color7 + Color8
37---38
Color8
39---40
Color8 + Color9
41---43
Color9
44---45
Color9 + Color10
46---47
Color10
48---49
Color10 + Color11
50---52
Color11
53---54
Color11 + Color12
55---56
Color12
57---58
Color12 + Color13
59---61
Color13
62---63
Color13 + Color14
64---65
Color14
66---67
Color14 + Open
68---128
Color Wheel Index - Color1 To Color15
129---190
Clockwise Color Rotation From Fast To Slow
191---193
Stop
194---255
CounterClockwise Color Rotation From Slow To Fast
0---7
Open
8---14
Gobo1
15---22
Gobo2
23---29
Gobo3
30---37
Gobo4
38---44
Gobo5
45---52
Gobo6
53---59
Gobo7
60---67
Gobo8
10
COLOR
GOBO
CH9
CH10
68---74
Gobo9
75---82
Gobo10
83---89
Gobo11
90---97
Gobo12
98---104
Gobo13
105---112
Gobo14
113---119
Gobo15
120---126
Gobo16
127---133
Gobo17
134---194
Clockwise Gobo Rotation From Fast To Slow
195---255
CounterClockwise Gobo Rotation From Slow To Fast
0---8
Off
9---16
Pattern Macro 1
17---25
Pattern Macro 2
26---33
Pattern Macro 3
34---42
Pattern Macro 4
43---50
Pattern Macro 5
51---59
Pattern Macro 6
60---67
Pattern Macro 7
68---76
Pattern Macro 8
77---84
Pattern Macro 9
85---93
Pattern Macro 10
94---101
Pattern Macro 11
102---110
Pattern Macro 12
111---118
Pattern Macro 13
119---127
Pattern Macro 14
128---135
Pattern Macro 15
136---144
Pattern Macro 16
145---152
Pattern Macro 17
153---161
Pattern Macro 18
162---169
Pattern Macro 19
170---178
Pattern Macro 20
179---186
Pattern Macro 21
187---195
Pattern Macro 22
196---203
Pattern Macro 23
204---212
Pattern Macro 24
213---220
Pattern Macro 25
221---229
Pattern Macro 26
230---237
Pattern Macro 27
238---246
Pattern Macro 28
247---255
Pattern Macro 29
0---9
Stop
10---120
Clockwise Pattern Rotation From Fast To Slow
11
PATTERN
MACROS
PATTERN
ROTATION[Clockwi
CH11
CH12
CH13
CH14
CH15
CH16
CH17
CH18
CH19
CH20
CH21
121---134
Stop
135---245
CounterClockwise Pattern Rotation From Slow To
Fast
246---255
Stop
0---9
Stop
10---120
Horizontal Pattern Rotation From Fast To Slow
121---134
Stop
135---245
Vertical Pattern Rotation From Slow To Fast
246---255
Stop
0---127
Pattern Zoom Manual
128---255
Pattern Zoom From Slow To Fast
0---9
Stop
10---120
Horizontal Pattern Movement Left
121---144
Stop
145---255
Horizontal Pattern Movement right
0---9
Stop
10---120
Vertical Pattern Movement Up
121---144
Stop
145---255
Vertical Pattern Movement Dowm
0---127
0---360°
128---191
Clockwise Rotation From Fast To Slow
192---255
CounterClockwise Rotation From Slow To Fast
0---7
Stop
8---255
Shaking From Slow To Fast
ECCENTRI
SHAKING
0---255
Prism Movement
PRISM
0---127
RPrism Indexing
128---191
Clockwise Rotation From Fast To Slow
192---255
CounterClockwise Rotation From Slow To Fast
0---255
Dimmer Intensity 0 To 100%
0---7
No Function
8---255
Shutter From Slow To Fast
0---39
No Function
40---59
Lamp On
60---79
Lamp Off
80---89
All Motors Reset
90---99
Pan/Tilt Motors Reset
100---109
Color Motor Reset
110---119
Gobo Motor Reset
120---129
Shutter & Dimmer Motors Reset
130---139
Other Motors Reset
140---149
Enable Blackout While Pan/Tilt Movement
150---159
Disable Blackout While Pan/Tilt Movement
12
se/CounterClockwis
e]
PATTERN
ROTATION[Horizon
tal /Vertical]
PATTERN ZOOM
HORIZONTAL
PATTERN
MOVEMENT
VERTICAL
PATTERN
MOVEMENT
ECCENTRI
RPRISM
DIMMER
INTENSITY
SHUTTER
FUNCTION[Active
After 5S
160---169
Enable Blackout While Color Change
170---179
Disable Blackout While Color Change
180---189
Enable Blackout While Gobo Change
190---199
Disable Blackout While Gobo Change
200---219
System Reset
220---255
No Function
Value
Function description
0---127
Pan Movement
128---255
Pan Shaking Movement Slow To Fast
0---127
Tilt Movement
128---255
Tilt Shaking Movement Slow To Fast
0---2
Open
3---4
Open + Color1
5---6
Color1
7---9
Color1 + Color2
10---11
Color2
12---13
Color2 + Color3
14---15
Color3
16---18
Color3 + Color4
19---20
Color4
21---22
Color4 + Color5
23---24
Color5
25---27
Color5 + Color6
28---29
Color6
30---31
Color6 + Color7
32---33
Color7
34---36
Color7 + Color8
37---38
Color8
39---40
Color8 + Color9
41---43
Color9
44---45
Color9 + Color10
46---47
Color10
48---49
Color10 + Color11
50---52
Color11
53---54
Color11 + Color12
55---56
Color12
57---58
Color12 + Color13
59---61
Color13
62---63
Color13 + Color14
64---65
Color14
66---67
Color14 + Open
17CH Mode
Channel
CH1
CH2
CH3
13
Function
PAN
TILT
COLOR
CH4
CH5
68---128
Color Wheel Index - Color1 To Color15
129---190
Clockwise Color Rotation From Fast To Slow
191---193
Stop
194---255
CounterClockwise Color Rotation From Slow To Fast
0---7
Open
8---14
Gobo1
15---22
Gobo2
23---29
Gobo3
30---37
Gobo4
38---44
Gobo5
45---52
Gobo6
53---59
Gobo7
60---67
Gobo8
68---74
Gobo9
75---82
Gobo10
83---89
Gobo11
90---97
Gobo12
98---104
Gobo13
105---112
Gobo14
113---119
Gobo15
120---126
Gobo16
127---133
Gobo17
134---194
Clockwise Gobo Rotation From Fast To Slow
195---255
CounterClockwise Gobo Rotation From Slow To Fast
0---8
Off
9---16
Pattern Macro 1
17---25
Pattern Macro 2
26---33
Pattern Macro 3
34---42
Pattern Macro 4
43---50
Pattern Macro 5
51---59
Pattern Macro 6
60---67
Pattern Macro 7
68---76
Pattern Macro 8
77---84
Pattern Macro 9
85---93
Pattern Macro 10
94---101
Pattern Macro 11
102---110
Pattern Macro 12
111---118
Pattern Macro 13
119---127
Pattern Macro 14
128---135
Pattern Macro 15
136---144
Pattern Macro 16
145---152
Pattern Macro 17
153---161
Pattern Macro 18
14
GOBO
PATTERN
MACROS(扫描图形)
CH6
CH7
CH8
CH9
CH10
CH11
CH12
CH13
CH14
CH15
162---169
Pattern Macro 19
170---178
Pattern Macro 20
179---186
Pattern Macro 21
187---195
Pattern Macro 22
196---203
Pattern Macro 23
204---212
Pattern Macro 24
213---220
Pattern Macro 25
221---229
Pattern Macro 26
230---237
Pattern Macro 27
238---246
Pattern Macro 28
247---255
Pattern Macro 29
0---9
Stop
10---120
Clockwise Pattern Rotation From Fast To Slow
121---134
Stop
135---245
CounterClockwise Pattern Rotation From Slow To
Fast
246---255
Stop
0---9
Stop
10---120
Horizontal Pattern Rotation From Fast To Slow
121---134
Stop
135---245
Vertical Pattern Rotation From Slow To Fast
246---255
Stop
0---127
Pattern Zoom Manual
128---255
Pattern Zoom From Slow To Fast
0---9
Stop
10---120
Horizontal Pattern Movement Left
121---144
Stop
145---255
Horizontal Pattern Movement right
0---9
Stop
10---120
Vertical Pattern Movement Up
121---144
Stop
145---255
Vertical Pattern Movement Dowm
0---127
0---360°
128---191
Clockwise Rotation From Fast To Slow
192---255
CounterClockwise Rotation From Slow To Fast
0---7
Stop
8---255
Shaking From Slow To Fast
ECCENTRI
SHAKING
0---255
Prism Movement
PRISM
0---127
RPrism Indexing
128---191
Clockwise Rotation From Fast To Slow
192---255
CounterClockwise Rotation From Slow To Fast
0---255
Dimmer Intensity 0 To 100%
15
PATTERN
ROTATION[Clockwi
se/CounterClockwis
e]
PATTERN
ROTATION[Horizont
al /Vertical]
PATTERN ZOOM
HORIZONTAL
PATTERN
MOVEMENT
VERTICAL
PATTERN
MOVEMENT
ECCENTRI
RPRISM
DIMMER
INTENSITY
CH16
CH17
0---7
No Function
8---255
Shutter From Slow To Fast
0---39
No Function
40---59
Lamp On
60---79
Lamp Off
80---89
All Motors Reset
90---99
Pan/Tilt Motors Reset
100---109
Color Motor Reset
110---119
Gobo Motor Reset
120---129
Shutter & Dimmer Motors Reset
130---139
Other Motors Reset
140---149
Enable Blackout While Pan/Tilt Movement
150---159
Disable Blackout While Pan/Tilt Movemen
160---169
Enable Blackout While Color Change
170---179
Disable Blackout While Color Change
180---189
Enable Blackout While Gobo Change
190---199
Disable Blackout While Gobo Change
200---219
System Reset
220---255
No Function
SHUTTER
FUNCTION[Active
After 5S]
Technical Parameters:
Voltage : AC100~240V/50-60Hz
Power consumption:220W@(220V)
Lamp:YODN 132W Platinum 2R Lamp
Lamp life : 6,000 hours average life
Color: 14 color + blank color wheel
Gobo: 17 fixed gobo + blank gobo
Prism : rotation 3-face prism, rotation function.
Dimmer : 0-100% electronic dimmer, strobe and electronic support can speed strobe effect, support
strobe macro function.
Beam angle : The lens group optical system, manual focus, the beam angle 3 °
Channel : 17/21CHS
Control mode : Standard DMX512, Automatic and Master/ slave mode
Mirror system:X/Y/Z High-speed shock mirror
Control panel: LCD display panel
Protection grade:IP20
Operating ambient temperature: -20℃-40℃
Net weight:7.5KG
Gross weight: 8.5 kg
Dimensions:358*268*197 mm
Packing size :410* 310*255 mm
16