1
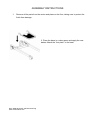
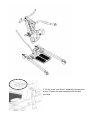
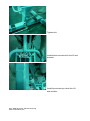
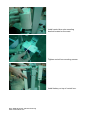
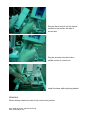
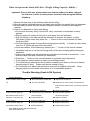
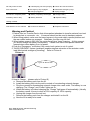
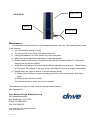
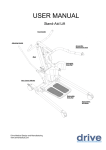
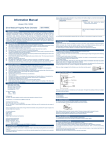
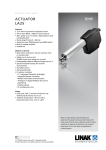
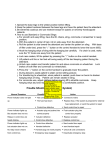
USER MANUAL Item: #13246 – Stand-Aid Lift Push Handle Base Width Adjustment Handle Mast Sling Attachment Hook Adjustable Knee Pad Front Caster W/Brake Foot Plate Front Caster W/O Brake Drive Medical Design and Manufacturing www.drivemedical.com Rev1.06.11.14 IMPORTANT SAFEGUARDS Your lift is for transferring patients only. Do not use the lift for any other purpose. “Stand-Aid Lift” is intended to be used for persons within the specified weight limit indicated for the lift. Do not attempt to lift more than the weight limit indicated. Before attempting to transfer, the user must be assessed by a qualified professional. The lift must be used by a caregiver with proper training to work with the person to be transferred. Only trained and qualified caregivers should transfer a person. Do not attempt to use the lift if you have not been properly trained to do so. Always be prepared before attempting to transfer a person. Do not use a sling that is not recommended for the lift. Do not store the lift in a shower, bath or other area with high humidity. Keep all components of the lift clean and dry and have electrical and mechanical safety. Always maneuver the lift with the handle provided. Drive Medical Design and Manufacturing www.drivemedical.com ASSEMBLY INSTRUCTIONS 1. Remove all the parts from the carton and place on the floor, taking care to protect the finish from damage. 2. Place the base in a clear space and apply the rear bakes. Attach the “foot plate” to the base. Drive Medical Design and Manufacturing www.drivemedical.com 3. Fit the “mast” and “boom" assembly into the base socket. Tighten the mast assembly with the bolt provided. Drive Medical Design and Manufacturing www.drivemedical.com Tighten bolt. Install bottom actuator bolt thru lift and actuator. Install top actuator pin chain thru lift and actuator. Drive Medical Design and Manufacturing www.drivemedical.com Install control box onto mounting bracket located on the mast. Tighten control box mounting screws. Install battery on top of control box. Drive Medical Design and Manufacturing www.drivemedical.com Plug the hand control into the socket located on the bottom left side of control box. Plug the actuator into the bottom middle socket of control box. Install the base width adjusting handle. REMARKS: Please always check the mast is fully locked into position. Drive Medical Design and Manufacturing www.drivemedical.com I.How to Operate the Stand-Aid Lifter: (Weight Lifting Capacity: 400 lbs.) Important: Prior to first use, please make sure that the battery has been charged for 24 hours in order to reach proper function and prolong the lifetime of battery. 1. Spread the base legs to the widest position before lifting. 2. Keep the patient centered between the base legs and have the patient face the attendant. 3. Be extremely cautious and use restraint straps for spastic or severely handicapped patients. 4. How to use Standard or Commode Slings: a. For smooth and easy lifting, have the lift, sling, commode or wheelchair in ready position. b. With the patient in center of bed, roll on side away from the attendant. c. Roll the patient to the side toward the attendant and center the patient on sling. With base of lifter under bed, press the “↓” button on the control handset to lower the boom (#20). d. Hook the hanging strips of sling with the hanging bar carefully. If a chain is used, make sure the “S” hooks are away from the patient. e. Lock rear casters, lift the patient by pressing the “↑” button on the control handset. f. Lift patient until his or her feet will swing easily off the bed, keeping patient facing the attendant. g. Unlock rear casters and transfer patient to and above commode or wheelchair. Lock brakes of both lifter and commode (or wheelchair). h. Press the “↓” button on the control handset to gradually lower the patient. i. During descent, assist patient to attain correct sitting posture. j. For transferring to wheelchair, when patient is seated, push down on boom to slacken hanging strips of sling. Patient can remain seated in sling. k. For commode use, adjust clothing before moving lift to straddle commode. Keep hanging strips taut and make sure patient is in a comfortable position. Trouble Shooting (Linak LA34 System) Normal Symptom Possible Cause Action Power indicator does not light ◆ Not connected to control box ◆ Connect to control box up. ◆ The fuse has blown ◆ Replace fuse, if the system is prepared for external fuse replacement, or send the system to repair Power indicator lights up ◆ Control box defective ◆ Replace control box ◆ Actuator plug not pushed into ◆ Push actuator plug into But actuator does not run. control properly Relays in control box are ◆ Actuator defective ◆ Replace actuator heard clicking. ◆ Control box defective ◆ Replace control box Power indicator lights up ◆ Control box defective ◆ Replace control box but actuator does not run. ◆ Handset defective ◆ Replace hand control Drive Medical Design and Manufacturing www.drivemedical.com control box properly . No relay noise is heard ◆ Handset plug not insert properly ◆ Check all cord connections from control box. ◆ Emergency stop engaged ◆ Charger plugged in ◆ Deactivate emergency stop ◆ Unplug charger Control box completely dead ◆ Battery completely discharged ◆ Charge battery on battery and no relay ◆ Battery defective ◆ Replace battery Control box okay apart from ◆ handset defective ◆ Replace hand control One direction on one channel ◆ Control box defective ◆ Replace control box clicking is heard. Warning and Caution! 1. Patient lifter is a Transfer Device that allows patient attendant to transfer patients from bed to wheelchair or commode…etc. It however should not be used to transport patients. 2. When lifting patient, make sure the base legs are in the most widely opened position and the rear caster brakes are engaged. Otherwise, the lifter may tilt over. 3. When battery power is 50% low, the controller will give “beep” warning. At this moment, you should charge the battery immediately. Please note that a lifted patient cannot be lowered down when battery is out of power. 4. Push the “Emergency” red button if the control unit system is out of control. 5. “QUICK RELEASE” system (push/pull) enables stepless retraction of the actuator under load (Mechanical emergency lowering). Refer to Picture A. Picture A: QUICK RELEASE 6. How to Charge: (please refer to Picture B) a. Remove the battery pack from the lift. b. Install the battery pack into the wall mounted or free standing external charger. c. Plug the mounted or freestanding external charger into a wall outlet. The battery is now charging. The “Charge” and “Power” lights are on. d. When the battery is finished charging the “Charge” light goes off automatically. (Usually the battery needs 4 hours to when at 50% capacity to 100% capacity. e. Unplug the charger from the wall out. f. Remove the battery pack from the charger and install it on the lift. g. Now the lift is ready to be used. Drive Medical Design and Manufacturing www.drivemedical.com PICTURE B: Battery Pack Charger Power cord . Maintenance: It is extremely important that the lift be inspected before each use. The following items need to be checked: a. All nuts and bolts should be tight. b. The lifter should move freely with caster brakes off. c. Check the brakes on the rear casters for proper operation. d. Make sure base adjustment mechanism is operating easily. e. Double check to ensure the “U” bracket at the end of the boom and the “S” hook on the hanging bar are secured tightly. f. Work the Linak Actuator to ensure that the battery still has enough power. When battery is 50% below full capacity, it will give “ beep” warning and need to re-charge immediately. g. Before initial use, place a drop of oil on the following areas. (1) Where mast and boom connect, hanging bar hook, pump handle hinge, and caster axles, (2) Where pump and boom attach, (3) Lubricate as above every two to three months. * We reserves the right to make technical changes without notice Manufactured For: Drive Medical Design & Manufacturing 99 Seaview Boulevard Port Washington, NY 11050 Phone: 516-998-4600 Fax: 516-998-4601 Drive Medical Design and Manufacturing www.drivemedical.com Rev1.06.11.14 www.drivemedical.com Drive Medical Design and Manufacturing www.drivemedical.com