1
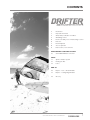
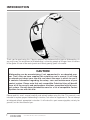
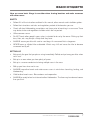
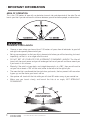
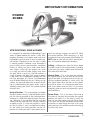
2012 DRIFTER IDS™ KITE USER MANUAL
MANUEL D'UTILISATION DE L'AILE
BENUTZERHANDBUCH FÜR DEN KITE
MANUAL DEL USUARIO DEL KITE
MANUALE D’USO DEI KITE
カイト・ユーザースマニュアル
РУКОВОДСТВО ПОЛЬЗОВАТЕЛЯ
DO NOT USE THIS PRODUCT UNLESS YOU HAVE READ AND UNDERSTAND
THESE WARNINGS, CAUTIONS, AND INSTRUCTIONS WHICH ARE FOR YOUR
SECURITY AND PROTECTION. THIS INFORMATION MAY BE SUBJECT TO
CHANGE AT ANY TIME. FOR CURRENT UPDATES, PLEASE VISIT OUR WEBSITE
AT: WWW.CABRINHAKITES.COM
IF YOU ARE BELOW THE AGE OF 18, YOU SHOULD HAVE YOUR PARENT OR
GUARDIAN READ THESE WARNINGS, CAUTIONS AND INSTRUCTIONS AND
SHOULD NOT USE THIS PRODUCT UNLESS YOU ARE UNDER THE PROPER
GUIDANCE AND SUPERVISION OF SUCH A PERSON.
The use of this product exposes the user to many unavoidable and unexpected risks, injury,
DANGERS and HAZARDS. The suppliers of this product are not responsible for any damage to
property or any personal injury caused by any use, misuse, abuse or irresponsible use of this
product by the user.
Kiteboarding is a HAZARDOUS sport. Power kites and their lines and control equipment can be
DANGEROUS to flyers and to anyone in the vicinity of their use. Kiteboarding must be taken seriously and we recommend that, at least in the early stages of your use, you seek the guidance
of professional instructors and experienced kiteboarders. Improper and/or unreasonable use of
this kite may result in DEATH or SERIOUS INJURY to ANY part of your body and to OTHERS. Do
NOT use your kite near power lines, airports, buildings, automobiles, trees, streets, parking lots,
rocks, piers, breakwaters, buoys, etc. and keep your kite fly lines away from people and ALL
obstacles. Always fly in an open area and observe wind and weather conditions, particularly in
circumstances where you may encounter offshore, onshore, variable or strong winds. Do NOT
attempt to use your kite on water until you are confident and comfortable with the use of a
trainer kite on land. Spend time to become familiar with the operation of your kite and remember
that you are responsible for its operation and for the security of those around you. As you learn
the sport, work within your own limitations and do NOT exceed them. If you intend to use the
kite on water, always use appropriate protective gears and flotation devices and do NOT attach
yourself or tie yourself permanently to the kite lines. The kite is NOT intended for use as a flying
device nor indeed is it intended as a means of flotation.
...continues to next page
continued from previous page...
RECOMMENDED KITEBOARDING PRACTICE:
Kiteboarding is an extremely diverse sport, with many disciplines and ability levels.
As with all sports, there can be certain inherent risks. The following contains key
security points to remember when operating your Cabrinha kite.
• KiteboardingisaHAZARDOUSactivityandtheuseofKiteboardingequipmentinvolvestherisk
ofseriouspersonalinjurytoanypartoftheuser’sbodyordeath.
• InjuriesareanINHERENTRISKofkiteboardingandtheparticipationinkiteboardingimpliesthe
user’sacceptanceandassumptionofthoserisks.
• ChildrenshouldALWAYSbeunderadultsupervision.
• Itisstronglyrecommendedthatbeginnerstakelessons.
• ALWAYSinspectyourequipmentforsignsofwearandteareachtimebeforeuse,particularly
alllines,canopy,bladders,screwsandfittings.
• IfANYproductsarefoundtoshowsignsofwear&tear,STOPusingtheproductimmediately
andrepairorreplacebeforefurtheruse.Ifindoubtaboutanysignsofwear&tear,please
contactyourlocalvendor.Contactdetailsareavailablefromwww.cabrinhakites.com
• NEVERplaceyourselfinasituationwherebreakageofanyoneofthevariouskiteboarding
componentswouldposearisktoyourselforothers,ormakeitdifficulttoreturntotheshore
securely&unassisted.
• Makesureyouuseproperlydesignedandmanufacturedpartsfromreputablesuppliers.
• Taketimetostudytheconditionsincludingseastate,tides,currents,weatherconditionsand
forecastsbeforeyoudecidetogosailing.Bewareofsailinginoffshore,onshore,variableor
strongwinds.
• Familiarizeyourselfwithanynewlocationbeforeventuringontothewater.Askthelocalstotell
youaboutanyhazards.
• Watchoutforotherbeachusers,especiallyswimmersandsmallchildren.Makesureyoukeep
yourboardandrigundercontrolatalltimesandthattheydon’tgetblownaboutonthebeach
orinthewater.
• Alwaysuseappropriateprotectivegearandflotationdevices.Wearthecorrectprotectiveclothing
fortheconditionssuchasawetsuitoraUVtop.
• WeSTRONGLYrecommendwearingakiteboardingspecifichelmet
• Makesuresomeoneknowswhereyou’vegone&whenyouareexpectedback–alwayssail
withabuddy.
• Beawareoftheconditionsastheychange.ALWAYSreturntothebeachifthereisasignificant
changeintheconditions.i.e.winddroppingorwind&wavesincreasing.
• Asyoulearnthesport,workwithinyourownlimitationsanddoNOTexceedthem.
• DoNOTalter,modifyorchangethisproduct.
• Thisproductisdesignedandmanufacturedonlyforkiteboardingonwaterorsnow.
• Keepthesewarnings,cautionsandinstructionsforfuturereference.
• ThefollowingcontainskeysecuritypointstorememberwhenoperatingyourCabrinhakite,and
associatedkiteboardingequipmentonwater,landorsnow.
SNOw USE GENERAl GUIDElINES
• ThepointslistedundertheRecommendedKiteboardingPracticealsoapplytotheuseofthis
productonthesnow.Pleasereadthepreviousparagraphsevenifyouintendtousethis
productprimarilyonthesnow.
• Thesekitesareintendedforuseonthesnowasatractiondevicetopropelarideracrosswide
opensnowfieldsinacontrolledandappropriatemanner.
• DoNOTattempttousethiskiteasaflyingdevice.DoNOTusethiskitetosoarfromridges,
cliffsorslopes.
• DoNOTattempttolaunchyourselfintotheairinanymannerwhichcancreateexcessive
impacttotherideruponlanding.
• EXTREMEcautionmustbetakenwhenusingthiskiteinanymountainousregion,uneventerrain
orglacier.Windconditionsintheseareasarenotoriouslyunstableandcanchangeinvelocity
anddirectionwithoutnotice.
• ALWAYSuseappropriateprotectivegear.WeSTRONGLYrecommendwearinga
snowboardingspecifichelmet.
• DoNOTtetheryourselftoanystationaryormovingobjectsuchasastake,snowmobile,or
carwhileflyingthiskite.
• ALWAYSstayincontrolandbeabletostoporavoidotherpeopleorobjects
• SNOWKITE:Peopledownwindordownslopehaverightofway.Itisyourresponsibilityto
avoidthem
• SNOWBOARD:Peopledownslopehaverightofway.Itisyourresponsibilitytoavoidthem
• YoumustNOTstopwhereyouobstructothersorarenotvisible.
• Wheneverstartingormergingwithotherslookupwind/uphillandyieldtoothers.
• Alwaysuseretentiondeviceswhileridingtohelppreventrunawayequipment.Ifyouremove
heretentiondeviceforanyreason,turnsnowboardupsidedownandpushthebindingsinto
thesnowtopreventrunaways.
• Observeanyandallpostedsignsandwarnings
• Keepoutofclosedareas
• SNOWBOARD:Priortousinganyliftyoumusthavetheknowledgeandabilitytoload,ride
andunloadsafely.
• DoNOTsnowboard/snowkitewhentiredorundertheinfluenceofalcoholordrugs.
•
Snowterrainandsnowboarding/snowkitingconditionsVARYCONSTANTLY--AVOIDANY
manmadestructures,trees,tree-wells,rocks,debris,variationsinterrainorslopes,avalanche
areas,crevasse,cliffs,powerlines,liftlines,waterhazards,changesinsnowsurfacesor
textureduetoaltitudeandsunexposure,windandweatherchanges,andanyotherconditions
whichcouldaffectyourabilitytoproperlycontrolyoursnowboard/snowkite.
CONTENTS
2
3
4
4
5
6
7
8
9
Introduction
ImportantInformation
Wind,Water,&WeatherConditions
WindRangeChart
KnowYourAbilityLevel/KiteboardingLocation
KiteCare
BeachEtiquette
AreaofOperation
KitePositions,Zone&Power
KITE OVERVIEW & CONTROL SYSTEM
10
2012DRIFTERIDS™Overview
SETUP
11
Sprint™InflationSystem
12
InflatingtheKite
14
Pause
HOW TO
15
Repairs-Tears/StrutsBladders
17
Repairs-LeadingEdgeBladders
19
Glossary
2012DRIFTERIDS™KITEUSERMANUAL
1
INTRODUCTION
ThankyouforpurchasingthisCabrinhaproductandwelcometothesportofkiteboarding.As
youmayknow,theexcitementofKiteboardingisattractingpeopleofallagesfromallcorners
oftheglobe.It’soneofthemostdynamicandfastestgrowingsportsintheworld.
CAUTION:
Kiteboarding can be overwhelming if not approached in an educated manner. That’s why we have supplied this extensive user’s manual. It will help
to educate you about your new kite and about the ways in which to use it.
It contains information regarding the setup, care and maintenance of your
control system. Please note that only compatible Cabrinha kites will benefit
from all of the security and performance functions associated with this control system. Consult www.cabrinhakites.com for a list of compatible Control
Systems for use with this kite.
Pleasereadthisuser’smanualcarefullyandentirelybeforeusingthiskite.Thismanualisnot
intendedtoreplaceproperkiteboardinginstruction,butrathertosupplementit.Donotattempt
tokiteboardwithoutappropriateinstruction.Itwillmakethissportmoreenjoyable,notonlyfor
yourself,butforthosearoundyou.
2
2012DRIFTERIDS™KITEUSERMANUAL
IMPORTANT INFORMATION
Kiteboarding is a hazardous sport, with many disciplines and ability levels. As with all
sports, there are inherent risks of injury. The following contains key points to remember
when operating your Cabrinha kite.
•
Befamiliarwiththesetupanduseofthesuppliedsecuritysystems:IDS™andtheHarness
LoopQuickReleasesystems.
•
Makesureyourcontrolsystemisriggedandusedaccordingtothesuppliedinstructions.
•
Makesureyourkiteiscompatiblewiththecontrolsystem.
•
AlwaysuseyourCabrinhakitewithabypassleash.
•
NEVERpermanentlyattachyourselftothiskite,thecontrolbar,orlines.
•
NEVERusethiskiteasaflyingdevice.
•
NEVERtouchthekitelineswhiletheyareundertension;donotcatchthekiteusingthese
lines.
•
Wheninflatedbutnotinuse,secureyourkitewithsandorwithsomethingheavyandnonabrasive;themoreweightthebetter(see“KiteCare”formoreinformation).Aninflatable
powerkitewillstillfly,evenwithoutarider,sobemindfulofthosearoundyouandsecure
yourkite.Yourkitemaycauseseriousinjuryordeathifitlaunchesunexpectedly.
•
Donotlendyourgeartosomeonewhohasnotbeenfullyinstructedontheuseofinflatable
kites.Otherusersshouldalsoreadthisuser’smanualandbeproficientinallitspoints.
•
Checkyourgearbeforegoingonthewater.Insurethatyourflyinglines,securitysystems,
kite,board,etc.areallriggedproperlyandareinworkingorder.
PROTECTIVE GEAR
Westronglyrecommendtheuseofthefollowingprotectivegear:
•
Kiteboardingspecifichelmet
•
LifeJacket,ImpactVest,orFlotationVest
•
NeopreneWetSuit
•
Gloves
•
FootProtection
•
EyeProtection
•
Knife
•
Sunscreen
2012DRIFTERIDS™KITEUSERMANUAL
3
IMPORTANT INFORMATION
WIND, WATER, AND WEATHER CONDITIONS
•
•
•
•
•
•
•
•
•
•
•
•
DoNOTunderestimatethepowerofthewind.
Beawareofunpredictableandchangingweatherconditions.
Avoid“offshore”or“onshore”windconditions.
Avoidstrong,gustywind.
Becarefulofwaveconditions,especiallywhenlearning.
Beeducatedabouttidesandripcurrents.
Bemindfulofyourabilitylevel.DoNOTkiteboardifconditionsarebeyondyourabilitylevel.
Beeducatedaboutairandwatertemperaturesandwearappropriateprotectionagainstthe
elements.
DoNOTusethisproductinthunderstorms.
Consultananemometerandweatherstationstodeterminewindspeedsifnecessary.
DoNOTuseanoversizedkite.ConsultyourWindRangeChartforthecorrectrecommended
size.Useyourcommonsense.Ifindoubtaboutwhatkitesizetouse,choosesmallerrather
thanbigger.
MakecertainthatyouarephysicallycapableofoperatingthesecurityQuickRelease(QR)
andIDS™devicesprovidedwiththiskite.Thiskiteandcontrolsystemhasbeendesigned
aroundatypicalriderweightof75kg(165lbs).
Riderswithaweightgreaterthan75kgmayneedtousemoreforcetooperatetheQRthanlighter
riders.IncreasesinwindstrengthmayalsoresultingreaterforcebeingrequiredtooperatetheQR.
BecertaintoseektheadviceofaprofessionalsuchasyourAuthorizedCabrinhaDealeraboutthe
performanceofthesecuritysystemsinrelationtobodyweight.
WIND RANGE CHART
Thiswindrangechartisonlytobeusedasapointofreference.Itisbaseduponariderwhois
approximately75kg(165lbs).Actualusemayvarybasedonyourbodyweight,abilitylevel,water
conditions,boardsize,andridingstyle.Whenchoosingakitesize,pleaseuseyourpersonalexperience,commonsense,andalwayscheckwhatotherridersareusingonthewaterforasize
reference.Lighterridersshoulduseasmallerkiteandheavierridersmayneedasizelarger.Be
certaintoseektheadviceofaprofessionalsuchasaninstructororAuthorizedCabrinhaDealer
beforemakingyourdecision.
4
2012DRIFTERIDS™KITEUSERMANUAL
IMPORTANT INFORMATION
KNOW YOUR ABILITY LEVEL
KITEBOARDING LOCATION
• Do NOT attempt kiteboarding without appropriateinstruction.
• ObserveALLlocallawsandregulationsregardingthisproductandtheusagearea.
• DoNOTkitealone.
• Talk to the local riders about the weather
conditionsandbeachrules.
• Launch,land,andridetogetherwithapartner
orhavesomeoneonshorewhocankeepan
eyeonyou.
• Checkyourareathoroughlybeforelaunchingyourkite.
• Makesureyouareingoodphysicalcondition
beforeusingthisproduct.
• Make sure you have considerable space in
whichtolaunch,land,andusethisproduct.
• Practice flying a small, traction kite or a
“trainerkite”beforeflyingthiskite.
• You should have at least 100 meters of
space from all objects on both sides and
downwind of you. Be especially aware of
yourdownwindarea.
• The more time spent on the “trainer kite”,
thefasteryouwilllearn.
• Makesureyouareaproficientswimmerbeforeusingthisproductinornearthewater.
• Make sure the wind and water conditions
are within your ability level and that you
havemadethecorrectequipmentchoices.
• NEVER kiteboard further from shore than
youarereasonablyabletoswimback.
• ALWAYS save a reserve of energy; end
your kiteboarding session before you are
exhausted.
• Makesureyou’vedoneyourhomeworkand
that you know the security precautions of
allaspectsofthesport:rigging,Launching,
landing,flying,riding,kitingamongotherwaterusers,selfrescuing,etc.
• Understandandpracticeoperatingyoursecurity systems before ever launching your
kite.
• Understandthetechniqueofself-rescuebeforeusingthisproductinornearthewater.
• NEVERletsomeonewhoisnotfamiliarwith
inflatable kites launch, catch, or use your
kite. You will endanger them, as well as
yourselfandthosearoundyou.
• Bemindfulandawareofthewinddirection
inrelationtoyourlauncharea.
• Avoid areas with rocks and/or shallow or
exposedreefs.
• Bemindfuloftidechanges.Aswaterlevels
change, you may be exposed to new obstructions.
• Avoidlaunching,landingorusingthisproduct near power lines, telephone poles,
trees,people,pets,buildings,automobiles,
streets,sharpobjectsandairports.
• Avoidcrowdedbeachesandwaterways.
• Makesureyourlinesdonotcrossawalkwayorpassage.
• DoNOTletotherswalkbetweenyouand
yourkite.
• Be careful and mindful of other water users,includingwindsurfers,boaters,jetskiers,swimmers,floatingobjects,etc.
• Before launching, make sure you have
scoutedabackuplandingarea,incaseyou
donotmakeitbacktoyourlaunchspot.
• Youareresponsiblefortheproperoperation
ofyourkite.
2012DRIFTERIDS™KITEUSERMANUAL
5
IMPORTANT INFORMATION
KITE CARE
Due to the often extreme nature of kiteboarding, a thorough approach should be taken
when caring for your kite and all its associated rigging, as well as your protective gear.
PREPARING FOR YOUR SESSION
• Thoroughly check your protective equipment (helmet, etc.) to make sure it is in
workingorderandingoodcondition.
• A frequent inspection of the kite and the
controlsystemshouldbemadeinorderto
identify punctures, tears, or abrasions in
the canopy, struts, or security systems. It
isalsonecessarytochecktheflylinesfor
wearandforunwantedknots,whichmay
reducethestrengthoftheflylines.Check
bridlelinesandpulleysforwearandreplace
whennecessary.
• Do NOT rig on asphalt, cement, gravel,
or other abrasive surfaces; doing so may
damage your equipment. It is best to rig
on sand or grass. Damage done to your
equipmentbyriggingonabrasivesurfaces
willnotbecoveredunderwarranty.
erties of the material and reduce it’s longevity.Ifyoumustleavethekiteexposedto
thewindonthebeach,placesandorsand
bags onto the areas of the kite, near the
trailingedgeuntiltheflutterisstabilized.Do
notuserocksorothersharpobjects.
• Do NOT leave your kite exposed to sunlight for long periods of time. Between
sessions,chooseashadedareatosecure
yourkite.Whennotinuse,stowaway.
PROPER STORAGE
• ALWAYS dry your kite prior to rolling or
folding.Foldingorrollingakitewhenwet
mayaffectthecolorclarityandlongevity.
• Itisrecommendedtowashthekitecomponents with fresh water and dry before
storing.
• DoNOTrigamongsharpobjectsthatcould
tearthecanopyorpuncturethestrutsand
leadingedgebladder.
• Clearthekiteofsandorotherforeignobjectsbeforestowing.
• TakecareNOTtoexposeyourflyinglines
to sharp objects that may wear through
them.
• Once it is clean and dry, stow your kite
in the supplied bag in a clean, dry, cool
place.
• While setting up, secure your kite with
sandorsandbags.DoNOTsecureyour
kite with rocks or other sharp or abrasive
objectsthatmaydamageyourkite.
• Do NOT place heavy objects on the bag
containingthekite.
BETWEEN SESSIONS
• NEVER leave an inflated kite unattended
on the beach for a long period of time.
Winds may shift or change and the kite
maybecomeunsecuredandflyoff.
• DoNOTleaveaninflatedkite(securedor
not) directly exposed to the wind for any
lengthoftime.Thisallowsthetrailingedge
toflutterexcessively.Anyexcessiveflutteringmayquicklybreakdownthefinishprop-
6
• Do NOT leave your kite inflated in your
car or car rack box; exposing the kite to
extreme temperatures while inflated may
damagetheinternalbladders.
• Washyourcontrolsystemwithfreshwater
fromtimetotimebyplacingtheentirecontrolsystem(withlineswoundontothebar)
intoabucketoffreshwaterandletitsitfor
5minutes.Allowtodrythoroughlybefore
storinginadrylocation.
• Onceitiscleananddry,stowyourcontrol
systeminaclean,drycoolplace.
2012DRIFTERIDS™KITEUSERMANUAL
BEACh ETIqUETTE
Here are some basic things to consider when sharing beaches and water accesses
with other users:
SAFETY
• FollowALLoftheinstructionsoutlinedinthismanual,othermanualsandinstallationguides.
• Followtheinstructionsandrulesandregulationspostedatthebeachesyouuse.
• Checkwithlocalkiteboardingassociationsandshopspriortolaunchinginanewarea.There
maybelocalrulesandregulationstofollowwhicharenotposted.
• Utilizecommonsense.
• DoNOTtouchotherpeople’sgear,unlessinstructedtodosobytheowner.Pickinguptheir
bars,kites,etc.maydisruptasetupritualtheyhave.
• ALWAYSsecureyourkitewithsandorsandbags.Anunmannedkiteisdangerous.
• NEVER leave an inflated kite unattended. Winds may shift and cause the kite to become
unsecuredandflyoff.
SETTING UP
• Setuponlythegearthatyouplanonusingimmediately.Deflateandputawayyourkiteswhen
notinuse.
• Setupinanareawhereyouhaveplentyofspace.
• Setupinamannerconducivetohavingmultipleusersinthearea.
• Rollupyourlineswhennotinuse.
• ALWAYSkeepotherbeachandwateraccessusersinmindwhenlaunching,landing,and
kiteboarding.
• Yieldtootherbeachusers.Becourteousandcooperative.
• ALWAYSbereadytolendassistancetootherkiteboarders.Thefavormaybereturnedsooner
thanyouthink.
2012DRIFTERIDS™KITEUSERMANUAL
7
IMPORTANT INFORMATION
AREA OF OPERATION
Thisisthe100metersofareawithnoobstaclestoeachsideanddownwindoftherider.Donot
launchyourkiteifyoudonothavethisdistancebetweenyourselfandotherpeople,orobstructions.
PLANNING YOUR LAUNCH
• Chooseanareawhereyouhaveatleast100metersofspacefromallobstaclestoyourleft
andrightandespeciallydownwindofyou.
• Setupyourequipmentsothatyourkiteisdownwindofwhereyouwillbelaunching,butmost
importantly,sothatitisatanangleoffofthewind.
• DO NOT SET UP YOUR KITE FOR A STRAIGHT DOWNWIND LAUNCH! The kite will
launchwithtoomuchpowerandyouwillendangerthelivesofyourselfandthosearoundyou
ifyoulaunchinthismanner.
• Basically,ifthewindisatyourback,andstraightdownwindisata180°,thenyouwillwantto
setyourkiteatabouta100°offthewind,eithertotheleftortotherightofyou.
• Themorethekiteispositionedintothewindwhenyoulaunch,thelesspoweritwillhavewhen
itgoesup,andtheeasieryourlaunchwillbe.
• Yourpartnerwillstandwiththekitewhileyouwillstand30metersawayatyourcontrolbar.
• Make sure you launch slowly, and launch the kite at an angle, NOT STRAIGHT
DOWNWIND!
POTENTIALLY HAZARDOUS:
DO NOT SET YOUR KITE FOR A
STRAIGHT DOWNWIND LAUNCH.
SAFER
SAFER
RIDER
8
2012DRIFTERIDS™KITEUSERMANUAL
IMPORTANT INFORMATION
POwER
ZONES
KITE POSITIONS, ZONE & POWER
Itisimportanttounderstandkiteboarding’sbasic
zones of power before you launch a kite. Kiteboardingaccidentscanhappenoverlandwhen
kiteboardersputtheirkitesinwhatiscalledneutralposition.Peoplethinkthatthekiteisstable
in neutral position. However, wind fluctuates-it
gustsandlulls-andinneutralposition,something
known as lofting can occur when wind fluctuates. When a kite luffs (or receives less wind
initsfoil),thekitewillmove slightly away from
the pilot. When a gust hits, the kite receives a
surge of power, and often that surge of power
istoomuchforakiteboarderstandingwiththe
kitehighoverhead.Asaresult,thekiteboarder
maybelofted(lifted)intotheair.Loftingcanbe
serious,butyoumayreducethechancesoflofting by understanding the power zones, and by
avoidingputtingyourkiteintheneutralposition
whileonland.
Neutral Position–Thisisthepositionjustabove
thepilot’sheadinthesky.Ifthepilotlevelsoutthe
bar,thekitewillgravitatetotheneutralposition.
However,itisdifficulttokeepthekiteinthisposition.Althoughinthispositionthekitemayfeel
steadyandmayfeellikeithastheleastamount
ofpowerorpull,itisalsothepositioninwhich
onlandthepilotismostsusceptibletolofting.
On the water, the neutral position can be utilizedtorestwhileyoureelinyourboard,buton
land,westronglysuggestyoudoNOTutilize
theneutralposition.Afterlaunching,itisbest
tomakeyourwaytothewaterwithoutdelay.Do
NOTlingeronlandwiththekiteinneutralposition–thiscouldbepotentiallyhazardous.
Lofting–Loftingoccurswhenthekiteisabove
theridersheadintheneutralposition.Instability
inthewindcancausesuddenverticalforceand
liftarideroffoftheirfeet.
Neutral Zone–Thisistheareathatincludes
theneutralpositionandtheareatotheleftand
rightofthepilot.Itencompassesthemostupwind or windward positions in which to fly the
kite.Whenflownhere,thekitehaslesspower
orpullthanwhenitisinthepowerzone.However,usecautionwhenthekiteisinthiszone,
especiallywhenonland,andespeciallyingusty
windconditions.
Power Zone–Thisistheareainfrontandto
thesidesofthepilot,butexcludingtheneutral
positionandzones.Itistheareainwhichthe
kitehasthemostpowerandpull.Whenflown
inthisarea,thekitecanbepowerfulandharder
tocontrol,soavoidflyingyourkiteinthiszone
whenlearning.Useextremecautionwhenflying
thekiteinthiszone.
2012DRIFTERIDS™KITEUSERMANUAL
9
OvERvIEw
2012 DRIFTER IDS™
1.
2.
3.
4.
5.
6.
7.
8.
KiteBody
LeadingEdge
Airlock™HighVolumeValve
Sprint™Valves
Sprint™AirDistributionTube
Sprint™AirClips
Bridle
Pulleys
2
9. BridleGuides
10.Frontlineattachmentpoint
point
11.Rearlineattachmentpoint
12.Front(center)Lines
13.Steering(rear)Lines
6
5
1
3
7
8
7
8
8
8
9
9
*imagenottoscale
11
10
11
10
10
13
4
12
12
2012DRIFTERIDS™KITEUSERMANUAL
13
SETUP
SPRINT™ INFLATION SYSTEM
TheSPRINT™inflationsystemisasimpletousefeaturetoquicklyinflateyourkitetoaneven
pressure.TheSPRINT™systemusesasingleinflationpointtoconnectyourhighvolume,two
wayCabrinhapump.Asyoupumpyourkitewithair,allstrutsandyourleadingedgeinflate
quicklyandsimultaneouslytothedesiredpressure.Thesuppliedleashpumpandthreaded
valveconnectionkeepsyourkiteundercontrolevenwhenpumpingupdirectlyinthewind.
Oncethekiteispumpedyoucanchoosetoclipofftheairtothestruts.Thiswayifyoudamage
astrutwhileinuse,therestofthekitewillmaintainitspressure.Attheendofthesessionyou
canchoosetodeflateyourkitecompletelybydisengagingthestrutclips.
Youcanalsokeepyourstrutsinflatedandputyourkiteawayrolledupsothatthenextsession
willtakejustminutestosetup.
SINGLE INFLATION VALVE FILLS THE ENTIRE KITE WITH AIR
AIRLOCK™ INFLATION/DEFLATION VALVE
THEUPPERSECTIONIS
THEINFLATIONCAP
THELOWERSECTIONIS
THERELEASEVALVE
FIG. 3
FIG. 2
FIG. 1
2012DRIFTERIDS™KITEUSERMANUAL
11
SETUP
INFLATION BASICS
SeethesectiononKiteCarebeforeinflatingyourkite.
•Unrollyourkitewiththestrutsfacingup.
• Makesureyourbackistothewindandthattheleadingedgeofthekiteisclosesttoyourbody.
Securethekitewithsandtokeepitfromflappinginthewind.
•Usethesuppliedpumpleashtoconnectthepumptothekite.Thiswillfreeyourhandsto
pumpthekite.
• Opentheinflationcapbyturningitcounter-clockwise.(FIG.1)
• Makesurethatthereleasevalveisseatedfirmlybyturningclockwise.Donotovertightenthe
releasevalvewhenthekiteisnotinflated.Doingsomaytwistanddamagethebladder.The
valvebaseisheldinplacebyaVelcrodisc
• AttachthepumpusingthesuppliedCabrinhaadapter(oruseastandardnozzle).Toattachthe
adapter,removetheadapterfromtheendofthepumphose.Threadtheadapterontothe
uppersectionoftheAirlock™.Reattachthehoseandpumpthekite.(FIG.2)
• OpenalloftheAirClipstoallowairtoflowfromtheLEintothestruts.(FIG.3)
• Wheninflating,holdthepumpwithbothhandsandprovideevenpressuretothehandle.This
willhelpmaintainthelifeofthePump.
• Confirmthatthecornersofeachstrutundertheleadingedgeareabletofullyinflate.Lightly
pushairaroundinthebladdersuntilthecornersarefreeandcorrectlylinedup.
•ItiscommonthattheLEwillinflatebeforethestruts.Ifastrutisnotinflating,makesurethat
theairclipisopenandtheairtubeisnotpinchedordamaged.
FIG. A
• Whenthekiteisfullyinflated,removepumphoseandscrew
theinflationcapbackon.Lightlyturn/tightenuntilinflationcap
isfirmlysecured.
• Tightenthelowerreleasevalve.
PROPERLY-INFLATED KITE
• Do not under-inflate or over-inflate the kite. Proper inflation
willmakeitdifficultbutnotimpossibletobendtheendsofthe
kitein.Ifitisveryeasytobendthewingtipsin,theleading
edgeisunder-inflated.Yourkiteshouldbefirmenoughthat
whileonitsback,thewingtipsshouldextendintotheairand
thekiteshouldretainitsbowedshape.(FIG.A)Iftheleading
edgeisunder-inflated,itmaycausepoorperformanceandrelaunchingproblems.Allkiteshavebeentestedusing450mB
pressure.NOTE:Thepumpsareratedto1barofpressure,
howeverduetowearandtear;pumpscanfailatamuchlower
pressure.
•Itisrecommendedthatyouisolatetheairinyourstruts.After
thekiteisinflated,closetheclipsontheairdistributiontubes.
UNDER-INFLATED KITE
12
• Oncethekiteisproperlyinflated,turnthekiteoverandsecure
withsand.(seeSETUPTIPSONSECURINGYOURKITE)
2012DRIFTERIDS™KITEUSERMANUAL
SETUP
TIPS FOR SECURING YOUR KITE
•
•
•
•
•
•
Neverleaveaninflatedkiteunattendedonthebeach
foralongperiodoftime.Windsmayshiftorchange
andthekitemaybecomeunsecuredandflyoff.
Alwayssecureyourkitewithsand,usingmoreweight
thanyouthinkyouneed.Anunmannedkiteisdangerous.
Never secure your kite with rocks or sharp objects
(includingyourboard);theywillcompromisethelifeof
the kite. If you do not have a sandy beach launch,
considersandbags.
Donotleaveaninflatedkite(securedornot),directly
exposedtothewindforanylengthoftime.Thisallows
thetrailingedgetoflutterexcessively,whichcandamage
thekiteortanglethecontrollines.Ifyoumustleave
thekiteexposedtothewindonthebeach,placesufficient
amountsofsandbetweeneachstrutandnearthetrailing
edgetominimizeorstopthefluttering.Also,ifpossible,
leavethekiteinashadedarea.
Keepinmindotherbeachusersandmakesureyour
kiteandlineswillnotbeadangertoothers.
Windyourlinesontothebarwhenyouarenotkiting.
Thiswillkeepthebeachfreeoflinesandwillprevent
other beach users from becoming tangled in your
equipment.
TO DEFLATE
UNSCREW
RELEASE
VALVE.
FIG. A
DEFLATING THE KITE
Thekitemaybedeflatedcompletelyorpartiallyforyour
convenience.TodeflateonlytheLeadingEdge,youmust
besurethatalltheSPRINT™airclipsarepinchedclosed,
thereby isolating each individual strut. Next, unscrew the
releasevalveandnottheinflationcap.Thereleasevalveis
thelowerportionoftheAIRLOCK.(FIG.A)Afterdeflating,
rollupeachendofthekitestartingatawingtipandmoving
towardsthecenter.Clearthevalveofanysandordebris;
then seal the valve before stowing kite to prevent debris
from getting inside internal bladder. To deflate the entire
kite, unclip the air clips at each strut. Then unscrew the
releasevalve.Thiswillallowalltheairtoflowthroughthe
leadingedgeandoutoftheairlock.
CAUTION:
Whenclosingvalveonadeflatedkite,holdbladder
inplacetopreventtwistingthebladder.Donotover
tightenvalvewhenkiteisdeflated.Youmaytighten
itfurtherwhenkiteispartiallyinflatedagain.
2012DRIFTERIDS™KITEUSERMANUAL
13
IMPORTANT!
PAUSE!
FOR SETUP OF YOUR CABRINHA CONTROL SYSTEM, REFER TO
YOUR SUPPLIED CONTROL SYSTEM MANUAL.
IF YOU ARE UNSURE AS TO WHICH CONTROL SYSTEMS ARE COMPATIBLE WITH THIS KITE, PLEASE REFER TO THE KITE/CONTROL
SYSTEM COMPATIBILITY CHART AVAILABLE ONLINE AT WWW.
CABRINHAKITES.COM.
14
2012DRIFTERIDS™KITEUSERMANUAL
REPAIRS
MAjOR TEARS
Foramajortearinthekitefabric,consultyourdealerforareputablekiterepairloft.Tofinda
Cabrinhadealerinyourarea,pleasegoto:http://www.cabrinhakites.com/where_to_buy/dealer.html
MINOR TEARS
Foraminortearinthekitefabric,youmayrepairthetear
withkiterepairtape.Yourkitehasbeensuppliedwithan
adhesivekiterepairmaterial.
1.
2.
3.
4.
5.
6.
Cleananddryyourkite.
Laythekiteflatonaclean,dry,smoothsurface.
Cuttwopiecesofrepairtapethesamesize,makingsure
theyareeachbigenoughtocovertheentiretear.
Carefullycoveronesideofthetearwithapieceofthe
repairtape.Gentlyrubthetapesmoothlyontothesur
faceofthekite.
Next,covertheoppositesideofthetearwiththesecond
pieceofrepairtape,inthesamemannerasbefore.
Makesurethetapeissecure.
FIG. 1
FIG. 2
REPAIRING STRUT BLADDERS
Key Points to Remember
• Before attempting to repair one of your kite
bladders, make sure your kite is clean and dry.
Always keep your kite pump, valves and bladders
free of sand, water and other things that will
dirtythem.
• Makesurethebladdersaredeflated.
• Avoidrepairingyourkiteonthebeachorindirty,dusty,
windy,orabrasiveareas.Itisbesttofindaclean,dry
spotoutofthewind.Agrassyspotisideal.
• Youwillneedasetofflyinglinesandabladderrepairkit
(suppliedwithkite)beforeyoubegintorepairthebladder.
• Keeptrackofallvalvepartsforlateruse.
1. First,laythekiteoutflatwiththestrutsfacingup.
2. DetachtheVelcroclosureattheendofthedamaged
strut.Thiswillopenupthesleeveofthestrutandwill
allowyouaccesstotheinternalbladder.(Fig.1)
3. Next,separatetheSprint™inflationtubefromtheLE
Sprint™valveattheaffectedstrutbyremovingthetubing
lockcollar(LEvalve)(Fig.3).
4. Slidetheairclipoffofthetube(Fig.4).
5. Removethescrews(2)fromthebaseofthestrutvalve
(Fig.5).Keeptrackofthevalvepartsforlateruse.
6.Tieoneflyinglinearoundthevalve.Cinchitdownwell
onthevalve.
7.Gentlyinsertthevalve/tubedownintothestrutsleeve.
FIG. 3
FIG. 4
FIG. 5
2012DRIFTERIDS™KITEUSERMANUAL
15
REPAIRS
REPAIRING STRUT BLADDERS (continued)
8. Gotothebaseofthesleeveandgentlypullthebladder
outofthesleeve.Detachtheflyinglineandleaveitin FIG. 6
thesleeve.Havingtheflyinglinethroughthesleevewill
allow you to easily replace the bladder once it is
repaired.
9. Slidetheairclipbackontotheinflationtube.Inflatethe
bladderandclampthetubingsothatitmaintainsair.Do
notoverinflatethebladder.
10. Submergethebladderinwatertolocatethehole.A
bathtuborlargesinkfullofwaterisbest.
FIG. 7
11. Lookforbubblestolocatethehole.
12. Onceyouhavelocatedtheleak,drytheareaandmark
theholewithacircle.Apermanentmarkerworksbest
forthis.(FIG.6)
13. Dryandcleantherestofthebladderwithasofttowel.
14. Again,deflatethebladder.
15. Decidewhethertousetheglueorapatchsuppliedin
yourbladderrepairkit.
16. Iftheholeisonaseam,youwillneedtogluethearea.
17. Iftheholeisonaflatareaofthebladder,removethebackingononeofthepatchesandpress
itontothebladder,coveringthehole.
18. Setthebladderasideforapproximately20minutestodry.
19. Again,inflatethebladderandchecktomakesureitisnowholdingair.
20. Ifyouhaverepairedtheholesinthebladder,coattheentirebladderintalcumpowdertoassist
insertionbackintothesleeve.(OPTIONAL)
21. Deflateonceagain.
22. Tietheflyinglinefromtheendofthestrutopeningontothevalve.
23. Laythebladderflatattheendofthestrut,sothatyoumaynowfeeditbackintothesleeve.
24. Gentlyfeedthevalve,followedbytherestofthebladder,intothesleeve.
25. Fromthevalveopeningofthesleeve,youwillpulltheflyinglineoutofthesleeve,whilepulling
thebladderbackintoplace.
26. Oncethebladderisreplaced,pullthevalvebackintotheholeofthesleeveandremovethe
flyinglinefromitsbase.(FIG.7)
27.ReplacetheSprintbasecollarandtightenthescrewsaccordingly.
28. Inflatethestrutpartiallytomakesurethebladderfitsintoallfourcornersofthesleeve.
29.AttachtheAirDistributiontubeandclipconnectedtotheLE.
16
2012DRIFTERIDS™KITEUSERMANUAL
REPAIRS
REPAIRING LEADING EDGE BLADDERS
FIG. 1
1. First,laythekiteoutwiththestrutsfacingup.
2.
EachendoftheLeadingEdge(LE)bladderisfoldedover
andsecuredwithaVelcroclosure.Youwillalsofindazipper
accesspocketatthecenteroftheLE.UndoeachVelcro
closureandunzipthecenteraccesspocket.Thiswillopen
upthesleeveofthestrutandwillallowyouaccesstothe
bladder.(Fig.1,2)
3.
Separate the Airlock Valve Assembly from the leading
edge.Carefullylifttheretainerringfromthebladder.Using
thesmallpulltabontheVelcroring,carefullypeeltheAirlock
baseoffoftheinsideoftheLE.Keeptrackoftheassembly
forlateruse.(Fig.3,4,5)
4. Next,disassembletheSprint™valves.Removethetubing
lockcollarsofthestrutvalves(Fig.6).
FIG. 2
FIG. 3
5. Slidetheairclipsoffofeachtube.(Fig.7).
6. Removethescrews(2)fromthebaseofeachLEvalve.
(Fig.8).
7. Keeptrackofthevalvepartsforlateruse.
8.
Forthenextstep,youwillneedtwoflyinglines.Starting
withoneendoftheleadingedge,tieonelinearoundthe
wingtipendofthebladder.Cinchthelinedownwell.Using
thesecondline,followthesameprocedurewiththeother
endoftheleadingedgebladder.
FIG. 4
9. Next,gentlypushthevalvesdownintothestrutsleeve.
10.Now, access the leading edge bladder through the
zipperedaccesspocketneartheleadingedgevalve.(Fig.2)
11.Gentlypullonesideofthebladderoutofthesleeveata
time,leavingtheflyinglinethroughbothsidesofthesleeve.
Havingtheflyinglinethroughthesleevewillallowyouto
easilyreplacethebladderonceitisrepaired.
12.Onceoutofthesleeve,attachtheairclips.Inflatethebladder
andcloseallclipsandtheairlockvalvesothatitmaintains
air.Donotoverinflatethebladder.
13.Submergethebladderinwatertolocatethehole.Abathtub
orlargesinkfullofwaterisbest.Youwillneedtosubmerge
onesectionofthebladderatatimeinordertolocatethe
hole.Lookforairbubblestolocatethehole.
FIG. 5
FIG. 6
14.Onceyouhavelocatedtheleak,drytheareaandmarkthe
holewithacircle.Apermanentmarkerworksbestforthis.
(Fig.9)
2012DRIFTERIDS™KITEUSERMANUAL
17
REPAIRS
15. Dryandcleantherestofthebladderwithasofttowel.
FIG. 7
16. Again,deflatethebladder.
17. Decidewhethertousetheglueorapatchsuppliedinyour
bladderrepairkit.
18. Iftheholeisonaseam,youwillneedtogluethearea.
19. Iftheholeisonaflatareaofthebladder,removethebacking
ononeofthepatchesandpressitontothebladder,covering
thehole.
FIG. 8
20. Setthebladderasideforapproximately20minutestodry.
21. Again,inflatethebladderandchecktomakesureitisnow
holdingair.
22. Deflateonceagain.
23. Tieeachflyinglinetothecorrespondingendsofthebladder.
24. Laythebladderflatnearthecenteraccesspocketandfold
it,accordionstyle,sothatyoumayfeedeachendbackinto
thesleevewithouttwistingthebladder.
FIG. 9
25. Starting with one end, feed the bladder into the access
pocket.
26. Walktooneendoftheleadingedgeandgentlypullonthe
flyingline,whileholdingtheendofthesleeve.Slowlyfeed
thebladderbackintothissideofthesleeve.(Fig.10)
FIG. 10
27. Next,followthesameinstructionswiththeothersideofthe
bladder,untilthevalvesareneartheholesandthebladder
isfullyinserted.
28. Tucktheendsofthebladderintothecorrespondingtips.
29. Oncethebladderisreplaced,pullthevalvesbackintothe
holesofthesleeve.(Fig.11)
FIG. 11
30. Next,placetheSprint™valvesbackintoposition.(Fig.12)
31. Makingsurenottocatchtheinternalbladderinthezipper,
closethecenterLEzipperpocket.Next,foldoverwingtip
accesspocketsandsecuretheVelcrostrips.
32. Re-attachtheAirlockValveAssembly.
33. PartiallyinflatetheLeadingEdgetomakesurethebladder
fitsintoallfourcornersofthesleeve.
34. Reassemble the Sprint™ valves and connect the air
distributiontubestoeachstrut.
18
2012DRIFTERIDS™KITEUSERMANUAL
FIG. 12
GlOSSARy
FREQUENTLY USED KITEBOARDING
& WIND TERMINOLOGY
CONTROLBAR
Thesteeringdevicetheriderusestosteerthekite.
D
A
AIRDISTRIBUTIONTUBES
TubesthatconnecttheLEbladdertothestrutbladders.AIRLOCK-a2partvalvethatallowsasinglepointforinflation
anddeflationofthekite.
AIRCLIPS
Clips that prevent air transfer between the LE and the
struts.
B
DE-POWERLINES
The two center flying lines that attach to the leading edge
bridlesonthekite-onetotheleftwingtip,theothertothe
rightwingtip.Theselinesassistinde-poweringthekite.
DOWNWIND
Thedirectioninwhichthewindistraveling.
F
FLYINGLINES
Atermusedtodescribeallfourofthelinesincludedwithyour
kitepackage.Theselinesconnectthebridlelinesonthekite
totheleaderlinesonthecontrolbarandaretypically20-30
metersinlength.
BAR(unit)–Aunitofpressure
•1bar=14PSI
•1mbar=0.015PSI
PSI–Aunitofpressure.Poundspersquareinch
•1PSI=68.9mbar
G
BEAUFORTSCALE
Asystemforestimatingwindstrengthbasedontheeffects
wind has on the physical environment (e.g. the behavior of
waves,smoke,etc.).Instrumentsarenotusedtodetermine
wind strengths in this point scale (O = calm to 12 = hurricane).
BODYDRAGGING
This is an instructional tactic / step in which the rider flies
thekitewhileinthewater,butwithouttheboard.Therider
willlaunch,thenwalktothewater,andbasicallydraginthe
water while practicing flying, re-launching and self-rescue
techniques.
BLADDER
Theinnerinflatabletubefoundwithintheleadingedgeand
thestrutsofthekite.(Imagineabike-ithasbothatireonthe
outsideandaninnertubewhichholdsair).
BRIDLES
Thelinesthathangfromthewingtipsandleadingedgeof
thekite.Theflyinglineswillbeattachedfromthecontrolbar
tothesebridlelinesinordertoconnectcontrolbartokite.
TowPoints–Theattachmentpointsforthebridle.
BYPASS™LEASHSYSTEM
An optional security leash feature that is recommended for
firsttimeusersandkiteboardingschools,andforriderswho
kiteboardwithoutbeinghookedintotheharnessloop.
C
CENTERLINEADJUSTMENTSTRAP(CAS)
Usedtodepowerthekitebychangingtherelationshipbetween
thefrontandbacklinelengths.Itisalsousedtopositionthe
barclosertotherider.
GUSTYWIND
Windisinconsistentandvariesconsiderablyfromonewind
strengthtoanother.
GYBING
The motion in which the rider changes the direction of the
boardhe/sheisriding.Theriderswitchesfromastarboard
tacktoaporttackorviceversa.
H
HARNESS
Apieceofequipmentusedtotemporarilyattachtheriderto
the control bar harness line. This enables the rider to save
energybyutilizingtheirbodyweightandalloftheirmuscles
tohangontothekite.Mostcommonarethewaistharness
(attachesaroundthetorso)andtheseatharness(attachesto
thewaistandaroundthelegs).
I
IDS(INTELLIGENTDEPOWERSYSTEM)
IDSisasimplifiedbridleandcontrolsystemthatseamlessly
provides2stagesofdepower.
INFLATABLEKITE
Akitewithinflatabletubesdesignedtofloatthekiteandto
facilitatewaterre-launchability.
K
KITEBOARDING
Thetermusedtodescribethesportofpowerkitingonwater
orsnow.
2012DRIFTERIDS™KITEUSERMANUAL
19
GlOSSARy
KITESURFING
Anothertermusedtodescribethesportofpowerkitingon
water.
KNOTS
Ameasureofspeedbasedonnauticalmiles.
1knot=1nauticalmileperhour.
1knot=1.15milesperhour.
1knot=1.85kilometersperhour.
L
LANDING
Theactionwhichplacesthekiteonthewateroronland.
LAUNCHING
Themotioninwhichtheridersteersthekitefromtheirpartner’shandsintothesky.
LEADERLINES
The lines that attach directly to the control bar. You will attachtheselinestotheflyinglinesinordertoconnectthem
toyourbar.
LEADINGEDGE(LE)
Thefrontinflatedtubeofyourkite.
LEEWARD
Thedownwindsideofthekiteboarder.
LOFTING
Loftingoccurswhenthekiteisabovetheridersheadinthe
neutralposition.Instabilityinthewindcancausesuddenverticalforceandliftarideroffoftheirfeet.
LUFF
A term used to describe what happens to the kite in a lull.
A term also used to describe the complete de-powering of
akite.
LULL
Atermusedtodescribewindwhenitlessensinstrength,for
anyamountoftime.
stronglysuggestyoudonotutilizetheneutralposition.After
launching,itisbesttomakeyourwaytothewaterwithout
delay.DoNOTlingeronlandwiththekiteinneutralposition.
ItisVERYdangerous.
NEUTRALZONE
Thisistheareathatincludestheneutralpositionandthearea
to the left and right of the rider. It encompasses the most
upwindorwindwardpositionsinwhichtoflythekite.When
flownhere,thekitehaslesspowerorpullthanwhenitisin
the power zone. However, use caution when the kite is in
this zone, especially when on land, and especially in gusty
windconditions.
O
OFFSHORE
Windisblowingfromtheshoredirectlyortoagreatextent
outtothewater.Donotoperateyourkiteinornearwaterin
thiswinddirection.
ONSHORE
Windisblowingdirectlyortoagreatextentdirectlyfromthe
water toward the land. Do not operate your kite in or near
waterinthiswinddirection.
OVER-POWERED
Asituationinwhichtheriderhasakitetoopowerfulforhis/
herabilitylevel,weight,strength,and/orwindconditions.
P
PLANING
Thepointintimeinwhichtheridergetstheboardskimming
onthewater.
POWERZONE
Thisistheareainfrontandtothesidesoftherider,butexcludingtheneutralpositionandzones.Itistheareainwhich
thekitehasthemostpowerandpull.Whenflowninthisarea,
thekitecanbepowerfulanddangerous,soavoidflyingyour
kite in this zone when learning. Use extreme caution when
flyingthekiteinthiszone.
M
PUMP–Deviceusedtoinflatethekite.Q
MPH
MilesPerHour.Ameasureofspeed.
1mph=1.6kilometersperhour.
Q
N
NEUTRALPOSITION
Thisisthepositionjustabovetherider’sheadinthesky.If
theriderlevelsoutthebar,thekitewillgravitatetotheneutral
position. However, it is difficult and dangerous to keep the
kiteinthisposition.Althoughinthispositionthekitemayfeel
steadyandmayfeellikeithastheleastamountofpoweror
pull,itisalsothepositioninwhichonlandtheriderismost
susceptibletolofting.Onthewater,theneutralpositioncan
beutilizedtorestwhileyoureelinyourboard,butonland,we
20
QRS-QUICKRELEASESECURITYSYSTEM
Aquickreleasepointonthecontrolsystemwhich,whenactivated,detachesthecontrolsystemfromtheharnessloop.
AlsoreferredtoastheMainQR.
QR2
AsecondaryquickreleaseontheQuicklinkBodywhichwhen
activatedseparatesthelandinglinefromtheIDSTower.Thus
separatingthekitefromtherider.
QUICKLINK
Quicklink refers to the molded harness loop body and
QR2pin.Thiscombinedsystemgivestheuseraquick
2012DRIFTERIDS™KITEUSERMANUAL
GlOSSARy
andeffectivewaytoreconnecttheIDSconnectortotheIDS
towerafterfulldeployment.TheQuicklinkbodyalsooffers
theuserthechancetointerchangeharnesslinelengths.
R
REACH
Adirectionoftravelrelativetothewinddirection.Generally
90-160degreesoffthewind.
RECOIL
Recoil is a convenience item, which allows riders a spot to
restthebarwhileunspinningitfromrotationaltricks.Italso
serves as a unit to keep tension on the bungee adjusters
whilekeepingthematarmsreach.
RE-LAUNCHING
Themotioninwhichtheridersteersthekiteoffofthewater
andbackintothesky.
S
SIDEOFFSHORE
Windisblowingfromeithertheleftortherightandfromthe
shoreouttothewater.Thisisacombinationofoffshoreand
sideshorewind.Donotoperateyourkiteinornearwaterin
thiswinddirection.
T
TRAINERKITE
Akitethatmaybeusedonlandtosimulatethemotionsused
in kiteboarding. It is an excellent instructional and learning
tool. Despite its small size, this kite still has power, so be
alert.
U
UNDER-POWERED
Asituationinwhichtheriderhasakitenotpowerfulenough
forhis/herweight,strength,and/orwindconditions.
UPWIND
Thedirectionfromwhichthewindisblowing.
W
WATERSTARTING
Themotionoftheriderinwhichhe/shegoesfromsittingor
lyinginthewatertostandingontheboard.
WINDWARD
Theupwindsideofthekiteboarder.
SIDESHORE
Windisblowingfromtheleftorfromtheright,paralleltothe
shore.Idealwinddirectionforkiteboarding.
SIDEONSHORE
Windisblowingfromeithertheleftortherightandfromthe
watertowardtheland.Thisisacombinationofonshoreand
sideshorewind.Utilizecautionwhenoperatingyourkiteinor
nearwaterinthiswinddirection.
SPRINT™
SinglePointRapidInflationTechnology.
STAGE2DEPOWER
Stage2DepowerisabuiltinfunctionofIDSwhichallowsthe
ridertoselflandakiteonthewaterorland.
STEERINGLINES
The two outside flying lines that attach to the trailing edge
bridlesonthekite-onetotheleftwingtipandtheotherto
therightwingtip.
STRUTS
The outer fabric tubes found on your kite. They house the
innerinflatablebladders,whicharefilledwithairtogivestructuretothekite.
2012DRIFTERIDS™KITEUSERMANUAL
21