1
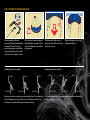
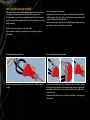
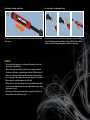
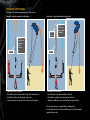
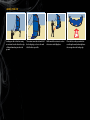
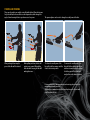
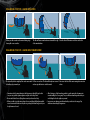
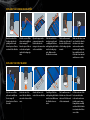
WELCOME
Thank you for buying this Peter Lynn product, and welcome to the World of Peter Lynn,
a world of wind driven excitement, where people passionately pursue their dreams
whether that’s freeriding at a local beach or enjoying the virgin snow on a back country
adventure. Peter Lynn is there to help them pursue their dreams, Peter Lynn is here
to help you pursue your dream, making you achieve your ultimate challenge. Are you
ready?
Peter Lynn has been there taking challenges from the early days of the sport. Challenges to develop breakthrough ideas, make better products, improve performance and
quality in all aspects of those products. We have the right kites for all kite disciplines,
for any terrain and for all conditions. All this is realized by a passionate crew of kite
sports enthusiasts and we invite you to join us. It’s that passion that makes us fly.
Before any attempt to use this product, please ensure you pay full and careful attention to the contents of this manual. While traction kiting is an exciting and fun sport, it
can be highly dangerous, especially if not all the necessary safety precautions are taken.
So please make sure you learn this great sport in a safe way. Only then will you progress
quickly and enjoy this beautiful sport to the max.
Enjoy!
SAFETY INSTRUCTIONS
CAUTION: Kite powered sports can be very dangerous and physically demanding. The user of this product
should understand that participating in kite powered sports may involve serious injury or death and agrees
to observe the safety precautions listed below.
Safe location and weather conditions:
• Stayawayfrompowerlines,roads,airfields,railwaylines,treesandbuildings.
• Neverlaunchyourkiteincrowdedareas.Donotflyyourkiteoverbystanders.
• Makesurethereisa‘clear’downwindareaatleastthreetimesthedistanceof
your flying line length.
• Neverflykitesorusethisproductinthunderstorms,lightningorgusty/stormy
winds.
• Neverflyakiteorusethisproductwithwindforcessostrongthatyouareunable to maintain full control of your kite and its power at all times.
• Donotflyakiteorusethisproductwhenwindconditionsarelikelytochange
dramatically.
• Stopkitingimmediatelywhenastormorlightningisapproaching.
• Makesureyouarefamiliarwiththelocationandlocalcustomsandlawsbefore
attempting any kind of kite sports.
Safe traction kiting:
• Atractionkiteisnotatoyandshouldnotbeflownbyinexperiencedpersons
and certainly not by children.
• Learntoflykitesbystartinginlightwindswithasmallsizedkite.
• Neveruseanytypeofkiteorthisproductforparagliding,parachutingorbase
jumping.
• Neveruseanytypeofkiteorthisproductforjumpingoffhighplaceslikehillsor
cliffs
• Neveruseanytypeofkiteorthisproductforanymanliftingactivity.
• Alwaysusefullyprotectivegearwhenkiteboarding,landboarding,snowkitingor
buggy riding.
Safe kiteboarding:
• Donotgokiteboardinginoffshorewinds.
• Becarefulwhenkitinginonshorewinds.
• Westronglyrecommendtheuseofhelmetandlifejacket/impactvest.Asafety
knife to cut flying lines in case of emergency is recommended.
• Donotkiteboardinspotsalreadyinusebyswimmersorsurfers.
• Bewareofstrongcurrentsandsharks.
• Staysafelyawayfromotherwatercraftsandshippinglanes.
• Nevergofurtherouttoseathanyoucansafelyswimback.
• Always make sure there is a capable person on shore that is keeping watch and is
ready to provide (or call for) help in case of an emergency.
• Westronglyrecommendtakinglessonsfromacertifiedkiteboardingschool
before using this kite on your own.
Safety issues when using this product:
•Thiskitehasbeenmanufacturedwithhighqualitymaterialsandhasbeenmanufactured using the latest and most advanced production methods.
• Priortoeveryuseofthisproduct,fullycheckyourequipmentforanysignsof
wear and tear. Replace parts immediately where needed.
• Priortoeveryuseofthisproduct,checkifyoursafetyreleasesarestillworking
properly and you are aware how to use it. In case the safety release does not
work as it should, do not use this product and replace parts where needed.
• Onlyusethisproductforkiteboarding,buggyriding,landboardingandsnowkiting.
• Donotusethisproductwhenyourbodyweightisover130kg(285lbs).
• Onlyusethisproductwhenyouareinagoodstateofhealth.Neverusethis
product when under the influence of alcohol, drugs or medication.
• Donotalter,modifyorchangethisproduct.Repairsshouldbedonebyaprofessional kite repair shop, sail repair shop, or by the Peter Lynn company.
THE WIND WINDOW
EDGE OF WIND WINDOW
MINIMUM POWER
POWER ZONE
MAXIMUM POWER
Beforeflyingyourkiteitisveryimportanttounderstandthe‘windwindow’.
The image shows where the kite will create the most power (straight downwind,
alsoknownasthe‘powerzone’)andwherethekitewillcreatetheleastpower
(edge of the window and zenith).
2
3
TERMINOLOGY
1
2
3
4
1
4
2
3
5
6
9
8
10
12
12
13
15
14
17
13
16
18
19
20
23
22
21
23
24
25
26
1. Kite’sleadingedge
2. Leftbridle
3. Rightbridle
4. Left rear line attachment point
5. Lefttoplineattachmentpoint
6. Right top line attachment point
7. Right rear line attachment point
7
8. Leftrearflyinglineattachmentpoint
9. Left top flying line attachment point
11 10. Righttopflyinglineattachmentpoint
11. Rightrearflyinglineattachmentpoint
12. Uppersegmentoftopflyingline
13. Attachmentpointconnectingtopline
segments
14. Lowersegmentoftopflyingline
15. Leftrearflyingline
16. Rightrearflyingline
17. Toplineconnectionpoint
18. Centertopline
19. Safetyline
20. Leftleaderline
1
2 3
21. Rightleaderline
22. Poweradjuster
23. Self-landinghandle/Kiteflag-outhandle
24. ControlbarwithcolourcodedEVAfoam
25. Centrixpush-awaydepowerloopwith
primary quick release
26. Safetyleashwithsecondaryquickrelease
5
6
10
7
8
11
9
12
12
13
1. Inflatevalve
2. Pumpleashattachment
3. Deflatevalve
4. Leading edge
5. Singleinflationairduct
6. Canopy
7. Trailingedge
8. Lefttoplineattachmentpointwithpulley
9. Struts
10. Righttoplineattachmentpointwithpulley
11. Barpressureadjustment
12. Top/rearlineadjustment
13. Leftrearlineattachmentpoint
14. Rightrearlineattachmentpoint
14
STARTING OFF
STEP 1. FINDING THE RIGHT LOCATION TO LAUNCH YOUR KITE
Tostartflyingyourkiteyouneedtofollowthesefivesteps:
Step1.Findingtherightlocationtolaunchyourkite
Step2.Pumpingupyourkite
Step3.Settingupyourbarandlines
Step 4. Checking your safety system
Step5.Launchingyourkite
Findaspottosetup,awayfromairports,powerlines,treesandbuildings.When
launching, the area should be free of kiteflyers or other people. Also make sure
there are no sharp objects on the ground, to prevent any damage to your kite.
STEP 2. PUMPING UP YOUR KITE
Place your kite on the ground with its
leading edge into the wind, the
bottom of the kite facing upwards.
Attach the pump leash to the kite’s
pump leash attachment.
Makesurethedeflatevalveisclosed
andsecuredwiththeVelcrotagand
bungee chord. Attach the pump hose
to the inflate valve.
Makesuretheclipsontheairducts
leading to the struts are all open.
Start pumping until the leading
edgefeelsfirm.Ifyouprefertousea
pressure gauge, pump until it reaches
about 6 psi.
Detachthepumpandclosetheinflate
valve.
Close the clips on the air ducts. This
will prevent the whole kite from losing pressure in case of a puncture.
Place the kite on the ground with
the top of the kite facing up, leading
edge into the wind. Weigh down the
canopy with some sand or a board
withfinsfacingup.
STEP 3. SETTING UP YOUR BAR AND LINES
Starting downwind of the kite,
unwind your flying lines while walking
downwind. Place your bar on the
groundthewrongwayaround.Make
sure your leader lines and other parts
of the bar are free of tangles or twists.
Holdyourlinesbetweenyourfingers
while walking back toward the kite, to
sort out the flying lines. Place all lines
on the ground.
Attaching the top lines to the kite
BRIDLE
FLYING LINE
Attach the flying lines one by one,
using larkshead knots.
Attaching the rear lines to the kite
BRIDLE
FLYING LINE
Check that your bridles are free of
tanglesandtwists.Makesurethepulleys are free of sand.
BRIDLE
FLYING LINE
Makesureyouattachyourflyinglinesusingalarksheadknot.Placealarkshead
knot in the flying line connector, slide it over the middle knot on the top line
attachment on the bridle and tighten the larkshead as shown.
BRIDLE
FLYING LINE
BRIDLE
BRIDLE
FLYING LINE
FLYING LINE
Connect the flying line connector to the rear line attachment and tighten the
larkshead as shown.
STEP 4. CHECKING YOUR SAFETY SYSTEMS
Before using this kite, please check the manual supplied with your bar on how
to activate your safety systems and re-attach the release systems used.
Werecommendtotestthesafetysystemwhenusingthekiteforthefirsttime
so you are aware how the system works, how to activate it and how to re-attach
it after activating.
The safety system works in two steps:
Primary safety - If you need to lose the power of the kite without losing the kite
itself the primary safety release can be used. The kite loses its power but is still
connected to the rider by the safety leash.
Secondary safety release - When the kite is still pulling after using your primary
quick release, use the secondary release on the leash.
Neverbeafraidtouseitbecauseitcansaveyourlife!
We recommend to check if your quick releases are in working order before
every launch!
Activating the primary quick release
Re-connecting the primary safety release
Toactivateyourprimaryquickrelease,pushtheredreleasecuffparttowards
the kite.
Re-connect the primary safety release by placing stainless steel ring on the end
of the depower loop tube into the Centrix push-away center piece until it locks
inbehindthehookinsidethecenterpiece.Nowslidethereleasecufftowards
the spreader bar.
Always make sure all parts are free of sand and snow before re-connecting your
safety system.
Activating the secondary quick release
Re-connecting the secondary quick release
Toactivateyoursecondaryquickrelease,movetheredreleaseinthedirection
of the arrows.
Re-connect the secondary safety release by placing the loop over the stainless
steelpin,foldingthepindownanslidingtherelaesecuffbackinplace.Make
surethereleasecuffissittingrightagainsttheballafterreconnecting.
WARNING!
• Thesecondarysafetysystemdoesnotfunctioniftheprimarysafetyonthe
depowerloopisnotpulledfirst.
• Thesecondarysafetyshouldonlybepulledincasetheprimarysafetywas
somehow not sufficient to completely depower the kite. Pull this safety only
if there is no other way, as it will completely disconnect you from your kite.
A loose kite might result in dangerous situations for bystanders or other kite
flyers and may also result in permanent loss of the kite.
• Whenyourkiteisonthewater,alwaysbeverycarefulwithflyinglineswhich
arenottensioned.Makesuretheydonotgettangledbehindanypartofyour
body, harness or board.
• Afterusingyoursafetysystem,puttingtensiononanyoftheotherlinescan
causeyourkitetotakeoffandstarttopull.
OPTIONS FOR SAFETY SYSTEMS
TheNavigatorSLfeaturestwooptionsforyoursafetysystem:
Standard - Safety line attached to both top lines
Extra safety - Safety line attached to single top line
safety line
extension
safety line
•
•
•
•
safety line
connects to the
flying lines at
top line
connection
point
Kitewilllosemostofitspower.
Kitewilldropfromtheskytowardstheedgeofthewindwindow.
Kitewillhavelittlepowerwhenlyingonthewater.
Veryfastandeasyrecovery,bardoesnotslideveryfarfromrider.
safety line
connects to the
flying line where
two segments
meet
safety line
•
•
•
•
Kitewillloseallofitspower.
Kitewilldropfromtheskyandwilllayonitsback.
Kitewillhaveverylittlepowerwhenlyingonthewater.
Slightlymoredifficultrecovery,barslidesfurtherawayfromrider.
ThesafetylineextensionissuppliedwithyourNavigatorSL.
Fordetailedinstructionshowtoinstallthisline,pleasecheckthemanual
supplied with your bar.
STEP 5 - LAUNCHING YOUR KITE
90o
Launching is best done using an
assistant. The assistant should grab
the leading edge of the kite near the
center, and lift the kite up with one
tip on the ground and the leading
edge into the wind, as if the rider
flew the kite to the edge of the wind
window.
Grab the bar and attach the safety
leash.
Walk towards the position where your
linesareat90degreestothewind
direction.
Findtherightpositionwithslighttension on your lines, where the fabric of
the kite does not flutter and the kite
can’t fly further towards the edge of
the wind window.
TIPS FOR LAUNCHING YOUR KITE
• Makesureyouarenotlaunchinginanareawithobstacleslikepolesorcars,
makesuretheareaisfreeofpeopleorotherkiteflyers.Donotflyyourkite
near powerlines, airports, highways, or in thunderstorms.
• Makesureyourequipmentisingoodworkingorder.Checkforwearandtear
and make sure your bar and safety system are in good working order before
you launch.
• Makesurethegroundisfreeofsharpobjectstopreventthefabricfrom
getting damaged.
Your assistant can now check that the
bridle is not hooked behind itself or
any part of the kite.
90
o
Check your flying lines to make sure
they are not twisted or tangled. Check
that the flying lines or any parts of the
bar are not hooked behind each other.
Check that you are holding your bar
the right way around. Check that your
power adjuster is set correctly.
When you are ready to launch, signal
to your assistant. Your assistant may
now let go of the kite. Slowly steer
the kite up along the edge of the wind
window.
• Onlylaunchwhilehookedintoaharnesswhenyouhaveanadvancedskill
levelandyouareconfidentwiththewindconditions.
• Whenindoubtofthewindstrength,tryasmallerkitefirst.
• Checkyourflyinglinesproperly.Beforeattemptingyourlaunch,makesure
they are free of twists and tangles. Also check if they are not hooked behind
any part of your bar or spreader bar before you launch.
LANDING YOUR KITE
Landing your kite is best done using
an assistant. Steer the kite to the edge
of the wind window, just above the
ground.
Theassistantnowtakesafirmholdof
the leading edge, as close to the middle of the kite as possible.
Walk towards the assistant to release
the tension on the flying lines.
Place the kite on the ground with its
nose facing the wind, and weigh down
the canopy above the leading edge.
STEERING AND POWERING
The power of your kite can easily be controlled with the bar. When the depower
loop is hooked in, the bar can slide over the depower line, which changes the
angle of attack causing the kite to produce more or less power.
When pushing the bar away, the
power of the kite will be reduced.
When pulling in the bar, the kite will
produce more power. When pulling
in the bar while steering, the kite will
make tighter turns.
The power adjuster can be used to change the overall power of the kite.
Toreducetheoverallpowerofthe
Toincreasetheoverallpowerofthe
kite, pull in the line coming out of the kite, pull the line slightly towards you
cleat to the desired position.
andmoveitawayfromthecleat.Now
let the line out and let it lock back
into the cleat at the desired position.
Formoreinformation,moreinstructionsandextratipspleaserefertothe
manual supplied with your bar.
We strongly recommend to use a Peter Lynn bar designed to be used with
your Peter Lynn LEI kite.
RELAUNCHING YOUR KITE - LEADING EDGE DOWN
When your kite crashes on the water leading edge
down pull on one rear line.
The kite will turn around and move towards the edge Steerthekiteoffthewaterandsheetoutthebar.
of the wind window.
RELAUNCHING YOUR KITE - LEADING EDGE TOWARDS RIDER
Occasionally the kite might lay flat on the water with Pull on one rear line. The kite will slowly turn around Nowsteerthekiteoffthewaterusingtheinstruction
its leading edge towards you.
and one tip will start to catch the wind.
above.
• Sometimes,afterleavingthewater,thekitemaynotdirectlyflyup.Inthis
case you can grab the power adjuster and jerk on both top lines.
• Neverwindleaderlinesorflyinglinesaroundyourhandsorbody.
• Whenyourkiteisonthewater,alwaysbeverycarefulwithflyinglineswhich
arenottensioned.Makesuretheydonotgettangledbehindanypartofyour
body, harness or board.
• Afterlettinggoofthebarwhenyourkiteisonthewater,thebarmayspin
around making the “wrong way” face you. When relaunching make sure you
are holding the bar the right way around.
• Largewavescandamageyourkitewhentheycrashintothecanopy.Pay
attention when riding in large waves.
TUNING YOUR KITE
Top/rear line adjustments
Youmayfindyourlinesnotsetrightforyourpersonalwayofflyingyourkite.
These are some guidelines that might help you set your lines correctly:
Bar pressure
Therearlinecanbeattachedto3differentpositionstosetthebarpressure.
1
If the kite steers very slow, with very
little response on your bar, but flies
fast,yourtoplinesaretooshort/rear
lines are too loose.
If the kite steers very direct but does
not accelerate in flight, leaving you
with minimum pull, your top lines are
toolong/rearlinesaretootight.
2
3
1.Minimumbarpressure
2.Mediumbarpressure
3.Maximumbarpressure
Undothebridlelinefromthewebbingloopsonthekiteandre-attachtheline
to the correct webbing loop.
Toshortentherearlinesattachthe
flying line attachment loop to the
bridle line just behind the adjustment
knot closest to the kite.
Tomaketherearlineslongerattach
the flying line attachment loop to the
bridle line just behind the adjustment
knot furthest away from the kite.
SELF RESCUE
In case you need to perform a self rescue use the self-landing handles on the bar
to completely flag out the kite.
Swim towards the kite along the flying line attached to your leash. When you
have reached the kite, grab your bar and wind the flying lines onto it if desired.
Takegreatcautionwithlooselines,theycaneasilygetcaughtbehindparts
of your body. Grab both tips of the kite and point the kite towards the shore,
leading edge in the direction of the wind. This will help you to get back to shore
safely.
PACKING UP YOUR KITE
Undothelarksheadknotstoundothe
flying lines from the kite.
Wind your flying lines onto the bar.
Undotheclipsontheairducts.
Open the deflate valve.
Foldyourkitefromtipstocenter,
pushing the air from the struts and
leading edge towards the deflate
valve.
Nowfoldyourkitein3or4sections
and store it in the supplied kite bag.
CARE AND MAINTENANCE
Peter Lynn products are designed to be strong and durable. The extreme nature of
the kite sport puts a high strain on the equipment involved. By taking good care of
your equipment, you can minimize the wear on your equipment.
Kite care:
• Inspectyourequipmentbeforelaunch.Checkfortears,abrasions,undone
stitching, and all other forms of damage.
Bar care:
• Makesureyouregularlycheckyourbarforwearandtear.Replacepartswhen
needed.
• Testallmovingpartsofyourequipmentsuchaspulleysbeforeeverylaunch.
• Makesureyourflyinglinesarefreeofknots.
• Donotrigonroughterrain.Stayfarawayfromsharpitemsthatcoulddamage
your kite, such as seashells, trees, washed up wood or fences.
• Beforelaunching,alwayscheckthatyourquickreleasesareinworkingorderand
free of sand or other debris.
• Secureyourkiteusingsoftitemslikesandorsandbags.Donotuseitemswith
sharp edges like rocks.
• Whenreachingthewater,beforestartingyourkiteboardingsession,splashsome
wateronyourbartorinseoffsandthathasstucktoit.
• DonotunnecessarilyleaveakiteunusedforalongerperiodoftimetopreventUV
damage. Weigh down fluttering parts to reduce wear.
• Aftereverysession,rinseyourbarwithtapwatertoremovethesaltfromthebar.
• Beforeconnectingyourpumptotheinflatevalve,pumpitafewtimestoremove
any sand from the hose.
• Alwaysmakesureyourkiteisdrybeforepackingandfreeofsandorsharpitems.
• Regularlyrinseyourkitewhenusedinsaltwater.
• Whenstoringforalongtime,itisadvisedtoleavepartofthebagopen,toallow
fresh air to get in the bag, and any remaining traces of moist to dry up.
If there are problems with your kite or your bar, please contact your Peter Lynn
dealer.
REPLACING YOUR LEADING EDGE BLADDER
Undotheendsofthe
leading edge tube by
pulling out the ends.
Attach a piece of line to
each end of the bladder.
Slidethecoversoffthe
valves and carefully cut
thetie-wrapsoff.
Attach a piece of line to
each valve and push it
inside the leading edge
tube.
Open the zipper in the
center and remove the
bladder. Attach the
strings to the same valves
on the new bladder.
Foldthenewbladder
nicely in two piles and
carefully pull the lines
while guiding the bladder
into the leading edge
tube.Makesurethe
bladder does not twist.
Pull a small amount of
bladder out of the end of
thetube.Foldtheends
of the leading edge tube
inwards.
Makesureallvalvescome
out of each hole. Attach
the tubes to the valves
and secure them with a
new tie-wrap. Pump the
kite carefully and check
if the tube is not twisted
and there are no leaks.
Attach the line to the
Undotheendofthe
strut. Slide the bladder
valve of the new bladder.
out via the bottom of the
strut.
Carefully pull the line
while guiding the bladder
intothestrut.Makesure
the bladder does not
twist.
Pull a small amount of
bladder out of the end of
thestrut.Foldtheends
of the strut inwards.
Pull the valve out of the
hole, attach the tube
to the valve and secure
it with a new tie-wrap.
Pump the kite carefully
and check if the bladder
is not twisted and there
are no leaks.
REPLACING YOUR STRUT BLADDER
Slidethecoveroffthe
valve and carefully cut
thetie-wrapoff.
Attach a piece of line to
the valve.
WARRANTY
Peter Lynn warrants this product, when it is purchased from an authorized Peter
Lynn dealer by a retail customer, to be free of major defects in material or workmanship to the original purchaser, for a period of six (6) months from the date of
purchase by the original retail customer. This warranty is subject to the following
limitations:
• Thewarrantyissolelyforthebenefitoftheoriginalretailpurchaserandmay
notbeassigned.Forretailcustomerwarrantyclaims,proofofpurchasefroman
authorized Peter Lynn dealer is required. If the date of purchase can not be established, Peter Lynn will make a determination based on the last production year
and/ortheconditionoftheparticularproductclaimed.
• Thewarrantyonthisproductisvalidonlywhenitissolelyusedfordesignated
purposes c.q. kiteboarding on water and does not apply to any product used for
rentaland/orteachingpurposes.
• PeterLynnwillmakethefinalwarrantydetermination,whichmayrequireinspectionand/orphotosoftheequipment.Photosmustclearlyshowthedefect(s).
If necessary, this information must be sent to the Peter Lynn dealer where the
product was originally purchased, postage prepaid. Alternatively you may contact
the Peter Lynn distributor in (or nearest to) your country.
• IfaproductisdeemedtobedefectivebyPeterLynn,thewarrantycoverstherepair
or replacement of the defective product only. Peter Lynn will not be responsible
for any costs, losses, or damages incurred as a result of loss of use of this product.
This warranty does not cover damage caused by misuse, abuse, neglect or normal
wear and tear including, but not limited to, damage due to excessive sun exposure,
use in combination with other than Peter Lynn control gear, damage caused by
improper handling and storage, damage caused by use in waves or shore break,
and damage caused by anything other than defects in material and workmanship.
• Thewarrantyisvoidedifanyunauthorizedrepair,changeormodificationhasbeen
made to any part of the equipment. The warranty for any repaired or replaced
equipmenttakeseffectfromthedateoftheoriginalpurchaseonly.Theoriginal
purchase receipt must accompany all warranty claims. The name of the Peter Lynn
dealer and the date of purchase must be clear and legible.
• Therearenowarrantieswhichextendbeyondthewarrantyspecifiedherein.
Warranty Claims
Warranty claims must be processed through an authorized Peter Lynn dealer and be
issuedareturnauthorizationpriortoshippingtheproductconcerned.Forclaims
processing please contact the Peter Lynn dealer the product was purchased from
or call - or write to - the national Peter Lynn distributor. If there is no Peter Lynn
distributorinyourcountry,pleasefindourcontactdetailsonourwebsite
www.peterlynn.com.
DISCLAIMER – RELEASE OF LIABILITY
Peter Lynn / Vliegerop Ltd - Release of Liability
Caution
Before making any attempt to set up or use this product, you agree to have read and
fully understood the entire Peter Lynn LEI user manual; including, but not limited to,
all instructions and warnings it contains. You also agree to make sure that any other
user of this Peter Lynn product, prior to using it, will also read and fully understand
this Peter Lynn LEI user manual; including, but not limited to, all instructions and
warnings it contains.
Assumption and acceptance of risk
Kitepoweredsportscanbeverydangerousandphysicallydemanding.While
powerkiting in its many forms is an exciting and fun sport, it can be highly dangerous
for yourself and others around you, especially if the necessary safety precautions are
not or only partly taken. The user of this Peter Lynn product should understand that
participating in kite powered sports can result in serious personal injury – and even
death – to the user as well as to third parties. Before setting up and using this Peter
Lynn product you agree to assume and accept any risk of injury, whether known or
unknown, to both yourself and any third parties from using this Peter Lynn product.
Toreducetheserisks,westronglyrecommendyoutosticktothesafetyprecautions
listed in this Peter Lynn user manual.
Disclaimer and Release of Liability
Concerning the purchase of this Peter Lynn product by you, you hereby agree, to
the greatest extent allowed by law, to waive any claims you have or may have in the
future against Peter Lynn and all related entities resulting from using this Peter Lynn
productand/oranyofitscomponents.
You will also release Peter Lynn and all related entities from any liability for special,
indirect, incidental, consequential or exemplary damages, whether in contract, tort,
negligence, strict liability or otherwise including, but not limited to, loss of property
other than this Peter Lynn product, loss of use of this product, or other property or
othereconomiclosses.PeterLynnshallnotbeliableforcontributionorindemnification, whatever the cause.
All terms and conditions contained herein shall, in the event of your death or
incapacity, apply and be binding upon your heirs, next of kin and any other representatives including, but not limited to, administrators and executors. The foregoing
provisions regarding liability and warranty are exclusive and in lieu of all other
liability- and warranty statements, whether written, oral or implied.