1
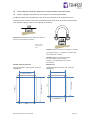
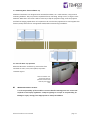
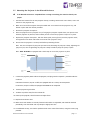
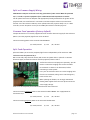
2.5 Mounting the Projector in the Blizzard Enclosure If the Blizzard enclosure is suspended from a ceiling or overhang, this must be done by two people. 1. Find the best location for the two projector clamps, avoiding contact with access doors, vents and control on the projector top. 2. Make sure that all four Projector clamp threaded rods are screwed into the projector tray, and locked in place with the locknut provided. 3. Remove the projector clamp bars. 4. Place the projector on the projector tray. If hanging the projector upside-down, one person must hold the projector in position, while another person secures the projector clamp bars in place. 5. Replace the projector clamp bars, with the rubber pads pressing firmly onto the projector cover, and tighet the nuts above and below each end of each projector clamp. 6. Ensure that the projector is securely held before proceeding further. Note: You can still adjust the projector pan and tilt by loosening the projector clamp, adjusting the projector feet, then re-tightening the projector clamp to hold the projector firmly in place. Note: BABY BLIZZARD is equipped with a load strap to secure the projector in place. Projector Clamp Rubber Pad Threaded Rod Lock Nut Projector Tray 7. Connect the projector power cable to the projector, and plug into the receptacle provided inside the enclosure: International Versions (.IN part # suffix) are equipped with CE17 16amp 2P+E receptacles US Versions (.US part # suffix) are equipped with NEMA L6-20 receptacles 8. Connect projector signal cables 9. Tie down any cables away from the exhaust fan 10. Power up the projector, check functions and adjust focus 11. Replace the enclosure cover 12. Make sure that all latches are securely fastened. The latches are adjustable, and should be checked periodically, since the rubber seal may compress slightly over time. 13. For additional security, use a bolt or padlock to lock one or more of the latches, using the security ring provided. Blizzard Enclosure User Manual page 11