1
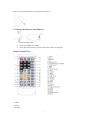
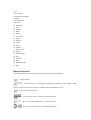
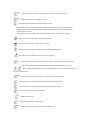
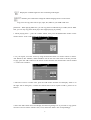
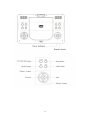
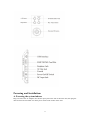
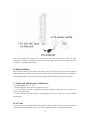
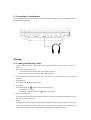
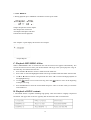
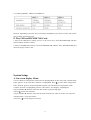
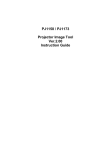
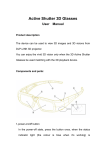
Table of Contents:
Table of Contents ……………………………………………………………… 1
Front
……………………………………………………………… 2
Important Safety Instructions ……………………………………………………3-4
Remote Control ………………………………………………………………… 5-6
Button Function …………………………………………………………… 6-9
Unit view ……………………………………………………… 10-11
Powering and Installation ……………………………………………………… 12-13
Play
…………………………………………13-17
System Setup ………………………………………………………………………18-20
Technical Specifications ………………………………………………………………… 20
Trouble Shooting ………………………………………………………………… 21
1
Front:
Thank you for purchasing this Portable DVD player. Before operating this unit, please read this
manual carefully and retain it for further reference.
Features:
-9 Inch Display
-Earphone jack
-USB, SD/MMC slot
-Supports DVD, VCD, MPEG4, CD, MP3, CD-R, DVD-RW, JPG, DIVX, Kodak picture CD
-Power: DC 9-12V
Accessories:
-Power adapter
-Car adapter
-AV cable
-Game joysticks (2pcs)
-Game disc
-Earphones
-User manual
-Remote control
-Carrying bag
2
IMPORTANT SAFETY INSTRUCTIONS:
WARNING:
TO REDUCE THE RISK OF FIRE OR ELECTRIC SHOCK, DO NOT EXPOSE TO
MOISTURE. DO NOT REMOVE COVER (OR BACK) AS THERE ARE NO USER
SERVICEABLE PARTS INSIDE. REFER SERVICING TO QUALIFIED SERVICE
PERSONNEL. SERVICE MUST BE CARRIED OUT BY QUALIFIED PERSONNEL ONLY,
OR THE WARRANTY IS NOT VALID.
The lightening flash with arrowhead symbol within an equilateral triangle is intended to
alert the user to the presence of non-insulated dangerous voltage within the product.
This may be of sufficient magnitude to constitute a risk of electric shock.
The exclamation mark within an equilateral triangle is intended to alert user to the
presence of important operating procedures and maintenance (service) instructions in
the literature accompanying the appliance.
Laser product symbol: located on the rear panel of the unit (in some cases at the bottom side),
indicates that this player is a class 1 laser product. It uses only a weak laser and there is no
hazardous radiation outside of the unit.
Installation:
Ensure that the portable DVD player is installed in accordance with the instructions and
illustrations provided in this manual.
3
GENERAL PRECAUTIONS:
1) Read through this instruction manual carefully before installation and use.
2) Do not touch the power plug with wet hands.
3) Switch off the mains power when the unit is not in use. (Disconnect the power plug from the
power outlet when you do not intend to use the unit for a long period of time).
4) Do not open the cover or touch any of the components inside the unit, this is only for qualified
technicians.
5) Do not expose the unit to direct sunlight or nearby objects that radiate heat as this may cause
damage to the unit.
6) Do not place the unit in moist and humid environments.
7) Please ensure the ventilation holes are not covered to avoid overheating and malfunction.
8) Clean the panel and case with soft dry cloth only, do not apply any kind of thinner, alcohol or
sprays.
9) Do not expose the unit to dripping or splashing, nor should any objects filled with liquids such
as vases be placed on the apparatus.
10) Excessive sound pressure from earphones and headphones can cause hearing loss.
Cleaning the Machine:
1) Please ensure the machine is turned off before cleaning.
2) Do not use any chemicals or cleaning agents to clean the machine.
3) Use slightly damp cloth to clean the outside of the machine.
Do not Open:
To reduce the risk of Electric Shock, do not remove the cover (or back). There are no userserviceable parts inside. Refer servicing to qualified service personnel only.
Care of Disc:
1)
2)
3)
4)
5)
6)
Do not place discs near heat sources such as direct sunlight or high humidity areas.
Keep discs in their cases to protect them from damage.
Do not touch the disc surface; hold the disc by the edges.
Do not use adhesive tape on the disc surface.
Wipe the disc gently from inside to outside with a soft cloth.
Do not use gasoline, non-disc special cleaning agents or antistatic spay to clean the disc
because these substances will cause damage.
Remote Control:
Using the Remote Control
4
Remove the plastic sheet before using the remote control.
To Change the Remote Control Battery
1. Open the Battery Door.
2. Insert one CR2025 size battery.
3. To use the remote control, point it at the remote sensor on the player.
Remote Control View:
1. Menu
2. Power
3. Number
5
4.10+
5. DVD Setup
6. Up/Down/Left/Right
7. Audio
8. Fast Forward
9. Rewind
10. Play/Pause
11. Stop
12. Display
13. Mute
14. Repeat
15. A-B repeat
16. Search
17. Program
18. Angle
19. Zoom
20. Volume+
21. OK/Confirm
22. Volume23. Subtitle/Copy
24. Title
25. Previous
26. Next
27. DVD/SD/USB
28. Step
Button Functions:
Note: Some buttons are only on the remote control and not on the DVD player.
Switch On/Off.
Press this button to cycle between optical disc (CD/DVD), Card Reader / USB.
Press the arrow key to choose the source and then press the OK button to read.
Enter or exit the setup menu.
Use to select an item in a menu or enter a password.
Press to enter the selected item, or to select an item.
Press to move the cursor or to scroll through numbers.
6
Press this button to return to the DVD disc title menu or PBC function.
Repeat playing the title, chapter or track.
Press this button to repeat a specific portion of a disc.
When playing a disc, press this button to mark an A point, then press it again to mark a
B point, the unit will repeat playing the contents between point A and point B. Press the
button again to cancel.
Please note: Point A and Point B will need to be in the same movie or song playing.
Press this button to skip to previous chapter or track.
Press this button to skip to next chapter or track.
Press this button to play or resume play from FWD, REW, SLOW.
Press this button to Pause. Press it twice to stop playing.
This button is used to program your favorite songs or chapters when playing a VCD,
CD or DVD disc. Press this button and then enter the number directly to start.
Press this button to fast forward or rewind. Fast forward or rewind speeds are 2X,
4X, 8X, 16X and 32X.
Select a title, chapter, track, title time, chapter time or tracking time.
Press this button to mute the sound. Press again to return the sound.
Press [VOL+] to increase sound, Press [VOL-] to reduce sound.
Select the audio language for the DVD.
Displays DVD title.
Displays information about the disc.
Enlarge the image 2X, 3X to 4X times the original size.
7
Display the available angles for discs containing multi-angles.
Subtitle: press and hold to change the subtitle language shown on the screen.
Copy: You can copy files such as mp3, mp4, AVI, JPEG to your USB or SD card.
[Attention:When playing MP3 files, you can copy them to USB directly; For MP4, AVI or JPEF
files, you can only copy them when player has stopped playing or paused].
1. When playing discs , press the “STOP” button, then press the“SUB/COPY” button on the
remote control,then it will display the dialog box as follows:
2. As you request, move the cursor by using the direction button on remote control to choose:
ALL SELECT, ALL UNSEL, COPY and EXIT. You can also move the cursor to the file you want
to copy, press the “OK” button on the remote control and then the selected files will be marked
“√”. Please see as follows:
3. Move the cursor to “COPY” item, press the “OK” button and then it will display “USB 1” on
the right side of dialog box, it means the selected files will be copied to USB 1, please see as
follows:
4. Press the “OK” button and it will display the following dialog box. If you want to copy, please
move the cursor to choose “NEXT” item; if not, choose the “Back” item correspondingly.
8
5. After moving the cursor to the “NEXT” item, press the “OK” button and the system will start
copying. If you want to cancel copying, please choose the “CANCEL” item. See as follows:
6. When the copying has finished the system will return to the previous status.
Portable DVD Player View:
9
10
Powering and Installation:
A. Powering the system indoors
Plug one end of the AC Adapter into the DC input jack on the side of the main unit, then plug the
other end into the 100-240V AC mains power outlet in the socket on the wall.
11
Note: The included AC adapter is for use with this unit only. Do not use it with any other
equipment. Disconnect the player from the mains power outlet on the wall if you don’t intend to
use it for an extended period of time.
B. Built-in Battery
Plug one end of the AC to DC adapter into the DC jack on the side of the player, and then plug the
other end into the 100-240V AC mains power outlet on the wall. When the battery is charging, the
LED indicator light will turn red. Once fully charged, the LED indicator light will turn green.
C. Using and Maintenance of Batteries
1. Working temperature: 5 – 40 ℃
2. Please unplug the mains power plug when not in use.
3. It is normal for the unit to generate heat during playback. But please avoid using it for
excessively long periods.
4. Avoid collisions with other objects; avoid getting the unit wet or using it in a hot or humid
environment.
D. AV Out
Connect one end of the supplied AV cable plug into the unit’s DVD’s AV OUT jack and connect
the other end to the AV INPUT jack on your TV or Monitor through an optional RCA Cable.
12
E. Connecting to headphones
Wired headphones may be used with the DVD or Monitor, simply plug in the headphone jack on
the Right DVD or Monitor.
Playing:
A. Loading and Playing a Disc:
1. After connecting power to the DVD player, push the Power On/Off switch to the “on”
position.
2. Place a disc gently into the tray.
- You should hear and feel the disc click firmly into place.
- Place a disc into the tray with the disc’s label facing up.
3. Close the DVD cover until it clicks shut. The unit will now load the disc and commence
playback.
4. Stopping Play.
Press the STOP (■) Button during play.
5. Play/Pause.
Press the Play/Pause ( ) button on the remote during play.
- Screen stops, no sound.
- To resume, Press the Play/Pause ( ) button once again.
6. Fast Forward/Rewind
Press Fast Forward or Rewind to achieve the place you desire with speed adjustable timing of
2X, 4X, 8X, 16X, 32X times.
7. Menu
A DVD is divided into sections called titles and chapters. When you play a DVD, a root menu
of the disc will appear on the screen of your DVD player or Monitor. The contents of the
menu vary from disc to disc. Press MENU during playback to display the menu.
13
B. Display:
1. Playing Time and Remaining Time
a. During playback press the “DISPLAY” button to display the current title number, the total
number of title, the current chapter number, the total number of chapters and the playing elapsed
time for the title. The heading will disappear automatically after 3 seconds if the DISPLAY button
is not pressed.
b. Press “DISPLAY” and hold to choose the options below in sequence.
Title Elapsed: The elapsed time of the title.
Title Remain: The remaining time of the title.
Chapter Elapsed: The elapsed time of the chapter.
Chapter Remain: The remaining time of the chapter.
Display off: The DVD’s time information will not be displayed.
2. ANGLE
During playback of a disc, press “ANGLE” to display the available angles for discs containing
multi-angles, showing the current angle number and the total number of angles displayed. Press
“ANGLE” to select another angle, then press again to exit and return to the normal viewing angle.
The angle display will disappear automatically if the “ANGLE” button is not pressed again within
3 seconds.
Note: Not all discs contain this feature.
3. SUBTITLE
During disc playback press “SUB” to select the subtitle language you desire, the current Subtitle
Language Number and the total Number of Subtitle Languages displayed. If there are multiple
languages press “SUB” again to select another subtitle language. To turn subtitles OFF, press the
14
“SUB” button until “Subtitle Off” is displayed. The Subtitle display will disappear automatically
if the “SUB” button is not press again within 3 seconds.
Note: Some DVDs only allow access to this function through the DVD menu.
4. AUDIO
During playback press “AUDIO” to select the audio language you desire, the current Audio
Channel Number and the total number of Audio Channels displayed. Press “AUDIO” again to
select another audio language. The audio display will disappear automatically if the “AUDIO”
button is not pressed within 3 seconds.
5. ZOOM
During playback press “ZOOM” to enlarge the picture by 2X, 3X or 4X with the current zoom
multiple modes.
6. A-B REPEAT
a. During playback firstly press “A-B” to set the Starting Point A.
b. Press “A-B” a second time to set the Ending Point B and player will repeatedly play the part
between Point A and Point B.
c. Press “A-B” a third time to cancel “A-B” repeat and resume normal playback.
A-B Repeat Starting Point
A-B Repeat Ending Point
15
A-B Repeat Cancelled
7. 1/ALL REPEAT
a. During playback press “REPEAT” and hold to see the repeat mode.
Chapter: Repeat the current chapter.
Title: Repeat the current title.
All: Repeat all chapters and titles.
Off: Resume normal playback.
The “Chapter” repeat display shows below for example:
Chapter Repeat
C. Playback MP3/MPEG-4 Disc:
When a MP3/MPEG-4 disc is inserted into the unit the menu screen appears automatically. You
can use the menu screen to select your desired folders and songs or the system plays the songs in
the order they were burned onto the disc.
1. Press the ▲ or ▼ button to choose a folder from the folder list.
2. Press “OK” to select the highlighted folder. The songs available under the folder will be listed.
3. Use ▲ or ▼ button to choose a song from the list. Press “OK” to select and begin playback of
the highlighted song.
4. Use the
button to move to the next song. Press the
button to move to the beginning
of the previous song.
5. Press the ▲ button to select the current folder and press “OK” to confirm. Then you can back
to the folder list.
D. Playback of DIVX content:
1. The DIVX format is capable of holding high quality video and sound in a highly compressed
file format. File types such as AVI are typically able to hold more data in a smaller file:
16
2. Comparing MPEG-1, MPEG-2 and MPEG-4:
However, depending on how the file was encoded, compatibility may still be an issue with certain
types of DivX or MP4 type files.
E. Play USB and SD/MMC/MS Card:
1. Plug in the USB device making sure it’s in the correct way. Press [DVD/SD/USB] and then
choose USB to select the content.
2. Insert a SD/MMC/MS memory card to the SD/MMC/MS interface. Press [DVD/SD/USB] and
select SD to play memory card.
System Setup:
A. On screen display Menu:
1) Press “SETUP” to display the main screen of the Setup Menu on the screen and “General Setup
Page” appears. At the same time “General” is highlighted. Press
to select other setting items.
Press “SETUP” again to exit the Setup Menu and the unit will resume its last playback mode.
2) When “General” is highlighted, press the “OK” button, “TV Display” is highlighted.
3) Press the ▲ or ▼ button to select the other menus in general setup page.
4) Press
to enter the sub menu.
5) Press the ▲ or ▼ button to select the sub menu and press the “OK” to confirm your selection.
6) Repeat steps 3-5 for other menus.
Note: Press
to return the previous menu.
17
B. Setting Page:
1. General Settings Page
1.1 Display Mode
a. Normal/PS: When the player outputs signal to a normal monitor. Wide-screen images are shown
on the screen, but with some parts cropped automatically.
b. Normal/LB: When the player outputs signal to a normal monitor, a normal picture is shown on
the screen with a black strip at both the top and bottom of the screen.
c. Wide: When the player outputs signal to a wide screen monitor, a wide picture is shown on the
full screen.
1.2 Angle Mark
On: The screen will show the angle mark icon. (If an angle option is available).
Off: The screen will not display the Angle Mark.
Note: Not all discs contain above features. The above features are disc dependent.
1.3 OSD Language
You can choose one out of several different languages as the OSD setup language.
1.4 Screen Saver
On: Enables screen saver.
Note: The DVD player will enter the Screen Saver mode after approximately five minutes if the
same image remains on the screen.
Off: Disables screen saver (off).
1.5 Last Memory
On: The unit will return to the last position on the disc.
Off: The unit will not return to the last position on the disc.
2. Audio Setup
2.1 Ch speaker setup
2.11 Channel
RIGHT/LEFT Channel: Mixes a 5.1ch audio signal to 2 audio channels and then outputs to
the left and right speakers.
Stereo: Outputs a stereo signal to the left and right speakers.
3. Dolby Setup
3.1 DUAL MONO
Stereo: Left/Right channel audio will be played back by the Left/Right speakers.
Left Channel: Playback of Left channel audio only.
Right Channel: Playback of Right channel audio only.
Mixed Channel: Both Left/Right channels are mixed to one mono channel.
3.2 Dynamic Range Compression
18
Use this mode to level all sound channels to ensure even sound levels.
4. Video Setup
Use to set up the screen settings:
Sharpness: Select from High, Middle or Low sharpness settings.
Brightness and Contrast: Use
or
button to select the option, press “OK” to confirm your
selection.
5. Preference Page (This should be set with no disc in the player)
5.1 Sound, Subtitles and Language:
In the Setup menu, you can choose the default settings of the sound, subtitles and menu
language.
5.2 Parental Controls:
Select the parental level you desire for disc with lock-out function or multiple rating levels. The y
are listed from level (1 Kid Safe) to the highest level (8 Adult). The setting allows PLAYBACK to
be restricted via password.
Note: This function will only work if the disc contains a parental control lockout.
5.3 Password Setting:
This function allows you to re-set a new password.
Note: You have to input the correct password to change the password setting. The default
password is 136900.
5.4 Default:
Select “Default” in preference page to make the setting return to the factory-set mode.
6. Exit Setup Menu
Press “SETUP” to exit the Setup Menu.
19
Specifications:
Portable DVD Player:
Compatible Disc:
DVD/VCD/CD/MP3/JPG/MPEG-4
Signal System:
PAL/NTSC
Screen Size:
9 Inch
Frequency Response:
20 Hz to 20 KHz
Video Output:
1 Vp-p/75 Ohm, Unbalanced
Audio Output:
1.4Vrms/10 KOhm (1 KHz, 0dB)
Audio S/N:
Better than 60 dB
Dynamic range:
Better than 85 dB
Laser:
Semiconductor Laser, Wave Length: 650 nm/795 nm
Power source:
DC 9 – 12V
Power Consumption:
15W
Working temperature:
5 – 40℃
Weight:
0.93KGS
Dimensions (L x W x H):
260*170*40mm
Note: This Manual is only for your reference. Changes to the design and specification may
be made without notice.
Trouble Shooting:
No sound or distorted sound?
Make sure your DVD is connected properly. Make sure all cables are securely inserted into the
appropriate jacks.
Can’t advance through a movie?
You can’t advance through the opening credits when warning information appears at the beginning
of movie. This is because the disc is programmed to prohibit that action.
20
The icon ( ) appears on the screen?
The feature or action cannot be completed at this time because:
1. The disc’s software restricts it.
2. The disc’s software doesn’t support the feature (e.g. angles)
3. The feature is not available at the moment.
4. You’ve requested a title or chapter number that is out of range.
Picture is distorted?
1. The disc might be damaged. Try another disc.
2. It is normal for some distortion to appear during forward or rewind scanning.
1. No forward or Rewind scan?
2. Some discs have sections that prohibit rapid scanning or title and chapter skip.
3. If you try to skip through the warning information and credits at the beginning of a movie,
you won’t be able to. This part of the movie is often programmed to prohibit skipping through
it.
IR sensor doesn’t work?
1. Ensure that the batteries in the remote are new or have sufficient power.
2. Ensure that the remote sensor eye is not obstructed.
3. Ensure that the infrared transmitter is affixed over the sensor eye of the component to be
controlled.
Disc won’t play?
1. Insert a disc with the label side facing up.
2. Check the type of disc you put into disc tray. This DVD only plays digital video discs, audio
CDs and MP3s.
Play starts, but then stops immediately?
1. The disc is dirty. Clean it carefully using a soft dry cloth.
2. Condensation has formed. Allow player to dry out.
Turner House
9-10 Mill Lane
21
Alton
Hampshire
GU34 2QG
[email protected]
Electrical and electronic products displaying the crossed out wheeled bin symbol above
must not be disposed of in general household waste. Take the product to a recycling
facility that accepts electrical and electronic products. Check with your Local Authority
for your nearest recycling centre
The lithium battery in this product must be recycled or disposed of properly. It is
recommended that the battery is removed by the manufacturer’s authorised engineer or a
competent person at a recycling centre. To recycle your lAVA product please contact your
nearest recycling centre.
22