1
Arena Par
Set Up
Arena Par
Power Supply: The Elation Professionals® Arena Par contains an
Set Up
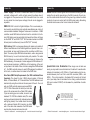
Notice: Be sure to follow figures two and three when making your own
POWER
automatic voltage switch, which will auto sense the voltage when it
is plugged into the power source. With this switch there is no need
to worry about the correct power voltage, this unit can be plugged in
anywhere.
POWER
cables. Do not use the ground lug on the XLR connector. Do not conDMX512
nect the cable’sDMX+,DMX-,COMMON
shield
conductor to the ground lug or allow the shield
conductor to come in contact with the XLR’s outer casing. Grounding
the shield could cause a short circuit and erratic behavior.
DMX-512: DMX is short for Digital Multiplex. This is a universal protocol used by most lighting and controller manufactures as a form of
communication between intelligent fixtures and controllers. A DMX
controller sends DMX data instructions from the controller to the fixture. DMX data is sent as serial data that travels from fixture to fixture
via the DATA “IN” and DATA “OUT” XLR terminals located on all DMX
fixtures (most controllers only have a DATA “OUT” terminal).
DMX Linking: DMX is a language allowing all makes and models of
different manufactures to be linked together and operate from a single controller, as long as all fixtures and the controller are DMX compliant. To ensure proper DMX data transmission, when using several
DMX fixtures try to use the shortest cable path possible. The order
in which fixtures are connected in a DMX line does not influence the
DMX addressing. For example; a fixture assigned a DMX address of 1
may be placed anywhere in a DMX line, at the beginning, at the end,
or anywhere in the middle. When a fixture is assigned a DMX address
of 1, the DMX controller knows to send DATA assigned to address 1
to that unit, no matter where it is located in the DMX chain.
SOUND
REMOTE
CONTROL
INPUT
INPUT
OUTPUT
COMMON
1
2
3
©Elation Professionals® - www.elationlighting.com - Arena Par Instruction Manual Page 5
2
DMX +
3
3
DMX -
1
2
DMX512 IN
3-PIN XLR
3
1
2
Figure 2
XLR Female Socket
XLR Male Socket
1 Ground
2 Cold
2 Cold
1 Ground
Termination red
avoids signal t
and interference
to connect a DM
120 Ohm 1/4 W)
and PIN 3 (DM
XLR Pin Configuration
Pin 1 = Ground
Pin 2 = Data Compliment (negative)
3 Hot
REMOTE
CONTROL
INPUT
SOUND
INPUT
3 Hot
OUTPUT
SOUND
Figure 3
Pin 3 = Data True (positive)
REMOTE
CONTROL
INPUT
INPUT
OUTPUT
Special Note: Line Termination. When longer runs of cable are
used, you may need to use a terminator on the last unit to avoid erratic
behavior. A terminator is a 90-120 ohm 1/4 watt resistor which is connected between pins 2 and 3 of a male XLR connector (DATA + and
DATA -). This unit is inserted in the female XLR connector of the last
unit in your daisy chain to terminate the line. Using a cable terminator
(ADJ part number Z-DMX/T) will decrease the possibilities of erratic
behavior.
POWER
Data Cable (DMX Cable) Requirements (For DMX and Master/Slave
DMX512 4 Channel
Operation): The Arena Par has 3 DMX channelDMX+,DMX-,COMMON
modes;
Mode, 5 Channel Mode, & 7 Channel Mode. The DMX address is set
electronically using the controls on the rear panel of the unit. Your unit
and your DMX controller require a approved DMX512 110 Ohm Data cable for data input and data
output. We recommend Accu-Cable DMX cables.
COMMON
If you are making your own cables, be sure to use
DMX +
DMX512 OUT
3-PIN XLR
standard 110-120 Ohm shielded cable (This cable
DMX may be purchased at almost all professional sound
and lighting stores). Your cables should be made
with a male and female XLR connector on either
Figure 1
end of the cable. Also remember that DMX cable
must be daisy chained and cannot be split.
1
DMX512 OUT
3-PIN XLR
POWER
3
1
2
DMX512 IN
3-PIN XLR
3
1
2
POWER
Termination reduces signal errors and
avoids signal transmission problems
and interference. It is always advisable
to connect a DMX terminal, (Resistance
120 Ohm 1/4 W) between PIN 2 (DMX-)
and PIN 3 (DMX +) of the last fixture.
Figure 4
©Elation Professionals® - www.elationlighting.com - Arena Par Instruction Manual Page 6