1
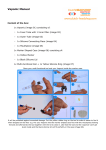
User Guide
check on line for the newest version of this guide.
version 1.3
Persei User Guide
Assembly Instructions
The Persei vaporizer is the world’s first and only non-flame powered variable voltage portable
extract vaporizer. The only one to use pure extract oils with no need for carrier agents or cotton
in the cartridge. The only one that allows you to load the cartridges with your own extract oils.
Persei, the future of vaporization has arrived.
● Persei Variable Voltage battery power unit
● Batteries for the VV battery power unit for the voltage required
● Correct Cartridge(s) for the selected voltage.
Prerequisites:
1.
Choose your required voltage configuration from the choices below.
WARNING always choose your voltage selection based on your cartridge type.
1A. Single/Double Cartridge
3.7volts
1B. Single/Double Cartridge
6.0volts
1C. Single/Double Cartridge
7.4volts
+
+
CR123A
18350
_
_
+
+
CR123A
18350
_
_
WARNING
Using 6.0v with a single or double
cartridge, requires the use of a
special purpose cartridge(s)
WARNING
Using 7.4v with a single or double
cartridge, requires the use of a
special purpose cartridge(s)
6.0 volts cartridge compatibility:
7.4 volts cartridge compatibility:
+
18650
_
3.7 volts cartridge compatibility:
1X
2X
2.4 Ohm Cartridge
1X
4 Ohm Cartridge
1X
5 Ohm Cartridge
or
or
or
2.4 Ohm Cartridge
4 Ohm Cartridge
5 Ohm Cartridge
2.4 Ohm Cartridge
2X
4 Ohm Cartridge
2X
5 Ohm Cartridge
Using a voltage setting with an incorrectly matched cartridge(s) will damage the cartridge(s)
Copyright © Utopia Planitia Technologies 2012
Distributed by
www.w9tech.com
Persei User Guide
Assembly Instructions
2. Unscrew base cap and remove from Persei body.
Top of
battery
Persei
body
battery alignment tool and turn tool until
3. Insert
battery is flush with the top of the Persei body.
Battery NOT
Flush with
Persei body
Battery is
Flush with
Persei body
battery alignment
4. Remove
tool and screw base cap
back on.
Base
cap
DO NOT charge any batteries in
the
the charger included with your
Persei, except for the batteries
included in your Persei kit or
serious personal injury could
occur.
Copyright © Utopia Planitia Technologies 2012
Page 2
Distributed by
www.w9tech.com
Persei User Guide
Assembly Instructions
5. Select the correct Persei head according to your cartridge type and screw it on
to the Persei body.
5A. Single or Double
5B. Single or Double
5C.
Cartridge 3.7volts
one 18650 battery
Cartridge 6.0volts
two CR123A batteries
Single or Double
Cartridge 7.4volts
two 18350 batteries
or
or
or
WARNING
Using 6.0v with a single or double
cartridge, requires the use of a
special purpose cartridge(s)
WARNING
Using 7.4v with a single or double
cartridge, requires the use of a
special purpose cartridge(s)
For 6.0 volts, a 2.5 to 4.0 ohm
cartridge(s) is/are recommended
For 7.4 volts, a 3.5 to 5.0 ohm
cartridge(s) is/are recommended
For 3.7 volts, a 1.5 to 2.5 ohm
cartridge(s) is/are recommended
Using a voltage setting with an incorrectly matched cartridge(s)
will damage the cartridge(s)
Copyright © Utopia Planitia Technologies 2012
Page 3
Distributed by
www.w9tech.com
Persei User Guide
Cartridge Guide
Select the correct Cartridges according to your selected voltage and Persei head.
You can choose what ever cartridge and voltage combination works best for you,
as each extract requires different power ratings.
3.7 - 5.0 volts (one 18650 battery)
Single Persei Head
1X
Double Persei Head
Warning, using this top will
damage cartridges if you
do not know how to use it
2X
1.5-2.5 Ohm Cartridge
1.5-2.5 Ohm Cartridge
1.5-2.5 Ohm Cartridge
4.5 - 6.5 volts (two CR123A batteries)
Single Persei Head
1X
Double Persei Head
Warning, using this top will
damage cartridges if you
do not know how to use it
2X
2.5-4.0 Ohm Cartridge
2.5-4.0 Ohm Cartridge
2.5-4.0 Ohm Cartridge
6.1 - 8.4 volts (two 18350 batteries)
Single Persei Head
1X
Double Persei Head
Warning, using this top will
damage cartridges if you
do not know how to use it
2X
3.5-5.0 Ohm Cartridge
3.5-5.0 Ohm Cartridge
3.5-5.0 Ohm Cartridge
Using a voltage setting with an incorrectly matched cartridge(s) will damage the cartridge(s)
Page 4
Copyright © Utopia Planitia Technologies 2012
Distributed by
www.w9tech.com
Persei User Guide
Cartridge Filling Instructions
Prerequisites: ● Select a level, flat and smooth heat resistant surface to work on
i.e. granite kitchen / bathroom counter
● Jet flame lighter recommended, regular lighter will also work
● Cartridge Fill Tool
1.
Hold the cartridge upright,
grasping it between your thumb
and forefinger just above the
threads.
2.
Place Fill Tool onto the top of the cartridge.
The air tube hole will be covered by the
deflector built into the Fill Tool.
The Fill Tool has been designed for a very tight precise fit onto the top of the cartridge.
Some force might be required the first time a new cartridge gets fitted with the
Fill Tool.
Copyright © Utopia Planitia Technologies 2012
Page 5
Distributed by
www.w9tech.com
Persei User Guide
Cartridge Filling Instructions
3.
If your extract is in a vial, place the vial into the Fill Tool upside down and with the
vial cap off (3a). If your extract is not in a vial, just load it directly into the
Fill Tool (3b). Remember ! 0.5 gram minimum and 1.0 gram maximum.
3a.
Copyright © Utopia Planitia Technologies 2012
3b.
Page 6
Distributed by
www.w9tech.com
Persei User Guide
Cartridge Filling Instructions
The goal during cartridge filling is to get all your extract into the bottom of the
cartridge using as little heat as possible, but as much as needed. We want to
avoid any cold spots on the cartridge walls to help prevent any melted extract
from solidifying on the way down and causing an air gap or blockage of any kind.
4.
Gently start to apply heat with your torch lighter on a low setting. Preheat the center
of the cartridge first, just above your fingers 1 until you feel the cartridge body get
warm. Keep rotating the cartridge so it heats all around evenly. Once you feel heat
working down, move the flame slowly up the cartridge toward the top 2 with plenty
of heat (just short of smoke being visible). As long as your fingers don't get too hot in
which case stop, let it cool, and repeat again if necessary. If the cartridge gets too hot
to hold, you are applying too much heat.
DO NOT overheat the cartridge!
4a.
4b.
2
2
keep rotating the
cartridge as you heat it
1
keep rotating the
cartridge as you heat it
1
Page 7
Copyright © Utopia Planitia Technologies 2012
Distributed by
www.w9tech.com
Persei User Guide
Cartridge Filling Instructions
5.
Keep applying heat with your torch lighter on a low setting, moving the flame up and
down from the top of the vial 5a or Fill Tool 5b down to just above your fingers. Keep
rotating the cartridge so it heats all around evenly. You should see your extract start to
liquefy and run down the Fill Tool and into the cartridge.
DO NOT overheat the cartridge!
5a.
keep rotating the
cartridge as you heat it
5b.
keep rotating the
cartridge as you heat it
Page 8
Copyright © Utopia Planitia Technologies 2012
Distributed by
www.w9tech.com
Persei User Guide
Cartridge Filling Instructions
6.
Once the extract begins to flow into the cartridge, move your torch lighter back down to
heat the Fill Tool and cartridge until all of your extract is in the cartridge. After about
25 - 30 seconds of heating, the part of the cartridge under your fingers will get really
hot, stop heating. Let the Fill Tool, vial and cartridge cool down for 3 minutes before
touching them!!!
DO NOT overheat the cartridge!
6a.
keep rotating the
cartridge as you heat it
6b.
keep rotating the
cartridge as you heat it
Page 9
Copyright © Utopia Planitia Technologies 2012
Distributed by
www.w9tech.com
Persei User Guide
Cartridge Filling Instructions
7.
Once cool, remove the vial (7a) and then the Fill Tool (7b).
The cartridge is now ready for use.
7a.
7b.
!!! Let the Fill Tool, vial
and cartridge cool down
before touching them !!!
8.
If you are going to store the cartridge
then place the white cap on the end.
Place white cap on
for storage, or
leave off for instant
use.
Page 10
Copyright © Utopia Planitia Technologies 2012
Distributed by
www.w9tech.com
Persei User Guide
Priming and Use
Prerequisites: ● Persei Vaporizer
● Cartridge(s) already filled with no less than .5 grams and no more
than 1 gram of extract and attached to your Persei vaporizer.
1.
Depending on how long your cartridge has been stored for, the temperature,
orientation of it during storage and thickness of your extract, the cartridge may
or may not need priming. All newly filled cartridges should be primed before use.
To test, place the mouthpiece in your mouth and try to gently suck air through using
only your mouth sherlock style, not your lungs, while pressing the button for 2
seconds.
If you feel and taste vapor, go to step 3.
If you did not feel or taste vapor, go to step 2.
!!WARNING!! Cartridge is HOT
during use, avoid touching it.
2.
Priming: Set up your Persei for 3.7 volts for the priming of ALL cartridges.
Press and hold the power button on the Persei for 3 seconds (1.5-2.5 ohm cartridges)
and 6 seconds (2.5-5.0 ohm cartridges) and let go.
Immediately try to gently suck air through using only your mouth sherlock style,
not your lungs. Keep repeating this cycle until you can feel and taste vapor,
sometimes you will hear or feel a tiny pop and then air will start flowing.
Never inhale hard using the Persei, this will result in extract being pulled into the
air tube causing clogging.
!!WARNING!! Cartridge is HOT
during use, avoid touching it.
3.
A. Using your lungs, very slowly inhale while holding down the power button for no
longer than 6 seconds (3 seconds at 7.4volts). Some users find it difficult to inhale
slowly enough and have greater success using method B.
B. Using your mouth, very slowly suck, filling only your mouth with vapor while
holding down the power button for a maximum of 6 seconds (3 seconds at 7.4volts).
Remove the Persei from your lips and inhale the vapor in your mouth deeply.
For both methods, continue drawing air through the cartridge for 2 - 3 seconds after
releasing the power button to help prevent clogging. Always allow the cartridge
to cool between hits.
!!WARNING!! Cartridge is HOT
during use, avoid touching it.
Copyright © Utopia Planitia Technologies 2012
Distributed by
Page 11
www.w9tech.com
Persei User Guide
Flow Chart
Remove the white cap from the top of the cartridge.
Place the mouthpiece in your mouth and try to gently suck air
through using only your mouth sherlock style, not your lungs.
If you feel and
taste vapor
If you did not feel or
taste vapor
!!WARNING!! Cartridge is HOT
during use, avoid touching it.
A. Using your lungs, very slowly inhale while holding
down the power button for no longer than 6 seconds
(3 seconds at 7.4volts). Some users find it difficult
to inhale slowly enough and have greater success
using method B.
B. Using your mouth, very slowly suck, filling only
your mouth with vapor while holding down the power
button for a maximum of 6 seconds (3 seconds at
7.4volts). Remove the Persei from your lips and
inhale the vapor in your mouth deeply. For both
methods, continue drawing air through the cartridge
for 2 - 3 seconds after releasing the power button to
help prevent clogging.
Always allow the cartridge to cool between hits.
Set up your Persei for 3.7 volts for the priming of
ALL cartridges. Press and hold the power button on the
Persei for 3 seconds (1.5-2.5 ohm cartridges) and 6
seconds (2.5-5.0 ohm cartridges) and let go.
Immediately try to gently suck air through using only your
mouth sherlock style, not your lungs.
Never inhale hard using the
Persei, this will result in
extract being pulled into the
air tube causing clogging.
Yes
!!WARNING!!
Cartridge is
HOT during
use, avoid
touching it.
Vapor
flow
now?
No
Try again
10 times
Advanced
Techniques
!!WARNING!!
Cartridge is HOT during
use, avoid touching it.
Increase the size of your hit by slowly inhaling for no
more than 6 seconds (3 seconds at 7.4volts). Hold in
your hit for 5 seconds while the cartridge cools and
repeat until your lungs are full.
Sherlock Style: Increase the size of your hit by slowly
using your mouth only to inhale the vapors into your
mouth for no more than 6 seconds (3 seconds at
7.4volts). Release the power button and quickly
inhale the vapors that are in your mouth into your
lungs and repeat the cycle until your lungs are full.
Let the cartridge cool for 5 seconds between hits.
Yes
Vapor
flow
now?
No
Take a pin or straightened paper clip and VERY
GENTLY insert it into the air tube until it touches the
heating element at the bottom.
Yes
Vapor
flow
now?
No
When your session
is finished, place the
white cap back onto
the cartridge, sit back
and relax!
Copyright © Utopia Planitia Technologies 2012
Please open a support ticket at www.w9tech.com and
you will be contacted to have your problem resolved.
Page 12
Distributed by
www.w9tech.com
Persei User Guide
Maintenance Instructions
Your Persei Vaporizer has been designed to be easy to care for and maintain.
By following these simple maintenance steps, you will keep your Persei Vaporizer performing
at peak performance.
Depending on your frequency of usage, the electrical contact points should be cleaned at least
once every 3 - 7 days. The Persei vaporizer uses relatively low voltage to operate and even
a small amount of residue on the contact points and/or threads can reduce the voltage flow,
impeding the performance of your Persei.
A. To clean the electrical contact points and threads, take a cotton swab (Q-Tip) and dip one end
into some Isopropyl Alchohol (ISO). The higher percentage of purity, the better, try to use as
close to 99% ISO as you can.
B. Using the ISO dampened end of the cotton swab, gently scrub and clean any residue from all
the contact surfaces and threads on your cartridge and Persei unit.
The contact surfaces are all the areas that make contact with each other when a cartridge is
screwed into the Persei unit.
C. Once cleaned, use the dry end of the cotton swab to help the drying process by gently
running it over the areas just cleaned. Be careful that no cotton gets left behind on any
surfaces or threads.
After every thing is completely dry, lightly touch the contact areas and threads with your
fingers. If you feel any tacky areas, please repeat the cleaning procedure steps A - C again
until all the contact areas and threads are tack free.
DO: Use ISO to clean the contact areas and threads on your cartridge
DO: Use ISO to clean the contact areas and threads on your Persei
DON’T: Submerse your cartridge, battery or charger in any liquid
DON’T: Try to clean out a cartridge by filling it with ISO
DON’T: Leave behind any lint or cotton on the cleaned surfaces or threads
DON’T: Screw a cartridge on to the Persei with out cleaning all contact areas first
DON’T: Use the incorrect cartridge type/combination for your selected voltage
AVOID: Using cartridges that have had their seals damaged and/or thin oil put in them,
causing them to leak.
Copyright © Utopia Planitia Technologies 2012
Page 13
Distributed by
www.w9tech.com
Persei User Guide
FAQ’s
Q. What are the DO’s and DON’T’s?
A. DO: Take the white cap off the cartridge before use and replace after use
DO: Pull air through the cartridge VERY SLOWLY
DON’T: Blow air into the cartridge, you will damage the seals
DON’T: Get any oils, waxes etc. into the air hole during filling
DON’T: Heat below the top 3/4 of the cartridge or you may damage the seals
DON’T: Inhale hard, you will suck too much extract into the vaporization chamber causing a clog
AVOID: Extract oils that are too thin or runny at room temperature, or poorly processed / purged
Q. Will the Persei cartridges fit other ecig batteries?
A. The refillable Persei cartridges will fit all vaporizers manufactured by Utopia Planitia Technologies.
Some cartridges might not work on other vaporizers from Utopia Planitia Technologies or produce very
little vapor, this is because they might be designed to work at certain voltages not supported on other
models. You have to match the voltage with the right ohms. Please see the Persei Cartridge Guide on
page 4 of this guide for the recommended cartridge(s) to use at each voltage level.
Q. What types of essential oils can I use?
A. Any essential oil that will liquify with heat and thicken at room temperature that was not produced
using water or ice extraction. There can be no plant material left in the extract i.e. bho, earwax,
putty, shatter, cO2, nitro etc.
Q. Can I remove the white cap?
A. We recommend removing the white cap before use and putting it back on after your session
Q. My cartridge is leaking, what can I do?
A. The most common reasons for leaking cartridges are:
Overheating the cartridge during filling and the seals are now damaged
Blowing air into the cartridge trying to clear a clog, the seals are now damaged
Inhaling too hard, try sucking very slowly and lightly
Inhaling too soft, try sucking a little harder, but not too hard
Over filling the cartridge, 1 gram is the maximum capacity
Using oil that is too thin or low quality / poorly processed / purged will leak
If your seals are damaged, it is best to reclaim your extract by turning the cartridge upside down,
heating it and collecting the extract that drips out to put into a new cartridge.
Q. I hear bubbling sounds when I inhale, is this normal?
A. No, bubbling is caused by extract that is too thin at room temperature and/or has impurities in it
from not being processed / purged correctly. These extracts are not recommended and will cause
your cartridge to clog, leak and generally underperform.
Q. My cartridge is defective, what can I do?
A. We recommend to test every cartridge before use by connecting it to the 3.7volt battery before filling it
with extracts. Hold down the power button while looking down the air hole. You should
see the element glowing brightly and feel the cartridge getting warm. Only hold down the power
button for a Max 6 seconds when the cartridge is dry. There are no refunds or exchanges on cartridges
for hygienic reasons. Packs of cartridges are sold as buy 4 get one free to insure against any defectives.
Copyright © Utopia Planitia Technologies 2012
Page 14
Distributed by
www.w9tech.com
Persei User Guide
FAQ’s
Q. How long does the battery last?
A. The battery is guaranteed for 14 days and a fully charged 3.7v battery will last for about 360
6 second hits. Our duration is a conservative figure, based on half of the calculated number.
The calculation you can use to estimate your number of hits based on your hit length is:
A 3.7 V battery and a 2.4 ohm cart will draw about 1.542 amps of current. (I=V/R)
So a 2000 mAh battery will last about 1.30 hr (2.0 amp-hr/1.542 amps) or about 78 minutes of use.
6 second hits = 780 hits
5 second hits = 936 hits
4 second hits = 1170 hits
Q. How long does the battery take to charge?
A. The answer to this depends on the remaining charge still left in your battery and which battery
type you are charging. For an empty battery to fully charge requires approx. 2 to 8 hours.
When in charging mode, the light on the charger will be solid Red and once charging has
completed the light will turn either solid or flashing Green depending on the state of the charge.
Q. My blue light flashes as soon as I press the button, what is causing this?
A. If the blue light flashes as soon as you press the button, that is the low battery warning signal.
Q. How long does a cartridge last?
A. We claim that they will last a minimum of 400 hits or 1 gram of extract using 3.7volts with a
2.4 ohm cartridge. Some users experience a lot more, but 400 is the minimum.
Q. How long is the warranty on the Persei?
A. The Persei unit has a limited lifetime* guarantee against manufacturer defects. The batteries are
guaranteed for 14 days and the charger for 30 days. Your invoice from an authorized dealer is
needed for any warranty claims. *Please see our online Persei warranty page for details.
Q. Can I charge LiFePo4 batteries in the charger included with the Persei?
A.. NO, DO NOT charge any other battery types except for those included
A
in your Persei kit or serious personal injury could occur.
Copyright © Utopia Planitia Technologies 2012
Page 15
Distributed by
www.w9tech.com