1
GODI User’s Manual
Gerd Stolpmann
(Last updated: October 22, 2012)
Contents
1
2
3
4
Getting and Installing GODI
5
1.1
Rocketboost and Skylift . . . . . . . . . . . . . . . . . . . . . . . . . . . . . . .
6
1.2
Preparing your system . . . . . . . . . . . . . . . . . . . . . . . . . . . . . . . .
6
1.3
Bootstrapping . . . . . . . . . . . . . . . . . . . . . . . . . . . . . . . . . . . . .
7
1.4
Installing packages with godi_console . . . . . . . . . . . . . . . . . . . . . .
8
1.5
Configuring external libraries . . . . . . . . . . . . . . . . . . . . . . . . . . . .
10
1.6
Using libraries from base packages . . . . . . . . . . . . . . . . . . . . . . . . .
12
Using GODI
14
2.1
Starting the OCaml toploop . . . . . . . . . . . . . . . . . . . . . . . . . . . . .
14
2.2
A simple IDE: ocamlbrowser . . . . . . . . . . . . . . . . . . . . . . . . . . . .
15
2.3
Using emacs/xemacs . . . . . . . . . . . . . . . . . . . . . . . . . . . . . . . . .
15
2.4
The O’Caml compilers and tools . . . . . . . . . . . . . . . . . . . . . . . . . .
16
2.5
Using add-on libraries with findlib/ocamlfind . . . . . . . . . . . . . . . . . .
17
2.6
Finding package documentation . . . . . . . . . . . . . . . . . . . . . . . . . .
19
2.7
Key packages . . . . . . . . . . . . . . . . . . . . . . . . . . . . . . . . . . . . .
19
The Architecture of GODI
21
3.1
GODI servers and clients . . . . . . . . . . . . . . . . . . . . . . . . . . . . . . .
21
3.2
Local directory layout . . . . . . . . . . . . . . . . . . . . . . . . . . . . . . . .
22
3.3
Packages . . . . . . . . . . . . . . . . . . . . . . . . . . . . . . . . . . . . . . . .
23
3.4
Libraries . . . . . . . . . . . . . . . . . . . . . . . . . . . . . . . . . . . . . . . .
26
Managing a GODI Installation
29
4.1
What can be done with godi_console . . . . . . . . . . . . . . . . . . . . . . .
29
4.2
Installed packages . . . . . . . . . . . . . . . . . . . . . . . . . . . . . . . . . . .
31
1
4.3
Binary packages . . . . . . . . . . . . . . . . . . . . . . . . . . . . . . . . . . . .
31
4.4
Skylift: Enhanced support for binary packages . . . . . . . . . . . . . . . . . .
32
4.4.1
Repositories of binary packages . . . . . . . . . . . . . . . . . . . . . .
34
Restoring old packages . . . . . . . . . . . . . . . . . . . . . . . . . . . . . . . .
34
4.5.1
Restoring an old binary package . . . . . . . . . . . . . . . . . . . . . .
34
4.5.2
Building an old version of a package . . . . . . . . . . . . . . . . . . . .
35
4.6
Distribution upgrades . . . . . . . . . . . . . . . . . . . . . . . . . . . . . . . .
35
4.7
Scripting GODI . . . . . . . . . . . . . . . . . . . . . . . . . . . . . . . . . . . .
36
4.5
5
6
Profiles
37
5.1
Creating profiles with version constraints . . . . . . . . . . . . . . . . . . . . .
38
5.2
Distributing profiles . . . . . . . . . . . . . . . . . . . . . . . . . . . . . . . . .
39
5.3
Other profile features . . . . . . . . . . . . . . . . . . . . . . . . . . . . . . . . .
39
Packaging Software
40
6.1
The build directory . . . . . . . . . . . . . . . . . . . . . . . . . . . . . . . . . .
40
6.2
Stages . . . . . . . . . . . . . . . . . . . . . . . . . . . . . . . . . . . . . . . . . .
41
6.3
The Makefile . . . . . . . . . . . . . . . . . . . . . . . . . . . . . . . . . . . . . .
42
6.3.1
Customising the «extract» stage . . . . . . . . . . . . . . . . . . . . . .
44
6.3.2
Customising the «patch» stage . . . . . . . . . . . . . . . . . . . . . . .
44
6.3.3
Customising the «configure» stage . . . . . . . . . . . . . . . . . . . . .
45
6.3.4
Customising the «build» stage . . . . . . . . . . . . . . . . . . . . . . .
46
6.3.5
Customising the «install» stage . . . . . . . . . . . . . . . . . . . . . . .
47
6.3.6
Dependencies . . . . . . . . . . . . . . . . . . . . . . . . . . . . . . . . .
48
6.3.7
Legacy expressions . . . . . . . . . . . . . . . . . . . . . . . . . . . . . .
49
6.4
Packing lists . . . . . . . . . . . . . . . . . . . . . . . . . . . . . . . . . . . . . .
50
6.5
An Example . . . . . . . . . . . . . . . . . . . . . . . . . . . . . . . . . . . . . .
51
6.6
Further targets for godi_make . . . . . . . . . . . . . . . . . . . . . . . . . . . .
52
6.7
Testing packages . . . . . . . . . . . . . . . . . . . . . . . . . . . . . . . . . . .
52
6.8
The package repository . . . . . . . . . . . . . . . . . . . . . . . . . . . . . . . .
52
6.9
Check list . . . . . . . . . . . . . . . . . . . . . . . . . . . . . . . . . . . . . . . .
53
2
7
8
Exporting packages
54
7.1
Exporting source packages (builds) . . . . . . . . . . . . . . . . . . . . . . . . .
55
7.2
Exporting profiles . . . . . . . . . . . . . . . . . . . . . . . . . . . . . . . . . . .
56
7.3
Exporting binary packages . . . . . . . . . . . . . . . . . . . . . . . . . . . . . .
56
7.4
Exporting seeds . . . . . . . . . . . . . . . . . . . . . . . . . . . . . . . . . . . .
56
7.5
Supported URLs . . . . . . . . . . . . . . . . . . . . . . . . . . . . . . . . . . . .
57
Profile reference
59
8.1
The file profile.ini . . . . . . . . . . . . . . . . . . . . . . . . . . . . . . . . . . .
59
8.1.1
The sections and attributes . . . . . . . . . . . . . . . . . . . . . . . . .
59
8.1.2
Which packages are selected by a profile . . . . . . . . . . . . . . . . .
60
Profile operations . . . . . . . . . . . . . . . . . . . . . . . . . . . . . . . . . . .
61
8.2.1
Activating a profile . . . . . . . . . . . . . . . . . . . . . . . . . . . . . .
61
8.2.2
Local operations («profile») . . . . . . . . . . . . . . . . . . . . . . . . .
62
8.2.3
Remote operations («rprofile») . . . . . . . . . . . . . . . . . . . . . . .
62
Profile patches . . . . . . . . . . . . . . . . . . . . . . . . . . . . . . . . . . . . .
62
8.2
8.3
9
External Dependencies
63
9.1
Configuration packages . . . . . . . . . . . . . . . . . . . . . . . . . . . . . . .
64
9.2
The conf-foo.mk file . . . . . . . . . . . . . . . . . . . . . . . . . . . . . . . . . .
64
9.3
How to use a configuration package . . . . . . . . . . . . . . . . . . . . . . . .
66
9.4
Library search . . . . . . . . . . . . . . . . . . . . . . . . . . . . . . . . . . . . .
66
9.5
Library lookup at runtime . . . . . . . . . . . . . . . . . . . . . . . . . . . . . .
67
9.5.1
ELF systems: Linux, FreeBSD, NetBSD, Solaris, HP-UX (64 bit) . . . .
67
9.5.2
Mach-O systems: Mac OS X . . . . . . . . . . . . . . . . . . . . . . . . .
67
9.5.3
SOM systems: HP-UX (32 bit) . . . . . . . . . . . . . . . . . . . . . . . .
67
9.5.4
Windows . . . . . . . . . . . . . . . . . . . . . . . . . . . . . . . . . . . .
67
Using godi_script to create configuration packages . . . . . . . . . . . . . . .
68
9.6
3
Preface
GODI is a programming environment for the computer language Objective Caml (O’Caml).
Ocaml results from the research activities of the Cristal project at the INRIA institute in
France.
From INRIA you can get the O’Caml compiler and runtime system, but this is usually not
enough to develop applications. You also need libraries, and fortunately there are many
developers all over the world providing them; you can go and pick them up. But it is a lot
of work to build and install each of them.
GODI is a system that simplifies this task: It is a framework that automatically builds the
O’Caml core system, and additionally installs a growing number of pre-packaged libraries.
For a number of reasons GODI is a source-code based system, and there are no precompiled
libraries, but it makes it very simple for everybody to compile them.
Features of GODI:
• Automatic installation of new libraries: GODI knows where a library can be downloaded, which prerequisites are needed to build it, and which commands must be invoked to compile and install it
• Complete package management of the installation: A library is installed as a package
(a managed set of files), so it is possible to remove it later without any hassle.
• GODI implements the necessary logic to upgrade installations: Because of the way
O’Caml works, all dependent libraries must be recompiled if a library is upgraded to
a newer version. GODI automates this process.
• Integration with the operating system: If additional C libraries are needed to build an
O’Caml library, and the operating system includes them, they will usually be automatically found and used. Non-standard locations can be configured (there is only one
configuration file for the whole installation).
• GODI has a menu-based user interface that makes it simple to use even for beginners.
• GODI tries to standardize the directory layout of library installations, so it becomes
simpler to find files of interest.
This manual is a mixture of a user’s and developer’s manual, and you find information at
various levels of details.
4
Chapter 1
Getting and Installing GODI
GODI is an O’Caml distribution that is compiled and installed from sources. The main reason for this is that it simplifies the maintenance of the GODI system from the perspective
of the developers. GODI has only very little central infrastructure, more or less it is only a
file management and distribution service, and complicated installations like compile farms
are not needed. Furthermore, GODI supports a wider range of operating systems than it
would be possible for a binary distribution. Users will also note the advantage that software
updates happen frequently, and the distributed software versions are often the latest that are
available.
Of course, there is also a downside, especially GODI users must do a bit more than for distributions where the software is available in binary form. For many operating systems this
is not hard to fulfill, though: First, the basic «C toolchain» to build C programs must be
already installed on the system, and it must work. Second, the development parts of the
system libraries must be installed on the system, e.g. C header files. The users must also
recognize by themselves when additional external libraries are required for certain GODI
packages. Third, the users’ patience is sometimes stressed, as it takes a bit of time to build
software. Fourth, the users should be prepared that sometimes things go wrong. The GODI
developers cannot guarantee that the distributed build procedures work on every system.
Sometimes they make too optimistic assumptions, for instance it is sometimes expected that
the OS has features it actually does not have (e.g. that shell utilities have GNU extensions).
Such errors happen from time to time, and the developers are glad when the users inform
them about such mistakes. Of course, this would require that the users have some skills recognizing them. Summarised, the GODI users need some basic skills in system and software
build management.
Resources
There are a number of on-line resources that are important for users. Links are available on
the GODI homepage, http://godi.camlcity.org:
• GODI mailing list
• Documentation about GODI details
5
• Documentation about the packages installable via GODI
• GODI bug tracking system
• Subversion server
• News
1.1
Rocketboost and Skylift
The package management software provided by GODI is continuously updated. For certain
releases we use code names:
• Rocketboost is the second-generation software (godi-tools-2.*), published in 2008.
• Skylift is the third-generation software (godi-tools-3.*), published in 2012.
(There is no name for the first generation, as usual.)
Skylift introduces a number of new features:
• Profiles, explained in chapter 5 and chapter 8
• Enhanced binary packages: see section 4.4
• Package export, in chapter 7
• Simplified patching, see section 6.3.2
• (New configuration packages - this is still being developed.)
This manual covers both Rocketboost and Skylift, and features only available in the latter
are specially pointed out.
1.2
Preparing your system
It is very likely that you must first install software because you can even start using GODI.
This is the generic list for all OS:
• You need gcc, the GNU C compiler. Other compilers are not supported (but may work
nevertheless). You need also the system header files, sometimes they are not installed
by default (e.g. glibc-dev on many Linux distributions).
• You need GNU make
• You need gzip/gzcat, bzip2/bzcat, and GNU patch
• You need the standard Unix shell and file manipulation tools. Sometimes m4 is not
installed by default.
6
Of course, these are only the requirements for the minimum GODI installation. Depending
on which GODI packages are installed, further external software may be needed.
There is a more detailed list in the README file contained in the GODI bootstrap tarball.
It depends on the OS which of the tools come with the OS and which must be additionally
installed.
1.3
Bootstrapping
The bootstrap procedure installs the minimum GODI system. Currently, the bootstrap procedure is split into two stages that run one after the other. Stage 1 installs basic tools written
in the C language that are required for the GODI package system. This means, after stage
1 the installed software is managed in the form of packages. We will discuss later what a
package really is, for now just think a package as a group of files that is added to the system
as a whole, and that can also be removed from the system as a whole.
Stage 2 installs the minimum O’Caml environment, and further parts of GODI.
In order to bootstrap, you need the bootstrap tarball, see http://godi.camlcity.org for where
it can be downloaded («Get GODI» link).
Basically, you execute the following steps (note that older tarballs are named godirocketboost-* and newer ones godi-skylift-*):
1. Extract the bootstrap tarball:
gzip -d godi-skylift-<VERSION>.tar.gz
tar xf godi-skylift-<VERSION>.tar
cd godi-skylift-<VERSION>
2. Start the bootstrap. This script asks some questions, e.g. where to install GODI, i.e.
<PREFIX>:
./bootstrap
Note that an Internet connection is required, as further downloads will be done.
3. Adjust PATH and enjoy GODI:
PATH=<PREFIX>/bin:<PREFIX>/sbin:$PATH
export PATH
The bootstrap procedure is discussed in more detail in the README file contained in the bootstrap tarball, especially what to do when things do not work as expected.
As <PREFIX>, you can choose any empty or not yet existing directory. It is not possible that
<PREFIX> points to an already used directory like /usr/local as GODI needs its own private
directory hierarchy.
It is not recommended to install GODI as super-user. Either install GODI privately under a
non-privileged account, or create a special «godi» account for a shared installation.
7
Options
The bootstrap script (stage 1) has a number of command-line options (needed for adjustments in very special situations). See ./bootstrap -help for a list. The most important options
are:
• -prefix <PREFIX>: Sets the default prefix
• -section <sect>: Selects the release line of GODI to install. See section 4.6 for information about release lines. This option defaults to the newest regular release.
• -restart: After an error, try again with the same set of options.
• -batch: Run non-interactively. All options must be given on the command-line.
• -append-path: When looking up system utilities, first system-specific standard locations are tried, and after these, the directories enumerated in the PATH variable. This is
the default.
• -prepend-path: When looking up system utilities, first the directories enumerated in
the PATH variable are tried, and then system-specific standard locations.
• -no-path: When looking up system utilities, only the system-specific standard locations are tried.
• -search-path <PATH>: When looking up system utilities, only the directories enumerated in the <PATH> argument are tried.
Environment
A number of environment variables are respected:
• CC: This variable selects the C compiler to use. Normally, gcc is preferred. This variable
must not be set to an absolute path but just to the name of the compiler command. Note
that it is very hard to change the C compiler at a later time.
• http_proxy and ftp_proxy: If you are connected to the Internet via a proxy, set these
variables accordingly. For example, if the proxy is installed on proxy.our.net on port
8080, set both variables to http://proxy.our.net:8080
1.4
Installing packages with godi_console
After the bootstrap procedure has been finished successfully, a number of programs are installed in <PREFIX>/bin and <PREFIX>/sbin. The former directory contains applications that
may be executed by everybody whereas the latter directory is reserved for administration
programs. One of these is godi_console which serves as the central management tool. It
goes into an interactive mode when called without arguments.
8
+-------------------------------- GODI Console --------------------------------+
>>> Select Source Packages <<<
FL NAME
INSTALLED
AVAILABLE COMMENT
==========Packages available as source code:====================================
[ 1]
apps-camlmix
1.1
1.1
Processes macros written in pu
[ 2]
apps-cduce
0.2.1
0.2.1
XML-oriented functional langua
[ 3]
apps-cduce-cvs
[ 4]
apps-godiva
[ 5]
[ 6]
[ 7]
apps-schoca
[ 8]
apps-unison
2.10.2
2.10.2
File synchronizer
[ 9]
base-curl
7.11.2#2
7.11.2#2
The version of CURL for GODI
[ 10]
base-expat
1.95.7#3
1.95.7#3
The version of expat for GODI
[ 11]
base-gdbm
1.8.3#4
The GNU database manager
[ 12]
base-pcre
4.5#1
4.5#1
The version of PCRE for GODI
[ 13]
base-subversion-c$
1.0.6
The subversion client allows d
[ 14]
conf-curl
3
3
Configures which curl library
[ 15]
conf-expat
6
6
Configures which expat library
[ 16]
conf-freetype2
1#1
1#1
Configures which freetype2 lib
20040829
XML-oriented functional langua
0.9.2
0.9.2
High-level tool for simplifyin
apps-headache
1.03
1.03
Tool for managing headers in s
apps-ledit
1.11
1.11
Line editor wrapper
0.2.0
Scheme interpreter written by
----------------------------------------------------------------(more)---------[p]rev [n]ext [u]pgrade all [s]tart/continue installation [h]elp e[x]it menu
>
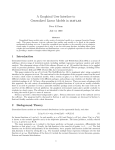
Figure 1.1: Selecting source packages with godi_console
9
After starting godi_console type «2» to enter the menu «Select source packages». The list of
available and installed packages appears (shown in figure 1.1). You can select (and deselect)
packages by entering the number and typing «b» to build the package, «k» to keep the package as it is, or «r» to remove the package (in the corresponding submenu). Finally, press «s»
to start the installation, a procedure comprising the following steps:
• GODI checks the package dependencies. Missing packages are implicitly selected for
build. Furthermore, if a package is rebuilt, all installed packages are checked whether
they are dependent on this package, and also rebuilt. The same «expansion» of the
update plan is performed for the packages scheduled for removal.
• When the dependencies had to be corrected, the package list is displayed again, and
the additionally affected packages are shown at the top of the list. In this case, type
again «s» to restart the resolution of dependencies.
• Finally, the update plan is executed: Missing software is retrieved from the Internet.
Old packages are removed. The new packages are extracted, built, and installed. These
actions are always performed automatically, without any need for the users to gear into
the running process.
This means, godi_console guides you through the build and installation processes, without
having to enter commands. We do not discuss godi_console here in detail, as it is equipped
with self-explanatory help texts.
A note for advanced users: godi_console also features a command-line mode which is useful for scripting purposes. There is a manual page for godi_console explaining this mode.
For example,
godi_console perform -build godi-xstr
builds (or rebuilds) and installs the package «godi-xstr».
Warning: Avoid to install new packages when disk space is already tight. You may run into
situations where it is hard to recover from. Furthermore, it is a bad idea to stop godi_console
while a package installation is being performed.
1.5
Configuring external libraries
Unfortunately, godi_console cannot build everything in an automatic way. Especially one
point requires manual intervention from time to time: External C libraries.
Of course, it is required that these external libraries are installed before GODI can make use
of them. For example, if you install the package godi-zlib it is a good idea to check whether
the underlying C library libz is already present or not (don’t forget to check that the C
header files are also installed). Especially for non-free OS like Solaris there is no standard
place to install such external libraries. Some admins put them into /usr/local, some into
/opt, and a lot of further private locations are in use, too. For Linux and BSD, however, these
libraries are often part of the OS, and can be found at known places in /usr.
10
The good news is that GODI is very flexible regarding these locations. There are two ways
of telling GODI where to find libraries: By changing the global configuration, and by setting
package-specific parameters.
The global parameter in question is SEARCH_LIBS: For example, when libz is installed in
/opt/phantasy such that the library libz.so is located in /opt/phantasy/lib and the C
headers are in /opt/phantasy/include, one can tell GODI this place by setting
SEARCH_LIBS += /opt/phantasy
in the global configuration file <PREFIX>/etc/godi.conf. This parameter is respected by
most packages that need external libraries (but not by all, as there are other, incompatible
methods of looking up libraries, see below).
GODI already knows a number of standard locations for libraries, i.e. directories where
certain OS install libraries by default. For example, NetBSD usually installs add-on libraries
in /usr/pkg which is already part of the built-in knowledge.
You may have already noticed that there are conf-<NAME> packages for a number of external
libraries <NAME>. For example, there is a conf-zlib package. The role of these packages is to
find and store the configuration where external libraries are expected to be found by GODI.
By default, the conf packages iterate over the directories enumerated by SEARCH_LIBS, and
look for the needed libararies in these places. Furthermore, a small test program is tried to
build, just to see whether the found libraries really work.
Sometimes the library cannot be found, or additional compiler or linker flags must be set.
The conf packages allow you to set the individual configuration parameters. Of course, the
GODI user must already know which parameter must be set to which value – in other words,
this is tweaking for experts. In godi_console, one can set the configuration parameters by
going to the configuration screens of the conf packages. For example, conf-zlib has two
such parameters:
GODI_ZLIB_INCDIR: The directory where the C header file zlib.h can be found
GODI_ZLIB_LIBDIR: The directory where the library file libz.so can be found
Some conf packages also allow you to set the flags for compiling and linking directly rather
than setting directories. In any case, the individual configuration parameters override the
search strategy followed by default.
Nowadays, libraries are more and more shipped with special configuration scripts. These
scripts simply output the required compiler and linker flags. When available, GODI prefers
these scripts, and sees them as a trusted source whose knowledge can be expected to be right.
For example, the freetype library has such a script, freetype-config, and one can call it by
«freetype-config --cflags» to get the compiler flags, and by «freetype-config --libs»
to get the linker flags. The corresponding GODI configuration package is conf-freetype2.
Instead of searching the library directly, it just looks for where this configuration script is
installed. Normally, the locations in SEARCH_LIBS are checked (by looking into the bin subdirectories), and the directories in PATH are checked. If the script cannot be found, it is still
possible to set the location directly with a configuration parameter:
11
GODI_FREETYPE2_CONFIG: The absolute path to the freetype-config script
When such a script is used, the configuration package does not support to specify the directories of the library directly, or to set the flags.
As pointed out, the output of the configuration scripts is simply trusted. If it happens that
the obtained flags do not work, the script is wrong, and it is not possible to use the library
from GODI.
Many OS now use the ELF file format for libraries (e.g. Linux, BSD, Solaris). ELF allows several ways of finding libraries at runtime, i.e. when the program using the library is started:
• The LD_LIBRARY_PATH variable may list directories where libraries are installed
• There is the RPATH (runtime path) entry in the executable using the library
• There is often a global configuration file (e.g. ld.so.conf for Linux) listing the default
library directories of the OS
For a number of reasons, GODI never uses the LD_LIBRARY_PATH feature. This variable is
more an ad-hoc solution to get misconfigured libraries working, but not the appropriate
means for a permanent and professional environment like GODI.
GODI uses one of the other two options: First, it is checked whether the library can be found
by keeping the default settings, and only if this does not work, the RPATH feature is enabled.
Note that this automatism is not applied when a configuration script is used; in this case it
is expected that this script already knows which way is the right one to find the library at
runtime.
Important note: Currently, this approach is not put through at all places. This has the effect that there
are usually more RPATH settings than needed. This is rarely problematic, but I already had the case
that a system library was installed in two versions, and the RPATH setting was wrong. In particular,
this library was libGL.so, and one version (in /usr/lib) was the MESA software 3D rendering version,
and the other version (in /usr/X11R6/lib) was the hardware 3D rendering version. Because of implementation errors, stub libraries were installed with RPATHs for /usr/lib (which is totally useless),
and my programs suddenly loaded the GL library for software rendering. The workaround in such
cases is to byte-compile with -custom (or to use the ocamlopt compiler), and to fix the RPATH with
-cclib -Wl,-R/preferred/path. This GODI problem will not be fixed soon.
1.6
Using libraries from base packages
Usually, GODI does not install add-on C libraries like libz; it is expected that these are already available by the OS, or that the sysadmin has already installed them. Sometimes,
however, GODI needs certain versions of the libraries, and it would be painful to require
that the sysadmin updates the OS or other parts of the system only to make GODI happy.
In these cases, GODI includes the libraries to install in the «base» series of packages, e.g.
base-pcre includes the preferred version of the PCRE library.
12
These packages are not enabled by default, however. It is first checked whether the library
version provided by the OS or the version found somewhere on the system is acceptable.
If not, the conf package fails, but prints a hint that enabling the base package would be a
simple solution for the problem. By setting a configuration parameter, the GODI user can
do this. For example, the conf-pcre package can be made using the base-pcre package by
setting
GODI_BASEPKG_PCRE=yes
The rest is again fully automatic.
13
Chapter 2
Using GODI
In this chapter, I would like to give some hints for O’Caml beginners, and explain where to
find what in the GODI environment.
2.1
Starting the OCaml toploop
The O’Caml bytecode compiler can be called as a so-called toploop: The user can enter declarations and expressions, and these are immediately compiled to bytecode, and immediately
executed. The toploop is very handy for coding attempts, and also an interesting debugging
aid for larger programs (because one can load already compiled bytecode into the toploop,
too). One can invoke the toploop with the command ocaml:
$ ocaml
Objective Caml version 3.08.1
#
For example, define the faculty function as (note that the # at the beginngin of the line is the
prompt symbol, and that the ;; at the end of the line indicates the end of the user input):
# let rec fac n = if n <= 1 then 1 else n * fac(n-1);;
The toploop answers with:
val fac :
int -> int = <fun>
This means that fac is a function taking integers as input, and returning integers as results.
Call the function as
# fac 10;;
14
and you get the result 3628800. Of course, we cannot give here an introduction
into the O’Caml language, so we stop here. It is recommended to install the package godi-ocaml-manual which includes both introductory and reference documentation of the O’Caml language. The installed manual can be found in the directory
<PREFIX>/doc/godi-ocaml-manual.
You can exit the toploop by pressing CTRL-D or typing #quit;; (including the hash mark).
You may have noticed that the toploop does not include a line editor. To get around this
limitation, install the package apps-ledit, and call the toploop by
$ ledit ocaml
This enables a number of keys (cursor keys, delete key, etc.).
2.2
A simple IDE: ocamlbrowser
The O’Caml core distribution includes a simple IDE that allows you to explore libraries, to
edit O’Caml sources, and to run the toploop: ocamlbrowser. As this program uses the Tk
library for the GUI operations, it is not installed by the GODI bootstrap procedure (so it is
not necessary to deal with the complications of finding external libraries already at this early
stage). ocamlbrowser is contained in the godi-ocaml-labltk package.
The program ocamlbrowser is invoked without argument, and pops up a new window with
three columns. In the leftmost column, the modules of the standard library are listed. If you
click at a module, the middle column shows the definitions of the module. The rightmost
column is only used when nested modules occur (e.g. MoreLabels.Set).
If you click at a definition (v=value, t=type, cn=exception, m=module, ...) the contents of
the definition are shown below the three columns. You can also view the interface and the
implementation files, if available, by pressing the buttons «Intf» and «Impl», respectively.
The toploop is invoked with the menu entry «File → Shell...». It works like the ordinary
toploop but also does syntax highlighting.
The editor is invoked with the menu entry «File → Editor...». It performs syntax highlighting, and you can even typecheck your definitions («Compiler → Typecheck»). As a special
feature, you can query the types of subexpressions after a typecheck pass: Just put the cursor
near the interesting symbol, or mark the expression, and press the right mouse key.
By selecting «Edit → To shell», the current definition (or the marked region) is copied over
to the shell window (if open).
Although ocamlbrowser has some interesting features, it is still too limited in order to be
useable as professional developement environment.
2.3
Using emacs/xemacs
GODI does currently not include packages with the required emacs Lisp definitions.
15
2.4
The O’Caml compilers and tools
The O’Caml core distribution includes:
• ocaml: The toploop (see above)
• ocamlc: The bytecode compiler, available for all platforms. For example, to compile
the file sample.ml to the program sample, call it as
ocamlc -o sample sample.ml
• ocamlopt: The native code compiler, available for most platforms. The command-line
options are almost the same as for ocamlc.
• ocamlc.opt and ocamlopt.opt: These are versions of ocamlc and ocamlopt that
are compiled with the native code compiler, and are much faster than ocamlc and
ocamlopt. The function is exactly the same.
• ocamlcp and ocamlprof: The bytecode compiler with profiling instrumentation, and
the corresponding analysis tool
• ocamlmktop: A special version of the bytecode compiler to create toploops with custom
functionality
• ocamldep: The dependency generator
• ocamllex(.opt) and ocamlyacc: Lexer and parser generators
• ocamldebug: The replay debugger
• ocamlmklib: A tool to create stub libraries
• ocamlrun: The bytecode interpreter. There is normally no need to call it directly.
• camlp4, camlp4o(.opt), camlp4r(.opt), mkcamlp4, ocpp: The configurable preprocessor
• ocamldoc: The documentation generator
These tools are all described in the O’Caml manual. The native-code compiler is not available
for all platforms, as well as the .opt versions of the tools.
The GODI version of ocamlmklib is a wrapper script around the real ocamlmklib.bin tool
that adds a number of default options that should be present in a GODI environment.
In addition to these official tools, some less official tools are also installed:
• addlabels and scrapelabels: These tools rewrite O’Caml programs from the old, unlabeled style to the new, labeled style, and vice versa.
• ocamlobjinfo: Outputs valuable information about bytecode files (cmo and cma), for
example which module versions must be loaded as prerequisites
• dumpapprox: Outputs valuable information about native-code files (cmx), for instance
whether a function is enabled for inlining.
16
2.5
Using add-on libraries with findlib/ocamlfind
Unfortunately, the O’Caml core distribution handles libraries in a rather low-level way, and
the user of the libraries must know the directories where these are installed. Furthermore,
the dependencies between the libraries must be manually resolved. This style is similar to
the way libraries are handled in the C language.
The findlib library (and the command-line frontend ocamlfind) try to bridge the gap between the user’s needs and the low-level but robust approach of the O’Caml core. GODI
equips all libraries with the necessary meta information findlib needs to process the libraries,
and to make them available in a user-friendlier manner.
In the toploop, findlib can be enabled by the directive (also type the hash mark):
#use "topfind";;
This installs a number of additional toploop directives:
• #require "<LIBNAME>": Loads the library <LIBNAME> into the toploop (unless it is already loaded), including all required prerequisites
• #list: Lists the available libraries
• #camlp4o: Enables the camlp4 preprocessor with standard syntax. This should be the
first directive after loading topfind.
• #camlp4r: Enables the camlp4 preprocessor with revised syntax. This should be the
first directive after loading topfind.
For example, a single
#require "pxp";;
loads the XML parser PXP into the toploop, including all predecessor libraries PXP is dependent on.
Unfortunately, some platforms cannot load libraries into the toploop that depend on external
C libraries. For example, Cygwin and NetBSD are such platforms. When you try to load such
libraries, these platforms output the error
Cannot load required shared library:
dynamic loading not supported on this platform.
The workaround is to create a custom toploop that statically links the needed libraries. For
example, to create a custom toploop with support for PXP, run the command
$ ocamlfind ocamlmktop -o mytop -package pxp,findlib -linkpkg
17
which creates a toploop program called mytop which can be used instead of the pre-built
toploop ocaml. Note that findlib must always be mentioned as package. The toploop mytop
has already built-in support for findlib, so you need not to «#use» topfind at the beginning
of every session. The «#require» directive for PXP is still necessary, however.
In order to call the standalone compilers ocamlc and ocamlopt, the tool ocamlfind should
be used. This is a wrapper program around the compilers that adds a number of additional
command-line options. For example, to compile the module sample.ml that calls functions
of PXP, use
$ ocamlfind ocamlc -c sample.ml -package pxp
When linking executables, the option -linkpkg must be passed to indicate that the libraries
must be linked, too:
$ ocamlfind ocamlc -o sample sample.cmo -package pxp -linkpkg
The tool ocamlfind can also be used as wrapper for ocamlcp, ocamlopt, ocamlmktop,
ocamldep, ocamldoc, and ocamlbrowser. The latter is very convenient to browse the interfaces of add-on libraries, e.g. to view the definitions of PXP, run
$ ocamlfind ocamlbrowser -package pxp-engine
(Note that we refer to pxp-engine, and not pxp, as the latter is only an empty pseudo package, and the ocamlbrowser call does not resolve dependencies.)
A special feature of findlib is that it simplifies the usage of camlp4 enormously, the grammarlevel preprocessor for O’Caml. In order to enable camlp4, set the -syntax option:
$ ocamlfind ocamlc ...
-syntax camlp4o
This enables camlp4 with standard syntax. Replace camlp4r for camlp4o to get the revised
syntax. The interesting feature of ocamlfind is that one can easily specify camlp4 extensions.
For example, to get the xstrp4 extension, just use
$ ocamlfind ocamlc ...
-syntax camlp4o -package xstrp4
i.e. add such extensions simply to the list of included packages.
The findlib library is available as GODI package godi-findlib. It is installed as part of the
bootstrap procedure. There is, however, a small but useful option that is not enabled by
default, and requires a recompilation of findlib: The Makefile wizard. This is a GUI to create
findlib-aware Makefiles with a few clicks.
To get it: Start godi_console, select the godi-findlib package, and enter the configuration
menu. Set the parameter
GODI_FINDLIB_TOOLBOX = yes
18
and rebuild findlib. You will also need godi-ocaml-labltk (and thus tcl/tk) in order to build
this special version of findlib (which is the reason why this option is disabled by default).
The result is that the «Makefile wizard» is included in the findlib package. Call the wizard
with
$ ocamlfind findlib/make_wizard
and follow the instructions in the new window that pops up.
There would be a lot more to say about findlib. As part of the package, the findlib manual is
also installed, so please look there for more information.
A final note on the syntax «-I +pkgname» the O’Caml compilers implement themselves. It
was introduced as simple mechanism to locate add-on libraries. For GODI, this kind of
referring to libraries should be regarded as deprecated legacy mechanism. The point is that
this syntax is much less flexible than findlib, and that it is also dictates the directory where
the library must be installed (which is not acceptable).
2.6
Finding package documentation
The documentation for package P can be found in <PREFIX>/doc/P. The preferred format is
HTML.
There is also a small CGI that can display library interfaces: godi-findlib-browser. It can
be found in <PREFIX>/doc/cgi-bin/browser.cgi after installation. One can easily view all
interfaces (but w/o formatting), and there is also a full-text search option. In order to activate
this CGI, you need a properly configured web server. For Apache, the widely used web
server, it is usually sufficient to include the directives
ScriptAlias /godi-bin <PREFIX>/doc/cgi-bin
<directory <PREFIX>/doc/cgi-bin>
AllowOverride None
Options ExecCGI
Order allow,deny
Allow from all
</directory>
into the configuration file httpd.conf, and to restart the web server. The CGI becomes visible
under the URL http://servername/godi-bin/browser.cgi. There are also other ways of
configuring Apache for this purpose.
2.7
Key packages
Some packages play a special role in the package system:
19
• The O’Caml core distribution is the union of the packages:
godi-ocaml: Compilers and runtime environment
godi-ocaml-src: Sources of the core distribution
godi-ocaml-dbm: NDBM access (module Dbm) (until ocaml-3.12)
godi-ocaml-graphics: Simple graphics (module Graphics)
godi-ocaml-labltk: GUIs with Tk
This means that the O’Caml source tarball, as it can be obtained from the INRIA FTP
server, is split up into five packages. The reason is that external libraries are needed
for some parts of the O’Caml core, and this can be easier handled when packaged
separately. In addition to this, there is also the O’Caml manual:
godi-ocaml-manual
You can select all of these packages by
godi-ocaml-all
which exists for convenience only (meta package).
The package godi-ocaml-src is very special, because it contains the already configured but not yet compiled source tree of O’Caml. It is the logical predecessor of the
other O’Caml core packages, which all extract and build parts of this tree. The idea of
this package is also to simplify patching the O’Caml compiler. There is one disadvantage of this construction: In order to force a rebuild of the whole O’Caml system when
newer sources are available, one must select both godi-ocaml and godi-ocaml-src. If
only the former were rebuilt, the old, wrong sources would be taken, and if only the
latter were rebuilt, only the sources would be updated without compiling them.
• The software GODI consists of is itself packaged. Since the rocketboost release of GODI
there is only the package godi-tools which contains everything GODI consists of.
(Older GODI releases were spread over several packages with names godi-core-*.)
• GODIVA is an associated project to simplify the creation of GODI packages. In order to
create GODI packages with GODIVA, you need apps-godiva. This tool is not needed
to process the generated packages, though.
• As already pointed out, findlib is supported by all libraries in GODI, and thus
godi-findlib is also a key package.
20
Chapter 3
The Architecture of GODI
In this chapter, we look at the various parts of GODI, and how they are related to each other.
It should become clearer how GODI works, and what one can expect from it.
3.1
GODI servers and clients
In principle, GODI is a kind of client/server system. This aspect is usually overlooked,
although it is one of the most important properties. The GODI system, as it was installed
in chapter 1, consists only of the client part that controls the locally installed packages. In
addition to this, there is also a GODI server that provides the necessary information which
packages exist and what the packages contain. The GODI client (e.g. godi_console) may
contact the server to update the list of packages. In godi_console you can trigger this by
selecting the menu item «Update the list of available packages».
The GODI server is mainly a Subversion repository where the files are stored that make up
the various packages. This repository is maintained by the GODI developers in a collaborative effort. You can view this repository under the URL https://godirepo.camlcity.org.
The godi-build directory contains the packages, whereas godi-bootstrap contains the base
software including the bootstrap script (from which it derives its name). (The other directories contain software not related to GODI, although some of the libraries are available as
GODI packages.)
More precisely, the godi-build directory on the GODI server only provides the build instructions, i.e. the set of rules that control the build and installation procedures. The GODI server
does not store the distribution files, i.e. the tarballs made and distributed by the authors of
the software packages. These are downloaded from the primary http or ftp servers. (To be
even more exact, the GODI server keeps copies of the distribution files, but these are only
used when the primary servers are not reachable.) For example, the package godi-ocamlnet
in version 0.98 has the following build instructions and distribution files:
• http://www.ocaml-programming.de/godi-build/3.08/godi-ocamlnet-0.98.build.tgz
is the URL where the build instructions can be obtained. These are created by the
GODI developers. This tarball contains the files:
21
DESCR:
Just a text file with a description of the package
distinfo: Contains checksum for distribution files
Makefile: The rules to build and install the package
PLIST.godi: The package list, i.e. it is described which files are part of the package
• http://aleron.dl.sourceforge.net/sourceforge/ocamlnet/ocamlnet-0.98.tar.gz is the
URL where the single distribution file can be obtained. This is the file distributed by
the author of the software.
The build instructions also contain dependency information. For this reason, it is necessary
that the build instructions of all packages must be available at any time, and because of this,
godi_console updates them in a single step. The distribution files, on the contrary, are only
downloaded when the corresponding package is built.
3.2
Local directory layout
The GODI directory hierarchy follows Unix conventions with some additions:
• <PREFIX>/bin: Binaries
• <PREFIX>/sbin: Binaries for GODI administration
• <PREFIX>/etc: Configuration files. Especially, you find here godi.conf, the global
configuration file for GODI, and ld.conf, the global configuration file for dynamic
stub libraries
• <PREFIX>/man: Manual pages
• <PREFIX>/share: Platform-independent files (in subdirectories)
• <PREFIX>/lib: C libraries and, in subdirectories, platform-dependent files
• <PREFIX>/lib/godi: Generated configuration files
• <PREFIX>/lib/ocaml/std-lib: O’Caml standard library
• <PREFIX>/lib/ocaml/compiler-lib: Additional O’Caml interface files
• <PREFIX>/lib/ocaml/pkg-lib: Add-on O’Caml libraries
• <PREFIX>/lib/ocaml/site-lib: User-installed (non-packaged) add-on O’Caml libraries
• <PREFIX>/build: GODI build system
• <PREFIX>/build/buildfiles: Contains the build.tgz files with the build instructions
(for archive purposes only)
• <PREFIX>/build/distfiles: Contains distribution files
22
• <PREFIX>/build/packages: Contains binaray packages (in All)
• <PREFIX>/build/mk: Global GODI build rules
• <PREFIX>/build/<CATEGORY>/<PACKAGE>: These directories contain the unpacked
build.tgz files
• <PREFIX>/db: The directory containing the package database
3.3
Packages
We already said that a package is a group of files that is installed as a whole. This is a
simplified definition, and when one looks in detail at the package concept, it becomes clear
that the same package may exist in three ways:
• As «source package»: The build instructions plus the distribution files may be viewed
as source packages. It is important to remember, however, that there is no single file
bundle containing the files to build the software (like SRPMs). The concept is rather
that the package metainformation are obtained from the GODI server in the form of
the mentioned build instructions, and that the raw sources of the software are directly
retrieved from the original file servers where the software authors distribute them (the
distribution files).
• As installed package: These are the installed files. GODI remembers which files belong
to which packages, and stores these data in the package database which can be usually
found at <PREFIX>/db.
• As binary package: This is an archive file containing the files to install (together
with a subset of the metainformation). These archive files can be found under
<PREFIX>/build/packages/All, and they are automatically created when a package
is built from sources.
The metainformation includes:
• The package name: The name is derived from the original name under which the
author distributes the software. GODI prefixes this name with a category indicator
(«base», «conf», «apps», «godi»):
base:
This is software outside of GODI’s scope, but required for GODI. Often, the
base software is part of the OS. In the case it is not available, or only in the
wrong version, the «base» packages may be used as replacement.
conf:
The configuration packages represent the knowledge about software outside of GODI that is used by GODI. For example, the configuration packages for external libraries remember where these libraries are located, and
how these must be linked to programs created with GODI. The source
package usually only consists of build instructions, but not of distribution files. The instructions include a script that systematically guesses facts
23
about the external software to configure, and checks these assumptions by
tests (autoconfiguration). See also section 1.5 for an explanation from the
user’s point of view. The result of the script is usually stored in a file,
and this file is the only content of the installed/binary package. For example, the package conf-zlib remembers the configuration parameters in
<PREFIX>/lib/godi/conf-zlib.mk. See the section 9.1 for a detailed discussion.
apps:
These are applications (end-user software).
godi:
This is software to build applications, i.e. libraries, meta-programming
(generators, compilers, ...), and development tools.
Sometimes, software falling into the «godi» category has also parts that
could be seen as applications. In such cases, «godi» is preferred over
«apps».
Libraries sometimes also have a runtime part, and this means they are
needed to run the applications. In the O’Caml world, this does not happen very often, because most libraries are statically linked. Nevertheless,
it might be necessary to create another category for run-time files, but this
makes only sense when the run-time part of libraries is separated from the
build-time part.
• The version of the package: The version string has two parts. The first part is the
«dotted» sequence of decimal numbers one usually associates with a version string.
It is the version the author of the software announces (but see below). The second
part is the package revision number. Sometimes the first attempt of the package has
errors, and to distinguish improved versions of the package from the previous ones,
the revision number is incremented. The revision number is a natural number. In
the version string, the revision number is separated from the primary version by the
keyword «godi». For example, in «1.2godi2», the primary version, as announced by
the author, is «1.2», and the GODI revision number is 2. When the «godi» suffix is
missing, the revision number is 0 by definition. Sometimes, the character «#» is used
as separator instead of «godi», but this is only an abbreviation and does not have any
meaning.
Usually, the primary version number consists of natural numbers separated by dots.
The syntax of the version numbers allows a few further elements. GODI restricts the
syntax because it must always be possible to compare two version numbers, and to
decide which one must be sorted before the other (linear ordering). Of course, this can
only be ensured when it is known how the version numbers are constructed.
In addition to the dotted decimals, one can also include letters. These are compared
lexicographically, e.g. «1.1ab» < «1.1ac». One can also use the characters «+» and «_»
as separators, but they have lower weight than the dot, e.g. «foo3.07+1» < «foo3.07.1».
There are a few further keywords: «test», «alpha», «beta», «pre», «rc», «pl» which are
also recognised as separators. The first five of these have the special property that they
decrease the weight, for example «1.1test1» < «1.1». The separator «test» decreases the
most, the separator «rc» (release candidate) decreases the least. For instance, «1.1test1»
< «1.1beta1». The separator «pl» (patch level) has again positive weight, but less than
24
all other separators. Other characters than the mentioned ones are not allowed in version strings.
Of course, the authors of software do not always use versioning schemes that are compatible with the one GODI applies. In this case, the packager should try to port the
original version numbers as closely as possible to the GODI scheme. It is essential,
however, that the order of the numbers is correctly represented, otherwise it might
happen that a newer version of the software is available, but GODI does not recognise
that. An example illustrates that: Some authors make both development snapshots
and regular releases available. For the former, date strings are used, e.g. foo-20040921.
For the latter, classic dotted numbers are used, e.g. foo-3.2. GODI can process both formats, and the sorting order for each format is properly represented. It is not possible,
however, to mix both formats. Because «20040921» is just a big number, it is higher
than «3.2», even if it was released before «3.2». The moral of the story: Use either date
strings, or dotted numbers, but do not alternate between them.
A final clarification about the revision numbers: They distinguish between several editions of the build instructions. They do not distinguish between different versions of
binary packages that are made from the same sources and the same build instructions,
but with a different equipment of predecessor packages. For example, if foo-4.4 is once
built with bar-1 and once built with bar-2 as predecessors, the same version string (and
thus the same file name) will be used for both binary packages that result from the
build. (Maybe we will have a mechanism to handle this some day.)
• Source: The package has fields that describe where the distribution files can be downloaded, and where more information can be obtained.
• Description: The package has a short, one-line description («comment»), and a longer
description that may even consist of several paragraphs.
• Dependencies: The package may require that other packages are already installed.
This is called a package dependency. There are two kinds of dependencies (for the moment, further types are discussed in godi-list): Build dependencies demand that the
predecessor packages must be installed at build time, and strict (runtime) dependencies express the requirement that the predecessor packages must be installed both at
build and at run time.
Furthermore, dependencies are handled differently for source packages, and for installed/binary packages. One difference is clear: For the latter type of package, there
are no build dependencies, because they are already built. The other differences have
to do with the handling of the transitivity of the dependency relation, and the meaning
of version conditions.
For source packages, it is not necessary to state indirect predecessors. For example,
if foo requires bar, and bar requires baz, GODI concludes that foo also requires baz
indirectly. GODI finds this out automatically. In contrast to this, installed and binary
packages must list all predecessors explicitly, even indirect ones, so bar has to demand
baz. Fortunately, GODI users never have to resolve such dependencies, as this is done
internally by GODI, so this is a detail users rarely see. (The transitive closure is taken
for several reasons. During compilation of software it may happen that indirect predecessors influence the current build. The cross-module inlining feature of O’Caml is
25
an example of this. Of course, such effects must be represented by the dependency
relation. Furthermore, the closure eases the distribution of binary packages.)
Dependencies may carry a version condition, for example foo may require bar in version ≥ 3.2. For source packages, these conditions are just handled as constraints. For
installed and binary packages, however, these conditions are transformed into exact
version requirements. For example, if the user happens to have version 3.3 of bar installed, this is acceptable when foo is built, because 3.3 ≥ 3.2. The resulting binary
package lists the dependency bar == 3.3, i.e. the actually found version is taken as
fixed version. The reason for this is that O’Caml libraries (and most dependencies are
about libraries) are very sensitive to changes, and it is unlikely that any other version
works than the one found at build time.
• Maintainer: The person who is responsible for maintaining the package as part of
GODI.
3.4
Libraries
As already pointed out, the O’Caml libraries always support findlib in the GODI system.
This is not a very hard requirement, and it is usually simple to even add such support to
libraries where the author does not do this. Findlib bases only on a few concepts, and complicated situations cannot arise.
The key ideas are that libraries are stored in known directories (directory convention), and
that there is a file with metainformation about libraries (called «META»). The directory
convention is as follows (here shown in the way GODI realises it):
• <PREFIX>/lib/ocaml/pkg-lib/<NAME>: This directory contains all code files for the library <NAME>, except DLLs. By «code files» we mean compiled interfaces (suffix cmi),
compiled modules (suffixes cmo, cmx, o), and library archives (suffixes cma, cmxa, a).
It is also a good idea to put the source interfaces here (suffix mli), for better documentation.
Files of other kind can go elsewhere, e.g. into <PREFIX>/lib/<NAME>, this is out of the
scope of findlib.
The code directory must not have subdirectories.
• <PREFIX>/lib/ocaml/pkg-lib/stublibs: This directory contains the DLLs for all
findlib libraries that are installed below pkg-lib. The DLLs are simple to recognise,
because their name begins with the prefix «dll», and has an OS-dependent suffix (e.g.
«.so» for Linux, «.dylib» for MacOS, etc.). Findlib also puts for every DLL a second file
into this directory, with the suffix «.owner», e.g. «dllfoo.so.owner» for the DLL «dllfoo.so». This file indicates to which library the DLL belongs (the name is stored in the
file).
This stublibs directory is already configured in ld.conf, the DLL configuration file of
O’Caml, so one need not to care about this detail.
If the OS does not support DLLs, the directory remains empty.
26
• <PREFIX>/lib/ocaml/site-lib/<NAME>: This is another directory for the library
<NAME>. In the site-lib hierarchy user additions are stored, whereas the pkg-lib hierarchy is reserved for libraries installed by GODI packages.
By a trick it is achieved that the command «ocamlfind install ...» automatically installs
the library into site-lib when it is executed outside of a GODI build, but into pkg-lib
when executed within a GODI build. So the libraries automatically end in site-lib
when GODI users build and install libraries manually.
• <PREFIX>/lib/ocaml/site-lib/stublibs: The DLL directory for libraries in the
site-lib hierarchy.
Of course, it is possible that the same library is installed under both pkg-lib and site-lib.
In this case, site-lib has precedence. Anyway, it is a bad idea to do so, because this may
break GODI’s build system. In general, it is ok to have libraries in site-lib that depend on
libraries in pkg-lib, but not vice versa.
In addition to the directory convention, findlib manages libraries also by storing metainformation about the libraries. These are put into files with the name META, and the META files are
contained in the code directories of the libraries. META has usually only a few lines, e.g.
description = "The library foo"
version = "1.0"
archive(byte) = "foo.cma"
archive(native) = "foo.cmxa"
and is seldom more complicated.
Findlib can also express dependencies (library X depends on library Y = library X uses features of Y). This mechanism is different from the GODI package dependencies, and there is
no strict need that the dependencies of findlib and GODI correspond to each other, although
this is usually the case for obvious reasons.
O’Caml libraries linked with external C libraries are a special case. In principal, there is
an O’Caml part, and a C part. As shown in section 1.5, it is required that the GODI user
can configure where the C library is located. The configuration data are contained in the
configuration package conf-foo for the external C library foo. The whole story is as follows:
• The O’Caml library (e.g.
foo.cma) is linked with a small stub library (e.g.
libfoo_stubs), which is also written in C, and whose purpose is to translate the
O’Caml conventions for data and function representation into the C conventions, and
vice versa.
• The stub library is linked with the external C library.
The O’Caml library and the stub library are part of the GODI package godi-foo. The location
of the external C library is specified by conf-foo. It is now possible that the C library is
located outside of GODI, or that the C library is available as GODI package, too. In the latter
case, the package is called base-foo, and it is required that the C library is installed in the
directory <PREFIX>/lib.
27
Note that although the information where the external C library resides is specified in
conf-foo, these locations are also entered into the O’Caml library as part of the build process, so that they are also available in godi-foo. At runtime, conf-foo is no longer needed.
Furthermore, if the user wants to change the configuration, it is not only required to build
conf-foo again, but also godi-foo, and GODI does not remind you of that.
Some platforms allow that C libraries are dynamically loaded into the running bytecode interpreter, but in general this cannot be assumed. Of course, the C libraries must be available
as DLLs (or DSOs in Unix terms) in order to be dynamically loadable. When the platform
does not support this technique, however, there is no advantage to have C libraries in DLL
form, as O’Caml links statically anyway.
Linking with C libraries is really complicated, and there are a number of details that must
be handled differently for the various platforms. It is currently not clear which facts about
linking are important for GODI users, and which are really technical details only experts
need to know.
28
Chapter 4
Managing a GODI Installation
4.1
What can be done with godi_console
The following tasks can be easily carried out with the help of godi_console:
• Updating the source packages: godi_console retrieves a new package list from the
GODI server, and gets the updated build instructions for all packages with a newer
version string.
Instructions:
1. Select: Main menu → Update the list of available packages
2. Wait until the system responds with a success message
3. Press «x» to exit from the dialogue
• Building additional packages from source: By selecting a package for build,
godi_console downloads the distribution files, compiles and installs the package. Furthermore, a binary package is created.
If necessary, godi_console also builds predecessor packages automatically, for both
build and strict dependencies.
Instructions:
1. Select: Main menu → Select source packages
2. Scroll up/down by pressing «p» and «n» (or use PageUp/PageDown keys). Finally enter the number of the package to build, and press Enter
3. The detailed description of the package appears. Press «b» to select it for build.
Press «x» to exit from the dialogue
4. It may happen that now the configuration dialogue appears. In this case, you can
set configuration parameters by entering their number, and changing their value.
If done, press again «x»
5. The package list is again shown. Press «s» to start the installation process.
29
6. It may happen that further (predecessor) packages are also selected for build, and
the package list is only updated to reflect this. Press again «s» in this case.
7. GODI now asks whether it is ok to start the installation. Press «o» to confirm this,
or «x» to cancel.
8. The installation process begins and runs fully automatic. (Actually, there is one
exception from the latter: When godi_console updates itself, the user must confirm this step, because it is very critical.)
9. When the installation process prints a success message, it is done. Press «x» to
exit.
• Updating packages by rebuilding them from source: By selecting an already installed
package for build, godi_console performs all necessary steps to upgrade the package
to the new version. First, the old version of the package is removed, and then, the new
distribution files are downloaded, built, and installed.
The dependencies are checked in two directions: Missing predecessor packages are
installed. This can happen when the new version requires additional prerequisites.
Furthermore, the successor packages are also handled in a special way, because the
strict successors are updated, too, or at least rebuilt if no newer version is available.
Instructions: Updating packages works like building packages for the first time.
• Removing installed packages: By selecting an installed package for removal,
godi_console deletes the package and all strict successors from the system.
Instructions:
1. Select: Main menu → Select source packages
2. Scroll up/down by pressing «p» and «n» (or use PageUp/PageDown keys). Finally enter the number of the package to remove, and press Enter
3. The detailed description of the package appears. Press «r» to select it for removal.
Press «x» to exit from the dialogue
4. The package list is again shown. Press «s» to start the installation process.
5. It may happen that further (successor) packages are also selected for removal, and
the package list is only updated to reflect this. Press again «s» in this case.
6. GODI now asks whether it is ok to start the installation. Press «o» to confirm this,
or «x» to cancel.
7. The installation process begins and runs fully automatic.
8. When the installation process prints a success message, it is done. Press «x» to
exit.
It is recommended to check whether enough disk space is available before installing packages. One can get into problematic situations when the disk becomes full in the wrong
moment, and it is difficult to recover from this. Furthermore, it is a bad idea to stop
godi_console in the wrong moment (CTRL-C) because of the same reasons. The critical step
begins when godi_console prints that it is installing a package («===> Installing for package»), and ends after the installation has been registered («===> Registering installation for
package»).
30
4.2
Installed packages
The command godi_info may be used to get detailed information about installed packages:
• godi_info -long <NAME>: Prints the comment, the description, strict dependencies
(both predecessors and successors are output), and the homepage of the software.
• godi_info -file-list <NAME>: Prints the files the package consists of.
The command godi_delete may be used to remove a package from a system (you can also
do this with godi_console). Give the -r option to delete the package and all successor
packages.
4.3
Binary packages
As mentioned earlier in this manual, the binary package file is put into the directory
<PREFIX>/build/packages/All after the build of a package has succeeded. This means that
this directory always contains a complete copy of the current installation plus a lot of history
information.
The support for binary packages has been enhanced in Skylift. Especially, it is now possible
to distribute binary packages easily. See the subsection below for details.
When a package is updated to a new version, the binary package file of the old version is not
deleted. In principle, this allows you to go back, and to restore the old package. Note that
the filenames of binary packages are chosen in a way so that these files are not overwritten
(except you build exactly the same package with the same dependencies again).
The main purpose of the binary packages is to simplify the distribution of software in LANs.
One can copy the packages from one system to another, and install them, which is a lot
simpler than to build the software on every system from source.
Tasks related to binary packages:
• Getting information: The godi_info command can also deal with package files. Just
pass the name of the file as argument, and the output of the command refers to the file
instead of the installed package. Example:
godi_info -long <PREFIX>/build/packages/All/godi-ocaml-3.08.1.tgz
In Skylift, the file names for binary packages also include a checksum, e.g. godiocaml-4.00.0@BUILD_85248f. The checksum allows it to distinguish different builds
of the same version.
• Installing an additional package: This is performed by godi_add. By default, it is not
allowed to overwrite the package if it is already installed. Example:
godi_add <PREFIX>/build/packages/All/godi-ocaml-3.08.1.tgz
You can also mention several package names on the command line to install several
packages at once. When predecessor packages are missing, they are searched in the
31
same directory the original package is taken from. When the predecessor packages
exist, but in the wrong version, the installation fails.
• Replacing a package: This can be done with godi_add, too, when the -u option (update)
is given. In principle, it is not necessary to delete the successor packages first, as the
package can be in-line replaced by a different version if the version conditions of the
dependent packages permit it. However, this is normally not the case.
Predecessor packages are not updated, however, even if this first enabled the installation of the original package. godi_add is simply not intelligent enough for this operation.
The package replacement even works if an older version is to be installed (downgrade).
• Cleaning the package directory:
Of course, you can delete the files in
<PREFIX>/build/packages/All when you are sure you do not need them anymore. Note that there also symlinks in the neighbour directories that should be
deleted, too.
Since Skylift, there is a file PKGMANIFEST in <PREFIX>/build/packages/All
which serves as table of contents. Simply delete this file, and create a new empty one.
(Generally, it is no error if PKGMANIFEST lists packages that do not exist, so this step
is optional.)
4.4
Skylift: Enhanced support for binary packages
As already mentioned, Skylift introduces a number of enhancements. Especially, binary
packages include now information about the build, so it can be tracked from which sources
they were exactly made. The godi_info utility can be used to display the build info, e.g.
godi_info
-long
1.3.2@BUILD_1da555.tgz
/opt/godi-4.00/build/packages/All/godi-findlib-
The build_version paragraph could read for instance:
— Version —
name=godi-findlib-1.3.2
— Parameters —
OPSYS=Linux
W32PORT=
MACHINE_ARCH=x86_64
– Distinfo —
$NetBSD$
SHA1 (findlib-1.3.2.tar.gz) = 3850c6732fd3b50b935806859dc7fe481112c810
Size (findlib-1.3.2.tar.gz) = 230556 bytes
— Applied patches —
— Interface checksums —
32
exists (bin/ocamlfind)
exists (bin/safe_camlp4)
MD5
(lib/ocaml/pkg-lib/findlib/fl_metatoken.cmi)
=
3c5bc46fd1c65ed3f66cd1cb8f6ec04c
MD5 (lib/ocaml/pkg-lib/findlib/findlib.cmi) = f924de9dc1d88a648cffd069d90f6b8f
MD5
(lib/ocaml/pkg-lib/findlib/toploop.cmi)
=
edb8b1422c08d147ade7c6c68d9f7381
MD5
(lib/ocaml/pkg-lib/findlib/topdirs.cmi)
=
7d6713e935533a6a4cf6c4f72cef5af1
MD5
(lib/ocaml/pkg-lib/findlib/fl_metascanner.cmi)
=
3f9f86c0c9884ae5041cb69ef7137d15
MD5
(lib/ocaml/pkg-lib/findlib/fl_package_base.cmi)
=
f561ffbf2522be8b8c2ff2a5232d2642
MD5
(lib/ocaml/pkg-lib/findlib/topfind.cmi)
=
647f308787ef75fd58c2d5cb74c31082
MD5
(lib/ocaml/pkg-lib/num-top/num_top_printers.cmi)
=
24dcdde5a8f7adf4ceddd6a65310668b
MD5
(lib/ocaml/pkg-lib/num-top/num_top.cmi)
=
ffdb1f4088b39025ff39fbddace356c2
As you see, this paragraph includes checksums of the sources and of the relevant interface
files. These data are considered to describe the compatibility of the binary package: if any of
these items changes, the package becomes incompatible. The compatibility is also summarized by a single MD5 checksum called build_version_fingerprint:
build_version_fingerprint: MD5:07306f326bf0efab1c5574c2dab1c5574
(also printed by godi_info -long). These fingerprints are also used for dependencies:
godi-ocaml-4.00.0@MD5:2dab1c5574cd2ff34d07306f326bf0ef
This would mean that the package is dependent on godi-ocaml in exactly this version and
build.
So, what does this mean operationally?
• If a new binary package is installed, it is checked whether the fingerprints in the dependency lists are matched by the currently installed packages. If there is no match, the
package cannot be installed. Note that it would not work anyway, because the ocaml
compiler also uses hard checksums for checking the compability of modules. This is
only taken to the level of packages.
• If the binary package is located via a search path, and if there are several builds for
a certain package version, GODI will automatically select the right build (if a match
exists).
33
4.4.1
Repositories of binary packages
In Skylift, it is now also possible to get binary packages from repositories, i.e. from directories where somebody put ready-made packages. Currently, there is no such official repository, though. Some GODI derivates use this feature, however, to distribute packages. It is
possible to create your own binary repository and to distribute packages, see chapter 7 for
details.
A repository is activated by setting the variable GODI_BINPKG in the file <PREFIX>/etc/godi.conf. This variable may contain URLs or paths to local directories.
Example: The directory <PREFIX>/build/packages/All happens to have exactly the right
format for a repository. So you can set
GODI_BINPKG = <PREFIX>/build/packages/All
in godi.conf, and you can then install your own packages without giving a path (e.g. in
godi_add). Of course, this is not really exciting, but can also point a webserver to this directory, and direct a different computer to pull binary packages from a URL. See section XXX
for instructions how to control in a more fine-grained way which packages are available in
this way.
Once you set GODI_BINPKG, the packages from the given repositories are also shown in
the godi_console dialog «Select binary packages».
4.5
Restoring old packages
In principle, one can restore binary packages (i.e. install the old binary package file again),
and one can recover source packages (i.e. go back to an old version of the source package,
and build it again).
4.5.1
Restoring an old binary package
You can restore an old binary package by calling godi_add -u for it:
cd <PREFIX>/build/packages/All
godi_add -u <NAME>.tgz
Sometimes this does not work, however, because the old package is not compatible with the
current set of predecessor or successor packages (godi_add reports a conflict). You can try to
replace the problematic packages by historic versions, too, but this is a very complex task,
and it is even unclear whether it is possible at all.
In general, it is better to build the old version of the package from source, see the next section
for instructions.
Skylift enhancement: It is possible to let godi_add look up the right build, e.g.
34
godi_add -d <PREFIX>/build/packages/All -u <NAME>
In this form, you can include (e.g. «foo-3.4») or omit (just «foo») the version string in the
package name. Especially, you need not to mention the build checksum. GODI searches for
the right package in the given directory (or better, in the PKGMANIFEST file there).
4.5.2
Building an old version of a package
This way of restoration is usually possible. In <PREFIX>/build/buildfiles, GODI
stores the build instructions of all package versions that were ever downloaded. In
<PREFIX>/build/distfiles, GODI stores the distribution files of all package versions that
were ever built.
Follow these steps to install the package corresponding to the build instructions in
<CAT>-<NAME>-<VERSION>.build.tgz:
1. Change the directory:
cd <PREFIX>/build/<CAT>
2. Delete the current build instructions (if present):
rm -rf <NAME>
3. Extract the old build.tgz archive:
godi_pax -rzf ../buildfiles/<CAT>-<NAME>-<VERSION>.build.tgz
4. Start godi_console and build the package again (see above). It might happen that the
distribution files do not exist locally in the distfiles directory, because the package
was never built before. In this case, godi_console tries to download them from the Internet. There is no guarantee, however, that historic distribution files remain available
forever.
Of course, godi_console may want to rebuild other packages, too. This is just the same
mechanism as building new packages. It may happen, however, that the already installed packages are too modern for the new package. This is not detected by GODI in
advance because this kind of information is not available. The most likely symptom is
that the build fails with a compiler error.
In order to keep this possibility, it is strongly discouraged to delete the files in the buildfiles
and distfiles directories.
Tip: If you are familiar with profiles, another way to do the downgrade is to add an ad-hoc
constraint to the profile, e.g.
godi_console
profile
<NAME>==<VERSION>
-enable
This extracts the old buildfile, so it is offered for build.
35
archive_4.00
-constraint
4.6
Distribution upgrades
There are usually several «release lines» of GODI, i.e. several completely independent series
of packages. When you perform the bootstrap procedure, one of the release lines is automatically selected and installed (there is always one release line reflecting the most up-to-date
state). Up to now, the following types of release lines are in use:
• For every major version of the O’Caml compiler a new release line is started. For
example, there are releases for the O’Caml 3.07 and the O’Caml 3.08 systems. Minor
updates (bug fixes) of the compiler are usually handled within the existing release line,
e.g. the 3.07 compiler was updated to 3.07pl2 after a while in the existing 3.07 line.
The reason for this is that the version of the O’Caml compiler is a major determinant
of all software covered by GODI. Often, software must be explicitly ported to a new
O’Caml compiler release, because the new version introduces almost always incompatibilities with the previous version.
• For certain development purposes, special release lines are started. These are often
experimental, and include features that are not yet ready for the stable GODI system.
Currently, the existing release lines of the first type are «3.09» to «4.00». The release lines of
the second type are announced in godi-list.
The release line GODI uses is determined by the variable GODI_SECTION that can be set in
the file <PREFIX>/etc/godi.conf. After changing this variable, please note that GODI does
not really detect that a different distribution is selected, it just retrieves the package from the
newly selected release. This means:
• If the new release has packages with newer versions, these are recognised as being
new, and the build instructions are downloaded when the package list is updated.
• If the new release has packages with older versions, these are recognised as being older
than the available ones, and the build instructions of the new release are ignored.
The consequence is that the change of the release line works only correctly when this implies
an upgrade, i.e. the packages of the new release are newer. If you really want to change to
an older release, you must first delete all extracted build instructions:
cd <PREFIX>/build
rm -rf apps/* base/* conf/* godi/*
After that, at least the build instructions of the older release are downloaded, and you can
start to build packages. You might still encounter strange effects, though, because package
downgrades are a somewhat hairy operation, as necessary information about compatibility
between old and new packages are missing.
36
4.7
Scripting GODI
The program godi_console cannot only be used in an interactive way, but also in scripts.
Call godi_console -help to see the possibilities. It is beyond this manual to describe the
command fully. See the manual page for «godi_console» for more information.
It should also be mentioned that all the godi_* commands just call godi_console to get their
work done. For example, godi_make is just a shortcut for «godi_console make».
37
Chapter 5
Profiles
In the Skylift release of GODI, a new concept for configuring many GODI settings at once has
been introduced: Profiles. This is especially useful for work groups, because several people
can share the same profile, and thus ensure that they build the same packages.
The profile selects:
• From which origin server packages are downloaded. This is by default always the official GODI server, but users are free to select other sources. For example, a work group
may set up its own server, and publish additional packages just for easier distribution
of further software within the group.
• Whether package versions are constrained, e.g. a work group may decide to keep a
certain key package at a certain version, and not to upgrade to a newer version.
• Whether additionally patches are applied to the packages. This feature allows it to
modify the packages of the work group.
Some of the features (especially version constraints) may also be useful for individual users.
The GODI deployment is by default equipped with two profiles:
• The head profile is the standard profile. It contains the latest versions of the packages.
There are no version constraints or patches in this profile.
• The archive profile can be activated as alternative source. It contains also older versions
of packages (starting at around July 2012). The archive profile is the right starting point
when version constraints are needed, because outdated versions are not deleted.
The GODI user interface allows it to change the current profile interactively. You can also
use the command-line:
godi_console profile -list
This lists the profiles, e.g.
38
archive_4.00
Archived packages for OCaml-4.00 (since June 2012)
head_4.00
Newest packages for OCaml-4.00
Switching to a profile is done with:
godi_console profile -enable name
After enabling a profile, you need to update the list of packages before you see the effect of
the profile.
5.1
Creating profiles with version constraints
Unfortunately, there is no user interface (yet) for this type of configuration: You need to edit
a text file. But it is not really complicated.
What you need to do:
1. Create a new profile as a copy of an existing profile (normally as copy of the archive
profile). The copy is needed because your changes would otherwise be overwritten the
next time the packages are updated.
2. Edit the profile as shown below.
3. Enable the profile, and update the package list.
For step 1 (here with the archive name for OCaml 4.00):
godi_console profile -enable archive_4.00
godi_console profile -copy-to myprofile
For step 2: The file to edit is now <PREFIX>/build/profiles/myprofile/profile.ini. You
find in this file several settings «include = *-*». This is basically the default constraint - all
packages are included in all versions (and godi_console finally takes the latest version of
this set of permitted packages). We can now change this constraint, e.g. «include = godiocaml==4.00.0 *-*», which would keep the package godi-ocaml at the version 4.00.0 even
when 4.00.1 is published. You can also use the operators «>=», «<=», «»> and «<» for the
version constraint. Don’t forget the trailing «*-*» which just means to include all other packages unconstrained.
There are several «include» settings. Which is the right one? This generally depends from
which source the constrained packages come from (note that the profile.ini file is split into
several sections for the sources). Most packages come from the source which is called publicgodirepo-4.00 (or whatever release you use). Only a few ones (especially godi-tools and godiscript) come from public-godirepo-skylif t, and the identifier public-godirepo-unknown is just a
reserved identifier for all other packages (e.g. self made ones).
For step 3: The commands to run are:
39
godi_console profile -enable myprofile -update
The -update switch causes that the package list is updated and it is reevaluated which packages are made available for build. (You could also run godi_console update with the same
effect.)
Tip: Later Skylift versions of godi_console add a useful option to the «profile» command
that is helpful for testing constraints:
godi_console profile -enable archive_4.00 -constraint godi-foo==2.3
This enables the archive_4.00 profile (again), and adds the ad-hoc constraint that godi-foo
is kept at version 2.3. The constraint is stored nowhere, and the only effect is that version
2.3 of godi-foo is unpacked into the build directory. Another profile activation, or even a
«godi_console update» will override the constraint again.
5.2
Distributing profiles
Profiles can be packed, distributed as a single file, and unpacked in a destination system.
Packing:
godi_console rprofile -site /tmp -put myprofile
Instead of a path like /tmp you can also specify a URL (FTP or WebDAV).
The distribution file can now be found in /tmp: myprofile.profile.tgz. You can e.g. publish
this file with a web server, and download the profile from another GODI deployment with
godi_console rprofile -site http://yourserver/directory -get
myprofile
Again, the site could also be an FTP url or a local path.
Automating the profile update
You can configure that the above profile download is automatically run whenever the local
user updates the package list. This way, the user does not need special knowledge about
profiles, and can nevertheless profit from this feature.
This feature is enabled by including a line
origin = URL
in the [profile] section of profile.ini. The URL must be the same URL as specified with the
-site switch.
40
5.3
Other profile features
The remaining features of profiles are better explained in other contexts:
• The chapter 7 explains how to export packages. This is also a great opportunity to
describe how such exports are added as package source to other GODI deployments.
• Creating profile patches is not that much different than creating other patches, and
hence you find all this information in sections 6.3.2 and 8.3.
41
Chapter 6
Packaging Software
This chapter explains the core method of packaging software. GODIVA is another method
with a simpler package specification file. GODIVA processes this file, and generates build
instructions according to the core method, so GODIVA should be regarded as a higher layer
that works on top of the core layer.
The question is whether to use GODIVA, or to manually apply the core method. There is no
simple answer, but the following criterions may help:
• GODIVA requires that the software to be packaged follows certain rules, e.g. that there
are certain «make» targets, that $PREFIX is honoured, etc. Normally, the build scripts
coming with a software distribution do not match exactly with the requirements (although they come quite close). If you package your own software, this is not a big
problem, just change the build scripts such that the GODIVA requirements are fulfilled. If you package third-party software, it may become necessary to apply patches
such that GODIVA and the build scripts play nicely together.
• GODIVA does not support configuration options.
• GODIVA does not support the inclusion of library flags from conf-* packages. This
makes it a bad choice for software that provides bindings for C libraries.
Some of the limitations can be worked around by patching the result of the generated build
instructions, however.
If you think you may want to try GODIVA, just install the apps-godiva package, and read
more on the homepage: http://projects.phauna.org/godiva. The following information
may be still of interest, however.
6.1
The build directory
The build instructions for a package are stored in the build directory:
<PREFIX>/build/<CAT>/<CAT>-<NAME>
42
You find here the following files and directories:
• Makefile (mandatory): This Makefile controls the overall build process. It does not
directly invoke compilers, but it calls the Makefile of the software to build as sub
process. This Makefile has a certain structure, see below.
• distinfo (mandatory): This file contains checksums of the distribution files, and of
patches.
• DESCR (mandatory): The long description of the package. Free ASCII text.
• BUILDMSG (optional): This message describes configuration options. Free ASCII text.
• MESSAGE (optional): A message to be displayed when the package is finally installed
(e.g. from a binary archive). Free ASCII text.
• PLIST or PLIST.godi (mandatory): The file describes which files are installed by the
package, and are owned by the package. The name «PLIST.godi» should no longer be
used. PLIST can include a number of directives, and is explained below in detail.
• CONFOPTS (optional): The list of configuration options (just one option per line).
• patches (optional): This directory contains patches to be applied to the unpacked software before the build starts. Patches are automatically applied by the build framework. Note, however, that patches are only applied when they also occur in distinfo,
otherwise an error is indicated.
• files (optional): Additional files to be added to the software. There is no automatism,
the commands performing the addition must be programmed in Makefile.
Usually, one needs only Makefile, DESCR, and PLIST (distinfo is generated, see below).
There may be the directory work as well. It contains the unpacked software, and this is the
place where the build process really happens. By deleting work, one can reset the build
process to the beginning. Note that it is possible to configure a different place for work (e.g.
somewhere in /tmp).
6.2
Stages
The build process is structured into several stages. A certain stage can only be reached from
the immediately preceding stage (but there is some shortcut logic, see below). The stages
are:
• fetch: This stage ensures that the distribution files are in <PREFIX>/build/distfiles. If
not, the files are downloaded.
• extract: Unpacks the distribution files into work.
• patch: Applies the patches to work
43
• configure: Configures the software (usually by calling a configure script)
• build: Compiles the software
• install: Installs the software
• package: Creates the binary package from the installed image
Normally, the build process just «climbs» the stages one after the other. The build
process remembers the already reached stages by placing invisible files into work, e.g.
work/.install_done indicates that build has completed the install stage.
When developing a package, it is possible to go to a certain stage, and to check whether
everything has been done right (in godi_console, the stages are simply iterated, and one
does not have the chance to stop and to check what is going on). This is done by calling
godi_make, and passing the name of the stage, e.g.
godi_make configure
continues the build process until at least the configure stage is reached.
There are defined actions that are carried out for every stage. These actions can be configured
by setting variables in Makefile (explained below). In addition to this, one can define pre and
post actions for every stage by adding rules to Makefile, e.g.
pre-configure:
<commands>
causes that these commands are executed before the predefined actions of the configure
stage. In the same way, a post-configure rule would be executed after the predefined actions of the configure stage.
6.3
The Makefile
The minimum Makefile looks as follows:
.include "../../mk/bsd.prefs.mk"
VERSION= ...
PKGNAME= ...-${VERSION}
PKGREVISION= ...
DISTNAME=...
DISTFILES=....tar.gz
CATEGORIES=...
MASTER_SITES= ...
MAINTAINER=...
HOMEPAGE=...
COMMENT=...
.include "../../mk/bsd.pkg.mk"
44
Of course, this is only rarely enough, but often only a few additions are needed. We will
discuss possible additions below. The «.include» directives are mandatory, and load the rest
of the build framework. The variables have this meaning:
• VERSION: This is the version string of the package, without revision suffix («godi» plus
revision number)
• PKGNAME: The package name, including the version string at the end (as defined by
VERSION).
• PKGREVISION: The revision number. This is a natural number ≥ 0. If omitted, the
revision number is assumed to be 0 which is the same as not specifying a number.
• DISTNAME: The name of the directory below work into which the distribution files are
unpacked, i.e. the name of the topmost directory of the distribution tarball. This is
usually the name of the package, optionally including the version string.
• DISTFILES: The names of the distribution files. This can be any number of files
(even zero); the names are separated by spaces. These files are downloaded from
MASTER_SITES, stored into the distfiles directory, and finally unpacked in work. If omitted, DISTFILES is tried to be derived from DISTNAMES by appending EXTRACT_SUFX,
usually tar.gz.The distribution files should be tar files (optionally compressed as
.gz or .bz2). Caution: GODI does not use GNU tar to extract tar files, and cannot cope with
the various extensions of GNU tar. The tar files must be POSIX-compliant «ustar» files. If
you use GNU tar, you can enforce this format by specifying –format=posix on the tar command
line.
• CATEGORIES: This should be the category prefix of PKGNAME, i.e. apps, conf, godi, or
base. In the future it will be possible to assign a package to several categories, and the
categorization will be visible in the user interface.
• MASTER_SITES: A list of URLs where the DISTFILES can be downloaded. The URLs are
tried in turn, so you can mention mirror sites in addition to the primary site. The URLs
must end with a slash (or more precisely, with the separator character to which the file
name can be appended). Currently, only «http» and «ftp» URLs are allowed. There is
special support for common download sites like Sourceforge, e.g. one can define
MASTER_SITES=${MASTER_SITE_SOURCEFORGE:=path/}
where path is the part to append to the master URL. (This strange syntax is needed
because MASTER_SITE_SOURCEFORGE expands to a list of URLs!)
The GODI backup URL is implicitly added to MASTER_SITES, and when neither of the
URLs work, the GODI backup server is tried in a final attempt.
• MAINTAINER: The name of the package maintainer, including email address
• HOMEPAGE: The homepage of the packaged software
• COMMENT: The short, one-line description of the package
With only these variables, the stage actions are defined as follows:
45
• fetch: The DISTFILES are downloaded from the MASTER_SITES.
• extract: The DISTFILES are unpacked into work.
• patch: Applies the patches to work
• configure: Does nothing, the default is that there is no configuration script
• build: Changes to the subdirectory of work containing the unpacked sources, and tries
to build the target «all»
• install: Changes to the subdirectory of work containing the unpacked sources, and
tries to build the target «install»
• package: Creates the binary package from the installed image
We will now discuss how to define a number of frequent variations of this default. As most
configurations can be done by setting further variables, the reference document of the variables is quite important: The file makevar-ref.txt describes the variables. It is usually
installed in <PREFIX>/doc/GODI/project-doc.
6.3.1
Customising the «extract» stage
There are not really many ways for this type of customisation. If only some DISTFILES need
to be unpacked, one can set
• EXTRACT_ONLY: Enumerates the file names to extract. This should be a subset of
DISTFILES.
6.3.2
Customising the «patch» stage
Patches need not to be declared in Makefile (only in distfiles). The patches must be put
into the patches directory. Usually, the file names of patches have the convention
patch-<letter><letter>-<info>
where the two letters define the order in which the patches are applied. The info suffix is
just a descriptive string, e.g. one can mention the patched file (if it is only one file).
Patches are applied relative to the toplevel directory of the unpacked sources. The patch
format should be «unified» patches. It is not allowed that files are created or deleted by
patching; in the first case one must copy the files from the files directory to the source tree,
and in the latter case one must delete the files by a script.
46
How to create patches - the traditional method
In this example we create a patch for the file foo.txt which is part of the bar-3.14 package.
1. Copy the original version of the file:
cd work/bar-3.14
cp foo.txt foo.txt.orig
2. Modify foo.txt as required
3. Create the diff file (current directory is still work/bar-3.14):
diff -au foo.txt.orig foo.txt >../../patches/patch-aa-foo.txt
If the file to patch is located in a subdirectory, do not change to this subdirectory! Create the
difference always from the toplevel directory of the unpacked sources.
Finally, you should also update distinfo, see below how to do this.
Creating patches - the simplified Skylift method
Since Skylift, patching has become simpler:
• After running «godi_make patch» just edit the sources as you want. There is no need
to keep originals.
• When the sources can be built again, i.e. «godi_make build» succeeds, you can go on
and create the patch.
• Run «godi_make makepatch». This will just show the patch, but not save it. You
can save the patch in three locations: (1) as site patch, (2) as profile patch, or (3)
as package patch. (1) is right if you need the patch just for yourself. It is stored in
the $LOCALPATCHES hierarchy. You get this behavior with «godi_make makepatch
SAVE=LOCAL». Choose (2) if you’d like to include the patch into the current profile. This
is achieved with «godi_make makepatch SAVE=PROFILE». And (3) is a normal package
patch, i.e. it is stored in the patches/ directory of the package: godi_make makepatch
SAVE=PACKAGE.
Note that the file name of the patch is automatically determined. In case of package patches,
the distinfo file will be updated.
6.3.3
Customising the «configure» stage
As mentioned, the default is not to configure the software. The following variables enable
this:
• HAS_CONFIGURE=yes: Enables to call a configuration script.
• CONFIGURE_SCRIPT: The name of the script to call. This defaults to «configure».
47
• CONFIGURE_ARGS: The arguments to be passed to the script. By default empty. Note that
the arguments are in shell syntax, i.e. separated by spaces, and if necessary, quoted.
E.g.
CONFIGURE_ARGS="word1 word2" word3
passes two arguments to the script where the first one is composed of two words.
If you just want to pass Makefile variables, the «Q» modifier is useful. It quotes automatically, e.g.
CONFIGURE_ARGS=-prefix ${LOCALBASE:Q}
so LOCALBASE is here always an argument of its own.
As with many other «plural» variables that have a list of arguments as values, it is
common to use the «+=» operator to add arguments, e.g.
CONFIGURE_ARGS+=-prefix ${LOCALBASE:Q}
CONFIGURE_ARGS+=-with-foo
This operator appends the new value to the already existing list, and ensures that there
is a space character as separator.
• CONFIGURE_ENV: Environment variables to be passed to the script. A number of variables are already passed by default (see reference). The syntax is simply:
CONFIGURE_ENV+=var=value
where var is the name of the variable, and value the new value.
• CONFIGURE_DIRS: Lists the directories where to invoke the configure script. By default,
this is only done in the toplevel directory of the source tree.
6.3.4
Customising the «build» stage
One can set a number of variables, and there are also some typical «code snippets».
• USE_GMAKE=yes: Effects that GNU make is used to build the software. By default,
godi_make is used (which is a BSD-type make utility).
• MAKEFILE: The name of the invoked Makefile of the source tree. Defaults to «Makefile».
• ALL_TARGET: The target(s) to pass to «make» to build the software. Defaults to «all».
See below for a discussion.
• MAKE_FLAGS: Further arguments to pass to «make». Especially, it is possible to override
variables of the invoked Makefile by passing «name=value» arguments. The arguments are again in shell syntax.
Pitfall: There is also a variable MAKEFLAGS, without underscore. This variable has a
different meaning, as it is used to pass flags to recursive invocations of godi_make.
Don’t touch it!
48
• MAKE_ENV: Environment variables to be passed to «make». A number of variables are
already passed by default (see reference). The syntax is simply:
MAKE_ENV+=var=value
where var is the name of the variable, and value the new value.
• BUILD_DIRS: Lists the directories where «make» is invoked to build the software. By
default, it is only invoked in the toplevel directory of the source tree. By setting this
variable to the empty string, the default action for the «build» stage is completely disabled.
Often, O’Caml software must be built with «make all» to get the bytecode version, and
«make opt» compiles to the native code version (if supported). This is usually expressed
by this code snippet
.if ${GODI_HAVE_OCAMLOPT} == "yes"
ALL_TARGET= all opt
.else
ALL_TARGET= all
.endif
(or some variation). The variable GODI_HAVE_OCAMLOPT expands to yes when the ocamlopt
compiler is available, and to no otherwise. (Note that there are some more variables that
describe the properties of the O’Caml core, see the variable reference.)
When findlib is used by the software, a special configuration must be enforced. This configuration sets a different lookup path for libraries such that the GODI-managed libraries have
precedence. To get it, put this line into Makefile:
MAKE_ENV+= ${BUILD_OCAMLFIND_ENV}
If forgotten, it may happen that the build fails because a required library is not found, or in
the wrong version.
6.3.5
Customising the «install» stage
Many of the «build» variables are also applied in the «install» stage, namely USE_GMAKE,
MAKEFILE, MAKE_FLAGS, MAKE_ENV. The following variables are specific for «install»:
• INSTALL_TARGET: The target(s) to pass to «make» to install the software. Defaults to
«install».
• INSTALL_DIRS: Lists the directories where «make» is invoked to install the software.
By default, it is invoked in the same directories as for the «build» stage. By setting
this variable to the empty string, the default action for the «install» stage is completely
disabled.
49
It is quite common to add post-install actions to Makefile, because often documentation
files are not installed by the installation procedure defined by the packaged software. An
example for such an action is:
post-install:
${MKDIR} ${PREFIX}/doc/godi-getopt
${CP} ${WRKSRC}/README ${WRKSRC}/COPYING \
${PREFIX}/doc/godi-getopt
There are a number of further variables here:
• PREFIX: This is the base directory where packages are installed. The variable LOCALBASE
has usually the same value, but for a number of reasons PREFIX should be preferred
when files are installed, and LOCALBASE should be preferred when files are looked up
(owned by other packages that are already installed)
• WRKSRC: This is the toplevel directory of the source tree, as absolute path.
• MKDIR, CP: These are defined commands. Of course, one could also directly call mkdir
and cp, but there are systems where there are several versions of various commands
(e.g. a BSD version and a System V version), and the GODI framework has selected
one that can be called through the mentioned variables.
During installation, a common source of problems are the various variants of the «install»
command. GODI rocketboost provides now «godi_install» which is a simple version of install in BSD style.
6.3.6
Dependencies
In Makefile one can also declare dependencies on other packages. The variables are:
• DEPENDS: Lists strict dependencies for build and runtime
• BUILD_DEPENDS: Lists build-time-only dependencies
The syntax for the expressions one can use in these variables:
• <BASENAME> <OPERATOR> <VERSION> : <PATH>
where <BASENAME> is the name of the package without version string, <OPERATOR> is
one of ==, >=, <=, >, <, !=, and <VERSION> is the version string the operator refers to. Note
that package revisions in <VERSION> (i.e. any «godi» suffixes) are ignored, and one cannot
enforce a certain revision.
The <PATH> is a legacy component of the dependency expressions, i.e. it is ignored by
godi_console, but there are still some scripts that need it (these will be phased out soon).
The <PATH> must be set to
50
../../<CATEGORY>/<BASENAME>
where <CATEGORY> is the category prefix of <BASENAME> (apps, godi, etc.). The
<PATH> is the relative path where to find the build directory of the package one refers to.
Examples for package dependencies:
• DEPENDS+=godi-ocaml>=3.07:../../godi/godi-ocaml
• BUILD_DEPENDS+=conf-zlib>=0:../../conf/conf-zlib
The comparison «>=0» should be read as «any version is accepted». There is also the legacy
syntax «-*» or even «-[0-9]*» for the same purpose, e.g. «conf-zlib-*», but it should no longer
be used in new packages.
Selecting the kind of dependency
BUILD_DEPENDS should only be used when it can be ensured that the referred package is only
needed at build time, and in all other cases DEPENDS must be used. Examples when build-time
dependencies are sufficient:
• A generator or other build-time tool is required, and the other package includes it. For
instance, godi-findlib is usually a build-time dependency because of this rule.
• The other package configures the build. All conf-* packages can be referred to by buildtime dependencies.
• An application program is built, and all executables are either created with ocamlc
-custom, or ocamlopt. In this case, the used libraries are not necessary at runtime, and
the corresponding packages can be listed in BUILD_DEPENDS.
Note, however, that there are exceptions from this rule. For example, godi-ocamlnet
also includes runtime files that are required even when the application is completely
statically linked.
In general, when a library is linked into a program, or a library is the antecedent for another
library, the dependency is of the runtime type.
6.3.7
Legacy expressions
In the past, it was necessary to put a number of expressions into Makefile to get a certain
behaviour, but due to improvements this is no longer required:
• GODI_PLIST: When set to «yes», the file PLIST.godi is used instead of PLIST
• .include "../../mk/godi.pkg.mk": This is now an empty file
• PATH:=${LOCALBASE}/bin:${PATH}: This is now always done
If you find that in existing packages, don’t copy it to new packages.
51
6.4
Packing lists
The file PLIST describes the installed files, so GODI knows which files are owned by the
package, and the files are removed when the package is deleted.
In general, the «install» stage must already have arranged that the files are installed in the
right directories. Often, this is done by passing PREFIX to the configure script, but there is no
general technique how this can be achieved. In doubt, read the documentation coming with
the software, and, of course, the Makefiles and other build scripts included in the software
distribution.
The PLIST file is needed first when the «install» stage is entered. Before this stage, the PLIST
file can be omitted.
If you don’t know the software you are packaging, it is sometimes difficult to find out which
files are actually installed. As mentioned, the PLIST file is needed before the installation is
done (at the beginning of the «install» stage), so you cannot just install and see what has
been installed. See below for a discussion how to cope with this problem.
In the simplest form, PLIST just lists the files that have been installed, plus a number of
directives how to deal with directories. For example:
bin/foo
This one-liner means that the package consists only of the executable bin/foo. Filenames
are relative to the installation prefix of GODI, and it is an error to use absolute path names.
In general, directories need not to be mentioned in PLIST. Directories are automatically created, and they are automatically removed when they become empty. Note: In previous
versions of GODI, the @dirrm directives controlled the handling of directories in more detail. This has been found as too complicated by the GODI developers, and has been removed
from the GODI packaging system.
As it is quite error-prone to enumerate files, there are a number of abbreviations and special
notations. We explain here only the most useful ones, for a complete reference see the file
plist-ref.txt (usually installed in <PREFIX>/doc/GODI/project-doc).
• @deepdir <dir>: The mentioned directory and its contents (including subdirectories)
are declared to be owned by the package.
• @findlib <name>: The named findlib library is declared to be owned by the package.
When the library includes DLLs, these are ignored, however.
• @dllfindlib <name>: The named findlib library and the included DLLs are declared
to be owned by the package. (Note: The ownership of the DLLs is only recognised
when there are .owner files. This is the case when the library was installed with
ocamlfind, but is usually not the case when another method was used.)
• @optional <directive>: The files covered by the <directive> are only installed in certain
configurations, and may be missing in other configurations. E.g. @optional @findlib
<name> means that the library is only optionally installed.
52
In most cases, these four directives are sufficient.
There is still the problem how to figure out which files are installed. A simple method:
1. Begin with an empty PLIST, and do godi_make install
2. Get the installed files by calling godi_make print-installed. Note, however, that
there is no guarantee that this list is complete, the «print-installed» script checks the
timestamps of all files in the GODI installation. This may go wrong, especially on
systems where the «find» command does not support the comparison of the ctime
field of the timestamp (which is less problematic than the mtime field).
3. Write the PLIST according to the output of «print-installed». One should keep in mind
that some files are only installed for certain system configurations, so just copying the
list may not be enough.
4. Now remove the package, and the files (so the package database is clean again):
godi_delete <packagename>
godi_make print-installed | ( cd <PREFIX>; xargs rm -f )
5. Remove these files, and install the package again:
rm work/.install_done work/.PLIST
6.4.1
Skylift: Verifying PLISTs
In Skylift, there is now a way to automatically verify PLISTs. This is done by comparing file
trees before and after installing and checking whether the difference is covered by PLIST.
It is easy to enable it: Just set the variable
GODI_VERIFY_PLIST = yes
in godi.conf. If you run «godi_make install», this enables two additional sub-actions:
«Checkpointing», and «Verifying PLIST». Any files not in PLIST are printed.
6.5
An Example
Here the Makefile of godi-xstr (slightly updated):
.include "../../mk/bsd.prefs.mk"
VERSION=
0.2.1
PKGNAME=
godi-xstr-${VERSION}
DISTNAME=
xstr
DISTFILES=
xstr-${VERSION}.tar.gz
CATEGORIES=
godi
MASTER_SITES= http://ocaml-programming.de/packages/
MAINTAINER=
[email protected]
53
HOMEPAGE=
COMMENT=
http://ocaml-programming.de
additional string functions
DEPENDS+=
godi-ocaml>=3.06:../../godi/godi-ocaml
BUILD_DEPENDS+= godi-findlib>=0.8.1:../../godi/godi-findlib
MAKE_ENV+=
${BUILD_OCAMLFIND_ENV}
USE_GMAKE=
yes
ALL_TARGET=
all
.if ${GODI_HAVE_OCAMLOPT} == "yes"
ALL_TARGET+=
opt
.endif
post-install:
${MKDIR} ${LOCALBASE}/doc/godi-xstr
.
for F in README LICENSE
${CP} ${WRKSRC}/${F} ${LOCALBASE}/doc/godi-xstr
.
endfor
.include "../../mk/bsd.pkg.mk"
The corresponding PLIST file:
@findlib xstr
doc/godi-xstr/README
doc/godi-xstr/LICENSE
6.6
Further targets for godi_make
The following targets have relevance:
• clean: Deletes the «work» directory, and resets the build process to a clean, initial state.
• print-installed: Prints a list of files that have been installed (created or modified) since
the last time the package was unpacked. The underlying method is not fully reliable.
• makesum: Creates the distinfo file, and puts entries for all DISTFILES into it.
• makepatchsum: Adds checksums for patches to an already existing distinfo file.
6.7
Testing packages
One of the basic properties every package must have is that one can delete it. So the most
primitive test checks this:
1. Install the package with godi_make install
2. Delete the package with godi_delete, check that there are no error messages.
3. Check that godi_make print-installed does not output anything!
54
6.8
The package repository
The package repository is realised with Subversion. Everybody can check it out:
svn checkout https://godirepo.camlcity.org/svn/godi-build
Of course, you need an account to modify any of the files. If you had one, you could do the
following:
• Copy your new package into the checked-out directory hierarchy. Normally, the right
directory is godi-build/trunk plus the relative path of the package directory.
• Add the package to the repository: run «svn add», and commit it: «svn commit».
• Ask other developers to check the package out, and to test it
• Release the package: Add the right line to godi-build/pack/release.<SECTION>.map,
invoke the web application called «Release Tool», and do the release.
I have prepared more detailed instructions how to perform these actions for everybody who
wants to have an account on the GODI server. (You get these instructions together with the
account data.)
6.9
Check list
• Can the package be cleanly deleted?
• Does the package also work for other types of systems than your own one? Not every
system supports DLLs, for example. Not every system has the ocamlopt compiler.
• Are all dependencies declared?
• Are the descriptions in DESCR, and optionally BUILDMSG up to date?
• Is the documentation installed? As bare minimum, there should be a file clarifying the
license conditions.
• Are the examples installed? These are part of the documentation.
• Are all references to external C libraries covered by conf packages? There should also
be conf packages for other unusual equipment that is not part of GODI.
(to be extended...)
55
Chapter 7
Exporting packages
Exporting means in this chapter that configurations established in one GODI deployment
are made available to other machines. This normally includes:
• Some files are generated on the origin system
• These files need to be published, e.g. put into a content directory of a web server. We
call such directories public in the next few sections. Note that this needs not unlimited
publicity as you can also activate access restrictions (e.g. passwords).
• A second system is configured so that it reads the published files
GODI defines a number of export routines which are described in more detail below. They
all have in common that a destination directory is needed where the exported files are put.
This directory needs to be set by the user: Just put
EXPORT_DESTDIR = <any local directory>
into <PREFIX>/etc/godi.conf. GODI will create subdirectories there, e.g. «buildfiles» for
the tared-up builds.
Of course, the export routines have no idea how you make these directories publicly accessible. E.g. point a webserver there.
By exporting something, you logically establish a new package source, and a source needs a
name. The name is set with
EXPORT_SOURCE = <name>
in godi.conf. Names have conventionally a format like <scope>-<name>-<detail>, where
the scope defines how far the source is valid (e.g. «public», «site», or «local»), the name is
just a name, and the detail can be used to distinguish between several editions. For its own
source, GODI uses names like «public-godirepo-4.00».
56
7.1
Exporting source packages (builds)
This covers buildfiles (build instructions) and distfiles (the original tar files). Just do
cd <PREFIX>/build/<CAT>/<NAME>
godi_make export-build
The effect is that these build instructions are tared up, and written to $(EXPORT_DESTDIR)/buildfiles. The index files packages_all.ini, packages.ini and available.new are also updated.
Finally, the referenced distfiles are copied to $(EXPORT_DESTDIR)/distfiles.
The buildfiles directory is in the right format so it can be mentioned as build site in a profile,
and the distfiles directory would work as a master site in a profile.
How the profile needs to look like
Remember how to create a new profile: First enable the profile you want to modify, then
copy this profile and give the copy a new name (e.g. «myprofile»), and finally enable the
copy:
• godi_console profile -enable <original_profile>
• godi_console profile -copy-to <new_name>
• godi_console profile -enable <new_name>
(Note that the <new_name> is the name of the new profile, and not the name of the new
source as defined in EXPORT_SOURCE. Of course, there is nothing wrong with using the
same name for both purposes.)
Edit the profile descriptor in <PREFIX>/build/profiles/<new_name>/profile.ini.
It is now essential that you add a new source section, e.g. [source_3], which looks like
[source_3]
name = <the name in EXPORT_SOURCE>
build_sites = <the public URL of the exported buildfiles directory>
master_sites = <the public URL of the exported distfiles directory>
include = *-*
enable_condition = always
The new source section needs also to be mentioned in the «sources» variable of the profile
section.
After you changed profile.ini, the new settings are not immediately active. You first need to
enable the profile (again), i.e. run godi_console profile -enable <new_name>.
57
7.2
Exporting profiles
When you export sources, it is a good idea to also export the right profile that activates
the source repository. An exported profile can be easily downloaded and enabled by the
commands
godi_console rprofile -site <URL of the profile directory> -get <profile name>
godi_console profile -enable <profile name>
so you can just tell your users to run these commands, and they are set up for using your
sources.
So, how to put your profile into a public directory?
• Go into any package directory <PREFIX>/build/<CAT>/<NAME>
• Run there: godi_make export-profile
The new file is put into ${EXPORT_DESTDIR}/profiles/, and has the same name as the
currently enabled profile.
7.3
Exporting binary packages
It is required that the package is built and installed before a binary package can be exported.
Just go to the directory and run
• cd <PREFIX>/build/<CAT>/<NAME>
• godi_make export-package
and the binary package for <NAME> is written into $(EXPORT_DESTDIR)/packages. Also,
the PKGMANIFEST file in this directory is updated.
Remember that you can direct GODI to consider a binary package directory by setting
GODI_BINPKG to the URL that corresponds to the directory.
7.4
Exporting seeds
A seed is an alternate way to start a GODI deployment. Instead of bootstrapping GODI
on a computer, just a seed file is unpacked at the right place. This seed file includes the
directory structure and a binary version of godi_console. All other files are then downloaded
via godi_console - normally seeds are used together with a binary package repository, and
godi.conf is already pre-configured so that packages can be just downloaded and installed.
But beware:
58
• The machines on which the seed files are unpacked need to be binary compatible with
the machine where the packages were compiled.
• It is not possible to change the deployment path by just unpacking to a different directory. This will cause error messages that files are not found.
So, how to make a seed file? Just go to an arbitrary package directory and run export-seed:
• cd <PREFIX>/build/<CAT>/<NAME>
• godi_make export-seed
The seed file is written to ${EXPORT_DISTFILES}/seeds, and has an automatically chosen
name.
7.5
Supported URLs
The standard version of godi_console can download packages, profiles, buildfiles, and distfiles from the following URL schemes:
• HTTP (e.g. http://server/directory), but no authentication
• anonymous FTP (e.g. ftp://server/directory)
• user FTP (e.g. ftp://user@server/directory), but no authentication
It is possible, though, to support more by activating a more powerful version of
godi_console. This is done by
• setting the option GODI_TOOLS_WITH_POWERWTOOL to yes (part of package
godi-tools)
• rebuilding godi-tools
This enhanced version additionally supports:
• authenticated HTTP (http://user@server/directory), both basic and digest authentication
• HTTPS (https://server/directory)
• authenticated HTTPS (https://user@server/directory)
• authenticated FTP (ftp://user@server/directory with password)
• over HTTP and HTTPS the additional possibilities of WebDAV can be exploited
59
Passwords, after haveing been interactively entered, are stored in a file ~/.godi_pw (but not
encrypted). Password encoded within the URL are ignored.
If the URLs include the user name «GODI_USER» literally, the variable GODI_USER is actually consulted for getting the user name (from godi.conf). This is useful for distributing
URLs via profiles where the respective name of the current user should be used instead of a
constant user string. For instance, the URL http://GODI_USER@server/dir is rewritten to
http://gerd@server/dir if the variable GODI_USER equals «gerd».
60
Chapter 8
Profile reference
8.1
The file profile.ini
A non-active profile is represented by the directory <PREFIX>/build/profiles/<name>.
Currently, this directory only contains one file, profile.ini (but we use a directory to have
the opportunity for more files in the future).
Once a profile is enabled or activated, other files are updated from the information in profile.ini. These files are especially <PREFIX>/etc/profile.conf and the profile patches in
<PREFIX>/build/profile-patches.
8.1.1
The sections and attributes
The file profile.ini uses the usual ini format, and is split into sections:
• The section [profile] contains some general fields (name of the profile, etc.), and
which other sections contain sources. Normally, these other sections have names like
[source_0], [source_1] etc., but this is just a convention and not enforced.
• The source sections contain fields that say from where package sources are taken (especially URLs). This is only about source code (profiles cannot control from where to
get binary packages).
Details about [profile]:
• Field «name»: The name of the profile (used for constructing file names). There are no
conventions about profile names.
• Field «comment»: A description of the profile
• Field «section»: This field determines the GODI section (e.g. 3.12 or 4.00). The section
is used to construct URLs, among other things, and a general orientation about the
OCaml version used.
61
• Field «archive»: This is a boolean field and should be «true» or «false». If set, all
packages are visible from the sources, and otherwise only the latest version of any
given package. (This is implemented by using packages_all.ini as index file in the
former and packages.ini in the latter case.)
• Field «sources»: This field lists the source sections, i.e. the sections enumerated here
are considered as describing sources.
• Field «origin»: If this field exists, it is the URL of the directory from where this profile
can be downloaded (GODI uses this URL to check for newer versions of the profile). If
it does not exist, the profile is local-only.
• Field «name»: The name of the source (see the beginning of chapter 7 for naming
conventions)
Details about source sections:
• Field «build_sites»: A space-separated list of URLs where build instructions (build.tgz
files) can be found. The URLs may contain variables as in a Makefile.
• Field «master_sites»: A space-separated list of URLs where tarballs with sources can
be found.
• Field «include»: A space-separated list of package constraints. This list determines
which packages from «build_sites» are visible. Normally this is set to *-* meaning that
all packages are visible. The list can also contain conditions like <name>==<version>
(the package name is only accepted in this version). Actually, all forms can be used
that are also defined for package dependencies.
• Field «enable_condition»: Should be set to «always». Other values are reserved for
GODI itself.
Details about [profile_options], an optional section: This section can be used to set variables
in godi.conf (actually profile.conf). The field names are the variable names, and the field
values are the values. By convention, this feature should only be used to set package options
(e.g. include «GODI_OCAMLGRAPH_VIEWER = no» to set this option to false).
Details about [profile_patches], an optional section: This section contains the encoded profile
patches. (See below for details.)
8.1.2
Which packages are selected by a profile
The set of packages is determined by these rules:
• The set is the union of the packages defined by all sources. If the same package is
available in the same version from several sources, the precedence is undefined.
• For every source, the set contains the visible packages of all build_sites (i.e. of all
URLs). If the package is available in the same version from several build URLs, the
system considers these alternatives as replicas, and may choose any.
62
• If archive=false, the packages of a build site are defined by the file <url>/packages.ini
(this file normally only contains the latest versions)
• If archive=true, the packages of a build site are defined by the file
<url>/packages_all.ini
• For every source, the packages obtained by reading packages.ini or packages_all.ini
from all URLs are checked for visibility: Only the packages matching the «include» list
are visible.
These rules define a set of packages, and every package may be available in several versions.
Normally, GODI prefers packages with the highest version number for build. (NB. You may
ask why we support archive=false. This way we can separate the directories with only the
head versions from the directories with all versions, and put them onto different servers.)
8.2
Profile operations
8.2.1
Activating a profile
What happens when a profile is activated? The operation exists in two versions:
• godi_console profile -enable <name>: This only enables the profile, but does not renew
the build instructions
• godi_console profile -enable <name> -update: Additionally, this downloads the build
instructions from the build_sites defined in the profile (recommended)
The effect of the activation is now:
• Updating files: profile.conf and the profile patches are extracted from profile.ini. This
makes the sources accessible, but also sets global properties like the GODI section, and
package options.
• Selecting packages (updates of the build instructions): The next time the list of packages is updated, the profile controls the set of visible packages (see above). Only the
latest package version of any visible package is unpacked, and written into the respective build directory <PREFIX>/build/<CAT>/<NAME>. If the profile is only enabled
but the update not yet done, it is only tried to fulfill the profile constraints by checking
the already downloaded build instructions in <PREFIX>/build/buildfiles.
• The profile modifies also operations done later: The master_site URLs defined in the
profile are preferrably used for downloading the source tarballs. The profile patches
are considered when patching the sources. The package options are considered when
configuring a package.
63
8.2.2
Local operations («profile»)
• godi_console profile -list: List available profiles
• godi_console profile -delete <name>: Deletes this profile (which must not be the current one)
• godi_console profile -copy-to <name>: Copies the current profile and saves the copy
under this name. The «origin» field is deleted.
8.2.3
Remote operations («rprofile»)
In order to be easily storable on a remote server, the profile directory is tared up before the
file transfer. The profile «foo» would be stored in the file «foo.profile.tar.gz».
• godi_console rprofile -site <URL> -list: Lists the available profiles on this server (so far
a list command is supported)
• godi_console rprofile -site <URL> -get <name>: Get this profile from the server, and
store it locally
• godi_console rprofile -site <URL> -put <name>: Store this local profile on the server
(only supported if the transport protocol is FTP or WebDAV).
8.3
Profile patches
Profile patches are additionally applied to a source tarball. They can be used to distribute
additional software changes along with the profile.
Profile patches are automatically found and applied when they exist. Remember that the
profile needs to be activated: When this happens, the patches found in profile.ini (in an
encoded form) are written to the directory <PREFIX>/build/profile-patches. The next time
a package is built from source, this directory is additionally checked for patches.
Create profile patches: See the general description in section 6.3.2. When saving the patch,
use
godi_make makepatch SAVE=profile
and the patch is written to <PREFIX>/build/profile-patches. Also, the patch is added to
profile.ini.
64
Chapter 9
External Dependencies
This chapter is about including third-party libraries written in the C language. There are no
good recipes for doing that in the sense: When you do this, you get that, because each of
these libraries is very different, and there are many system-specific issues. Nevertheless, we
have some utilities in GODI making it easier.
One remark especially for Linux users: Linux is an outstanding OS also in the way it handles
C libraries. You get them by just installing another system package. They are installed in
/usr/lib. Effectively, any kind of C library is handled as if it were part of the core system.
This makes it very easy to use them, but:
• Other systems (including BSD) do not do it in this way. There is usually a separation
between the base OS and optionally installable extensions. Most of the libraries we are
interested in are considered as extensions. That means they are not in /usr/lib, but
somewhere else. This has consequences for finding the library, both at compile and at
run time.
• The Linux way can get hairy when you want to override the library in /usr/lib by
your own version. There is some defined lookup order in the sense that the system
looks into certain directories in a certain order, but it is error-prone to do this right.
The next introductory remark is about autoconf. While being very comfortable for the user,
the autoconf approach has also disadvantages, especially when there are several options for
selecting a library, or for enabling features. Because it is automatic, autoconf simply picks
one option, in the hope it is what the user wants. Of course, this option might be wrong,
but the following build can be nevertheless successful, and the error remains undetected.
Especially, in an environment like GODI where the user does not enter the «configure» and
«make» commands directly, the problems of bad autoconfiguration often become visible
only much later.
One of the things autoconf is notorious for: Imagine you want to disable the use of a library,
but the library is installed on the system. (Reasons for wanting this may be manifold.) Autoconf scripts often do not respect the user’s wish when they find the library nevertheless.
65
9.1
Configuration packages
GODI has a special kind of package for selecting C libraries external to GODI. When a configuration package is built, it looks for the relevant compiler options for using the library.
These options are then written into a single file - the only content of the installed package.
The O’Caml package using the library simply adds the configuration package to its build
dependencies, and looks into the configuration included in the configuration package for
the compiler options.
This approach has several advantages:
• It defines a uniform way to find libraries. This is especially important when there are
two or more O’Caml packages X and Y using the same C library Z. First, the user has
to specify lookup information only once. Second, the search order for the library is the
same for both X and Y, ensuring that X and Y actually use the same Z.
• The user experience is better. By installing a configuration package the user can be sure
that a certain library is really found. In the interactive version of godi_console there is
even a procedure for testing the library settings immediately.
• The results of the library lookup script are documented in the configuration package.
• The user gets full control about which libraries are used.
There are many ways of creating a configuration package. Basically, the script finding the
library settings can be written in any language. Actually, we have shell scripts, and O’Caml
scripts using the godi_script environment. For new configuration packages the latter is recommended, and described in the following sections.
9.2
The conf-foo.mk file
The result of the configuration is a small file in Makefile syntax, usually installed in the
directory <prefix>/lib/godi. An example (conf-freetype2.mk):
CONF_FREETYPE2_INCDIRS=
CONF_FREETYPE2_LIBDIRS=
CONF_FREETYPE2_LIBNAMES=
CONF_FREETYPE2_CFLAGS=-I/usr/include/freetype2
CONF_FREETYPE2_LDFLAGS=-lfreetype -lz
CONF_FREETYPE2_NEED_RPATH=no
CONF_FREETYPE2_TOTAL_CFLAGS=-I/usr/include/freetype2
CONF_FREETYPE2_TOTAL_LDFLAGS=-lfreetype -lz
CONF_FREETYPE2_SCRIPT=/usr/bin/freetype-config
CONF_FREETYPE2_DEPENDS=
CONF_FREETYPE2_REQS=
66
The variables all start with CONF_<NAME> where <NAME> is the capitalized package name. The
idea is that the using Makfile of the settings can simply include the file, and get all settings
at once this way.
Effectively, the TOTAL_CFLAGS and TOTAL_LDFLAGS variables count. Note however that there
are many older conf packages not producing these variables. Actually, the set of variables
evolved with the development of GODI, so there are now several styles. We document here
the recommended one.
The variables include more than TOTAL_CFLAGS and TOTAL_LDFLAGS because it is sometimes
more convenient to use one of the other, more basic variables.
There are two methods for determining the compiler options:
• Config script method: Calling a config script (like freetype-config): This is easy and
straight-forward. The script returns the CFLAGS and LDFLAGS settings.
• Search method: Searching for the library and figuring out the compiler options.
Depending on the method, only a subset of the variables are set.
• INCDIRS: Directories where to look for include files. These are the directories later
turned into -I options. System directories like /usr/include that are checked anyway for header files by the compiler must be omitted. Multiple directories are spaceseparated. This variable is usually only set by the search method.
• LIBDIRS: Directories where to look for libraries. These are the directories later turned
into -L, and sometimes -Wl,-rpath options. System directories like /usr/lib that are
checked anyway for libraries by the linker must be omitted. Multiple directories are
space-separated. This variable is usually only set by the search method.
• LIBNAMES: The names of the libraries. These are the names later turned into -l options.
Multiple names are space-separated. Following linker conventions, several libraries
must be given in their reverse dependency order, i.e. when x needs y, the order is «x
y». (Note that the order is usually only important for static linking.) This variable is
usually only set by the search method.
• CFLAGS: The flags for C-compiling. This variable is usually only set by the config script
method.
• LDFLAGS: The flags for linking. This variable is usually only set by the config script
method.
• NEED_RPATH: Either «yes» or «no». If «yes», it is required to pass a -Wl,-rpath option
to the linker to instruct the loader where to find the library at runtime. (See comments
below.) This variable should only be «yes» if LDFLAGS does not already include the
-Wl,-rpath options.
• TOTAL_CFLAGS: The «union» of INCDIRS and CFLAGS. For any method, this variable contains the effective options for C-compiling.
67
• TOTAL_LDFLAGS: The «union» of LIBDIRS, LIBNAMES, LDFLAGS, and NEED_RPATH. For any
method, this variable contains the effective options for linking.
• SCRIPT: If the config script method is used, this variable points to the script (absolute
path).
• DEPENDS: Additional dependencies for using the library. The syntax of DEPENDS is the
same as for other GODI dependencies. This is mostly used if the C library is provided
by another GODI package, e.g. DEPENDS=base-gdbm-*:../../base/base-gdbm.
• REQS: This variable is only used for «stacked» configurations. For example, if you want
to use the xpm library you also need the x11 library, so the config options for xpm are
always used together with those for x11. The REQS variable documents which other
configs are in effect. (more about syntax.)
We describe later how to create a configuration package that is able to determine these variables.
9.3
How to use a configuration package
First of all, you need to know which variables are set by the configuration package. If this
package is a new-style package and uses the above described variables, there is still some
freedom which variables are there and which are omitted. Basically, it can only be assumed
that TOTAL_CFLAGS, TOTAL_LDFLAGS, and DEPENDS are filled. The other variables might be
simply empty. However, if you know the method of how the variables are determined, it
can be assumed more about which variables are present.
In the Makefile using the variables, the code usually looks like:
BUILD_DEPENDS+=conf-foo-*:../../conf-foo
.if exists(${LOCALBASE}/lib/godi/conf-foo.mk)
.include ${LOCALBASE}/lib/godi/conf-foo.mk
CONFIGURE_ARGS += ...
CONFIGURE_ENV += ...
.endif
The configuration package is added as build dependency, and the conf-foo.mk file is included (if existing - note that the «.if exists» construct is required to avoid GODI errors).
Then, the arguments passed to the configure script are modified (or environment variables
are set). Of course, there are also other methods of passing the config settings down to the
build needing them.
9.4
Library search
The GODI variable SEARCH_LIBS is set to a (space-separated) list of directories where to look
for C libraries. If «dir» is in mentioned in SEARCH_LIBS, it is looked into «dir/include» for C
68
headers, and into «dir/lib» for the libraries. If a config script is needed, it is also looked into
«dir/bin» (in addition to the directories in PATH).
Configuration packages should use SEARCH_LIBS for finding libraries.
9.5
Library lookup at runtime
By passing -L options to the linker it is not ensured that the (shared) library is found at
runtime. Unfortunately, we are getting here very system-dependent: There are many ways
of pointing the loader to the right directory.
9.5.1
ELF systems: Linux, FreeBSD, NetBSD, Solaris, HP-UX (64 bit)
The object file format ELF is very flexible in this respect. There are effectively three methods
for specifying shared library directories: (1) Set the LD_LIBRARY_PATH environment variable,
(2) Modify a global config file (e.g. /etc/ld.so.conf), (3) Put the directory into the object file
using the shared library («rpath»).
The GODI policy is as follows: We never use (1). Method (2) is respected, but we never modify ELF config files. That means if a library is found without any additional linker options,
we leave it at that, and don’t pass further rpath options. Method (3) is used for all other
library locations.
The C compiler flag to pass an rpath directory «dir» down to the linker is: -Wl,-rpath,dir.
(HP-UX uses a different flag.)
9.5.2
Mach-O systems: Mac OS X
In this object file format the path where to find a library at runtime is stored in the library
(so-called install name), and automatically copied over by the linker to the using object file.
This means we have to do nothing special for using a library.
9.5.3
SOM systems: HP-UX (32 bit)
In this object file format the path where to find a library at runtime is stored in the library,
and automatically copied over by the linker to the using object file. This means we have to
do nothing special for using a library.
9.5.4
Windows
Windows still relies on a very old method for implementing DLLs. Effectively, the libraries
are split into two parts: An import library, and the DLL loaded at runtime. The -L options
are only used for finding the import libraries. The corresponding DLLs are usually put into
«bin» directories, and looked up by PATH.
69
Recall that Windows allows users to choose the installation directory of programs, so storing
any absolute paths into executables does not make sense.
As there is no clever method for finding DLLs, GODI has to adopt the Windows style. We
don’t do anything special for instructing the loader to look into the right directory, and hope
that the user sets the PATH correctly.
9.6
Using godi_script to create configuration packages
Look at examples:
• conf-freetype2 for the config script method
• conf-jpeg for the search method
There is some documentation for godi_script in <prefix>/doc/godi-tools/html.
A new version of godi_script is currently being developed.
70