1
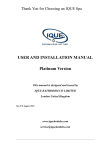
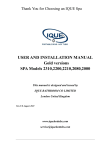
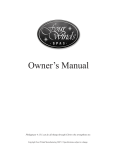
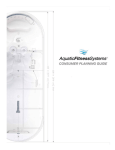
Thank You for Choosing an IQUE Spa Hydrospa Limited USER AND INSTALLATION MANUAL Diamond Version Trinidad2200-TD Cayman2200-CD Bermuda2210-BD Martinique2210-MD Tahiti2080-TD Capri2100-CD This manual is designed and issued by IQUE BATHROOM CO LIMITED London United Kingdom Ver.11.0 August 2011 www.iquehottubs.com [email protected] Table of Content 1. SAFETY INSTRUCTIONS ___________________________________________ 2 2 WARNING! ________________________________________________________ 4 3. HYPERTHERMIA __________________________________________________ 4 4. PRECAUTIONS____________________________________________________ 4 5. INSTALLATION DIAMOND GOLD FAMILY & SILVER SERIES __________ 6 6. ELECTRICAL SERVICE CONFIGURATION ___________________________ 8 7. INITIAL START UP& SPA COVER BASKET LIFTER ___________________ 19 8. START UP & CARE________________________________________________ 21 9. OPERATION INSTRUCTIONS ______________________________________ 23 10. WATER CHEMISTRY _____________________________________________ 28 11. SPA MAINTENANCE _____________________________________________ 32 12.TROUBLESHOOTING ____________________________________________ 34 13. WINTER AND SUMMER INSULATION _____________________________ 35 14. IMPORTANT additional information_________________________________ 38 15. ADJUST THE DRAINAGE VALVE FOR BLOWER____________________40 Jet selector valve Air control / regulator Air control / regulator Air control / regulator Waterfall valve Air control / regulator Jet selector valve Aroma therapy Filter area Control panel Picture shows Model Trinidad 2200 Model 2200, 2210,2100, 2080, Ver.11.0 1 PLEASE FILL IN THE INFORMATION BELOW AND KEEP FOR FUTURE REFERENCE Do remember to study the warranty form sign it and give it to your dealer, warranty null and void if not the warranty form has been signed. Name of Purchaser Date of Purchase Address City State/Prov Zip/Code Spa model Spa color Store Name Spa serial # Telephone Store Address City State/Prov Zip/Code Every effort has been made to ensure the accuracy of this manual. However, we reserve the right to modify and improve our spa products without prior notice. This may result in minor variations between this manual and your spa. Thank you. SAVE THESE INSTRUCTIONS 1. SAFETY INSTRUCTIONS ! IMPORTANT - READ, FOLLOW AND SAVE THESE INSTRUCTIONS Read the entire manual and safety instruction before operating your Spa. Follow these basic safety precautions when installing your spa. (a) WARNING: Do not permit children to use this spa without close supervision at all times by an adult. (b) DANGER: RISK OF ACCIDENTAL DROWINNG: Exercise extreme caution when children using the spa. To avoid accidents or risk of drowning, ensure children do not use this spa unless under direct and close supervision at all times by an adult. Model 2200, 2210,2100, 2080, Ver.11.0 2 (c) DANGER: RISK OF INJURY: The suction fittings included in this spa are designed to match the water flow of the pump. To ensure safety and compatible flow rates, install the same model suction fitting or pump, in the event a replacement is required. CAUTION: NEVER OPERATE THE SPA IF THE SUCTION FITTINGS ARE BROKEN OR MISSING. NEVER REPLACE A SUCTION FITTING WITH ONE RATED LESS THAN THE FLOW RATE MARKED ON THE ORIGINAL SUCTION FITTINGS. (d) DANGER: RISK OF INJURY: When the spa jets are in use, suction through drains and skimmers are powerful. Do not remove the suction grate. A damaged suction grate can be hazardous to children and adults with long hair. As a precaution, restrict long hair from floating freely in the spa. If any part of the body or hair is drawn into or stuck in the fittings, turn the spa off immediately. (e) DANGER: RISK OF ELECTRIC SHOCK. Install the spa at least 5 feet (1.5M) from all metal surfaces. In accordance with your country electrical Code, a spa may be installed within 5 feet (1.5M) of metal surfaces only if each metal surface is permanently connected to the wire connector on the terminal box provided, by a minimum NO.8 AWG(8.4mm2) solid copper conductor. (f) DANGER: RISK OF ELECTRIC SHOCK. Never operate any electrical appliances from inside the spa or if you are wet. Do not permit any electric appliance, such as a hair dryer, light, radio, telephone or television, within 5 feet (1.5m) of the spa. (g) WARNING - To reduce the risk of injury: i Water temperatures between 38'C (100' F) and 40'C (104'F) are considered safe for a healthy adult. Lower water temperatures are recommended for young children and when spa use exceeds 10 minutes. Never allow the spa water temperature to exceed 40'C (104'F). ii Spa water temperatures for pregnant women should be limited to 38'C (100'F). Higher water temperatures may have a high potential for causing fetal damage in the early stages of pregnancy. Limit time is no longer then10 minutes iii Individual tolerance of water temperature can vary and regulating devices may not reflect the proper temperature. Check the water temperature with an accurate thermometer before entering a spa. iv The use of alcohol, drugs, or medication before or during spa use may lead to unconsciousness with the possibility of drowning and is strictly prohibited. v Those people with a history of heart disease, low or high blood pressure, circulatory system problems, diabetes or obesity should consult a physician before using a spa. vi Some medication may induce drowsiness; affect heart rate, blood pressure, and circulation. Those people using any medication should consult a physician before using a spa. (h) Do not use the spa immediately after any strenuous exercise. (i) Maintain water chemistry as recommended. Model 2200, 2210,2100, 2080, Ver.11.0 3 ! 2 WARNING! During pregnancy, soaking in hot water may cause damage to the fetus. Limit use to 10 minutes at a time. Prevent drowning: Prevent child drowning: Spa heat speeds up effects of alcohol, drugs or medicine and can cause unconsciousness Water attracts children. Always attach a spa cover after each use. Immediately leave spa if uncomfortable or sleepy. 3. HYPERTHERMIA Hyperthermia occurs when the internal temperature of the body reaches a level several degrees above the normal body temperature of 98.6'F or 37'C. THE SYMPTOMS OF HYPERTHERMIA INCLUDE: Dizziness Fainting Drowsiness Lethargy Increase in internal body temperature WARNING: THE USE OF ALCOHOL OR DRUGS CAN GREATLY INCREASE THE RISK OF FATAL HYPERTHERMIA IN HOT TUBS AND SPAS 4. PRECAUTIONS ! a) Always enter and exit the spa slowly. b) Never use the spa alone. c) Always measure the water temperature with an accurate thermometer before entering the spa. Tolerance of water temperature may vary and regulating devices may differ as much as ±5’F (3'C). d) Spa water temperatures for pregnant women should be limited to 38'C (100'F). Higher water temperatures may have a high potential for causing fetal damage in the early stages of pregnancy. Always consult your doctor prior to using a spa. e) Children's body temperature can increase more rapidly than adults in water temperatures above 99'F or 37.4' C. Limit use by children in water above body temperature. f) The use of alcohol, drugs, and /or medication before or during spa use may result in hyperthermia, serious injury, unconsciousness or drowning. g) Those people with a history of heart disease, low or high blood pressure, circulatory system problems, Model 2200, 2210,2100, 2080, Ver.11.0 4 diabetes or obesity should consult a physician before using a spa. h) Some medication may induce drowsiness; affect heart rate, blood pressure, and circulation. Those people using any medication should consult a physician before using a spa. i) People with infections, sores, or skin abrasions should not use the spa. Warm temperatures may allow the growth of infectious bacteria if not properly disinfected. j) Test the GFCI (Ground Fault Circuit Interrupter) unit before each use. (Refer to instructions provided by GFCI manufacturer.) k) Only service or repair any equipment if the circuit breaker and/or all power to the spa are off. l) When not it use and/or if children are present, the spa must be locked and the protective cover securely in place at all times. CAUTION a) The following people should consult with a physician before using the spa. Those suffering from heart disease, diabetes, high or low blood pressure, any condition requiring medical treatment, pregnant women, the elderly and infants. b) The consumer product safety commission recommends the water temperature in a spa should not exceed 104'F or 40'C. Complete immersion under water, in excess of 104'F or 40'C, can be hazardous to your health. c) Long exposure in water at higher temperatures can cause high body temperature. Symptoms may include dizziness, drowsiness, fainting, and nausea and reduced awareness and could lead to drowning. Limit exposure when using the spa under these conditions. d) Do not use the spa under influence of alcohol, narcotics, or other drugs. The use of the sap under these conditions may lead to serious consequences. e) Always test the spa water temperature before entering the spa. Enter and exit the spa slowly. Wet surfaces can be very slippery. f) Never bring any electrical appliance into or near the spa. Never operate any electrical appliance from inside the spa or when you are wet. g) Proper chemical maintenance of spa water is necessary to maintain safe water and prevent possible damage to spa components. h) Use the spa straps and clip tie downs to secure the cover when not in use. This will help to discourage unsupervised children from entering the spa and keep the spa cover secure in high wind conditions. There is no representation that the cover, clip tie downs, or actual locks will prevent access to the spa. Model 2200, 2210,2100, 2080, Ver.11.0 5 SAFETY DEVICES Your spa is equipped with the following safety features: Over Heat Protection-- An electronic high limit switch is located under water. It shuts off the heater, pumps and accessories when the water temperature exceeds 112'F or 44'C. This function automatically resets when the spa water temperature drops below 109'F or 43'C. Heater High Limit Protection--An electronic high limit switch is located on the heater barrel. It turns off the heater and low speed pump if it senses a temperature of 118'F (44'C) or greater. To reset this safety device, power to the spa must be interrupted. Heater Dry Run Protection--A water flow sensor is also part of the design. It prevents the heater from turning on until there is sufficient water flow. Freeze Protection System-- This function will activate the jet pumps for 1 minute every 2 hours or less when the temperature in the equipment compartment drops to 55'F or 13'C or below. Once the freeze protection system is initiated, it will remain active for a 24- hour period. Automatic Pump and Light Time Out-- The automatic, built-in timer turns off the spa jet pump(s) and air blower (optional on some models) after 15 minutes of operation. 5. INSTALLATION INSTRUCTION GOLD & SILVER SERIES Read all instructions in this manual prior to having your spa installed indoors or outdoors. IMPROPER INSTALLATION MAY RESULT IN EQUIPMENT DAMAGE AND VOID THE WARRANTY Surface and Pad Requirements: Place your new Spa on a 4” (10cm) thick reinforced CONCRETE PAD. Ensure the concrete has cured for at least one week before setting the spa in place. A typical spa, filled with water, could weigh as much as 2.5tons.The concrete could crack if it is not fully cured when placing the spa. TO ENSURE YOU DO NOT VOID THE WARRANTY ON YOUR SPA, RESTRICT THE USE OF SHIMS OF ANY KIND OR PLACING THE SPA ON AN UNEVEN OR CRACKED PAD. THIS WILLL ALSO REDUCE THE RISK OF CAUSING THE SPA TO BUCKLE .DISTORT AND/OR CRACK. 1) If your spa is located near water sprinklers, adjust of cap to ensure the water does not affect the wood cabinet of the spa. 2) Build balconies and decks to meet current state and local codes to safely support the maximum load of your filled spa including the number of people during use, Check with your construction contractor for safety standards in your area. 3) Gates must be self- closing and self-locking. Check your local codes for regulations. 4) Ensure installation and the chosen location allows unobstructed access to the spa. It is the responsibility of the spa owner to provide clear access on all sides of the spa for service. Failure to meet these guidelines may result in additional service charges during maintenance or repairs to your spa. 5) To restrict water from entering the equipment compartment and away from all electrical components, ensure all water drains away from the spa. Model 2200, 2210,2100, 2080, Ver.11.0 6 Electrical installation requirements: IMPROPER INSTALLATION MAY RESULT IN EQUIPMENT DAMAGE AND VOID THE WARRANTY NOTE:DO not turn on electrical power to your spa until instructed in the owner manual. 1) Improper electrical connections may damage the equipment, cause injury, a fire, and void your spa warranty. We strongly recommend that only a licensed and bonded electrician perform the electrical installation. 2) Installation must be in accordance with the National Electrical Code; local and state electrical codes; and the manufacturer’s instructions. It is the responsibility of the spa owner to ensure a qualified electrician performs the electrical installation. 3) This equipment has been designed to operate on 230 or 380 volts, 50HZ alternating current. 4) The spa must be connected to a dedicated branch circuit. 5) IMPORTANT Note: Europe – R.C.D. Installation – circuit breaker, including ampere size and selection of the conductor size and type must be performed by qualified electricians in accordance with national Regional and Local codes and regulations in effect at the time of installation. 6) As required, the electrical circuit to the spa must include a Class A type Ground R.C.D Interrupter. 7) All supply wires must be copper and rated at a minimum 90.C 8) Input Power Wiring and Circuit Breaker Selection The Equipment Type column does not include the circulation pump for Silver series. A jumper in the equipment control box configures the mode. In the HC 32 AMP 230 V or 2 and 3 phases Mode the heater will operate with everything on in the spa. In the LC 16 AMP Mode the heater turns off if either pump is in high speed or if the blower is turned on. To hook-up your spa, follow these instructions: 1) Remove the screws holding the equipment access panel to the front of the spa cabinet. Set the panel aside. Instructions how to open see page 26. 2) Loosen the 2 screws on the top of the front equipment control enclosure. 3) Use- “flexible, non-metallic conduit for a spa requiring #10 AWG or #8 AWG wire or 1” flexible non-metallic conduit for a spa requiring #6 AWG wire. Run the conduit from the power source through the hole in the left or right front corner of the enclosure into the equipment control box to the spa and secure / seal with PG so no water can enter into the box. 4) After pulling all wires through the conduit and into the equipment control box, connect them to the proper terminals as indicated by the wiring diagram see Electrical service configuration for each system Diamond/Gold or Silver versions. 5) Configure the jumpers to the correct position as indicated by the Electrical service configuration. Ensure the wires are properly tightened. 6) Close the lid on the equipment control box and secure with the 2 screws. 7) Electrical hook-up is now complete. Do not replace the equipment door at this point. Model 2200, 2210,2100, 2080, Ver.11.0 7 6. ELECTRICAL SERVICE CONFIGURATION The settings made from factory as default is usually 1 x 32Amp, 2 x16Amp If not the setting had been agreed to change for a specific country, check with the Distributor/Retailer 6.1 MAINS CONNECTIONS – Diamond and Gold Series (a) Services Configuration Options 1, 2, or 3 phases Diamond Series (a) Services Configuration Options 1, or 3 phases Balboa System PN: 53883 Configuration Setting 2x 2-speed pump The default is “FILTER 1” is 8:00AM to 10:00AM, “FILTER 2” is 8:00PM to 10:00PM Celsius Temp Display Cleanup Cycle – 30 minutes after spa use/timeout, Pump 1-Low & Ozone or 1x Circ Pump 1x Blower Circ Pump and Ozone run for 1 hour Ozone suppression for one hour after pump/blower button press 230V, 1X32AMP L1 – Live N1 – Neutral Brown wire J95-J23 White wire J26-J32 Blue wire J28-J57 Note: J32 and J23 are electrically identical. The white wire may be attached to either terminal before removed. J57,J58 and J59 are electrically identical. The white wire may be attached to either terminal before removed. Model 2200, 2210,2100, 2080, Ver.11.0 8 400V, 3X16AMP L1, L2, L3 – Live N1 – Neutral Brown wire J95-J28 White wire Removed J26-J23/J32 Blue wire Removed J28-J57/J58 Note: J32 and J23 are electrically identical. The white wire may be attached to either terminal before removed. J57,J58 and J59 are electrically identical. The white wire may be attached to either terminal before removed. Model 2200, 2210,2100, 2080, Ver.11.0 9 For Capri 2100 CD Balboa System PN: 53883 Configuration Setting 2x 2-speed pump The default is “FILTER 1” is 8:00AM to 10:00AM, “FILTER 2” is 8:00PM to 10:00PM Celsius Temp Display Cleanup Cycle – 30 minutes after spa use/timeout, Pump 1-Low & Ozone or 1x Blower Circ Pump and Ozone run for 1 hour Ozone suppression for one hour after pump/blower button press 230V, 1X32AMP L1 – Live N1 – Neutral Brown wire J95-J23 White wire J26-J32 Blue wire J28-J57 Note: J32 and J23 are electrically identical. The white wire may be attached to either terminal before removed. J57,J58 and J59 are electrically identical. The white wire may be attached to either terminal before removed. Model 2200, 2210,2100, 2080, Ver.11.0 10 400V, 3X16AMP L1, L2, L3 – Live N1 – Neutral Brown wire J95-J28 White wire Removed J26-J23/J32 Blue wire Removed J28-J57/J58 Note: J32 and J23 are electrically identical. The white wire may be attached to either terminal before removed. J57,J58 and J59 are electrically identical. The white wire may be attached to either terminal before removed. Model 2200, 2210,2100, 2080, Ver.11.0 11 (b) Dip Switch Reference 3X16Amp 1X32Amp WARNING Main Power to system should be turned OFF BEFORE adjusting DIP SWITCH Persistent Memory (A12) must be RESET to allow new DIP switch settings to take effect To reset Persistent Memory: 1. Power down. 2. Set A12 ON 3. Power up. 4. Wait until “Pr”is displayed on your panel. Note: If “CFE ”appears means DIP switch configuration is wrong!. 5. Power down and then set A12 OFF. 6. Power up again Model 2200, 2210,2100, 2080, Ver.11.0 12 (c) PUMP INSTALLATION (i) Plug wiring The Socket on the PCB, please note the two outer holes shape R Red- Live B Blue - No use (except for 2nd live connector of 2 sp pump) W White– Neutral G Green – Earth The Plug (ii) SETUP If for any reason need to change something, connections should be reference as below: Output Features J5 connect to Jack Pump 1 = Jet 1 on the control panel, 230VAC 2.25kW J1 Pump 2 = Jet 2 on the Control panel, 230VAC 2.25kW J5 Blower, 230VAC 1.0kW J3 Circulation pump, 230VAC 0.25kW J2 Ozonator J9 Light J12 Control Panel J70 or J71 Audio Visual J4 J4 J3 J12 J71 J70 J1 Model 2200, 2210,2100, 2080, Ver.11.0 J2 J9 13 (d). Configuration Control panel ML700. Temp Set (26°C - 40°C) The start-up temperature is set at 37.5°C. The last measured temperature is constantly displayed on the LCD. Note that the last measured spa temperature displayed is current only when the pump has been running for at least 2 minutes. Warm /Cool Press the “Warm “or “Cool” button OR once to display the set temperature. Each time either button is pressed again, the set temperature will increase or decrease depending on which button or pressed after three seconds, the LCD will automatically display the last measured spa temperature. Setting the Filter Cycle The filter cycles are programmed to start and end times for time capable panels ( This setting is our factory delivering setting) (The default is “FILTER 1” is 8:00AM to 10:00AM, “FILTER 2” is 8:00PM to 10:00PM) Press “Time” then “Mode/Prog” “Mode/Prog” “Mode/Prog” within 3 seconds Display “PROGRAM”, “FILTER 1” and “START TIME” Press “Warm” or “Cool” to change the start hour OR Then press “Mode/Prog” to enter start minutes setting Press “Warm” or “Cool” to change the start minutes OR Then press “Mode/Prog” to see “PROGRAM”, “FILTER 1” and “END TIME” Press “Warm” or “Cool” to change the end hour OR Then press “Mode/Prog” to enter end minutes setting Model 2200, 2210,2100, 2080, Ver.11.0 14 Press “Warm” or “Cool” to change the end minutes OR Then press “Mode/Prog” to see “PROGRAM”, “FILTER 2” and “START TIME” Repeat as above for “FILTER 2” start/end hour and minutes Press “Time” exit programming For cir-pump, and the purge purge 2 times / 24 hours at the beginning of the filtration cycles, when purge all pumps will start in low speed and stop after 1 minute and blower start and stop after 30 seconds. Filtration cycles Filtration & Heating starts automatically when sensors detected a 05. Degree C drop from the setting temperature and stops once it has reached the set temperature. If the circ pump is out of Filtration time &Heating, every time when any of jets pumps or the blower’s button is pressed to activate, no matter the jets pumps work in low speed or high speed, at the same time the circ pump will start to work with the pumps or blower, when the pumps or blower turn off the circ pump will keep working for up to 1 minute then stop. Circ pump cleanup cycle: If the circ pump is out of Filtration time &Heating, when all pumps and blower are used and set to off, or all pumps and blower timeout ( turn off automatically). After 30 minutes, the circ pump will start to run for 1 hour, when the cleanup cycle time meets the filter duration time the circ pump will continue until filtration cycle is ended. Waterfall: the waterfall will work with the jet pumps Setting the Time Press “Time” then “Mode/Prog” to enter the time programming Press “Warm” or “Cool” to change the hour OR Then press “Mode/Prog” to enter minutes setting Press “Warm” or “Cool” to change the minutes Press “Time” OR exit programming Work Mode Model 2200, 2210,2100, 2080, Ver.11.0 15 The spa can work at standard, economy, sleep modes. Press “Mode/Prog” button to enter mode programming, then press “Cool” to cycle through to desired mode(LCD flashes until confirmed),then press the “Mode/Prog” button to confirm the selection. Standard Mode is programmed to maintain the desired temperature. Note that the last measured spa temperature displayed is current only when the pump has been running for at least 2 minutes, the “standard” icon will be displayed until the mode is changed. Economy Mode heats the spa to the set temperature only during filter cycles, the “economy” icon will display until the mode is changed. Pressing “jet1” while in economy mode puts the spa in Standard-In-Economy mode, which operates the same as Standard Mode, then reverts to Economy Mode automatically after 1 hour during this time, a press of “Mode/Prog” button will revert to Economy Mode immediately. Sleep Mode heats the spa to within 20°F /10°C of the set temperature only during filter cycles. The “sleep” icon will display until mode is changed. Standby Mode Pressing “warm” or “cool” then “jet2” will turn off all spa function temporarily. This is helpful when changing a filter. Press any button to exit Standby mode. OR Locking the panel Pressing “Time” “Jet1” then “Warm” within 3 seconds. When locked, the PL “PL ” light will light. All buttons are frozen except the “Time” button. To unlock the panel, press “Time” “Jet1” and “Cool” Locking the Set Temperature Pressing “warm” or “Cool” then “ Time,” “Jests1,” and “Warm” within 3 seconds to activate the lock. The TL “TL ” light will light when the set temperature is locked. To unlock the set temperature, press “Warm” or “Cool” then “Time,” “Jets 1” and “Cool” OR OR Model 2200, 2210,2100, 2080, Ver.11.0 16 Jets (Diamond version) Jet1 To start pump1 (two speed) press “Jet1” one time, the pump1 will work at low speed, then press “Jet1” again, the pump1 will work at high speed. The low speed will turn off automatically after 2 hours, and the high speed will turn off automatically after 15minutes. Press the third time “Jet1” the pump1 will stop. Jet2 To start pump2 (two speed) press “Jet2” one time, the pump2 will work at low speed, then press “Jet2” again, the pump2 will work at high speed. The low speed will turn off automatically after 2 hours, and the high speed will turn off automatically after 15minutes. Press the third time “Jet2” the pump2 will stop. Blower To start blower press “Blower” automatically turn off after 15 minutes. one time, to stop it press again, if left on, the blower will Light Color light Press the “Light” button to turn on the lights, again to turn off it, keep pressing the “Light” button turn on and turn off the lights, the color will be different each time, just one time, the color can change automatically. they can working 8 status , the first status is changing the color automatically , then you press the lights button, turn off it then turn on it stay red color, then you keep turning off and turn on they will stay different colors every time and after 7 times they get back to the first status change the color automatically. stop pressing the “Light” button. The lights will automatically turn off after 4 hours. Invert Press the “Warm” or “Cool” button, followed by the “Blower” button to change the numbers of display to read upside down. temperature OR (e) The power cable cap Model 2200, 2210,2100, 2080, Ver.11.0 17 There are both power cable caps on the corner shirt. you can use a drill machine to drill the suitable hole for the power cable. Model 2200, 2210,2100, 2080, Ver.11.0 18 7. INITIAL START-UP PROCEDURES AND SPA COVER BASKET LIFTER DO NOT TURN ON THE POWER TO THE SPA WHEN THE SPA IS PARTIALLY FILLED OR EMPTY 1) Ensure the circuit breaker to the spa is off 2) Rotate all the jets in the spa to a clockwise—fully open position Executed in FACTORY 3) If the spa is equipped with valves (a handle located near the jet pumps), ensure the handle is open. Spas with 1 pump will include 2 valves and spas with 2 pumps will include 4 valves. Note: a circulation pump will include 2 valves. The valves are in open position upon delivery see picture. 4) How to open and close the door to pump area Un-tighten the three screws in bottom of the door and remove it. Note that the door is always on the side where the control panel is installed For Diamond and Gold series there is a lock installed. Use the attached keys to open and lock 5) To prevent the possibility of leakage in the equipment bay, ensure the pump unions are tight. 6) Close and cap the hose bib. This is used for draining the spa Now check next chapter for the spa start up and care The side of the skirts panel for install the spa cover basket lifter Note: the spa cover basket lifter should install the back skirt panel that side face to the control box/panel side, one this side shirt we have drilled the holes for the fixing screws, just need to use the screw to fix the spa cover basket lifter. The holes for the fixing screws Model 2200, 2210,2100, 2080, Ver.11.0 19 Back side for install sap cover basket lifter Front side, control box and panel side Model 2200, 2210,2100, 2080, Ver.11.0 20 8. SPA START-UP and CARE IMPORTANT Your spa has passed stringent quality assurance testing by trained technicians to ensure reliability and your long –term satisfaction. Before filling the spa, wipe the shell clean with a soft dry rag. Follow these instructions to ensure a successful start-up or refill. 1) Fill spa to correct level (approximately 4 inches 10 cm above the top of the filter cartridge). 2) Power up. First the system starts in priming mode the circulation pump starts up automatically do NOT start jet pumps or blower at this stage let the priming mode continue until the control panel display shows standard mode. IMPORTANT! Check for air locks in the circulation pump system, during the priming. There are six small jets installed in the foot well walls one is the ozonator where there should be a stream of bubbles coming out if there is small bubbles coming out from some of the other small jets there is an airlock in the system check for 30 seconds and if there is still small bubbles do as follows. Turn the power off and follow the instructions on last page in this Manual. WARNING DO NOT ALLOW THE PUMPS TO RUN FOR MORE THAN 1 (one) MINUTE WITHOUT WATER FLOWING FROM THE JETS. PUMPS WITH DRY RUN PROBLEMS WILL NOT BE COVERED UNDER WARRANTY 3) Once the priming is completed, Re-attach the equipment access panel. 4) Heating will occur at a rate of 5-12 f or 3-5 .C per hour, depending upon the size of the spa and the electrical circuit 5) Add stain and scale control (or a similar product.) 6) Test and adjust total alkalinity. Run pump for 1/2 hour. 7) Test and adjust pH. Run pump for 1/2 hour. Test again to ensure stable pH and alkaline levels. 8) If sanitizing with bromine, add sodium bromide with jets running. (See “bromine” in this section.) 9) Fill and set bromine floater or adjustable bromine feeder and place in the spa water. 10) Shock water using potassium peroxymonosulfate while jets are running. 11) If sanitizing with chlorine, use only a granular “Dichloride” compound. On start up, turn on all jets, add 1 oz. per 500 gal. spa water. Check free available chlorine (FAC) to attain 2-3PPM. Repeat of needed. For regular use, turn jets on, scatter 1/2 oz. per 500 gal. to spa water to maintain 2-3PPM of FAC. (See “chlorine” in this section.) 12) Run jet pump/s and blower if installed for 1/2 hour Model 2200, 2210,2100, 2080, Ver.11.0 21 13) Be sure to regularly check your sanitizer levels! 14) Check for air locks in the circulation pump system, there are six small jets installed in the foot well walls turn off the jet pumps and blower check for small bubbles coming out from the small jets. 15) To conserve energy and ensure your spa is ready for use, place the thermal cover securely on and lock it. 16) IMPORTANT Pillows must be removed from the Spa after each time the spa has been used. Pillows will not be replaced on guarantee if the color has changed or faded. Model 2200, 2210,2100, 2080, Ver.11.0 22 9. OPERATING INSTRUCTIONS Timeouts refer to a preset length of time that a function is programmed to operate shutting off automatically. Certain conditions (filters of freeze) can cause a function to operate longer, while faults can cause a function to operate for a shorter length of time. The system keeps track of timeouts regardless of other conditions occurring In multi-button sequences, if buttons are pressed too quickly in sequence they may not register. Initial Start-up When your spa is first actuated, it will go into priming mode (after displaying some configuration information). Please see the Instructions in this Manual for Power-up and Pump Priming. The Priming mode will last for up to 4 minutes and then the spa will begin to heat the spa and maintain the water temperature in the Standard mode.(press “Warm” or “Cool” to skip Priming Mode) If the Spa shuts off during the priming mode there is an air lock in the circulation system. There might be Dr, HFL Dr4 displayed on the control panel indicating that there is an air lock. Follow the instructions how to handle that on the last page section 2 in this manual. Ozone Ozone suppression for one hour after pump/blower button press, other time Ozone will work with the circulation pump, operates continuously .when there is no pump or blower working. Model 2200, 2210,2100, 2080, Ver.11.0 23 MESSAGE’S DISPLAYED ON THE CONTROL PANEL Message Meaning Action Required No message on display The control panel will be disabled until Power has been cut off to the spa Power returns. Spa settings are preserved on all systems OHH "Overheat” – The spa has shut down. On some systems, an alarm may sound. One of the sensors has detected 118’F (approximately 47.8’C) at the heater DO NOT ENTER THE WATER. Remove the spa cover and allow water to cool. Once the heater has cooled, reset by pushing any button. If spa does not reset, shut off the power to the spa and call your dealer or service organization OH5 “Overheat”- The spa has hut down. One of the sensors has detected that The spa water is 110’F (approximately 43.3’C) DO NOT ENTER THE WATER. Remove the spa cover and allow water to cool. At 107’F (approximately 41.7ºC), the spa should automatically reset. If spa does not Reset, shut off the power to the spa and call your dealer or service organization ICE “Ice”- potential detected. condition No action required. The pumps and the blower will automatically activate regardless of spa status. 5Nr Spa is shut down. The sensor that is Plugged into the sensor “A” jack is not Working If the problem persists, contact your dealer or service organization. (May appear Temporarily in an overheat situation and Disappear when the heater cools.) 5nb Spa is shut down. The sensor that is Plugged into the sensor “B” jack is not Working If the problem persists, contact your dealer or service organization. (May appear Temporarily in an overheat situation and Disappear when the heater cools.) Model 2200, 2210,2100, 2080, Ver.11.0 freeze 24 Message 5n5 Meaning Sensors are out of balance. If this Is alternating with the temperature, It may just be a temporary condition. If the display shows only this message(periodically blinking), the spa is shut Down Action Required If the problem persists, contact your dealer Or service organization HFL A substantial difference between the Temperature sensors was detected. This Could indicate a flow problem Check water level in spa. Refill if necessary. If the water level is okay Make sure the pumps have been primed. If problem persists, contact your dealer Or service organization. LF Persistent low flow problems. (Displays On the fifth occurrence of the “HFL” Message within 24 hours.) Heater is shut Down, but other spa functions continue To run normally. Follow action required for “HFL” message. Heating capacity of the spa will not reset automatically; you may press any button to reset. Dr Inadequate water detected in heater Check water level in spa. Refill if Necessary. If the water level is okay, Make sure the pumps have been primed. Press any button to reset. dr4 Inadequate water detected in heater. (Displays on third occurrence of “dr” Message.) spa is shut down. Follow action required for “dr” message. spa will not automatically reset; you may Press any button to reset. Pr When your spa is first activated, it will Go into priming mode -The priming mode will Last for up to 4 minutes and then the spa Will begin to heat and maintain the water Temperature in the standard mode. Model 2200, 2210,2100, 2080, Ver.11.0 25 Message --F Meaning Temperature unknown. Action Required After the pump has been running for 2 Minutes, the temperature will be displayed. --C Temperature not current Economy Or sleep mode in In Economy or sleep mode, the pump may Be off for hours outside a filter. If you wish To see the current spa temperature, either Switch to Standard mode or turn Jets 1 on For at least two minutes. 5by Standby Mode has been activated By pressing a button combination on User panel Press any button to leave Standby mode and return to normal operation Periodic Reminder Messages (Press the “Mode” button to reset a displayed reminder) Message Meaning Action Required rPH Every 7 days Test and adjust PH chemical levels per manufacturer’s instruction r5R Every 7 days Test and adjust sanitizer chemical levels per manufacturer’s instructions rCL Every 30 days Remove, clean, and reinstall filter per manufacturer’s instructions. rTG Every 30 days Test & reset GFCI per manufacturer’s instructions. rDR Every 90 days Drain and refill spa per manufacturer’s instructions rCO Every 180 days Clean and condition cover per manufacturer’s instruction .rTR Every 180 days Clean and condition wood per manufacturer’s instructions Rcm Every 365 days Install new filter. Model 2200, 2210,2100, 2080, Ver.11.0 26 Warning! Shock Hazard! No User Serviceable Parts Do not attempt service of this control system. Contact your dealer or service organization for assistance. Follow all owners’ manual power connection instructions. A licensed electrician must perform installation and all grounding connections must be properly installed. Jet Selector Valves (Diverter) Your spa is equipped with a spa side selector valve. This valve can be used to divert jet power from one area in the spa to another. This valve is fully adjustable and can be used to suit the bather’s desired affect. The valve may be difficult to turn when the spa pump is on high speed. This is normal and is caused by the high rate of water flow and pressure present in the valve. Two pump systems have two valves and one-pump systems have one valve. Air Control Valves The air control is an on off valve that allows air to be introduced into a specific jetting configuration resulting in more vigorous jet action. Turn the valve handle clockwise to turn the air on and counter clockwise to turn the air off. Opening the valve increases jet pressure and closing the valve decreases the jet pressure. Model 2200, 2210,2100, 2080, Ver.11.0 27 10. WATER CHEMISTRY Maintaining water chemistry will aid in preventing possible damage to your spa and ensuring safe water conditions for users. Water Quality: Filtering the water helps maintain clean, clear and safe water. You spa is equipped with a 2 cartridges filter system. Although the filter traps most solid materials, it is necessary to add a sanitizer (chlorine or bromine) to the water. This will help oxidize organic materials and reduce build up of algae or bacteria. Note: Do not use peroxide chemicals. To ensure the safe operation of your spa, we recommend using chemicals from your authorized spa dealer. The dealer is informed about the care and maintenance of your spa and can provide guidance when choosing alternative methods for maintaining water quality. Note: Use of the wrong chemicals can be dangerous and may void the warranty on your spa. Water Testing: Testing your spa water on a regular basis with an accurate test kit or strips is also recommended. These kids are available from your authorized spa dealer. Follow the chemical manufacturer’s instructions for use. PH CONTROL: All water has a PH value. This value measures the acid to alkaline relationship from 14-point scale. A reading of 7.0 is considered neutral while a lower reading is considered acidic and a higher reading is alkaline. The proper PH for spa water is between 7.2-7.6. A high PH (above 7.6) can reduce sanitizer efficiency, cloud the water, promote scale formation on the spa surface and equipment and impede the filter operation. When PH is too high, add a PH reducer. Low PH (below7.2) can cause equipment corrosion, water that can irritate users and rapid sanitizer dissipation. Add PH increaser to adjust the level. Note: Good PH control and sanitation are essential for proper spa water treatment. Always add PH adjuster with jets operating and circulate chemicals for at least 30 minutes. Follow the chemical manufacturer’s directions and procedures when adding chemicals to spa water. Sanitizer: Warm water creates a fertile environment for growth of bacteria. To prevent growth it is very important to maintain adequate and constant levels of sanitizer in your spa. Model 2200, 2210,2100, 2080, Ver.11.0 28 WARNING: Sanitizers such as Tri-chlor (tablets or sticks), calcium hypochlorite, sodium hypochlorite, peroxide based chemicals or any chemical compound that remains undeserved in direct contact or adheres to the spa surface will damage the spa and void the warranty. Bromine: Maintaining a proper total bromine level of 3.0-5.0 PPM can control bacteria. Tablets are easy to use and effective. Brominating tablets will keep your water clean, clear and odor-free. A bromine “floater” dispenses the tablets properly and evenly into the spa water to avoid damage to the spa surface. Do not drop bromine tablets directly into the water. Allow for a bromide reserve by adding 1/2 oz. of sodium bromide per 100 gal of water every time you fill your spa. Chlorine Chlorine is also a water sanitizer. It is sensitive to pH. Any pH reading outside of the optimum range of 7.2-7.6 will reduce the effectiveness of chlorine. The best chlorine for your spa is a granular “Dichloride” compound. It dissolves quickly in moving water and has a nearly neutral pH. For severely contaminated water, it is most effective to drain the spa and refill it with clean water. Add chlorine while jets are running and let them run for 1/2 hour. Or disinfect the spa with large chlorine dosed, in the range of 8-10 PPM. Use a chlorine test kit or strips to maintain a reading of 1.0-3.0 PPM of free chlorine. If the reading is below 1 PPM, raise the level before using the spa. If the reading is above 3 PPM, allow PPM to drop to proper range before using the spa. To increase the effectiveness of the chlorine, leave the protective cover on your spa. Leaving the cover off may result in decay of the chlorine by exposure to sunlight and reduce the effectiveness of the chlorine by organic debris deposits. Higher water temperatures also promote fast decay of chlorine. Note: Two individuals in a spa may reduce the level of chlorine as much as 3 PPM in 20 minutes. Read the instructions on your chlorine container carefully, or consult your local spa dealer if you are having difficulty adjusting your chlorine level. Shock Treatments (Potassium Peroxymonosulfate): Even with regular sanitization the need for shock treatment may arise. Shock is recommended over super chlorination because it does not require additional sanitizer. Shock is also effective in oxidizing wastes and reducing chloramines or bromamines. Follow the manufactures instructions listed on the label. Model 2200, 2210,2100, 2080, Ver.11.0 29 Super Chlorination: Super chlorination quickly oxidizes the spa water to burn away waste such as hairspray and lotions that the spa filter cannot remove. This waste build-up reduces the power of the sanitizer resulting in dull water and may cause irritation to the user’s eyes and skin. It may also produce an ineffective sanitizer. Super chlorination can eliminate this occurrence. To produce an adequate super chlorination, apply 5 times the normal chlorine dosage. Stain & Scale inhibitor (Controlling Stain & Scale) Due to hot water conditions, staining and scaling may become a problem. Water circulation can cause the erosion of metals from spa equipment and create a stained surface. A weekly dose of a stain and scale fighter will help. To eliminate metals in your water and increase the life of your spa equipment, add a sequestering agent to the spa water when draining or refilling the spa for the first time. Total Alkalinity: Total alkalinity (TA) is the amount of carbonate, bicarbonate and hydroxyl ions in the water. TA (total alkalinity) affects and protects the PH of water. Proper TA levels allow other chemicals to work more effectively. Water with a TA above 160, makes it difficult to adjust the pH. With a TA below 130 the PH is unstable and difficult to maintain at proper levels. Foam Inhibitor: Rapid circulation of spa water combined with soap residue from the user may cause foaming in your spa. Foam inhibitors cannot remove the soap but will control foam in the water. A shock treatment can oxidize soap in the water and help prevent foaming. If foaming remains an issue, change the water. Consult the foam inhibitor container for directions. When adding chemicals to your spa water, ad to the center of the spa with the pump and air blower (bubbles) operating simultaneously. Never add chemicals directly into the skimmer. To ensure no chemical reaction, only add chemicals to heated water. Never add chemicals to cold water. Store all chemicals in a cool, dry place and out of reach of children or pets. Consult your authorized spa dealer prior to any chemical use. Model 2200, 2210,2100, 2080, Ver.11.0 30 Keeping your water clean & safe MONDAY FRIDAY TEST: Bromine/Chlorine PH Total Alkalinity ADJUST: Follow steps 1-4 ADD: stain and Scale control TEST: Bromine/Chlorine PH Total Alkalinity ADJUST: Follow steps 1-3 STEP#1: Adjust total alkalinity: (ideal range = 130-160). Test water (follow directions on manufacturer’s label) and add required amount of chemicals with jets on. Wait 30 minutes before running additional tests. STEP#2: Adjust PH: (ideal range = 7.4-7.6). Test water (follow directions on manufacturer’s label) and add required amount of chemicals with jets on. STEP#3: Adjust bromine/chlorine: (ideal range = 3-5ppm or 4-6ppm for heavy usage for bromine and 1-3 ppm for chlorine). Fill bromine floater or adjustable feeder and shock spa as necessary. STEP#4: Stain and scale control – Add required amount each week (with jets on). Note: The chemical chart above is a simple schedule for moderate spa use. Depending on the user load and frequency of use, more frequent chemical balancing may be required. Model 2200, 2210,2100, 2080, Ver.11.0 31 11. SPA MAINTENANCE Draining your spa: Do not drain water onto your lawn or garden until all chemicals are negligible in the water. To dissipate the sanitizer, leave the spa cover off to expose the water to direct sunlight. Remember to drain and refill your spa at least every 4 months depending on use. To drain your spa: 1) Turn power off. 2) Attach a hose to the hose bib at the lowest point of your spa. Open the valve allowing the water to drain away from the spa. See illustration below. 3) Clean the spa surface. (See care of spa surface.) 4) Refill spa. (Follow initial start – up procedures to reheat spa.) Filter cleaning: As part of your regular maintenance or in where there is a decrease in jet performance, clean the filters every 3-4 weeks. On initial start – up, filters should be cleaned every second day for the first two weeks of operation. Always turn off the spa before removing and cleaning the filter cartridges. To clean the filters, simply use a garden hose with and spay nozzle and spay the entire filter. Remove basket and filter cartridge By twisting counter clockwise And lift up. Remove stains, lotions etc. by soaking the cartridge into warm water, add filter cleaning/compound available at your distributor You may use a brush for removing remaining dirty particles. Rinse it thoroughly and let dry. Care for the spa surface: Your spa has been crafted with a high luster finish that will generally not adhere stains and dirt. After draining the spa, use a soft damp cloth to wipe down and household soap or liquid detergent. Difficult stains and dirt may be removed by using a non-abrasive household cleaner dissolved in water. To avoid excessive foaming when Model 2200, 2210,2100, 2080, Ver.11.0 32 refilling the spa, rinse the surface well. CAUTION: Do not use any cleaning products containing abrasives or solvents. This could damage the surface and void your warranty. Care of the spa cabinet (Thermo Guard skirt). To clean your Thermo Guard skirt, simply wipe the cabinet with a clean towel and a mild soap. Note: The skirt will fade slightly under normal environmental exposure. CAUTION: Do not use any cleaning products containing abrasives or solvents. This could damage the surface and void your warranty. Care for the spa cover: The thermal cover for your spa is made of extremely durable foam insulated material. To ensure safety for children and to minimize heat loss, we recommend the cover ties always are in place when the spa is not in use. However, the ties will not prevent unauthorized people from entering the spa. SPECIAL COLD WEATHER INSTRUCTIONS WE DO NOT RECOMMEND DRAINING YOUR SPA FOR THE WINTER. Winter is g great time to enjoy your spa. However, it is difficult to remove water from the plumbing lines. If you do not plan to use your spa during the winter, winterize to eliminate any water trapped in the system. 1) Prior to draining the spa ensure the power is turned off. Drain water as low as possible. Using a wet/dry – vacuum or high-pressure blower will remove most of the water from the spa plumbing (blower only air line ) 2) When the spa is drained, leave the hose bib open and open the pump drain plug on the bottom side at the front end of the pump. Loosen all pump unions and fittings to allow air and water to flow in the system. This should help prevent expansion damage in pipes and fittings. If your region is subject to heavy snowfall in winter, you may want to build a protective cover over the spa. A – piece of plywood reinforced with “2x4” planks may work well. Your spa is equipped with automatic freeze protection. During severe cold weather conditions, check your spa on a frequent basis to ensure proper operation. In the event of a power outage your spa equipment system may freeze quickly. Check your spa immediately after any power failure to ensure it is operating properly. Contact your local spa dealer for additional information on winterizing your spa. Model 2200, 2210,2100, 2080, Ver.11.0 33 12. TROUBLESHOOTING Heating System Symptom Problem Corrective action Does not heat 1. Temperature setting is too low. 2. Dirty filter 3. Air Lock 1. Turn up the thermostat 2. Clean filter 3. Prime pump Too hot 1. Temperature setting too high 2. High limit tripped 3. Too much filtration 1. Turn down the thermostat 2. Call for service 3. Reduce the number of filter cycles and/or the filter cycle duration Hot Tub Temperature erratic water 1. level 1. Fill with water to 3” (7cm) to 4” (10cm) above top of the filter Display reads Symptom Problem Corrective action OVERHEAT 1. Too much filtration 2. Temperature setting too high 1. Reduce the number of filter cycles and/or the filter cycle duration 2. Turn down the thermostat Will not turn on in any mode 1. No power 1. Check circuit and/or R.C.D. Turns on by itself 1. Normal automatic daily power Filtration or anti-Freeze cycle 1. No action required Light is out 1. Burned out bulb 1. Replace bulb breaker Pump shuts down Symptom Unexpectedly while in use Problem 1. Automatic timer has shut pump off 2. Motor over- heated and automatic protective device has shut down pump(s) Model 2200, 2210,2100, 2080, Ver.11.0 Corrective action 1. Push JETS Button again to start another cycle 2. If pump(s) will not restart when JETS Button is pushed, call for service 3. If problem persists, call for service 34 13. WINTER AND SUMMER INSULATION Spas are equipped with an insulation curtain on the pump area skirt that can remove and install it for usage in summer and winter time. DURING SUMMER TIME THE CURTAIN INSULATION MUST BE REMOVED FROM THE SKIRT Remarks: Outside temperature for summer time is from + 15 ° C and upwards. Warning, the curtain must be removed and put it away during summer time otherwise the temperature will be too high and may cause the equipment to be overheated Rem Model 2200, 2210,2100, 2080, Ver.11.0 35 remove it and put it away during the summer and take it out and install it on skirt during the winter. Model 2200, 2210,2100, 2080, Ver.11.0 36 DURING WINTER TIME THE CURTAIN INSULATION SHOULD BE INSTALLED Remarks / Warning When using the curtain insulation during winter time it will save a lot on your energy cost. But be aware of to remove it during summer time. Failure in not remove it can seriously effect the installed equipment and warranty will be void if not following this instructions. Model 2200, 2210,2100, 2080, Ver.11.0 37 14. IMPORTANT Additional installation information Due to vibrations during transportation the connections to pumps and heater must be checked during installation and water filling of the spa. Fill the spa with water then check each connection for all pumps and the spa pak and hand tighten them. IMPORTANT Airlock RE-LEASE ACTION Fill in your spa When you fill the water into spa, please insert the water hose into the filter or direct fall the water into the filter. This way can push out the air into pump, to prevent the airlock in the pump Insert the hose into the filter Fall the water into the filter Model 2200, 2210,2100, 2080, Ver.11.0 38 To re-lease an air lock in the circulation system open the pump union nut Diamond and Gold Silver version have a 2 speed large pump installed the small circulation pump may have been installed (Option) please see your purchase information. (small pump) and let some water flow out of the pump then hand tighten the nut and power up again. Prime mood (Pr) is displayed in control panel. Check again for small bubbles if they still are there from some of the small jets then do it the same once again until the small bubbles doesn’t come out anymore. There should only be coming out a stream of bubbles from one jet which is the ozone. Please note that once the jet pumps or blower has started the the ozone will shut of for one hour and then automatically start again. Model 2200, 2210,2100, 2080, Ver.11.0 39 15. ADJUST THE DRAINAGE VALVE FOR THE BLOWER If there is some air comes out from the water lead pipe which connects with the drain valve when the blower work, there might been some debrises etc. cause the malfunction, this time you need to adjust the black valve in the drain valve as follows 1, Open the drain valve and take out the black valve and check for debrises. 2, Use a clamp to hold the nut, and at the same time, use a screw driver to wring the screw tightly a little than before. Note :There must be a gap of at least 1mm. 3, After adjusting this, insert the black valve into the drain valve and close the drain valve. Model 2200, 2210,2100, 2080, Ver.11.0 40