
1
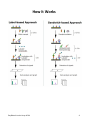
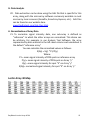
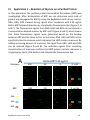
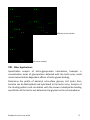
RayBiotech Lectin Array 40 --Detect glycan profiles using 40 lectins User Manual (Version 1.5) Updated May 10th, 2015 Cat # GA-Lectin-40 RayBiotech, Inc. We Provide You With Excellent Protein Array Systems and Service Tel:(Toll Free) 1-888-494-8555 or 770-729-2992; Fax: 1-888-547-0580; Website:www.RayBiotech.com Email: [email protected] Lectins printed on slides (40) Format Detection Method AAA; AIA; ASA; BPA, DSA; ECA; GNA; GS-I; GS-II; HHA; LBA; LcH A; LEA; Lotus; MAA; NPA; PHA-E; PHA-L; PSA; SJA; SNA-I; SNA-II; UEA-II; VFA; WFA; ACL; Con A; SBA; WGA; DBA; UEA I; PNA, Jacalin; STL; VVA; EEL; MPL; PTL I; AAL; UDA One standard glass slide is spotted with 8 wells of identical lectin sub-arrays. Each lectin is printed in duplicated on every sub-array; Fluorescence with laser scanner: Cy3 equivalent dye Sample Volume 50 – 100 l per array Reproducibility CV <20% Assay duration 6 hrs See Section For Array Fluor dye (cy3 B Bioti Biotin-Streptavidin Glycan from Lecti Glass Slide RayBiotech Lectin Array 40 Kit 1 TABLE OF CONTENTS I. Overview………………………………………………………………………………………………………………………………..………………….… 1 Introduction…................................................................................................................................................3 How It Works………………………………………………………………………………………………………………………………………... 4 II. Materials Provided……………………………………………………………………………………………….………………..…….. 5 III. General Considerations………………………………………………………………………………………………….….…… 6 A. Label-Based vs. Sandwich-Based Method…………………………………………… 6 B. Preparation of Samples……………………………………………………………………………………………….… 6 C. Handling Glass Slides…………………………………………………………………………………………..……….…….7 D. Incubation…………………………………………………………………………………………………………………………………….…… 7 IV. Protocol……………………………………………………………………………………………………………………………………………………….… 7 A. Dialysis of Sample…………………………………………………….……………………………………………………………. 8 B. Biotin-labeling Sample………………………………………………………….………………………………………….9 C. Dry the Glass Slide………………………………………………………………………………………………………….………10 D. Blocking and Incubation…………………………………………………………………………………….…………. 10 E. Incubation with Cy3 Equivalent Dye-Streptavidin ……………...… 11 F. Fluorescence Detection …………..……......……..……..……..……..……..……..……..……..……..…….. 12 G. Data Analysis ………………………………………………………………………………………….…………………………………… 13 H. Normalization of Array Data ………………………………………………………………..……………….. 13 V. Lectin Array 40 Map...……………………………………………………………….………………………………………………… 13 VI. Lectin Array 40 Key………………………………………………………………………………………………………………. 14 VII. Application 1- Detection of Glycans on HRP…………………………………..………...15 VIII. Application 2- Profile of Serum Sample……………………………………………….……..….. 16 IX. Other Applications………………………………………………………………………………………………………………….…….. 17 X. Troubleshooting Guide…………………………………………………………………………………………………………....18 RayBiotech Lectin Array 40 Kit 2 I. Introduction Glycocalyx, literally meaning ‘sugar coat’, is an extracellular polymeric coating surrounding many prokaryotic and eukaryotic cells consisting of glycoproteins, glycolipids, proteoglycans and glycosaminoglycans. The constituents of the glycocalyx play an important role in the process of cell signaling, virus transfection, and immunity. However, detection tools for the research of glycobiology are currently in very limited supply. RayBiotech, pioneered the development of antibody arrays, which are now widely applied in the research community with hundreds of peer reviewed publications such as in Cell and Nature. Taking advantage of advancements in microarray technology developed for antibody arrays, we recently developed glycan arrays to help researchers: 1) identify and profile the glycans in their samples; 2) determine whether their biomarker of interest has glycan moieties, and; 3) find specific glycan binding ligands in biological samples. Lectins are glycan-binding proteins which have been purified from trees, beans and some fruits. They are highly specific for a given glycan based on their sequence and the different sugar unit structures the glycan contains. For the RayBiotech lectin array, one standard glass slide is spotted with 8 wells of identical lectin arrays. Each lectin, together with the positive controls is arrayed in duplicate. The slide comes with a 8-well removable gasket which allows for the process of 8 samples using one slide. Four slide slides can be nested into a tray, which matches a standard microplate and allows for automated robotic high throughput process of 64 arrays simultaneously. The RayBiotech lectin array provides a powerful new tool for glycosylation determination, drug discovery and biomarker development; all with limited samples volumes required. RayBiotech Lectin Array 40 Kit 3 How It Works RayBiotech Lectin Array 40 Kit 4 II. Materials Provided Upon receipt, all components of the RayBiotech Lectin Array 40 kit should be stored at -200C. After initial use, remaining reagents should be stored at 4°C to avoid repeated freeze-thaw cycles and may be stored for up to 3 months (Labeling Reagent, Item 2, should be prepared fresh each time before use). Unused glass slides should be kept at -20 °C and repeated freeze-thaw cycles should be avoided (slides may be stored for up to 6 months). The entire kit should be used within 6 months of purchase. Components Item 1 2 3 4 5 6 7 8 9 10 11 12 13 Description Dialysis Vials Labeling Reagent Labeling Buffer Stop Solution Lectin Array Glass Slide Assembly Sample Diluent 20X Wash Buffer I 20X Wash Buffer II Cy3 equivalent dye-conjugated Streptavidin Slide Washer/Dryer Adhesive device sealer Floating Dialysis Rack Manual 1-Slide kit 16 4 1 1 1 1 1 1 1 2-Slide kit 32 8 2 2 2 1 1 1 2 4-Slide kit 64 16 4 4 4 2 2 2 4 1 2 2 1 1 4 4 1 2 8 8 1 Additional Materials Required Detection antibodies of interest (For sandwich-based method only) Orbital shaker Laser scanner for fluorescence detection Aluminum foil 1.5ml Polypropylene microcentrifuge tubes KCl, NaCl, KH2PO4 and Na2HPO4 (For label-based method only) Plastic or glass containers, beaker, stir plate and stir bar Pipettors, pipette tips, ddH2O and other common lab consumables RayBiotech Lectin Array 40 Kit 5 III. General Considerations A. Label-Based vs. Sandwich-Based Method The RayBiotech Lectin Array 40 Kit can be used with either a label based method or as a sandwich based method. The label based method is used to biotin samples containing proteoglycans and glycoproteins for direct detection on the array via a Cy3 equivalent dye-conjugated Biotin-Streptavidin complex. A complete protocol and the primary materials for this procedure are included with the kit. The sandwich based method is used for antibody detection of glycocalyx elements (glycolipids , glycoproteins, etc.) captured on the array. The user will need to supply the labeled reporter antibodies specific for the glycocalyx elements of interest. An example protocol for this procedure with a general “Antibody Cocktail” is included in this manual. Specific antibody concentrations and conditions will need to be determined by the end user. B. Preparation of Samples Use serum-free conditioned media if possible. If serum-containing conditioned media is required, it is highly recommended that complete medium be used as a control since many types of sera contain glycocalyx elements. We recommend the following parameters for your samples: o 50 to 100 μl of original or diluted serum, plasma, cell culture media, or other body fluid, or 50-500 μg/ml of protein for cell and tissue lysates. Note: If you experience high background or the readings exceed the detection range, further dilution of your sample is recommended. RayBiotech Lectin Array 40 Kit 6 C. Handling Glass Slides Do not touch the surface of the slides, as the microarray slides are very sensitive. Hold the slides by the edges only. Handle all buffers and slides with latex free gloves. Handle glass slide in clean environment. Because there is no barcode on the slide, transcribe the slide serial number from the slide bag to the back of the slide with a permanent marker before discarding the slide bag. Once the slide frame assembly is removed this will allow you to distinguish one slide from another. D. Incubation A. Completely cover array area with sample or buffer during incubation. B. Avoid foaming during incubation steps. C. Perform all incubation and wash steps under gentle rotation. D. Cover the incubation chamber with adhesive film during incubation to prevent evaporation, particularly when incubation is more than 2 hours or <70 l of sample or reagent is used. E. Several incubation steps such as step 6 (blocking), step 7 (sample incubation), step 10 (detection antibody incubation), or step 13 (Cy3 equivalent dye-streptavidin incubation) may be done overnight at 40C. Please make sure to cover the incubation chamber tightly to prevent evaporation. RayBiotech Lectin Array 40 Kit 7 IV. Protocol READ ENTIRE PROTOCOL BEFORE STARTING A. Dialysis of Sample Note: For the Sandwich based protocol start at C. Drying the Glass Slide, step 8, on page 10. Do not do steps 1-7. Note: Samples must be dialyzed prior to biotin-labeling (Steps 5–7). 1. To prepare dialysis buffer (1X PBS, pH=8.0), dissolve 0.6 g KCl, 24 g NaCl, 0.6 g KH2PO4 and 3.45 g Na2HPO4 in 2500 ml ddH2O. Adjust pH=8.0 with 1M NaOH and adjust final volume to 3000 ml with ddH2O. 2. Add each sample into a separate Dialysis Vial (Item 1). Load 200 μl cell culture supernatant or 100 μl cell lysates or tissue lysate (1~2 mg/ml total protein) or 20 μl serum or plasma + 80 μl 1X PBS, pH=8 (5-fold dilution. Carefully place Dialysis Vials into Floating Dialysis Rack. Note: If the samples appear to be cloudy, transfer the samples to a clean tube, centrifuge at 13,000 rpm for 20 minutes at 2-8°C. If the samples are still not clear, store them at -20°C for 20 minutes. Remove from the freezer, immediately centrifuge at 13,000 rpm for 20 minutes at 2-8°C. 3. Place Floating Dialysis Rack into ≥500 ml dialysis buffer in a large beaker. Place beaker on a stir plate and dialyze, for at least 3 hours at 4°C, stirring buffer gently. Then exchange the 1X PBS buffer and repeat dialysis for at least 3 hours at 4°C. Transfer dialyzed sample to a clean eppendorf tube. Spin dialyzed samples for 5 min at 10,000 rpm to remove any particulates or precipitants, and then transfer the supernatants to a clean tube. Note: The sample volume may change during dialysis. Note: Dialysis procedure may proceed overnight. Note: Determine the total protein concentration for cell culture supernatants or cell/tissue lysate after dialysis procedure (Step 3). We recommended using a BCA total protein assay (eg, Pierce, Catalog # 23227). RayBiotech Lectin Array 40 Kit 8 B. Biotin Labeling of Sample Note: Amines (e.g., Tris, glycine) and azides quench the biotinylation reaction. Avoid contaminating samples with these chemicals prior to biotinylation. 4. Immediately before use, prepare 1X Labeling Reagent. Briefly spin down the Labeling Reagent tube (Item 2). Add 100 µl 1X PBS into the tube, pipette up and down or vortex slightly to dissolve the lyophilized reagent. 5. Add 1X Labeling Reagent to dialyzed samples. a. For labeling cell culture supernatants: transfer 180 μl dialyzed sample into a new tube. Add 36 μl of 1X Labeling Reagent Solution per 1 mg total protein in dialyzed cell culture supernatant. Mix well. For example, if sample’s total protein concentration is 0.5 mg/ml you need to add 3.24 µl 1X Labeling Reagent to the tube of 180 μl dialyzed sample. Note: You need to biotin-label 360 μl of dialyzed sample if dilution of the biotin-labeled samples is 2 fold in step 11 on page 12. b. For labeling serum or plasma: Add 22 μl of 1X Labeling Reagent Solution into a new tube containing 35 μl dialyzed serum or plasma sample and 155 μl Labeling Buffer (Item 3). c. For labeling cell or tissue lysates: transfer 30 µg (15 μl of 2 mg/ml) cell or tissue lysates into a tube and add labeling buffer (Item 3) for a total volume of 300 μl. Then add 3.3 μl of 1X Labeling Reagent Solution. Note: To normalize serum/plasma or cell/tissue lysate concentrations during biotinylation, measure sample volume before and after dialysis. Then adjust the volumes of dialyzed serum/plasma or cell/tissue lysates and Labeling Buffer to compensate. RayBiotech Lectin Array 40 Kit 9 6. Incubate the reaction solution at room temperature with gentle rocking or shaking for 30 min. Mix the reaction solution by gently tapping the tube every 5 min. 7. Add 3 μl Stop Solution (Item 4) into each reaction tube and immediately dialyze as directed in Steps 1–3 on page 8. Note: Biotinylated samples can be stored at -20°C or -80°C until you are ready to proceed with the assay. C. Dry the Glass Slide 8. Take out the glass slide containing bag from the box, and let the slide equilibrate to room temperature inside the sealed plastic bag for 2030 minutes. Remove slide from the plastic bag; peel off the cover film, and let it air dry at room temperature for another 1-2 hours. Note: Incomplete drying of slides before use may cause the formation of “comet tails”. D. Blocking and Incubation 9. Add 100μl Sample Diluent (Item 6) into each well and incubate at room temperature for 30 min to block slides. 10. Decant buffer from each well. Add 100μl of sample to each well. Incubate arrays at room temperature for 1-2 hour. (Longer incubation time is preferable if higher signal intensity is desired) Note: We recommend using 50 to 100 μl of original or diluted serum, plasma, conditioned media, or other body fluid, or 50-500 μg/ml of protein for cell and tissue lysates. Cover the incubation chamber with adhesive film during incubation if less than 70 ul of sample or reagent is used. Note: This step may be done overnight at 40C for highest intensities. 11. Wash: RayBiotech Lectin Array 40 Kit 10 a. Calculate the amounts of 1x Wash Buffers I & II that are needed for each step of the protocol. Separately dilute required amounts of 20x Wash Buffer I and 20x Wash Buffer II with ddH2O to 1x concentration. For example if 12 ml of 1x Wash Buffer I is needed then 600 μl of 20x Wash Buffer I would be diluted to a final volume of 12 ml. b. Decant the samples from each well, and wash each well 5 times (5 min each) with 150 μl of 1x Wash Buffer I at room temperature with gentle shaking. Completely remove wash buffer between each wash step. c. (Optional for Cell and Tissue Lysates) Put the glass slide with frame into a box with 1x Wash Buffer I (cover the whole glass slide and frame with Wash Buffer I), and wash at room temperature with gentle shaking for 20 min. d. Decant the 1x Wash Buffer I from each well, wash 2 times (5 min each) with 150 μl of 1x Wash Buffer II at room temperature with gentle shaking. Completely remove wash buffer between each wash step. Note: Incomplete removal of the wash buffer after each wash step may cause “dark spots”. (Background signal is higher than that of the spot.) E. Incubation with Cy3 Equivalent Dye-Streptavidin 12. Briefly spin down the Cy3 equivalent dye-conjugated streptavidin tube. 13. Add 1.4 ml of Sample Diluent to Cy3 equivalent dye-conjugated streptavidin tube. Mix gently. 14. Add 80 μl of Cy3 equivalent dye-conjugated streptavidin to each well. Cover the slide with aluminum foil to avoid exposure to light or incubate in dark room. Incubate at room temperature for 1 hour. RayBiotech Lectin Array 40 Kit 11 15. Decant the samples from each well, and wash 5 times with 150 μl of 1x Wash Buffer I at room temperature with gentle shaking. Completely remove wash buffer in each wash step. F. Fluorescence Detection 16. Disassemble the slide assembly by pushing clips outward from the slide side. Carefully remove the slide from the gasket. Note: Be careful not to touch the surface of the array. 17. Place the slide in the slide Washer/Dryer (a 4-slide holder/centrifuge tube), add enough 1x Wash Buffer I (about 30 ml) to cover the whole slide, and then gently shake at room temperature for 15 minutes. Decant Wash Buffer I. Wash with 1x Wash Buffer II (about 30 ml) with gentle, and gently shake at room temperature for 5 minutes. 18. Remove water droplets completely by one of the following ways: i. Put the glass slide into the Slide Washer/Dryer, and dry the glass slide by centrifuge at 1,000 rpm for 3 minutes without cap. ii. Or, dry the glass slide by a compressed N2 stream. iii. Or gently apply suction with a pipette to remove water droplets. Do not touch the sub-array areas, only the sides of the slide. 19. Imaging: The signals can be visualized through use of a laser scanner equipped with a Cy3 wavelength such as Axon GenePix. Make sure that the signal from the spot containing the highest concentration receives the highest possible reading, yet remains unsaturated. Note: If the signal intensity for different lectins vary greatly in the same array, we recommend using multiple scans, with a higher PMT for low signal lectins, and a low PMT for high signal lectins. RayBiotech Lectin Array 40 Kit 12 G. Data Analysis 20. Data extraction can be done using the GAL file that is specific for this array, along with the microarray software commonly available in most microarray laser scanners (GenePix, ScanArray Express, etc.). GAL files can be found on our website here. www.RayBiotech.com/Gal-Files.html. H. Normalization of Array Data 21. To normalize signal intensity data, one sub-array is defined as "reference" to which the other arrays are normalized. This choice can be arbitrary. For example, in our Analysis Tool Software, the array represented by data entered in the left-most column each worksheet is the default "reference array." You can calculate the normalized values as follows: X(Ny) = X(y) * P1/P(y) Where: P1 = mean signal intensity of POS spots on reference array P(y) = mean signal intensity of POS spots on Array "y" X(y) = mean signal intensity for spot "X" on Array "y" X(Ny)= normalized signal intensity for spot "X" on Array "y" Lectin Array 40 Map RayBiotech Lectin Array 40 Kit 13 V. Lectin Array 40 Key Lectin Abbreviation Source Carbohydrate Specificity AIA AIA Artocarpus integrifolia (Jackfruit) seeds aGal Aleuria aurantia AAL Aleuria aurantia mushrooms Fuca6GlcNAc Allium sativum ASA Allium sativum agglutinin (Garlic) aMan Amaranthus caudatus ACL, ACA Amaranthus caudatus seeds Galβ3GalNAc Anguilla anguilla AAA Anguilla anguilla (Fresh Water Eel) aFuc Bauhinia purpurea BPA, BLP Bauhinia purpurea alba (Camel’s Foot Tree) seeds Galβ3GalNAc Concanavalin A Con A Canavalia ensiformis (Jack Bean) seeds aMan, aGlc Datura stramonium DSA, DSL Datura stramonium (Thorn Apple, Jimson Weed) seeds (GlcNAc)2-4 Dolichos biflorus Erythrina cristagalli DBA ECA, ECL Dolicos biflorus (Horse Gram) seeds Erythrina cristagalli (Coral Tree) seeds aGalNAc Galb4GlcNAc Eunonymus europaeus EEL Eunonymus europaeus (Spindle Tree) seeds Gala3Gal Galanthus nivalis Griffonia (Bandeiraea ) simplicifolia I Griffonia (Bandeiraea ) simplicifolia HippeastrumIIhybrid GNA, GNL Galanthus nivalis (Snowdrop) bulbs aMan GS-I, GSL-I, BSL-I Griffonia (Bandeiraea ) simplicifolia seeds aGal, aGalNAc GS-II, GSL-II, BSL-II Griffonia (Bandeiraea ) simplicifolia seeds a or βGlcNAc HHA, HHL, AL Hippeastrum hybrid (Amaryllis) bulbs aMan Jacalin Jacalin, AIL Artocarpus integrifolia (Jackfruit) seeds Galβ3GalNAc Lens culinaris LcH, LCA Lens culinaris (lentil) seeds aMan,aGlc Lectin Abbreviation Source Carbohydrate Specificity Lotus tetragonolobus Lotus, LTL Lycopersicon esculentum LEA, LEL, TL Lotus tetragonolobus, Tetragonolobus purpurea (Winged Pea, Asparagus Pea) seeds Lycopersicon esculentum (tomato) fruit Maackia amurensis I Maclura pomifera MAA, MAL, MAL-I MPL, MPA Maackia amurensis seeds Maclura pomifera (Osage Orange) seeds Galb4GlcNAc Galβ3GalNAc Narcissus pseudonarcissus NPA, NPL, DL Narcissus pseudonarcissus (Daffodil) bulbs aMan Peanut PNA Arachis hypogaea peanuts Galβ3GalNAc Phaseolus lunatus Phaseolus vulgaris Erythroagglutinin Phaseolus vulgaris Leucoagglutinin LBA Phaseolus lunatus (Lima Bean) seeds PHA-E Phaseolus vulgaris (Red Kidney Bean) seeds PHA-L Phaseolus vulgaris (Red Kidney Bean) seeds GalNAca(1,3)[Fuca(1,2)]Gal Galb4GlcNAcb2Mana6(GlcNAcb4) (GlcNAcb4Mana3)Manb4 Galb4GlcNAcb6(GlcNAcb2Mana3)Mana3 Pisum sativum Psophocarpus tetragonolobus I Sambucus nigra I PSA, PEA Pisum sativum (Pea) seeds aMan, aGlc PTL, PTL-I, WBA-I Psophocarpus tetragonolobus (Winged Bean) seeds SNA-I Sambucus nigra (Elderberry) bark Sambucus nigra II SNA-II Sambucus nigra (Elderberry) bark GalNAc, Gal NANAa(2,6)GalNAc > GalNAc = Lac > GalNANAa(2,6)Gal GalNAc > Gal Solanum tuberosum STL, PL Solanum tuberosum , (potato) tubers Sophora japonica SJA Sophora japonica (Japanese Pagoda Tree) seeds (GlcNAc)2-4 bGalNAc Soybean SBA Glycine max (soybean) seeds a > βGalNAc Ulex europaeus I UEA-I Ulex europaeus (Furze Gorse) seeds aFuc Ulex europaeus II UEA-II Ulex europaeus (Furze Gorse) seeds Poly β(1,4)GlcNAc Urtica dioica UDA Urtica dioica (Stinging Nettle) seeds GlcNAc Vicia faba VFA Vicia faba (Fava Bean) seeds aMan Vicia villosa VVA, VVL Vicia villosa (Hairy Vetch) seeds GalNAc Wheat Germ WGA Triticum vulgaris (wheat germ) GlcNAc Wisteria floribunda WFA Wisteria floribunda (Japanese Wisteria) seeds GalNAc aFuc (GlcNAc)2-4 Sugar Abbreviations Fuc: L-Fucose GlcNAc: N -Acetylglucosamine RayBiotech Lectin Array 40 Kit Gal: D-Galactose Lac: Lactose GalNAc: N -Acetylglactosamine Glc: D-Glucose Man: Mannose 14 VI. Application 1 – Detection of Glycans on a Purified Protein In this application the purified protein Horseradish Peroxidase (HRP) was investigated. After biotinylation of HRP we can determine what kind of glycans are conjugated to HRP by using the RayBiotech lectin array. Lectins, GNA, HHA, NPA showed strong signals after incubation with 0.33 ug/mL Biotin-HRP followed detection by streptavidin-fluorescence-dye (Figure A, B and C). The fluorescence signals from GNA, HHA and NPA can be blocked in a concentration depend manner by HRP itself (Figure A and C), which means that these fluorescence signals were generated based on the binding between HRP and the three lectins. As we know, GNA, HHA and NPA lectins specifically bind to mannose which indicates that HRP contains mannose. By adding increasing amount of mannose, the signal from GNA, HHA and NPA can be reduced (Figure A and B). The reduction signals from increasing concentrations of mannose confirms that HRP protein contains mannose in its glycocalyx. Lectin VVA binds to the streptavidin-fluorescence dye. A Biotin-HRP 0.33 ug/mL Mannose 300 30 3 0 mM HRP 100 10 1 0 ug/mL GNA HHA NPA RayBiotech Lectin Array 40 Kit 15 B C + Mannose 30000 25000 20000 15000 10000 30000 300 mM Mannose 30 mM Mannose 3 mM Mannose 5000 0 -5000 + HRP 0 25000 20000 100 ug/mL HRP 15000 10 ug/mL HRP 10000 1 ug/mL HRP 0 5000 0 -5000 Pos Neg GNAHHA NPA VII. Application 2 – Profiling of a Serum Sample Using the lectin array, we can discover the different glycoprotein profiles of the serum samples or cell lysates from patient cohorts versus a control group. Below images showed the profiles of the glycans from serum samples detected by Biotin-anti-human IgG and Fluorescence dyestreptavidin. Different serum samples RayBiotech Lectin Array 40 Kit 16 Different serum samples (No serum sample) VIII. Other Applications: Quantitative analysis of lectin-glycoprotein interactions, Example: a concentration series of glycoproteins detected with the lectin array could reveal concentration dependent effects of lectin-glycan binding; Determine the profile of bacterial cell-surface glycans; Cell lysate from bacteria can be Biotinylated and hybridized to the lectin array. Analysis of the binding pattern and correlation with the known carbohydrate-binding specificities of the lectins can determine the glycans on the cell membrane. RayBiotech Lectin Array 40 Kit 17 IX. Troubleshooting Guide Problem Cause Inadequate detection Inadequate reagent volumes or improper dilution Short incubation time Weak Signal Too low glycan concentration in sample Improper storage of kit Bubble formed during incubation Uneven Signal Arrays are not completed covered by reagent Reagent evaporation Cross-contamination from neighboring wells Comet tail formation General Inadequate detection Overexposure Dark spots High Background Insufficient wash Dust Slide is allowed to dry out RayBiotech Lectin Array 40 Kit Recommendation Increase laser power and PMT parameters Check pipettes and ensure correct preparation Ensure sufficient incubation time or change sample incubation step to overnight Reduce amount of dilution or concentrate sample Store kit as suggested temperature; Don’t freeze/thaw the slide Handle and pipette solutions more gently; De-gas solutions prior to use Prepare more reagent and completely cover arrays with solution Cover the incubation chamber with adhesive film during incubation Avoid overflowing wash buffer Air dry the slide for at least 1 hour before usage Increase laser power that the highest concentration for each lectin receives the highest possible reading yet remains unsaturated Lower the laser power Completely remove wash buffer in each wash step Increase wash time and use more wash buffer Minimize dust in work environment before starting experiment Take additional precautions to prevent slides from dying out during experiment 18 Note: This product is intended for research only and is not to be used for clinical diagnosis. Our produces may not be resold, modified for resale, or used to manufacture commercial products without written approval by RayBiotech, Inc. Under no circumstances shall RayBiotech be liable for any damages arising out of the use of the materials. Products are guaranteed for three months from the date of purchase when handled and stored properly. In the event of any defect in quality or merchantability, RayBiotech’s liability to buyer for any claim relating to products shall be limited to replacement or refund of the purchase price. This product is for research use only. ©2010 RayBiotech, Inc. RayBiotech Lectin Array 40 Kit 19


![Les besoins des plantes [expériences] séq2](http://vs1.manualzilla.com/store/data/006425426_1-d260fe3404863812e90a2af157c2db5a-150x150.png)