1
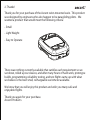
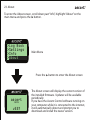
v381
English
Instructions
1. Contents:
Thanks! ..........................
Safety ..............................
Overview ......................
Battery ...........................
Turning On ..................
Fly .....................................
Fly Mode .......................
Log Book ......................
Log Book Details ......
Settings .........................
Altimeter ......................
Units ...............................
Flight ..............................
Sink Alarm ..................
Beep ................................
Date & Time .................
Watch .............................
Log Memory ...............
Track Log ......................
Barometer ....................
Info ..................................
2
3
4
5
6
7
8
9
10
11
12
13
14
15
16
17
18
19
20
21
22
About .............................
Computer .....................
Care .................................
Specifications ............
License ..........................
Warranty .......................
Contact ..........................
23
24
25
26
27
28
29
2. Thanks!
Thank you for your purchase of the Ascent wrist-mounted vario. This product
was designed by engineers who also happen to be paragliding pilots. We
wanted a product that would meet the following criteria:
- Small
- Light Weight
- Easy to Operate
There was nothing currently available that satisfies each requirement so we
sat down, rolled up our sleeves, and after many hours of hard work, prototype
builds, programming, reliability testing, and test flights came up with what
we believe is the best small, rechargeable variometer available.
We know that you will enjoy this product and wish you many safe and
enjoyable flights.
Thank you again for your purchase.
Ascent Products
3. Safety Information
Warning; This product is not intended to be used as a precise measurement of
altitude, vertical speed, or temperature.
Warning; This product contains a Lithium-ion rechargeable battery. The
product must be disposed of properly. Use only in accordance with operating
instructions.
Warning; This product and its components contain chemicals known to the
State of California to cause cancer and birth defects, or reproductive harm.
This notice is being provided in accordance with California Proposition 65. If
you have further questions please contact Ascent Products.
4. Charging the Battery
Your vario operates on a rechargeable lithium-polymer battery. The battery
has up to 10 hours flight time or 4 months standby time when fully charged
using the default settings. The beep volume and duration have a noticable
affect on battery life with louder and longer beeps requiring more power and
reducing battery life.
To charge the battery, plug the mini-USB end of the cable into the product
and plug the other end into the AC wall charger, car charger, or computer. The
screen will briefly display “charging”, and the icon on the info screen will be
animated.
If the battery becomes low during use, “
Low Bat” will flash at the
top of the screen and the volume will be muted until the unit is recharged. If
the battery becomes critically low, the unit will shut off and not turn on again.
We recommend charging the battery as soon as possible to avoid possible
permanant damage caused by over discharging the battery.
The product takes less than 2 hours to fully charge. When fully charged, the
icon on the info screen will show full. Lithium-polymer batteries do not have a
memory and there is no advantage to letting the unit run completely out of
power prior to charging. Therefore you are advised to keep the unit fully
charged so that it is ready to use when you are ready to fly.
mini-USB
5. Product Overview
To get the most out of your new product we recommend that you read the
entire manual. However, we believe that once you start using the menus you
will find the operation of the product easy and intuitive.
The product has four push buttons for navigation and adjustment as shown
below.
goes back one menu step
(short press)
Power button
(long press)
Volume button
(long press)
goes forward one menu step
(short press)
moves up one menu
position per click or
increases value of
selected variable
- holding the button
down will accelerate the
change
moves down one menu
position per click or
decreases value of
selected variable
- holding the button
down will accelerate the
change
6. Turning the vario on and off
13
54
To extend the battery life, after 10 minutes of inactivity the vario automatically enters the sleep mode to conserve battery power and briefly displays the
current time as shown below. It will not fall asleep in the fly mode. While
asleep, pressing any button briefly will display the time for a few seconds. If
the time does not display, the battery is discharged. In this case, recharge the
battery and reset the time and date (under settings).
Sleep Mode - This screen displays the time.
Press and hold the button for 2 seconds to
wake up the product to startup screen.
You can also press the button for 2 seconds
at any time to put the unit in the sleep mode or
simply let it fall asleep again.
Power On?
No
Yes
Press the button to scroll down and highlight
“Yes”, then press the button to turn on to the
main menu page.
7. Starting and Ending a Flight
Use the and buttons to highlight Fly and then push the button to enter
Fly Mode. When the unit enters Fly Mode it will beep to indicate the current
volume setting. The unit will begin recording the flight after a specified
change in altitude. This threashold altitude can be adjust in the “Settings”
menu.
>Fly
>Log Book
>Settings
>Barometer
Main Menu
Press the
button to enter “Fly” mode
Press and hold the button for 2 seconds to end
the flight and exit “Fly” mode.
Abs
2534
+ 350
Fly Mode - This screen displays the absolute altitude
as indicated by the “Abs” (or relative altitude as
indicated by “Rel” if selected in the Settings menu).
The screen also displays the current averaged
vertical speed (default = 5 seconds).
8. Fly Mode
By briefly pressing any of the four buttons during the flight, the screen will
temporarily display other flight information for 5 seconds and then return to
the default screen. Remember a long press of the
button will exit the
Flight Mode completely and stop the recording of flight data.
Max
min
Briefly Press the
button to change the
“Volume” during a
flight. Then use the
and buttons to
adjust the volume.
Volume
40%
Abs
Press the button to
view the current time
& flight duration.
2534
+350
Note: if the main fly
screen is set to
relative altitude then
this screen will display
the absolute altitude
and temperature.
3842
+540
Press the button to
view the maximum
altitude and maximum
averaged vertical
speed so far this flight.
Press the button to
view the current
relative altitude and
current temperature.
Rel
hr
12:52
1 48
1205
62°F
9. Viewing the Log Book
Use the and buttons to highlight Log Book and then push the button
to enter the Log Book. This unit can store summary data for 200 flights.
Pushing the and buttons will scroll through the recorded flights. Pressing
the button will allow you to see additional flight details as described on the
next page. The data in the log book will be saved, even if the battery is
completely discharged or the unit is reset.
>Fly
>Log Book
>Settings
>Barometer
Flight# 2
29/02/2008
Strt:12:04
1hr 23min
Main Menu
Press the
button to enter the Log Book
Press the
Book
button at any time to exit the Log
Log Book - This is the first page you will see when
entering the log book. It displays the flight number,
date, launch time, and duration of the flilght. Note
that the flight data starts recording after a preset
(default=4 meter) altitude change has been detected
while in flight mode. The unit stops recording flight
data when the user exits the flight mode.
10. Log Book Details
You can view additional information about the flight by pushing the
button.
Flight# 2
Strt: 1329
Max: 3842
End:
820
flight number
starting altitude
maximum altitude
ending altitude
flight number
maximum 2-second lift
maximum averaged lift (default = 5-seconds)
maximum 2-second sink
Flight# 2
Tmax: 68°F
Tmin: 52°F
flight number
maximum temperature
minimum temperature
Flight# 2
Lift: +670
Avg.: +540
Sink: -590
11. Settings
To enter the Settings Menu, highlight Settings on the main menu and press
the button. All of these settings are saved extept for the time and date
even if the battery is completely discharged. If this happens you will need to
set the time and date.
>Fly
>Log Book
>Settings
>Barometer
Main Menu
Press the
>Altimeter
>Units
>Flight
>SinkAlarm
button to enter the Settings Menu
Settings Menu - From this page you can select
which catagory of settings you wish to modify.
There are currently eight choices: Altimeter, Units,
Flight, Sink Alarm, Beep, Date & Time, Watch, and
Memory.
12. Altimeter
To change a specific value or function, press the and buttons to highlight
the value, press the button to select and use the and buttons to adjust.
This new value is automatically saved when you press the button. To select
a “radio” button, highlight the value and push the button.
Changing the “Mode” from Absolute to Relative changes the default screen on
the main Fly mode. The relative altitude is automatically reset to zero for every
flight when you first enter the fly mode.
>Altimeter
>Units
>Flight
>SinkAlarm
Settings Menu
Press the
Altitude:
> 540 m
Absolute
Relative
button to enter the Altimeter Menu
Altimeter Options - From this page you can adjust
the current altitude, and select the default flight
mode display of absolute or relative (to launch).
The vario works by using temperature compensated pressure measurements. Because of this,
changes in the weather will affect the displayed
values. If you know the altitude of the launch, you
can adjust the altitude prior to launching.
13. Units
To select a “radio” button, highlight the value and push the
>Altimeter
>Units
>Flight
>SinkAlarm
SI
Imp
altitude
meters
feet
vertical speed
m/s
ft/min
temperature
celsius
fahrenheit
Settings Menu
Press the
Units:
Imperial
SI/Metric
button.
button to enter the Units Menu
Units - From this page you can choose which units
you would like the vario to display.
14. Flight Settings
To change a specific value or function, highlight the value and use the
buttons to adjust.
>Altimeter
>Units
>Flight
>SinkAlarm
Settings Menu
Press the
Avg.:
5s
Strt:
4m
Suppress
Beep
and
button to enter the Flight menu
Flight Settings - From this menu you can choose the
vertical speed averaging time which is a value from
1 to 60 seconds (default = 5 seconds). You can also
adjust the altitude change required to start recording a flight (default = 5 meters) and whether or not
to suppress the beeps prior to crossing this threshold. Beep suppression is on (checked) by default to
aviod annoying beeps while standing on launch.
15. Sink Alarm
To change a specific value or function, press the
and use the and buttons to adjust.
>Altimeter
>Units
>Flight
>SinkAlarm
Settings Menu
Press the
Alarm On
Alarm Off
Velocity:
> - 3.0m/s
button, highlight the value
button to enter the Sink Alarm
Sink Alarm Options - From this page you can turn
the sink alarm on or off, and choose the threshold
sink velocity. The sink alarm velocity is calculated
using a 2-second average.
16. Beep
To change a specific value or function, press the
and use the and buttons to adjust.
>Units
>Flight
>SinkAlarm
>Beep
Settings Menu
Press the
Standard
Double
Classic
User
button, highlight the value
button to enter the Beep Options menu
Beep Options - From this menu you can choose
from some preset or user configurable tone
options. The Standard and Double beeps have
been optimized for performance and long battery
life (~10 hours). The Classic may sound more similar
to other vario’s, however the battery life is reduced
(~6 hours). The User beep option can be configured
using the Ascent User Control software. Values are
entered into the program and then downloaded to
the vario.
17. Date & Time
To change a specific value or function, press the button, highlight the value
and use the and buttons to adjust. It is necessary to set the time and
date after charging if the battery was completely discharged.
>Flight
>SinkAlarm
>Beep
>Date&Time
Settings Menu
Press the
Date:
>DD/MM/YYYY
Time:
>HH:MM
button to enter the Date & Time
Date & Time - From this page you can set the date
and time. This is necessary for your flight to be
recorded correctly in the log book. This can also be
set by connecting the unit to a computer using the
Ascent User Control software.
18. Watch
There are several options to modify the display while displaying the time.
These are found under the “WatchMode” in the “Settings” Menu.
>Flight
>SinkAlarm
>Date&Time
>Watch
Settings Menu
Press the
RightHand
Left Hand
Normal
Inverted
button to enter the WatchMode
Watch Mode- From this page you can customize
how the “watch” is displayed while in sleep mode.
This display can be rotated for right or left handed
users, and can be inverted (white numbers on black
background).
19. Log Memory
To change a specific value or function, press the button, highlight the value
and use the and buttons to adjust. Note that you must keep scrolling
down on the Settings page to reach the Log Memory setting menu.
>SinkAlarm
>Time&Date
>WatchMode
>LogMemory
Settings Menu
Press the
Flts:
16
8% Full
Clear Log?
> No
button to enter the Log Memory
Log Memory - From this page you can view the
number of flights logged and the % of memory
used. When full, you must clear the log in order to
log more flights. To clear the log, press the
button and use the and buttons to select yes
and press the button again.
20. Track Log
To change a specific value or function, press the button, highlight the value
and use the and buttons to adjust. Note that you must keep scrolling
down on the Settings page to reach the Track Log setting menu.
To download the track log and other logbook data you must connect the unit
to a computer running the Ascent Control software. This software can be
downloaded from the support page of www.ascentvario.com.
>Time&Date
>WatchMode
>LogMemory
>Track Log
Settings Menu
Press the
Int.: 10s
Time: 159h
ClearTrack?
> No
button to enter the Track Log
Track Log - From this page you can adjust the
recording interval (from 1 to 240 seconds) and view
the remaining hours of space using that interval.
When full, you must clear the track log in order to
log more flights. To clear the log, press the
button and use the and buttons to select yes
and press the button again.
21. Barometer
To enter the Barometer Menu, highlight Barometer on the main menu and
press the button.
>Fly
>Log Book
>Settings
>Barometer
Main Menu
Press the
Barometer:
991mbar
29.34inHg
81 F
button to enter the Barometer Menu
Barometer Menu - This page displays the current
atmospheric pressure in both mbar and mmHg. It
also displays the current temperature.
22. Info
To enter the Info screen, highlight “Info” on the main menu and press the
button.
>Fly
>Log Book
>Settings
>Info
Main Menu
Press the
Alt 2657 m
79 F
DD/MM/YYYY
HH:MM:SS
button to enter the Info screen
The info screen will show the current altitude,
temperature, date , time, and battery status.
23. About
To enter the About screen, scroll down past “Info”, highlight “About” on the
main menu and press the button.
>Log Book
>Settings
>Info
>About
Main Menu
Press the
ascent
INSPO
v357
button to enter the About screen
The About screen will display the current version of
the installed firmware. Updates will be available
periodically.
If you have the Ascent Control software running on
your computer while it is connected to the internet,
it will automatically detect and prompt you to
download and install the newer version.
24. Connecting to a Computer
Please visit www.ascentvario.com and download and install the “Ascent User
Control” software from the support page. This software currently works only
on a Microsoft PC and requires Microsoft.NET and a specific USB driver to run.
The Ascent User Control should recognize if your computer is missing this
software and prompt you to download it.
Instructions for this software are included with the software under the “Help”
menu.
To connect your variometer to a computer plug the micro USB end of the
supplied cable into the product. Plug the other end of the cable into a
computer USB port.
mini-USB
25. Care of Product
Your product is constructed of high quality materials and does not require
maintenance other than cleaning. Clean the product using a soft cloth
dampened with a mild detergent solution and then wipe dry. AVOID chemical
cleaners and solvents that may damage plastic and braided nylon components.
Do not store the product where prolonged exposure to sun, heat, rain, snow,
or extreme cold may result in permanent damage.
Do not store the unit where the buttons can be depressed as this will lead to
the battery being drained.
The product is not waterproof so do not immerse it in water.
26. Specifications
Altimeter:
Temperatue corrected, user calibrated altitude
Absolute and Relative (to launch) altitude
Display in meters or feet with 1 meter (3 ft) resolution
Variometer:
Averaged digital display with 0.1 m/s (10 ft/min) resolution
Instantaneous audio adjustable volume
Sink alarm - user selectable threshold (can be easily disabled)
Temperature:
Ambient temperature in Fahrenheit or Celsius with 1 degree resolution
Flight Log :
Automatically records summary data for 200 flights
Automatically records detailed tracklog data at user determined interval
Display:
Black & White Graphic LCD with 128 x 64 pixel resolution
Battery:
320 mAh rechargable lithium polymer battery
Up to 10 hours flight time or 4 months standby
Battery charge indicator
Physical Properties:
44mm (1.75”) x 60mm (2.36”) x 16mm (0.63”)
40g (1.41 oz)
PC/ABS housing and velcro wrist strap
27. Software License Agreement
By using you Ascent Products variometer you agree to be bound by the terms
and conditions of the following software license agreement.
Ascent Products grants you a limited license to use the software embedded in
this device in the normal operation of the product. Title, ownership rights,
and intellectual property rights of the software remain Ascent Products.
Your product’s software is property of Ascent Products and is protected under
the United States copyright laws and international copyright treaties. The
structure, organization, and code of the software are valuable trade secrets to
Ascent Products and shall remain so. You agree not to decompile or reverse
engineer the software to be used in any other way. You agree not to export or
re-export the software to any country in violation of the export control laws of
the United States.
28. Limited Warranty
Your Ascent Products vario is warranted to be free of defects in materials or
workmanship for twp years from the date of purchase. Within this period
Ascent Products at its sole option may repair or replace any parts that fail in
normal use. These repairs or replacement will be made at no charge to the
customer. The customer is responsible for shipping and handling of the item.
The warranty does not cover failures due to abuse, misuse, accident, or
unauthorized alterations or repairs.
To obtain warranty service, contact Ascent Products by e-mail at
[email protected], or by phone at +1-760-536-8799.
29. Contact Us
For questions or assistance with your vario please contact us by e-mail at
[email protected] or by phone at +1-760-536-8799.
Visit our website at www.ascentvario.com to download a pdf of the latest
users manual
Please share your experiences with your ascent vario with us on facebook
firmware version: v381