1
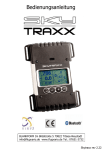
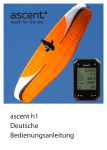
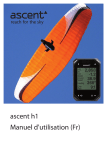
ascent h1
English Instructions
Thanks!
Thank you for your purchase of the Ascent wrist-mounted vario. This product was designed by engineers who also happen to
be paragliding pilots. We wanted a product that would meet the following criteria:
- Small
- Light Weight
- Easy to Operate
There was nothing currently available that satisfies each requirement so we sat down, rolled up our sleeves, and after many
hours of hard work, prototype builds, programming, reliability testing, and test flights came up with what we believe is the best
small, rechargeable variometer available.
This was our introduction in 2008 to our v1 unit. After selling thousands of varios, getting pilot feedback, and collecting
lessons learned, we decided to do the whole thing again. We believe that this new product both improves on the
original concept while retaining the ascent identity that made the v1 such a success.
We know that you will enjoy this product and wish you many safe and enjoyable flights.
Thank you again for your purchase.
Ascent Products
Safety Information
Warning; This product is not intended to be used as a precise measurement of altitude, velocity, or temperature.
Warning; This product contains a Lithium-ion rechargeable battery. The product must be disposed of properly. Use only
in accordance with operating instructions.
Warning; This product and its components contain chemicals known to the State of California to cause cancer and birth
defects, or reproductive harm. This notice is being provided in accordance with California Proposition 65. If you have
further questions please contact Ascent Products.
Charging the Battery
Your vario operates on a rechargeable lithium-ion battery. The battery can provide power for at least 10 hours of flight
time, or up to 1 year standby time when fully charged. The beep volume and mode have a noticable affect on battery life
with louder and longer beeps requiring more power and reducing battery life.
To charge the battery, plug the micro-USB end of the cable into the product and plug the other end into the AC wall
charger, car charger, or computer. The screen will display “USB Connected Charging”. When the unit is completely
charged the screen will change to “USB Connected Charged”.
The product takes less than 2 hours to fully charge. Due to protection circuits it is not possible to over-charge. When
fully charged, the icon on main menu will show full. Lithium-polymer batteries do not have a memory and there is no
advantage to letting the unit run completely out of power prior to charging. Therefore you are advised to keep the unit
fully charged so that it is ready to use when you are ready to fly.
If the battery becomes critically low, the unit will shut off and not turn on again. We recommend charging the battery as
soon as possible to avoid possible permanant damage caused by over discharging the battery. Avoid storing and
charging the battery in extreme hot (>40°C) or cold (<0°C) environments.
2
Product Overview
To get the most out of your new product we recommend that you read the entire manual. However, we believe that once
you start using the menus you will find the operation of the product easy and intuitive.
The product has four push buttons for navigation and adjustment as shown below.
Flight Exit
(long press)
GPS Antenna
goes back one menu step
(short press)
moves up one menu position
per click or increases value of
selected variable
> Fly
> Log Book
> Settings
> Info
> Pilot Data
goes forward one menu step
(short press)
moves down one menu position
per click or decreases value of
selected variable
Volume button
(during flight)
Power button
(long press)
Turning the vario on and off
Press and hold the
turn the unit on.
button until the prompt appears (2 seconds), then with “Yes” highlighted, press the
button to
As soon as the unit is turned on, it will attempt to start aquiring satellites. Please make sure that the antenna has a clear
view of the sky during use and especially during the calibration process. This process should take less than 3 minutes
however we suggest that you turn the unit on and enter the Fly mode early in your setup routine.
To turn the unit off, press and hold the
Info mode.
button for 2 seconds. Note that it is not possible to turn the unit off while in
To extend the battery life, after 30 minutes of inactivity the vario automatically turns itself off. This will not happen in the
fly or info mode.
When the unit is turned on, the main menu is displayed (shown above). This screeen has five options: Fly, Log Book,
Settings, Info, and Pilot Data. Use the and buttons to highlight your choice and press the button to select. This
page also displays an estimate of the remaining battery charge using an icon at the bottom of the screen.
Starting and Ending a Flight
Use the and buttons to highlight Fly and then press the button to enter Fly Mode. The unit will not start recording a flight (and by default not beep) until the velocity threshold has been crossed. This thresholds can be adjusted in the
Settings menu. To exit and save the flight, press and hold the or button.
3
Wrist Strap
The wrist strap is secured to the vario body by two spring pins (similar to those used on a typical watch). To remove the
strap (to replace it with a new wrist strap or the included riser strap) place the vario face down on a non scratching
surface and with a small screwdriver or similar tool place the end between the spring pin shoulder and the vario body.
Carefully compress the spring pin several mm and the pin should disengage from the body. Repeat on the other side.
Installation of the strap is done by inserting the spring into the strap hole and aligning one end of the pin into one of the
holes in the back cover. Carefully compress the other end of the spring pin while aligning the tip with the other hole in
the body. Release the pin and be sure to give the strap a good pull to make sure that the pins are well seated and
engaged.
Wrist Strap
Spring Pin
Reset Switch
Lanyard Hole
Press Here
Troubleshooting
If the vario is not responding to button presses, there are a few ways to reset the unit. Plugging the vario in to a
computer or a power source may help (especially if the problem is low battery related). If not, then it is possible to
perform a software reset by pressing all 4 buttons at the same time. If this does not help, it is possible to perform a
hardware reset by inserting a paper clip or other similar pin into the hole on the back of the unit and pressing gently until
you feel a “click”.
When reset, the screen will go blank and return to the start-up screen. Please note that the flight logs will not be erased.
If it is ever necessary to perform a reset, please send an e-mail to [email protected] with a description of the
problem and solution.
4
Fly Mode
The main fly screen is shown below. By briefly pressing any of the four buttons during the flight, the screen will temporarily display other flight information (as shown on the next page) for 5 seconds and then return to the default screen.
When you enter flight mode, the unit will beep twice to indicate the current volume level.
A long press of the
or
button will exit the Flight Mode completely and stop the recording of flight data.
Exit Flight
(long press)
MSL
Alt
Vert
Speed
Ground
Speed
Wind Direction
and Speed
Track
Wind
4,730
+ 850
20.3
WNW
SW@14
Glide
9.3:1
True (MSL) Altitude
(or Altitude Relative to launch depending on settings)
Averaged Vertical Speed
(default = 5 second average)
Ground Speed
(Instantaneous)
Heading
(Instantaneous)
Glide Ratio
(5 second average)
Exit Flight and Turn Off
(long press)
The last line of the display will show “Calibrating” during the entire calibration process. Please make sure that the front of
the vario has a clear view of the sky throughout this important callibration period.
The wind speed and direction are calculated based on the fastest and slowest ground speed recorded while turning in a
complete circle. As you continue to make additional circles, this value is slowly adjusted and improved. While flying
straight, it stops re-calculating and the last known wind speed and direction are remembered and displayed. The next
first complete circle will then come up with a new value. Elongating your turns and/or flying in a poorly shaped circle
should not affect this calculation. However artificially speeding up and/or slowing down during the circle will alter the
calculated values.
5
Fly Mode - Alternate Screens
By briefly pressing any of the four buttons during the flight, the screen will temporarily display other flight information
for 5 seconds and then return to the default screen.
Page
13:24
Duration
1:56
Distance
6.3
And
Direction
NW
from Start
Temp.
76.5°
Time
Time
Duration of Flight (h:mm)
Distance from Launch (mi. or km)
Direction from Launch
Temperature (°F or °C)
Page
Volume
Pressing the
the volume.
button will display the current volume. Press the
or
button to adjust
Page
Max
Alt
Rel
Alt
4,730
1,290
Max Lift
850
Avg Lift
620
Max Sink -730
Maximum Altitude this flight (ft or m)
Altitudue Relative to launch (ft or m)
(or True (MSL) Altitude depending on settings)
Maximum instantaneous lift this flight (non-averaged) (fpm or m/s)
Maximum averaged lift this flight (fpm or m/s)
Maximum instantaneous sink this flight (fpm or m/s)
Page
Latitude
0.00000
Current GPS Coordinates
Longitude
0.00000
6
Log Book
Use the and
buttons to highlight Log Book and then push the button to enter the Log Book. The h1 can store
flight summary data for up to 300 flights. Pushing the
and
buttons will scroll through the recorded flights.
Pressing the button will allow you to see additional flight details. Note that the data in the log book will be saved even
if the battery is completely discharged or the unit is reset.
Flight #
059
Date:
29/01/2011
15:36
Start Time:
Flight Duration:
Max Dist:
1:40
12.5mi
Max Temp:
Min Temp:
80°F
60°F
Flight #
059
Max Ground
Speed:
[email protected]
Max Wind
Speed:
SW@9
Flight #
Maximum temperature
Minimum temperature
059
Start Alt:
Max Alt:
End Alt:
12,083
18,522
175
Max Lift:
Avg. Lift:
Max Sink:
+520
+480
-510
Start (Launch) Altitude
Max Altitude
End (Land) Altitude
Max Lift (instantaneous)
Max Lift (averaged)
Max Sink (instantaneous)
Maximum Wind Speed
059
End Location
33.81973
Lat:
Long:
-116.96423
> Delete?
• No
o Yes
Flight Duration
Maximum distance from Launch
Flight #
Maximum Ground Speed
Start Location
33.82087
Lat:
Long:
-116.95718
Flight #
Flight Log Number
Launch Date
Launch Time
Launch GPS Coordinates
Landing GPS Coordinates
059
Use the button to highlight Yes and then push the button to
delete this flight. Note: this action permanently deletes this flight
number from the log book and the remaining flights will not be
re-numbered.
7
Settings
To enter the Settings Menu, highlight Settings on the main menu and press the button. From this page you can select
which catagory of settings you wish to modify. There are currently nine choices: Altimeter, GPS, Beep, Flight, Date & Time,
Units, Compass, Memory, Display, and Language. All of these settings are saved even if the battery is completely
discharged.
Altimeter
Altitude Calibration
• GPS (WGS84 Geoid)
o QNH Pressure
> 1013.25 hPa
o Altitude
>
1,752 ft
This setting allows you to select whether to use the GPS to calibrate the pressure altitude
prior to launch, or to set the altitude manually. The GPS uses the WGS-84 Geoid method to
determine the altitude. This should approximately match standard pressure altitude.
The QNH Pressure is the the extrapolated barometric pressure at sea level. This can be
found by contacting your local airport. Some competitions may require you to calibrate
the vario using this method.
Alternatively, if you know the altitude of your launch, you can manually calibrate the vario
based on this.
Altimeter cont.
Displayed Altitude
• Pressure
o GPS (WGS84 Ellips)
This setting allows you to select whether to display the altitude based on pressure or GPS.
The pressure altitude is what normally defines airspace. The WGS84 Ellipsoid altitude is
closest to what would be shown in Google earth and other maping software. The IGC
track log file records both the pressure and GPS altitude 1x per second.
Altitude Reference
• True (MSL)
o Relative to Launch
This setting selects what altitude is displayed on the main fly screen. The Relative to
Launch altitude is automatically reset to zero for every flight when you first enter the fly
mode. Relative altitude may be more convenient for some site flying.
GPS
GPS Units
• DD.ddddd°
o DD°MM.mm’
o DD°MM’SS”
This setting selects the units for GPS display
Decimal Degrees
Degrees, Decimal Minutes
Degrees, Minutes, Seconds
Beep
Beep Style
• Short
o Long
o Sweep
Sink Alarm
• Alarm On
o Alarm Off
Sink Rate
>
590 ft/min
Ascent has three beep options. Short (which is “quieter” and sounds closer to our v1
Standard beep), Long (which sounds “louder”), and Sweep, which updates the frequency
of the tone mid-beep to the latest vertical speed information. Note that longer beeps, and
louder volume settings require more power and slightly reduce the battery life. Therefore
the “Sweep” beep is limited to medium volume to ensure a minimum of 10 flight hours.
It is possible to turn the “Sink Alarm” on and off.
This is the instanteanous negative vertical speed required for the sink alarm to go off.
8
Flight
Vertical Speed Avg.
> 01 seconds
This is the number of seconds over which the displayed vertical speed is averaged. The
“beep” always uses the instantaneous vertical speed.
Start Flight
> 07 mph
After entering Fly Mode, the unit waits until this customized velocity threshold is crossed.
A series of beeps will play to indicate that the flight has initiated.
Preflight Beep
• Off
o On
Prior to a flight being initiated the “preflight beeps” can be suppressed. This prevents the
unit from making annoying and battery wasting beeps prior to launching.
Date & Time
Time: 14:19
UTC Offset:
> -8:00
Date
07/20/2012
Date Format
o DD/MM/YYYY
• MM/DD/YYYY
The time is set automatically using the GPS signal, however you need to enter the
UTC offset manually.
The date is set automatically using the GPS signal, however you can choose which
format you would prefer the date displayed.
Units
Altitude
o m
• ft
Distance
o km
• mi
Temperature
o °C
• °F
Units Continued...
On these pages, you can
customize the displayed
units.
Vertical Speed
o m/s
• fpm
Ground Speed
o kph
• mph
Compass
Compass
• Cardinal (WSW)
o Degrees (252°)
On this page, you can customize the way Compass directions are displayed.
9
Memory
Flight Log Book
125 Flights
62.5% Full
> Clear Log Book?
There are a maximum of 300 Log summaries available in the Flight Log Book. When
these are full, it will be necessary to clear the Log Book before recording more tracks.
There are additionally up to 50 hours of track log (igc/kml) memory available
(1-second intervals). After this memory is full, it will start overwriting existing tracks
(oldest first).
Display
Contrast
> 3
The display contrast is pre-caliblrated, however can be adjusted here if desired. This
setting makes the entire display lighter or darker.
Language
o
•
o
o
o
o
o
Deutsch
English
Español
Français
Italiano
Norsk
日本語
Here it is possible to select the language for the vario. Please contact us if you are
missing your language, or if you find a translation error.
Info
To enter the Info screen, highlight “Info” on the main menu and press the
Ascent h1
Software: v1.303
Serial# 2C2001AC
07/20/2012
10:38:05
Ascent hardware version
Ascent software version
Unit Serial Number
Date
Time
Altitude:
Lat:
Long:
Altitude
Latitude
Longitude
71.3m
0.00000
0.00000
button.
10
Connecting to a Windows Computer
Please navigate to the support tab of www.ascentvario.com to download and install the “h1 Ascent Control (PC)”
software. Please note that Microsoft.NET 4.0 (or newer) needs to be installed on your computer. This is pre-installed on
most computers, but if not a quick search on the internet will find the download link.
To prevent any issues regarding saving tracks or driver software, right click on the software and select Properties. Then
check “Run this program in XP Compatibility mode” and “Run this program as administrator” as shown below.
To connect your variometer to a computer plug the micro USB end of the supplied cable into the product. Plug the other
end of the cable into a computer USB port.
If you have any difficulties with this process, please send an e-mail to [email protected]. Please include the vario
firmware version, and what operating system you have (Windows XP, Windows 8, etc.).
11
Ascent Control for Windows
When you connect the h1 to your pc, the Ascent Control software should automatically recognize the device and display
the Serial Number. If you have an internet connection, the software will compare the firmware on your vario with the
latest version available on our web site. If the firmware on your h1 is out of date, it will recommend that you download
and install the latest version. Click “About” to see the current version, and click the link (if available) to download the
newer firmware. Then use File -> Upgrade Firmware to upgrade to the newer version. Some versions of Chrome do not
allow the link to work. If you have any problems, please send an e-mail to [email protected].
It is necessary to fill out the first 3 lines of the “Pilot Data” form (Pilot,
Glider Type, and Glider ID) in order for the downloaded .igc tracks to
be “valid” and accepted by most competitions. This information,
along with the Competition Class, Competition ID, and Site will be
stored on the vario and hardware encrypted into the header of the
downloaded .igc file. It is not possible to edit the .igc file without
making the g-record “invalid”.
Select the file you want to download using the pull-down menu, and
then select the format (.igc for gliding competitions such as Leonardo, or .kml for Google Earth), then click “Download Tracklog”.
Click “Download Log Book” to download the complete log book on
the vario in .csv (comma seperated values) format. This file can be
easily imported into a spreadsheet program such as Excel.
The h1 is compatible with several 3rd party softwares such as GpsDump, GpsDump for Android, and ParaFlightBook.
These pc softwares use the Ascent Control driver, so it is necessary to first install the Ascent Control software before
using them.
12
Connecting to an Apple Computer - (10.7 and newer)
Please navigate to the support tab of www.ascentvario.com to download and install the “h1 Ascent Control (Mac)”
software. Drag the downloaded “h1 Ascent Control.dmg” to your Applications folder.
When you connect the h1 to your Mac, the
Ascent Control software should automatically
recognize the device and display the Serial
Number and current firmware version. If you
have an internet connection, the software will
compare the firmware on your vario with the
latest version available on our web site. If the
firmware on your h1 is out of date, it will
recommend that you download and install the
latest version.
It is necessary to fill out the first 3 lines of the “Pilot Data” form (Pilot,
Glider Type, and Glider ID) in order for the downloaded .igc tracks to
be “valid” and accepted by most competitions. This information,
along with the Competition Class, Competition ID, and Site will be
stored on the vario and hardware encrypted into the header of the
downloaded .igc file. After downloading, it is not possible to edit the
.igc file without making the g-record “invalid”.
Select the file you want to download using the pull-down menu, and
then select the format (.igc for gliding competitions such as Leonardo, or .kml for Google Earth), then click “Download Tracklog”.
Click “Download Log Book” to download the complete log book on
the vario in .csv (comma seperated values) format. This file can be
easily imported into a spreadsheet program such as Excel.
13
Care of Product
Your product is constructed of high quality materials and does not require maintenance other than cleaning. Clean the
product using a soft cloth dampened with a mild detergent solution and then wipe dry. AVOID chemical cleaners and
solvents that may damage plastic and braided nylon components.
Do not store the product where prolonged exposure to sun, heat, rain, snow, or extreme cold may result in permanent
damage.
Do not store the unit where the buttons can be depressed as this may lead to the battery being drained.
The product is not waterproof so do not immerse it in water.
Specifications
Altimeter:
High resolution (10cm), temperatue corrected, pressure sensor - sampling 32x per second
GPS or user calibrated altitude
True and Relative (to launch) altitude
Display in meters or feet with 1 meter (3 ft) resolution
GPS:
48 Channel GPS Receiver
Variometer:
Customizably averaged digital display with 0.1 m/s (20 ft/min) resolution
Instantaneous audio with adjustable volume
Sink alarm with user selectable threshold
Temperature:
Ambient temperature in Fahrenheit or Celsius with 1 degree resolution
Memory:
Automatically records Flight Log summary data for up to 300 flights
Automatically records up to 50 hours of 1-second interval detailed tracklog data in igc or kml format
Display:
Black & White Transflective Graphic LCD with 128 x 128 pixel resolution
Battery:
Custom 830 mAh rechargable lithium-ion battery with Sanyo cell
Physical Properties:
8.3cm (3.28”) x 5.4cm (2.13”) x 1.5cm (0.59”)
93g (3.3 oz)
14
Software License Agreement
By using you Ascent Products variometer you agree to be bound by the terms and conditions of the following software
license agreement.
Ascent Products grants you a limited license to use the software embedded in this device in the normal operation of the
product. Title, ownership rights, and intellectual property rights of the software remain Ascent Products.
Your product’s software is property of Ascent Products and is protected under the United States copyright laws and
international copyright treaties. The structure, organization, and code of the software are valuable trade secrets to Ascent
Products and shall remain so. You agree not to decompile or reverse engineer the software to be used in any other way.
You agree not to export or re-export the software to any country in violation of the export control laws of the United
States
Limited Warranty
Your Ascent Products vario is warranted to be free of defects in materials or workmanship for two years from the date of
purchase. Within this period Ascent Products at its sole option may repair or replace any parts that fail in normal use.
These repairs or replacement will be made at no charge to the customer. The customer is responsible for shipping and
handling of the item.
The warranty does not cover failures due to abuse, misuse, accident, liquid ingress, or unauthorized alterations or repairs.
To obtain warranty service, contact Ascent Products by e-mail. Do not return the unit without first contacting Ascent
Products.
Contact Us
For questions or assistance with your vario please contact
www.ascentvario.com
[email protected]
Ascent Products
14781 Pomerado Road, Suite #210
Poway, CA 92064
USA
Please also “like” our facebook page (http://www.facebook.com/ascent.vario) for occasional updates.
15