1
Facility Commander 2.2
Installation Manual
Copyright
Copyright © 2009, GE Security Inc. All rights reserved.
This document may not be copied or otherwise reproduced, in whole or in part, except as
specifically permitted under US and international copyright law, without the prior written
consent from GE.
Document number/ 460570003D (April 2009).
Disclaimer
THE INFORMATION IN THIS DOCUMENT IS SUBJECT TO CHANGE WITHOUT NOTICE. GE ASSUMES
NO RESPONSIBILITY FOR INACCURACIES OR OMISSIONS AND SPECIFICALLY DISCLAIMS ANY
LIABILITIES, LOSSES, OR RISKS, PERSONAL OR OTHERWISE, INCURRED AS A CONSEQUENCE,
DIRECTLY OR INDIRECTLY, OF THE USE OR APPLICATION OF ANY OF THE CONTENTS OF THIS
DOCUMENT. FOR THE LATEST DOCUMENTATION, CONTACT YOUR LOCAL SUPPLIER OR VISIT US
ONLINE AT WWW.GESECURITY.COM.
This publication may contain examples of screen captures and reports used in daily operations.
Examples may include fictitious names of individuals and companies. Any similarity to names
and addresses of actual businesses or persons is entirely coincidental.
Trademarks and patents
GE and the GE monogram are registered trademarks of General Electric.
Facility Commander product and logo are trademarks of GE Security.
Other trade names used in this document may be trademarks or registered trademarks of the
manufacturers or vendors of the respective products.
Software license agreement
Intended use
The EULA is included on the product CD.
Use this product only for the purpose it was designed for; refer to the data sheet and user
documentation. For the latest product information, contact your local supplier or visit us online
at www.gesecurity.com.
iii
Contents
Preface . . . . . . . . . . . . . . . . . . . . . . . . . . . . . . . . . . . . . . . . . . . . . . . . . . . . . . . . . . . . . . . . . . . . . . . . . . . . . . . . . . . . . . . . . v
Related Documentation . . . . . . . . . . . . . . . . . . . . . . . . . . . . . . . . . . . . . . . . . . . . . . . . . . . . . . . . . . . . . . . . . . . . . . . . . . . . . .v
Conventions used in this document . . . . . . . . . . . . . . . . . . . . . . . . . . . . . . . . . . . . . . . . . . . . . . . . . . . . . . . . . . . . . . . . . . vi
Safety terms and symbols. . . . . . . . . . . . . . . . . . . . . . . . . . . . . . . . . . . . . . . . . . . . . . . . . . . . . . . . . . . . . . . . . . . . . . . . . . . vi
Chapter 1.
Introduction . . . . . . . . . . . . . . . . . . . . . . . . . . . . . . . . . . . . . . . . . . . . . . . . . . . . . . . . . . . . 1
Product overview . . . . . . . . . . . . . . . . . . . . . . . . . . . . . . . . . . . . . . . . . . . . . . . . . . . . . . . . . . . . . . . . . . . . . . . . . . . . . . . . 2
Video management . . . . . . . . . . . . . . . . . . . . . . . . . . . . . . . . . . . . . . . . . . . . . . . . . . . . . . . . . . . . . . . . . . . . . . . . . . . . . . 3
Centralized video management. . . . . . . . . . . . . . . . . . . . . . . . . . . . . . . . . . . . . . . . . . . . . . . . . . . . . . . . . . . . . . . . . . . . . . .3
Distributed video management . . . . . . . . . . . . . . . . . . . . . . . . . . . . . . . . . . . . . . . . . . . . . . . . . . . . . . . . . . . . . . . . . . . . . . .4
Software inventory . . . . . . . . . . . . . . . . . . . . . . . . . . . . . . . . . . . . . . . . . . . . . . . . . . . . . . . . . . . . . . . . . . . . . . . . . . . . . . 5
Minimum system requirements . . . . . . . . . . . . . . . . . . . . . . . . . . . . . . . . . . . . . . . . . . . . . . . . . . . . . . . . . . . . . . . . . . . 6
Facility Commander Server. . . . . . . . . . . . . . . . . . . . . . . . . . . . . . . . . . . . . . . . . . . . . . . . . . . . . . . . . . . . . . . . . . . . . . . . . . .6
Remote Media Server . . . . . . . . . . . . . . . . . . . . . . . . . . . . . . . . . . . . . . . . . . . . . . . . . . . . . . . . . . . . . . . . . . . . . . . . . . . . . . . .7
Client Workstations and Web Browser . . . . . . . . . . . . . . . . . . . . . . . . . . . . . . . . . . . . . . . . . . . . . . . . . . . . . . . . . . . . . . . .8
Checklist . . . . . . . . . . . . . . . . . . . . . . . . . . . . . . . . . . . . . . . . . . . . . . . . . . . . . . . . . . . . . . . . . . . . . . . . . . . . . . . . . . . . . . . 9
Connecting hardware devices . . . . . . . . . . . . . . . . . . . . . . . . . . . . . . . . . . . . . . . . . . . . . . . . . . . . . . . . . . . . . . . . . . . 10
Connecting server systems. . . . . . . . . . . . . . . . . . . . . . . . . . . . . . . . . . . . . . . . . . . . . . . . . . . . . . . . . . . . . . . . . . . . . . . . . 10
Connecting intercom hardware. . . . . . . . . . . . . . . . . . . . . . . . . . . . . . . . . . . . . . . . . . . . . . . . . . . . . . . . . . . . . . . . . . . . . 11
Connecting analog CCTV switchers . . . . . . . . . . . . . . . . . . . . . . . . . . . . . . . . . . . . . . . . . . . . . . . . . . . . . . . . . . . . . . . . . 13
Chapter 2.
Upgrading Facility Commander . . . . . . . . . . . . . . . . . . . . . . . . . . . . . . . . . . . . . . . . . 17
Upgrading from version 2.1 to 2.2 . . . . . . . . . . . . . . . . . . . . . . . . . . . . . . . . . . . . . . . . . . . . . . . . . . . . . . . . . . . . . . . . 18
Migration background Information . . . . . . . . . . . . . . . . . . . . . . . . . . . . . . . . . . . . . . . . . . . . . . . . . . . . . . . . . . . . . . . . . 18
Database migration. . . . . . . . . . . . . . . . . . . . . . . . . . . . . . . . . . . . . . . . . . . . . . . . . . . . . . . . . . . . . . . . . . . . . . . . . . . . . . . . 19
Obtaining the License Key . . . . . . . . . . . . . . . . . . . . . . . . . . . . . . . . . . . . . . . . . . . . . . . . . . . . . . . . . . . . . . . . . . . . . . . . . . 22
Upgrading remote media servers . . . . . . . . . . . . . . . . . . . . . . . . . . . . . . . . . . . . . . . . . . . . . . . . . . . . . . . . . . . . . . . . . . . 22
Upgrading client workstations . . . . . . . . . . . . . . . . . . . . . . . . . . . . . . . . . . . . . . . . . . . . . . . . . . . . . . . . . . . . . . . . . . . . . . 22
Chapter 3.
Installing Linux . . . . . . . . . . . . . . . . . . . . . . . . . . . . . . . . . . . . . . . . . . . . . . . . . . . . . . . . 23
Overview . . . . . . . . . . . . . . . . . . . . . . . . . . . . . . . . . . . . . . . . . . . . . . . . . . . . . . . . . . . . . . . . . . . . . . . . . . . . . . . . . . . . . . 24
Installing Red Hat Linux 5.3 on a Facility Commander 2.2 Application Server . . . . . . . . . . . . . . . . . . . . . . . . . 24
Chapter 4.
Installing AIX . . . . . . . . . . . . . . . . . . . . . . . . . . . . . . . . . . . . . . . . . . . . . . . . . . . . . . . . . . 33
Overview . . . . . . . . . . . . . . . . . . . . . . . . . . . . . . . . . . . . . . . . . . . . . . . . . . . . . . . . . . . . . . . . . . . . . . . . . . . . . . . . . . . . . . 34
Install AIX. . . . . . . . . . . . . . . . . . . . . . . . . . . . . . . . . . . . . . . . . . . . . . . . . . . . . . . . . . . . . . . . . . . . . . . . . . . . . . . . . . . . . . 34
iv
Facility Commander 2.2
Installation Manual
Chapter 5.
Installing Databases . . . . . . . . . . . . . . . . . . . . . . . . . . . . . . . . . . . . . . . . . . . . . . . . . . . 37
Overview . . . . . . . . . . . . . . . . . . . . . . . . . . . . . . . . . . . . . . . . . . . . . . . . . . . . . . . . . . . . . . . . . . . . . . . . . . . . . . . . . . . . . . 38
Linux Informix Database . . . . . . . . . . . . . . . . . . . . . . . . . . . . . . . . . . . . . . . . . . . . . . . . . . . . . . . . . . . . . . . . . . . . . . . . 38
Installing the Informix database. . . . . . . . . . . . . . . . . . . . . . . . . . . . . . . . . . . . . . . . . . . . . . . . . . . . . . . . . . . . . . . . . . . . . 38
Installing the Linux Informix Schema . . . . . . . . . . . . . . . . . . . . . . . . . . . . . . . . . . . . . . . . . . . . . . . . . . . . . . . . . . . . . . . . 42
AIX Informix Database . . . . . . . . . . . . . . . . . . . . . . . . . . . . . . . . . . . . . . . . . . . . . . . . . . . . . . . . . . . . . . . . . . . . . . . . . . 45
Moving Physical Volumes . . . . . . . . . . . . . . . . . . . . . . . . . . . . . . . . . . . . . . . . . . . . . . . . . . . . . . . . . . . . . . . . . . . . . . . . . . . 45
Creating the user accounts . . . . . . . . . . . . . . . . . . . . . . . . . . . . . . . . . . . . . . . . . . . . . . . . . . . . . . . . . . . . . . . . . . . . . . . . . 45
Creating the database logical volumes . . . . . . . . . . . . . . . . . . . . . . . . . . . . . . . . . . . . . . . . . . . . . . . . . . . . . . . . . . . . . . 47
Allocating space for the databases. . . . . . . . . . . . . . . . . . . . . . . . . . . . . . . . . . . . . . . . . . . . . . . . . . . . . . . . . . . . . . . . . . 48
File system sizing. . . . . . . . . . . . . . . . . . . . . . . . . . . . . . . . . . . . . . . . . . . . . . . . . . . . . . . . . . . . . . . . . . . . . . . . . . . . . . . . . . . 49
Installing the AIX Informix database . . . . . . . . . . . . . . . . . . . . . . . . . . . . . . . . . . . . . . . . . . . . . . . . . . . . . . . . . . . . . . . . . 51
Installing the AIX Informix Schema . . . . . . . . . . . . . . . . . . . . . . . . . . . . . . . . . . . . . . . . . . . . . . . . . . . . . . . . . . . . . . . . . . 54
Chapter 6.
Installing Facility Commander applications . . . . . . . . . . . . . . . . . . . . . . . . . . . . . . 57
Overview . . . . . . . . . . . . . . . . . . . . . . . . . . . . . . . . . . . . . . . . . . . . . . . . . . . . . . . . . . . . . . . . . . . . . . . . . . . . . . . . . . . . . . 58
Installing Facility Commander 2.2 Server . . . . . . . . . . . . . . . . . . . . . . . . . . . . . . . . . . . . . . . . . . . . . . . . . . . . . . . . . 58
Continuing the Server Installation . . . . . . . . . . . . . . . . . . . . . . . . . . . . . . . . . . . . . . . . . . . . . . . . . . . . . . . . . . . . . . . . . . . 60
Media server and client Web installations . . . . . . . . . . . . . . . . . . . . . . . . . . . . . . . . . . . . . . . . . . . . . . . . . . . . . . . . . . . 62
License Manager . . . . . . . . . . . . . . . . . . . . . . . . . . . . . . . . . . . . . . . . . . . . . . . . . . . . . . . . . . . . . . . . . . . . . . . . . . . . . . . 63
Installing the Media Server on the Facility Commander Server . . . . . . . . . . . . . . . . . . . . . . . . . . . . . . . . . . . . . . 64
Installing Remote Media Servers . . . . . . . . . . . . . . . . . . . . . . . . . . . . . . . . . . . . . . . . . . . . . . . . . . . . . . . . . . . . . . . . . 66
Installing the Media Server from the Facility Commander Server. . . . . . . . . . . . . . . . . . . . . . . . . . . . . . . . . . . . . . 66
Installing the Media Server from the Installation DVD. . . . . . . . . . . . . . . . . . . . . . . . . . . . . . . . . . . . . . . . . . . . . . . . . 67
Installing Client Workstations. . . . . . . . . . . . . . . . . . . . . . . . . . . . . . . . . . . . . . . . . . . . . . . . . . . . . . . . . . . . . . . . . . . 69
Installing the Client from the Facility Commander Server . . . . . . . . . . . . . . . . . . . . . . . . . . . . . . . . . . . . . . . . . . . . . 69
Installing the Client from the Installation DVD . . . . . . . . . . . . . . . . . . . . . . . . . . . . . . . . . . . . . . . . . . . . . . . . . . . . . . . . 70
Host File Setup . . . . . . . . . . . . . . . . . . . . . . . . . . . . . . . . . . . . . . . . . . . . . . . . . . . . . . . . . . . . . . . . . . . . . . . . . . . . . . . . . 71
Starting Facility Commander . . . . . . . . . . . . . . . . . . . . . . . . . . . . . . . . . . . . . . . . . . . . . . . . . . . . . . . . . . . . . . . . . . . . 73
Chapter 7.
Contacting technical support . . . . . . . . . . . . . . . . . . . . . . . . . . . . . . . . . . . . . . . . . . . 75
Contacting technical support. . . . . . . . . . . . . . . . . . . . . . . . . . . . . . . . . . . . . . . . . . . . . . . . . . . . . . . . . . . . . . . . . . . . 76
Appendix A. Time Synchronization (NTP Setup) . . . . . . . . . . . . . . . . . . . . . . . . . . . . . . . . . . . . . . . 77
Overview . . . . . . . . . . . . . . . . . . . . . . . . . . . . . . . . . . . . . . . . . . . . . . . . . . . . . . . . . . . . . . . . . . . . . . . . . . . . . . . . . . . . . . 78
Achieving Time Synchronization . . . . . . . . . . . . . . . . . . . . . . . . . . . . . . . . . . . . . . . . . . . . . . . . . . . . . . . . . . . . . . . . . 78
Manual NTP Setup on the Picture Perfect Server . . . . . . . . . . . . . . . . . . . . . . . . . . . . . . . . . . . . . . . . . . . . . . . . . . . 79
Picture Perfect (Linux System). . . . . . . . . . . . . . . . . . . . . . . . . . . . . . . . . . . . . . . . . . . . . . . . . . . . . . . . . . . . . . . . . . . . . . . 79
Picture Perfect (AIX system) . . . . . . . . . . . . . . . . . . . . . . . . . . . . . . . . . . . . . . . . . . . . . . . . . . . . . . . . . . . . . . . . . . . . . . . . . 80
v
Preface
This document describes how to install Facility Commander and its components. It also includes instructions to
connect hardware and other peripheral devices.
There is also information describing how to contact technical support if you have questions or concerns.
This document is intended for system administrators, business partners, or installer technicians responsible for
system installation and integration.
Installer technicians should be familiar with personal computers, client and server relationships, databases,
Web browsers, and graphical user interface (GUI) navigation. They should also have a working knowledge of:
•
•
Picture Perfect application
Database operations
Everyone should read the chapters, such as the Introduction, database, and any other components needed for
system installation and integration.
Related Documentation
The following documents contain detailed information about specific software and operating systems:
•
•
•
Facility Commander Administration Guide
This document describes Facility Commander and its components. It describes the Facility
Commander interface and contains step-by-step procedures to use the application.
Picture Perfect 4.0 Installation Manual
This document describes how to install and configure the Picture Perfect application.
Picture Perfect 4.0 User Manual
This document describes how to configure and manage the Picture Perfect application. It describes the
Picture Perfect interface and contains step-by-step procedures to use the application.
More documentation is available about these products. Also, refer to other vendor’s or manufacturer’s
documentation as well.
vi
Facility Commander 2.2
Installation Manual
Conventions used in this document
The following conventions are used in this document:
Bold
Menu items and buttons.
Italic
Emphasis of an instruction or point; special terms.
File names, path names, windows, panes, tabs, fields, variables, and other GUI elements.
Titles of books and various documents.
Blue italic
(Electronic version.) Hyperlinks to cross-references, related topics, and URL addresses.
Monospace
Text that displays on the computer screen.
Programming or coding sequences.
Safety terms and symbols
These terms may appear in this manual:
CAUTION: Cautions identify conditions or practices that may result in damage to the equipment or other property.
WARNING: Warnings identify conditions or practices that could result in equipment damage or serious personal injury.
When disposing of this product, please separate it from other waste and deliver it to the appropriate recycling center in
your country, in accordance with Waste Electrical and Electronic Equipment (WEEE) directive 2002/96/EC and amendment
2003/108/EC and their respective national equivalents. For more information, visit www.recyclethis.com.
Chapter 1 Introduction
This chapter provides an overview of your Facility Commander 2.2, including
minimum hardware/software requirements and steps you need to perform before
you begin installing, configuring, and using your Facility Commander 2.2.
In this chapter:
Product overview . . . . . . . . . . . . . . . . . . . . . . . . . . . . . . . . . . . . . . . . . . . 2
Video management . . . . . . . . . . . . . . . . . . . . . . . . . . . . . . . . . . . . . . . . . . 3
Software inventory . . . . . . . . . . . . . . . . . . . . . . . . . . . . . . . . . . . . . . . . . . 5
Minimum system requirements . . . . . . . . . . . . . . . . . . . . . . . . . . . . . . . . . 6
Checklist . . . . . . . . . . . . . . . . . . . . . . . . . . . . . . . . . . . . . . . . . . . . . . . . . . 9
Connecting hardware devices . . . . . . . . . . . . . . . . . . . . . . . . . . . . . . . . . 10
2
Facility Commander 2.2
Installation Manual
Product overview
Facility Commander is a security integration platform that provides integrated digital video, analog video
switchers, intercom, and intrusion with access control. It interfaces with Picture Perfect, which continues to
perform all access control, alarm, and reporting tasks.
The main features of Facility Commander include a comprehensive alarm management system with direct
access to graphical maps and video clips from the Alarm Monitor, and a high-level command and control
interface to Digital Video Recorders (DVRs) and their connected cameras.
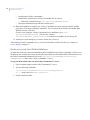
Configuring Facility Commander is accomplished using a Web browser, such as Internet Explorer. Operators
select which facilities, doors, inputs, and outputs they want to control from Facility Commander and import
these records from the access control system.
The alarm events associated with these devices can be configured to perform any number of actions in Facility
Commander. For example, if a door has a video camera monitoring it, whenever a Door Forced alarm occurs,
the system can be configured to send an e-mail notice to the Security Supervisor, and also tag the video clip so
it can be reviewed later.
Monitoring the system is accomplished using the Facility Commander Launcher, which provides the capability
to monitor alarms and control video cameras. All alarms generated by Picture Perfect are sent to the access
control system’s Alarm Monitor, and also to the Facility Commander Alarm Monitor. From the Facility
Commander Alarm Monitor, security personnel can perform all of the operations that they can do on Picture
Perfect.
The Facility Commander Command and Control client features include:
•
•
•
•
•
•
•
•
•
Create or import site maps for graphical representation of device and alarm locations
Associate symbols and icons with devices, such as doors, intercoms, intrusion devices, and cameras
Display a graphical map showing the location of an alarm and the alarm state
Control devices from graphical maps, such as locking or unlocking a door
Acknowledge alarms from either the graphical map or from the alarm monitor
View recorded video clips associated with alarm events
View live video from fixed or PTZ cameras
Control a PTZ camera on-screen by using the mouse to pan, tilt, and zoom
Search for video clips stored on a DVR by event, event type, camera, or DVR
Chapter 1
Introduction
Video management
The key feature of Facility Commander is integrated digital video. There are two architectural configurations
available, depending on the organization’s size and geographic locations.
If the site is relatively small or in one central location, then the Media Server can be installed on the Facility
Commander Application Server to manage the video services.
In large environments with several geographically distributed sites, it may be undesirable to transmit video
clips across the network. In this case, adding a Remote Media Server to the system improves the video
transmission process.
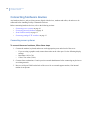
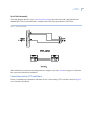
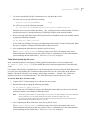
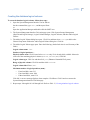
Centralized video management
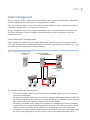
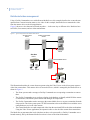
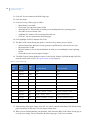
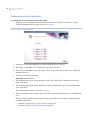
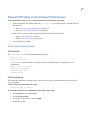
Using a single server configuration, this example describes the events that occur when an operator wants to
view video. The Media Server, installed on the Facility Commander Application Server shown in Figure 1, has
two DVRs with four cameras and two client workstations.
Figure 1. Single server with centralized video
Access Control
Server
Facility Commander
Server/Media Server
Facility Commander
Clients
DVR 1
Cam 1 Cam 2
DVR 2
Cam 3
Cam 4
The illustration includes the following process:
•
•
•
•
The client workstation sends a message to the Facility Commander Application Server requesting a
connection to camera three.
The Facility Commander Application Server performs a lookup in the database to identify which DVR
the camera is connected to, and which system controls and manages the components. In this example,
there is only one Facility Commander Application Server in the network.
The Facility Commander sends a message to the Media Server (installed on the Facility Commander
Application Server) to expect a connection from the client system. The client system opens a TCP/IP
connection socket to the Media Server with the server configuration to receive the video stream.
The Media Server sends compressed video from the associated DVR to the client workstations. Using
the Video Viewer application, the operator is able to view the video stream from camera three.
3
4
Facility Commander 2.2
Installation Manual
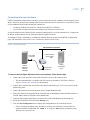
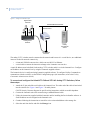
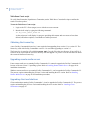
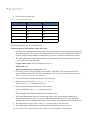
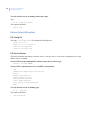
Distributed video management
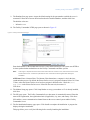
Using a Facility Commander server with a Remote Media Server, this example describes the events when an
operator from a remote location wants to view video. In this example, the Media Server transmits the video
from the camera device to the client application.
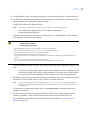
Figure 2 shows two sites that can be located anywhere — in the same city or different cities. Both sites have
two DVRs, four cameras, and two client workstations.
Figure 2. Typical configuration with Remote Media Server
Access Control
Server
Facility Commander
Server
Clients
Site One
DVR 1
Remote Media Server
Cam 1 Cam 2
Site Two
DVR 2
Cam 3
Cam 4
This illustration describes the events when an operator using the Video Viewer on the client system requests
video from camera three. This camera device is located at site two, which is managed by the Media Server as
shown in Figure 2.
•
•
•
•
The client system sends a message to Facility Commander server requesting a connection to camera
three.
The Facility Commander server performs a lookup in the database to identify which DVR the camera
is connected to, and which system controls and manages the components.
The Facility Commander sends a message to the remote Media Server to expect a connection from the
client system. The client system opens a TCP/IP connection socket to the Media Server with the server
configuration to receive the video stream.
The remote Media Server sends compressed video from the associated DVR to the client workstations.
Using the Video Viewer application, the operator is able to view the video stream from camera three.
The Media Server guarantees that local video does not have to be processed by a Facility Commander server
located remotely, but by the Remote Media Server that is closer to the client workstations.
Chapter 1
Introduction
Software inventory
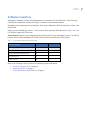
All Facility Commander software and documentation are available on CD and DVD discs. The GE Security
CD/DVD label information includes the Facility Commander version number and date.
Depending on the operating system and database, there may be additional CD/DVDs from other vendors, such
as Microsoft.
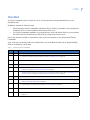
Before you start installing any software, verify you have all the required CD/DVDs. Refer to Table 1 for a list
of CD/DVDs supplied by GE Security.
Picture Perfect Users: If you are integrating Picture Perfect with a Facility Commander system, you will also
need the Picture Perfect Installation CD for the Picture Perfect External Interface (EIF) package.
Table 1.
List of CD/DVDs shipped with Facility Commander
Facility Commander
Operating System
Linux
AIX
Database
Informix
Informix
Facility Commander Installation DVD
Documentation CD
Video Drivers CD
Refer to the following sections for the list of minimum system requirements:
•
•
•
Facility Commander Server on page 6
Remote Media Server on page 7
Client Workstations and Web Browser on page 8
5
6
Facility Commander 2.2
Installation Manual
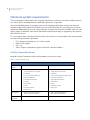
Minimum system requirements
The size and number of disks that the server requires depends on several factors, such as the database software,
size of the Facility Commander database, and RAID requirements, if applicable.
Due to the demanding nature of streaming video over IP, managing multiple video streams from the newly
introduced support for SymSuite and VisioWave devices requires increased CPU processing power, memory,
and network bandwidth. System-wide video performance is equally affected by the resolution, frame rate, and
quality settings of individual video streams and should be adjusted accordingly as supported by the SymSuite
and VisioWave devices.
FC servers and/or client workstations used for hosting video devices or viewing multiple video streams should
meet the following minimum requirements
•
•
•
•
CPU: Dual processor/Dual core at 2.5 GHz or higher
RAM: 4 GB or higher
NIC: 1 Gb
Video: Graphics card hardware support for DirectX 9 with Pixel Shader 3
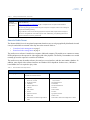
Facility Commander Server
Install the Facility Commander software and its database on the server system.
Table 2.
Facility Commander Server
Facility Commander Server
Operating
System
• Red Hat Linux 5.3
• AIX 6.1
Hardware
• Dell Power-Edge 2900or 2950, Dual
processor/Dual core, 2.5 GHz
• 4 GB RAM;
• Four 73 GB SCSI hard drives
• DVD/CD-ROM drive
• 160 GB SCSI tape drive
• 1 Gb NIC
• 56K modem
• Mouse
• Graphical monitor
• Video card
•
•
•
•
•
•
•
•
•
•
RAID Options
• RAID 1 (two pair hard drives)
RAID 10 (four hard drives)
• RAID 1 (two pair hard drives)
RAID 10 (four hard drives)
Databases
Supported
• Informix 11.5 UC3 or newer
• Informix 11.5 UC3 or newer
IBM eServer P5 9111-520
2-way 1.5 GHz 64 bit CPUs
4 GB RAM;
Four 73 GB 10K RPM SCSI disk drives
IDE Slimline DVD drive
1000 Mbps Ethernet NIC
56K modem
Mouse
Graphical monitor
Video card
Chapter 1
Introduction
Table 2.
Facility Commander Server (continued)
Facility Commander Server (continued)
Additional
Information for
Linux users
Visit the Web site
http://www.redhat.com/hardware to get a complete list of computers and hardware
supported by Red Hat.
GE Security strongly recommends using the computers it supplies, which have undergone
significant reliability testing.
If you decide to use non-GE Security supplied computers and require technical support,
service is chargeable at normal GE Support rates. Additionally, compatibility with future
product releases cannot be guaranteed.
Remote Media Server
The Remote Media Server is an optional component when there are several geographically distributed sites and
it may be undesirable to transmit video clips across the network. Refer to:
•
•
Centralized video management on page 3
Distributed video management on page 4
The media server software is installed on a separate, dedicated computer. The media server connects to remote
DVRs and processes the requests for video tagging and video playback. The Facility Commander server would
normally process the requests in a smaller environment.
The media server runs the media software; does not have a user interface; and does not contain a database. In
addition, some digital video software interfaces are Windows DLL-dependent. In those cases, a Windowsbased Media Server is required to play video.
Table 3.
Remote Media Server Requirements
Remote Media Server
Operating System
Windows 2008 Server
Red Hat Linux 5.3
Windows XP Professional SP3
Hardware
• Dell Power-Edge 1900, Dual processor/
Dual core, 2.5 GHz
• 80 GB hard drive
• 4 GB RAM;
• DVD/CD-ROM drive
• 1 Gb NIC
• 56K modem
• mouse
• graphical monitor
• Video card
• Alternative: Dell Power-Edge 2900 or
2950
• Dell Power-Edge 1900, Dual processor/Dual
core, 2.5 GHz
• 80 GB hard drive
• 4 GB RAM;
• DVD/CD-ROM drive
• 1 Gb NIC
• 56K modem
• mouse
• graphical monitor
• Video card
• Alternative: Dell Power-Edge 2900 or 2950
7
8
Facility Commander 2.2
Installation Manual
Client Workstations and Web Browser
The following section lists the minimum system requirements for the client workstations and Web Browser.
Table 4.
Client Workstations and Web Browser
Web Browser or Client Workstation
Operating System
Windows XP professional SP3 or Windows Vista SP2
Web Browser
Internet Explorer 6.0 with Service Pack 1 or later
Hardware
•
•
•
•
•
•
•
•
•
•
Optiplex, Dual processor/Dual core, 2.5 GHz
80 GB hard drive
2 GB RAM
DVD/CD-ROM drive
1 Gb NIC
56K modem
mouse
graphical monitor
Video: Graphics card hardware support for DirectX 9 with Pixel Shader 3
Adobe Acrobat reader
Chapter 1
Introduction
Checklist
A Facility Commander system consists of a server, client workstations, and optional Media servers for
distributed video.
In addition, consider the following items:
•
•
When integrating Facility Commander with Picture Perfect, Facility Commander can be installed on a
standalone server or can be installed on the Picture Perfect server.
For Facility Commander standalone server applications to work with Picture Perfect, you must install
the Picture Perfect External Interface (EIF) package on the Picture Perfect server.
Review the checklist carefully to determine the tasks you need to complete to successfully install Facility
Commander.
Some of the steps are optional and can be installed later, such as the Remote Media Server. Required (REQ)
fields are indicated by a check mark.
Table 5.
Step
Checklist for Setup and Installation
REQ
Action
Select Operating System
• Install Linux using the product vendor CDs. Refer to Installing Linux on page 23.
• Install AIX using the product vendor CDs. Refer to Installing AIX on page 33.
Select Database - Facility Commander installed on a standalone application server
• Install the Informix database, using the Facility Commander Installation DVD. Refer to Linux Informix
Database on page 38 or AIX Informix Database on page 45.
• Install the Informix Schema, using the Facility Commander Installation DVD. Refer to Installing the Linux
Informix Schema on page 42 or Installing the AIX Informix Schema on page 54.
Install Facility Commander and Components
• Install Facility Commander server software using the Facility Commander DVD. Refer to Installing
Facility Commander applications on page 57.
• Install Facility Commander license. Refer to License Manager on page 63.
• Install the Remote Media Server software. Refer to Installing Remote Media Servers on page 66.
• Install Facility Commander client software on all workstations. Refer to Installing Client Workstations on
page 69.
9
10
Facility Commander 2.2
Installation Manual
Connecting hardware devices
Any hardware devices, such as client systems, digital video devices, modems and cables, do not have to be
connected before installing Facility Commander software.
Before connecting hardware devices, refer to the following sections:
•
•
•
•
Connecting server systems on page 10
Connecting intercom hardware on page 11
Serial Cable Assembly on page 13
Connecting analog CCTV switchers on page 13
Connecting server systems
To connect the server hardware, follow these steps:
1. Connect the monitor, keyboard, and mouse to the appropriate ports on the back of the server.
•
•
•
If you are using a graphics card, connect the monitor to the video port. Use the following display
settings:
Resolution: 1024 x 768
Colors: True color (32-bit)
2. Connect client workstations. Consult your site network administrator before connecting any devices to
an existing network.
3. Reserve serial port COM2 on the back of the server for an external support modem, if an internal
modem is not present.
Chapter 1
Introduction
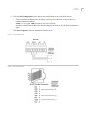
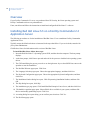
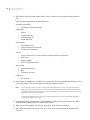
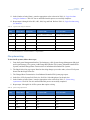
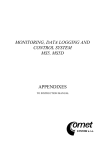
Connecting intercom hardware
Facility Commander communicates with other systems such as an intercom exchange over the network (LAN/
WAN). Therefore, the intercom exchange must be connected to the network. Because it is a serial device, there
are two additional items needed for network connectivity:
•
•
a Lantronix UDS100 converter box, which converts RS-232 to Ethernet
a serial cable to connect the intercom exchange to the Lantronix converter box
A static IP address must be defined for the intercom exchange and it is set in the Lantronix box. Configure an
IP address on the Lantronix box by using the Lantronix-supplied software.
To configure Facility Commander to communicate with the Intercom system, use the HTML Configuration
pages (for instructions, refer to the Facility Commander Administration Guide).
Figure 3. Intercom Hardware Layout
Standard Ethernet Network
9-pin serial
connector
Zenitel
AlphaCom
intercom
exchange
Lantronix Device
Server (UDS
100)
25-pin serial
connector
Facility
Commander
Server
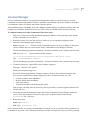
To connect and configure Alphacom Intercom hardware, follow these steps:
1. Connect the 25-pin end of the serial cable to the RS-232 port on the Lantronix unit.
•
This non-standard cable is available from GE Security (part number: 320575001). Refer to
Figure 4, Serial Cable Assembly for cable pinouts.
2. Connect the 9-pin end of the serial cable to the data port (default is port 1, not service port 0) on the
AlphaCom system.
3. Connect the Lantronix unit to the network using a standard Ethernet cable.
4. Follow the instructions supplied with the Lantronix unit for installing the DeviceInstaller software. A
fixed IP address must be assigned to the Lantronix unit.
5. Continue following the instructions to search for active units and add them to the manage list.
6. Select the unit from the list and click the Manage icon.
7. Click the Web Configuration icon to display the configuration screen in the Web browser.
•
If the screen does not display after one minute, you may need a different version of the Java
runtime installed. Download the file: J2SE v 1.6.0_10 JRE from the Sun Microsystems
Web site: www.java.sun.com
11
12
Facility Commander 2.2
Installation Manual
•
Install the software and set JRE as the default setting for the browser. Try the Web Configuration
again.
8. Click Port Properties. Enter the information described in Table 6.
Table 6.
Port Properties Settings
Field Name
Parameters
Serial Port Settings
Serial Protocol
RS-232
Speed
9600
Character Size
7
Parity
Even
Stop Bit
1
Flow Control
None
Packing Algorithm
Packing Algorithm
Enable
Idle Time
Transmit12ms
Trailing Characters
None
Send Immediate After Sendchars
Enable
Sendchar Define 2-Byte Sequence
Disable
Send Character 01
0d
Send Character 02
00
Chapter 1
Introduction
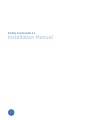
Serial Cable Assembly
The wiring diagram shown in Figure 4, Serial Cable Assembly shows the 25-pin and 9-pin end of the nonstandard cable. This non-standard cable is available from GE Security (part number: 320575001).
Figure 4. Serial Cable Assembly
When all hardware connections and configuration are complete, refer to the Checklist on page 9 to determine
how to proceed with software installation.
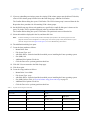
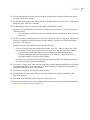
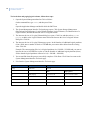
Connecting analog CCTV switchers
Facility Commander can communicate with other devices, such as analog CCTV switchers, shown in Figure 5,
over a network (LAN/WAN).
13
14
Facility Commander 2.2
Installation Manual
Figure 5. Analog CCTV Switcher Layout
Digital Video
Cameras
Standard Ethernet Network
Lantronix
Device Server
Analog CCTV
Switcher
Facility
Commander
Server
25-pin serial
connector
The analog CCTV switcher must be connected to the network and because it is a serial device, two additional
items are needed for network connectivity:
•
•
a Lantronix UDS100 converter box, which converts RS-232 to Ethernet
a serial cable to connect the intercom exchange to the Lantronix converter box
A static IP address must be defined for the analog CCTV switcher and it is set in the Lantronix box. Configure
an IP address on the Lantronix box by using the Lantronix-supplied software.
The Lantronix device is configured using Lantronix-supplied software. To configure Facility Commander to
communicate with the switcher, use the HTML Configuration pages (for instructions, refer to the Facility
Commander Administration Guide).
To connect and configure the Kalatel KTD-348 and KTD-440 Analog CCTV Switchers, follow
these steps:
1. Attach the 25-pin end of the serial cable to the Lantronix box. The other end of the cable is hard-wired
into the switcher. See Figure 6 and Figure 7 for cable pinouts.
Call GE Security Customer Support for specific wiring instructions, which are model-dependent.
2. Connect the Lantronix unit to the network using a standard Ethernet cable.
3. Follow the instructions supplied with the Lantronix unit for installing the DeviceInstaller software. A
fixed IP address must be assigned to the Lantronix unit.
4. Continue following the instructions to search for active units and add them to the manage list.
5. Select the unit from the list and click the Manage icon.
Chapter 1
Introduction
6. Click the Web Configuration icon to display the configuration screen in the Web browser.
•
If the screen does not display after one minute, you may need a different version of the Java
runtime installed. Download
J2SE v 1.6.0_10 JRE from Sun at: www.java.sun.com
Install the software and set JRE as the default setting for the browser. Try the Web Configuration
again.
7. Click Port Properties. Enter the information listed in Table 7.
Figure 6. KTD-348 cable pinouts
Figure 7. KTD-440 cable pinouts
15
16
Facility Commander 2.2
Installation Manual
Table 7.
Port Properties settings
Field
Parameter
Serial Port Settings
Serial Protocol
RS-232
Speed
9600
Character Size
8
Parity
Even
Stop Bit
1
Flow Control
None
Packing Algorithm
Packing Algorithm
Enable
Idle Tim
Force Transmit12ms
Trailing Characters
None
Send Immediate After Sendchars
Enable
Sendchar Define 2-Byte Sequence
Disable
Send Character 01
7e
Send Character 02
7e
When all hardware connections and configuration are complete refer to the Checklist on page 9 to determine
how to proceed with software installation.
Chapter 2 Upgrading Facility Commander
This chapter covers the information needed to upgrade existing Facility
Commander systems to the latest version.
In this chapter:
Upgrading from version 2.1 to 2.2 . . . . . . . . . . . . . . . . . . . . . . . . . . . . . 18
Migration background Information . . . . . . . . . . . . . . . . . . . . . . . . . 18
Database migration . . . . . . . . . . . . . . . . . . . . . . . . . . . . . . . . . . . . . 19
Obtaining the License Key . . . . . . . . . . . . . . . . . . . . . . . . . . . . . . . . 22
Upgrading remote media servers . . . . . . . . . . . . . . . . . . . . . . . . . . . 22
Upgrading client workstations . . . . . . . . . . . . . . . . . . . . . . . . . . . . . 22
18
Facility Commander 2.2
Installation Manual
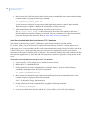
Upgrading from version 2.1 to 2.2
When upgrading to the latest version of Facility Commander, the host server and Linux media server(s) will be
new installations. The windows standalone media servers, clients, and workstations can either be new
installations or upgrades depending on the operating system.
Facility Commander 2.2 uses Linux 5.3 or AIX 6.1 with Informix 11.5 database. Therefore, the Informix
database needs to be reinstalled, and then the data in the database repository needs to be migrated from the old
database to the new one. The following provides general information and the steps required to accomplish the
data migration.
Migration background Information
Deployment
There are four modules (shell scripts) used in the data migration process listed in Table 8 on page 18. These
scripts are grouped for two purposes, each with their own deployment shell scripts:
•
•
FC_22_Migration_Source_Deployment.sh
FC_22_Migration_Target_Deployment.sh
All scripts are located on the Facility Commander 2.2 Installation DVD in the dbmigration folder
(directory). Each deployment script must be executed from the dbmigration folder. The deployment scripts
will perform the following operations:
•
•
•
•
Create the /bud/FC_DataExport destination directory tree on the server if it does not already
exist
Create and populate the log of the script's execution
Remove any existing migration script files
Copy the appropriate shell scripts and supporting files into the destination directory
General
There are four modules (shell scripts) used in the data migration process. Refer to Table 8.
Each script is executed from the command line in a terminal window.
Type:
sh <script name>.sh
Each script will generate a log file as a result of its execution. The log file name is <script_name>.log
Table 8.
Migration scripts
Name
Shell script
Table Rows Count
FC_Count_Table_Rows.sh
Table Data Extract
FC_Extract_Table_Data.sh
Table Data Loader
FC_Populat_Table_Data.sh
Table Rows Truncate
FC_Truncat_Table_Rows.sh
Chapter 2
Upgrading Facility Commander
Operation of shell scripts
The shell scripts operate in the following manner:
Table Data Extract
The Table Data Extract shell script extracts the data rows in each table found the Informix database to a flat
data (.dat) file. The script generates the FC_Extract_Tables_List.ctl control file. This control file is
created based on the contents of the database being accessed by the script and is subsequently used by the
Table Data Loader script.
Table Data Loader
The Table Data Loader script populates the data from each flat file created by the Table Data Extract script into
the corresponding table in the Informix database. This script uses the control file created by the Table Data
Extract script to ensure all extracted data is reloaded.
Table Rows Truncate
The Table Rows Truncate script deletes all rows in each table found the Informix database. This script is used
to remove loaded data if the Table Data Loader script fails to deliver a full load.
Table Rows Counter
The Table Rows Counter script counts the number of rows in each table found the Informix database. This
script is used to verify the table data extract and loader scripts.
Database migration
Note:
Note: Perform the database migration prior to installing Facility Commander 2.2 server installation.
There are two steps required to successfully migrate your database information from FC 2.1 to FC 2.2.
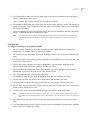
•
•
Extract the table data from the FC 2.1 database
Load the extracted table data into the new FC 2.2 database
Extract table data from the FC 2.1 database
To extract the table data from the old Informix database:
1. Login to the FC 2.1 host (source) server with the root user account.
2. Mount the FC 2.2 Installation DVD.
3. Change directories from the command line in a terminal window. Type one of the following
commands, depending on how the DVD was mounted:
cd /media/dvd/dbmigration
4. Run (execute) the Migration Source Deployment shell script from the command line in the same
terminal window by typing the following command:
sh FC_22_Migration_Source_Deployment.sh
5. Change directories from the command line by typing the following command:
cd /bud/FC_DataExport
19
20
Facility Commander 2.2
Installation Manual
6. Run (execute) the Table Data Extract shell script from the command line in the same terminal window.
terminal window by typing the following command:
sh FC_Extract_Table_Data.sh
As the script runs it displays its progress providing table names and row counts of data extracted.
When the script is complete, it displays the total number of tables processed.
7. After completing the table data population, check the log file for errors.
The FC_Count_Table_Rows.sh shell script can be run to derive the contents of the source
Informix database and ensure all data was extracted. There is a minimum of 67 tables that should be
processed during the data extraction. Refer to, Table Rows Count script on page 22.
Load the extracted table data into the new FC 2.2 database
The contents of the directory (/bud/FC_DataExport), especially the flat data (.dat) files and the
FC_Extract_Tables_List.ctl file must to be copied to the same directory on the FC 2.2 host (target) server.
If the target server is a new machine, the files can be transferred directly using a Linux/Unix utility such as ftp.
If the FC Host server is being upgraded, these files will need to be temporarily stored on some form of
removable media such as a memory stick or USB drive. The removable media will be used to transfer the files
back onto the upgraded server. The Linux and AIX upgrades are destructive upgrades, erasing all files on the
server.
To load the extracted table data into the new FC 2.2 database:
1. Login to the FC 2.2 host (target) server with the root user account.
2. Mount the FC 2.2 Installation DVD.
3. Change directories from the command line in a terminal window. Type one of the following
commands, depending on how the DVD was mounted:
cd /media/dvd/dbmigration
4. Run (execute) the Migration Source Deployment shell script from the command line in the same
terminal window by typing the following command:
sh FC_22_Migration_Target_Deployment.sh
5. Change directories from the command line by typing the following command:
cd /bud/FC_DataExport
6. Copy the saved flat data (.dat) files and the FC_Extract_Tables_List.ctl file to this directory.
Chapter 2
Upgrading Facility Commander
7. If you have installed the Facility Commander Server, shut down the service.
For Linux servers, type the following command:
service facilityCommander
stop
For AIX servers, type the following command:
sh /var/FacilityCommanderServer/server/bin/FCShutdown.sh
When the service has successfully shut down, [ OK ] will appear in the terminal window. If it fails to
shut down (because it is already shut down), [FAILED] will appear in the terminal window.
8. Run (execute) the Table Data Loader shell script from the command line in the same terminal window
by typing the following command:
sh FC_Populat_Table_Data.sh
As the script runs it displays its progress providing table names and row counts of data loaded. When
the script is complete, it displays the total number of tables processed.
9. After completing the table data load, check the log file for errors.
The FC_Count_Table_Rows.sh shell script can be run to derive the contents of the source
Informix database and ensure all data was extracted. There is a minimum of 67 tables that should be
processed during the data load. Refer to, Table Rows Count script on page 22.
Table Data Populate log file errors
In the event that the data is not completely loaded (populated) and/or there are errors recorded in the
FC_Populat_Table_Data.log file, the loaded data can be removed using the Rows Truncation shell
script.
For example, if the Facility Commander Server was licensed and run at any time before the Table Data Loader
is run, the server will probably have loaded some data (inserted rows) in to various tables in the Informix
database. The log file will show error messages with "Unique constraint … violated. 100: ISAM error:
duplicate value for a record with unique key." The Table Data Loader script will need to be rerun.
To run the Table Rows Truncate script:
1. Login to the FC 2.2 host (target) server with the root user account.
2. Run the shell script by typing the following commands:
sh FC_Truncat_Table_Rows.sh
As the script runs it will display its progress providing table names and row counts of rows deleted,
and when complete, a total number of tables processed.
Note:
On AIX, this script is unable to run as efficiently as on Linux. On Linux, it will complete in one pass or execution.
On AIX, it will have to be run multiple times until the number of tables truncated is zero. The
FC_Count_Table_Rows.sh shell script can be run after each time the Table Rows Truncate script is run to
determine that all of the tables have zero or no rows.
3. After completing the Rows Truncation, check the log file for errors.
The FC_Count_Table_Rows.sh shell script can be run to derive the contents of the source
Informix database and ensure all data was extracted. There is a minimum of 67 tables that should be
processed during the data load. Refer to, Table Rows Count script on page 22.
21
22
Facility Commander 2.2
Installation Manual
Table Rows Count script
To verify Data Extraction, Population or Truncation, run the Table Rows Count shell script to confirm the
results of each step above.
To run the Table Rows Count script:
1. Login to the FC 2.2 host (target) server with the root user account.
2. Run the shell script by typing the following command:
sh FC_Count_Table_Rows.sh
As the script runs it will display it's progress providing table names and row counts of rows data
deleted, and when complete, a total number of tables processed.
Obtaining the License Key
A new Facility Commander license key is not required when upgrading from version 2.1 to version 2.2. The
license key used with Facility Commander version 2.1 is used when upgrading to version 2.2.
The license key is stored in a file called license.xml. Copy the file to the root directory (Linux/AIX is /)
so that it can be copied into the resources directory after the upgrade. Or, print or view the file and write down
the current 40-character license key.
Upgrading remote media servers
Linux remote media servers running Facility Commander 2.1 cannot be upgraded to Facility Commander 2.2
because of the new Linux 5.3 operating system. Refer to Installing Remote Media Servers on page 66 for
installation instructions.
Windows remote media servers running Facility Commander 2.1 can be upgraded to Facility Commander 2.2.
The process requires uninstalling the previous version and installing the new version. Refer to Installing
Remote Media Servers on page 66 for installation procedures
Upgrading client workstations
Client workstations running Facility Commander 2.1 can be upgraded to Facility Commander 2.2. The process
requires uninstalling the previous version and installing the new version. Refer to Installing Client
Workstations on page 69.
Chapter 3 Installing Linux
This chapter includes the information needed to install and configure the Linux
5.3 operating system.
In this chapter:
Overview . . . . . . . . . . . . . . . . . . . . . . . . . . . . . . . . . . . . . . . . . . . . . . . . . 24
Installing Red Hat Linux 5.3 on a Facility Commander 2.2
Application Server . . . . . . . . . . . . . . . . . . . . . . . . . . . . . . . . . . . . . . . . . 24
24
Facility Commander 2.2
Installation Manual
Overview
If your Facility Commander 2.2 server was purchased from GE Security, the Linux operating system and
Facility Commander software are preloaded on it.
If not, start below and follow the instructions to install and configure Red Hat Linux 5.3 software.
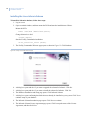
Installing Red Hat Linux 5.3 on a Facility Commander 2.2
Application Server
The following procedures are for the installation of Red Hat Linux 5.3 on a standalone Facility Commander
Application Server.
Typically accept the default selections as instructed in the steps that follow. If you are in doubt, consult with
your system administrator.
Click Release Notes for information on this version of Red Hat Linux.
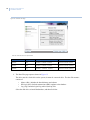
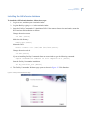
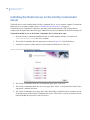
To install Red Hat Linux, follow these steps:
1. Insert the Red Hat Linux 5.3 Operating System DVD, and then boot the computer. The boot prompt
displays.
2. At the boot prompt, click Enter to proceed and wait for the process to load the basic operating system
drivers.
3. The CD Found dialog box opens, press tab or use the right arrow key to select SKIP. Press enter or the
spacebar to start the installation.
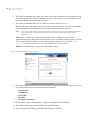
4. The Red Hat Welcome page opens. Click Next.
5. The Language Selection page opens. Choose the appropriate language, and then click Next.
6. The Keyboard Configuration page opens. Choose the appropriate keyboard configuration, and then
click Next.
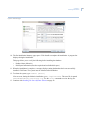
7. The Installation Number dialog box opens. Click Skip entering Installation Number, and then click
OK.
8. The Skip dialog box opens, click Skip.
9. The installation type page opens. Click Install Red Hat Enterprise Linux Server, and then click Next.
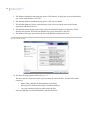
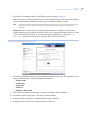
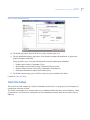
10. The hard drive partition page opens. Select all disk drives available in your system, and then click
Review and modify partitioning layout. Click Next.
11. A warning dialog box opens asking you to confirm your selections. Click Yes.
12. The Disk Setup page opens.
Chapter 3
Installing Linux
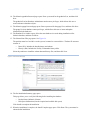
13. If you are reinstalling an existing system, the existing LVM volume groups must be deleted. To do this,
select a LVM volume group from the list on the Disk Setup page, and then click Delete.
The Confirm Delete dialog box opens. Click Delete. The LVM volume group is removed from the list.
Repeat the above procedure for all remaining LVM volume groups.
14. On the Disk Setup page, delete each partition on a specific drive until all disk space is shown as free
space. To do this, select a partition displayed in the list, and then click Delete.
The Confirm Delete dialog box opens. Click Delete. The partition is removed from the list.
15. Select the hard drive displayed in the list, and then click New.
Note:
It will be necessary to create a boot partition and swap space partition. The remaining space from the
physical volume(s) can be assigned to a volume group. The volume group is then partitioned into Logical
Volumes using the LVM. See Figure 8 and Figure 9, for more detailed sizing information.
16. The Add Partition dialog box opens.
17. Create the boot partition as follows:
•
•
•
•
•
•
Mount Point: /boot
File System Type: ext3
Allowable Drives: Select the hard disk on which you are installing the Linux operating system.
Size (MB): 100
Additional Size Options: Fixed size
Click the Force to be a primary partition check box.
18. Click OK. You are returned to the Disk Setup page.
19. Click New again.
20. Create the swap partition as follows:
•
•
•
•
•
•
Table 9.
Mount Point: Leave blank.
File System Type: swap
Allowable Drives: Select the hard disk on which you are installing the Linux operating system.
Size (MB): Refer to Table 9, Physical volume sizing (boot and swap) on page 25.
Additional Size Options: Fixed size
Click the Force to be a primary partition check box.
Physical volume sizing (boot and swap)
Logical/physical drive
Partition
Recommended size
sda or hda
boot
100 MB
swap
RAM
Swap space
Less than 1 GB
2 times the size of RAM
1 GB to 2 GB
1.5 times the size of RAM
2 GB to 8 GB
Equal to the size of RAM
More than 8 GB
0.75 times the size of RAM
25
26
Facility Commander 2.2
Installation Manual
21. Click OK. You are returned to the Disk Setup page.
22. Click New again.
23. Create the rootvg volume group as follows:
•
•
•
•
•
•
Mount Point: Leave blank.
File System Type: physical volume (LVM)
Allowable Drives: The hard disk on which you are installing the Linux operating system.
Size (MB): Leave the default value.
Additional Size Options: Fill to maximum allowable size
Click OK. You are returned to the Disk Setup page.
24. Click (highlight) LVM PV, and then click LVM.
25. The Make LVM Volume Group page opens. Create the rootvg volume group as follows:
•
•
•
•
Volume Group Name: Rename it to rootvg (must be spelled exactly as shown in lower case).
Physical Extent: 32 MB.
Physical Volumes to Use: Select the hard disk on which you are installing the Linux operating
system.
Click Add to create necessary logical volumes.
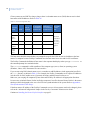
26. The Make Logical Volume dialog box opens. Create Logical Volumes LogVol00 through LogVol10
using the values listed in Table 10, Logical volume sizing on page 26.
Table 10. Logical volume sizing
Volume
group
Logical
volume
Enter
mount
point
Size required (MB)
Size to enter (MB)
rootvg
LogVol00
/
4,096
5,000
LogVol01
/home
512
600
LogVol02
/tmp
2,048
2,400
LogVol03
/usr
6,144
7,000
LogVol04
/var
4,096
4,800
LogVol05
/bud
32,768
36,000
LogVol06
/db1
2,048 (S) 2,048 (M) 2,048 (L)1
2,400 (S) 2,400 (M) 2,400 (L)
LogVol07
/db2
2,048 (S) 2,048 (M) 2,048 (L)
2,400 (S) 2,400 (M) 2,400 (L)
LogVol08
/db3
256 (S)
400 (S) 500 (M) 700 (L)
LogVol09
/db4
4,096 (S) 12,288 (M) 32,768 (L)
4,700 (S) 13,800 (M) 36,500 (L)
LogVol10
/log
2,048 (S) 4,096 (M)
2,400 (S) 4,700 (M) 9,300 (L)
1.
384 (M) 512 (L)
8,192 (L)
S = Standard database, M = Medium database, L = Large database
27. After entering each logical volume, click OK. You will be returned to the Make LVM Volume Group
page. Repeat step 26 and step 27 for each logical volume entry.
28. When you have finished defining your partitions, click OK on the Make LVM Volume Group page to
to accept your settings. You are returned to the Disk Setup page. Click Next to continue.
Chapter 3
Installing Linux
29. The GRUB Boot Loader Configuration page opens. Accept the default settings, and then click Next.
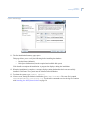
30. The Network Configuration page opens. Under Network Devices, click Edit to set parameters for the
network interface. The Edit Interface dialog box opens.
Configure the Edit Interface dialog as follows:
Note:
•
•
The Facility Commander host must have a static IP address. It does not work with DHCP.
Select Enable IPv4 support check box. Click Manual configuration.
Deselect Enable IPv6 check box.
Click OK. You are returned to the Network Configuration page. Under Hostname, Set the hostname,
click manually, and then enter the hostname.
CAUTION:
Do not leave the hostname field blank, it must be set to an alphanumeric value before Facility
Commander is installed!
Keep the following in mind:
•
•
•
•
Use LOWERCASE a through z, and/or 0 through 9. Do NOT use UPPERCASE.
Use the simple machine name, such as fchost1, not the fully qualified name.
The host name may not be more than 16 characters in length.
Do not use host names containing the dash character (-).
Informix Dynamic Server 11.5 does not recognize this as a valid character and will prevent the database from
starting.
• Do not use host names containing the underscore character (_).
This is not a valid character in the web server running on the Facility Commander host.
Under Miscellaneous Settings, configure the Gateway and Primary DNS, if applicable, and then click
Next.
•
If you fail to provide a Primary DNS, an error message dialog box opens. Depending on your
network environment, this could cause future problems. If you do not know what this should
be, consult your Network Administrator. Click Continue on the error message dialog box.
31. The Region Selection page opens. Select the region corresponding to the server location from the dropdown menu. Click the System clock uses UTC check box, and then click Next.
Note:
Note: Selecting three letter time zone designators ("EST", "PST", "CST", etc.) cause a problem with daylight
savings time. Instead of using these designators, the full “America/New York", “America/San Francisco", etc
should be used.
If it is necessary to adjust the date and/or time, use the dateconfig command when the Linux
installation is complete.
32. The Set Root Password page opens. In the Root Password field, enter a password (minimum six
characters) for root. In the Confirm field, enter the password again, and then click Next.
You will need this password later when you install the Informix database (See Linux Informix
Database on page 38).
27
28
Facility Commander 2.2
Installation Manual
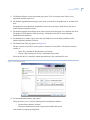
33. The Package Group Selection window opens. Click Customize now to open the Package Selection
page.
Select the following packages, and then click Next.
Desktop Environments:
•
GNOME Desktop Environment
Applications:
•
•
•
•
Editors
Graphical Internet
Office/Productivity
Sound and Video
Development:
•
•
•
Development Tools
Legacy Software Development
X Software Development
Servers:
•
•
•
•
Legacy Network Server (click on Option packages and select all options)
Mail Server
Printing Support
Server Configuration Tools
Base System:
•
•
•
Administration Tools
Base
X Windows Systems
Languages:
•
No selection
34. After a check of dependencies in packages is performed, the About to Install Red Hat Enterprise Linux
Server page opens. Click Next to begin the installation of Red Hat Linux 5.3.
Note:
If, for some reason, you do not wish to continue with the installation process, this is your last opportunity to
safely cancel the process and reboot your machine. Once you press the Next button, partitions will be written
and packages will be installed. If you wish to abort the installation, you should reboot now before any existing
information on any hard drive is rewritten.
To cancel this installation process, press your computer's Reset button or use the [Control]-[Alt]-[Delete] key
combination to restart your machine.
35. After installation, the Congratulations, the installation is complete page opens. Remove any media
used during the installation process, and then click Reboot.
36. When the reboot is complete, the Welcome page opens. Click Forward to continue.
37. The License Agreement page opens. Click Yes, I agree to the License Agreement, and then click
Forward.
Chapter 3
Installing Linux
38. The Firewall page opens. Select Firewall: Disabled, and then click Forward. A confirmation dialog
box opens. Click Yes to continue.
39. The SELinux Setting page opens. Select SELinux: Disabled, and then click Forward. A confirmation
dialog box opens. Click Yes to continue.
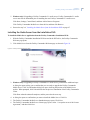
40. The Kdump page opens. Accept the default settings, and then click Forward.
Optional: If you want the host to synchronize its clock with a remote time server, click the Network
Time Protocol tab.
•
Check the Enable Network Time Protocol check box and use the drop-down menu to select a
time server.
41. The Set Up Software Updates page opens. Select No, I prefer to register at a later time, and then click
Forward. A confirmation dialog box opens, click No thanks, I’ll connect later. The Finish Updates
page opens, Click Forward.
Optional:To register with Red Hat and provide a Red Hat login:
•
•
If you have already registered with Red Hat Network, click Yes, I’d like to register now. Click
Forward and the Choose Server page opens. Select your server and click Forward to continue.
• If you provided your Red Hat login account information, the Activate dialog opens.
• Enter the subscription number in the appropriate field. Otherwise, select I do not have a
subscription number. Click Forward to continue.
If you have never registered, choose Why Should I Connect to RHN? The Why Register dialog
box opens, providing registration information.
42. The Create User page opens. Since a user account will be created during the installation of the Facility
Commander application, it is not necessary to create an account now. Click Forward to continue. A
confirmation dialog box opens, click continue.
43. The Sound Card page opens. Click Forward to continue.
44. The Additional CDs page opens, There are no required add-ons for Facility Commander. Click
Forward to continue.
45. The Finish Setup dialog box opens. Click OK to reboot the server.
46. The set up for Red Hat Linux is now complete and you may proceed to install the Informix database.
Refer to Linux Informix Database on page 38
29
30
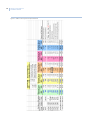
Facility Commander 2.2
Installation Manual
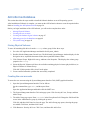
Figure 8. RHEL ES 5.3 File system disk space allocations
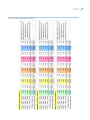
Chapter 3
Installing Linux
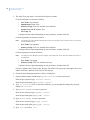
Figure 9. RHEL ES 5.3 Database disk space allocations
31
32
Facility Commander 2.2
Installation Manual
Chapter 4 Installing AIX
This chapter covers the information needed to install and configure the AIX
operating system for Facility Commander.
In this chapter:
Overview . . . . . . . . . . . . . . . . . . . . . . . . . . . . . . . . . . . . . . . . . . . . . . . . . 34
Install AIX . . . . . . . . . . . . . . . . . . . . . . . . . . . . . . . . . . . . . . . . . . . . . . . . 34
34
Facility Commander 2.2
Installation Manual
Overview
If your Facility Commander 2.2 server was purchased from GE Security, the AIX operating system and
Facility Commander software are preloaded on it.
If not, start below and follow the instructions to install and configure AIX 6.1 software.
Install AIX
To install the AIX operating system, follow these steps:
Note:
The installation media must be loaded in the boot device. The system must be set to boot from the device in which the
installation media is loaded. Refer to the hardware documentation that accompanied your system for instructions on
setting the boot device.
1. Insert the AIX Volume 1 media into the media device.
2. Shut down your system. If your machine is currently running, power it off by following these steps:
a. Log in as the root user.
b. Type the following command:
shutdown -F
c. If your system does not automatically power off, place the power switch in the Off position.
Note:
Any external devices (CD-ROM drive, monitor, etc.) attached to the server must be powered on before the
server is powered on.
3. Power up all attached external devices.
4. Power up the server.
5. When the system beeps twice, press the F5 key (or 5 on an ASCII terminal). If you have a graphics
display, you will see the keyboard icon on the screen when the beeps occur. If you have an ASCII
terminal, you will see the word keyboard when the beeps occur.
Note:
Note: If your system does not boot using the F5 key (or the 5 key on an ASCII terminal), refer to your hardware
documentation for information about how to boot your system from an AIX product media.
The system begins booting from the installation media.
6. When prompted to Define the System Console, press F1 on the keyboard (or 1 on an ASCII terminal),
and then press Enter.
7. You will be prompted to select a language to be used for installation. Select 1 for English, and then
press Enter.
8. The Welcome to Base Operating System Installation and Maintenance page opens. Select 2, Change/
Show Installation Settings and Install, and then press Enter.
9. The Installation and Settings page opens. Select 1, System Settings, and then press Enter.
10. The Change Method of Installation page opens. Select 1, New and Complete Overwrite, and then press
Enter.
Chapter 4
Installing AIX
11. The Change Disk(s) Where You Want to Install page opens. Select the hard disk (volume group) on
which to install the operating system.
Type 0, Continue with choices indicated above, and then press Enter.
12. The Installation and Settings page opens again. Review the settings and type 0, Install with the current
settings listed above, or type the number of the one(s) you want to change. When you are satisfied with
the settings, press Enter.
If you are installing over a previous operating system, the Overwrite Installation Summary page opens.
Select 1, Continued with Install, and then press Enter.
Note:
The installation process will begin and messages will display on the screen as filesets are loaded from the
CD(s). This will take a while, depending on your system. When the installation is complete, the system will
reboot.
Configure AIX
To configure AIX using a non-graphical terminal:
1. The Set Terminal Type page opens. Select this terminal as the console and enter the appropriate
terminal type, for example: ibm3151, and then press Enter.
2. The Software License Agreements page opens. Highlight Accept License Agreements, and then press
Enter.
3. The Accept License Agreements page opens. Highlight Accept Installed License Agreement. Press tab
to select Yes, and press Enter.
4. Press F3 three times to return to the Software Maintenance Agreement page. Highlight Accept
Software Maintenance Terms and Conditions, and then press Enter.
5. The Accept Software Maintenance Terms and Conditions page opens. Highlight Accept Software
Maintenance Agreements. Press tab to select Yes, and press Enter.
6. The Command Status page opens. Press F3 three times.
7. The Installation Assistant page opens. Highlight Set Date and Time, and then press Enter
8. The Set Date and Time page opens. Select Change/Show Date, and then press Enter.
9. The Change/Show Date and Time page opens. Make necessary changes, and then press Enter.
10. Press F3 three times to return to the Set Date and Time page. Select Change Time Zone Using System
Defined Values, and then press Enter.
11. The Time Zone name page opens. Highlight the appropriate choice, and then press Enter.
Note:
Selecting three letter time zone designators ("EST", "PST", "CST", etc.) cause a problem with daylight savings
time. Instead of using these designators, the full "America/New York", America/San Francisco", etc. should be
used.
12. The Change Time Zone page opens. To accept the system defined offsets for your time zone, press
Enter.
13. The Command Status page opens. Press F3 twice to return to the Installation Assistant page. Highlight
Set Root Password, and then press Enter.
35
36
Facility Commander 2.2
Installation Manual
14. The Set Root Password page opens. Type the new password and then type it again to confirm the entry.
Press Enter.
15. The Installation Assistant page opens again. Highlight Configure Network Communications, and then
press Enter.
16. The Configure Network Communication page opens. Highlight TCP/IP Startup, and then press Enter.
17. The Available Network Interfaces submenu will display. Highlight the Standard Network Interface
being configured, and then press Enter.
18. The Minimum Configuration and Startup screen page opens. You are asked to enter the following
information: Type or select values in all fields and when complete, press Enter.
•
•
•
•
•
Host name
Internet address
Network mask
Network interface nameserver
• Internet address
• Domain name
Default gateway address
• Address
• Cost
19. The Command Status page opens. Press F3 three times to return to the Installation Assistant page.
Highlight Task complete, Exit to login, and then press Enter.
20. The console login page opens. Log in as root with the associated password, and then press Enter.
21. Reboot the system by typing: shutdown –Fr [Enter]
Do not use the reboot command at any time. Doing so will corrupt any existing databases. A number
of welcome messages are displayed. This may take several minutes.
If you are installing an Informix database, continue to AIX Informix Database on page 45.
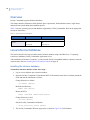
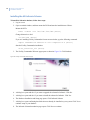
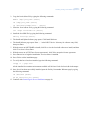
Chapter 5 Installing Databases
This chapter describes the installation tasks associated with installing the
databases used by Facility Commander.
In this chapter:
Overview . . . . . . . . . . . . . . . . . . . . . . . . . . . . . . . . . . . . . . . . . . . . . . . . . 38
Linux Informix Database . . . . . . . . . . . . . . . . . . . . . . . . . . . . . . . . . . . . 38
Installing the Informix database . . . . . . . . . . . . . . . . . . . . . . . . . . . 38
Installing the Linux Informix Schema . . . . . . . . . . . . . . . . . . . . . . . 42
AIX Informix Database . . . . . . . . . . . . . . . . . . . . . . . . . . . . . . . . . . . . . . 45
Moving Physical Volumes. . . . . . . . . . . . . . . . . . . . . . . . . . . . . . . . . 45
Creating the user accounts. . . . . . . . . . . . . . . . . . . . . . . . . . . . . . . . 45
Creating the database logical volumes . . . . . . . . . . . . . . . . . . . . . . 47
Allocating space for the databases. . . . . . . . . . . . . . . . . . . . . . . . . . 48
File system sizing . . . . . . . . . . . . . . . . . . . . . . . . . . . . . . . . . . . . . . . 49
Installing the AIX Informix database . . . . . . . . . . . . . . . . . . . . . . . . 51
Installing the AIX Informix Schema . . . . . . . . . . . . . . . . . . . . . . . . . 54
38
Facility Commander 2.2
Installation Manual
Overview
Facility Commander supports Informix databases.
This chapter includes information about database space requirements, default database names, login names,
and passwords created during the installation process.
Table 11 lists the operating systems and databases supported by Facility Commander. Refer to the appropriate
section for instructions.
Table 11. Operating systems and databases
Operating System
Linux
AIX
See page 38
See page 45
Database:
Informix
Linux Informix Database
This section describes the steps needed to install Informix database using a Red Hat Linux 5.3 operating
system on a standalone Facility Commander Application Server.
After installation of Informix is complete, you must run the Facility Commander database schema to create the
required tables. Refer to Installing the Linux Informix Schema on page 42.
Installing the Informix database
To install the Informix database, follow these steps:
1. Log in as root, and then open a terminal window.
2. Insert the Facility Commander 2.2 Installation DVD. If the autorun feature does not launch, mount the
DVD and start the installation as follows:
Change directories to Media:
cd /media [Enter]
Make the dvd directory:
mkdir dvd [Enter]
Mount the DVD:
mount /dev/dvd /media/dvd [Enter]
Change directories to dvd:
cd /dvd [Enter]
Start the Facility Commander installation:
sh FC_Installer_Linux [Enter]
3. The Facility Commander Welcome page opens as shown in Figure 10. Click Database.
Chapter 5
Installing Databases
Figure 10. Facility Commander Welcome page
4. The Database Installation and Setup page opens. Click Informix. A dialog box opens to confirm that
you want to install Informix. Click Yes.
5. The Informix Database Introduction page opens. Click Next to continue.
6. The Informix Database License Agreement page opens. Click I accept the terms of the License
Agreement, and then click Next.
7. The Informix Password page opens. Enter a password (minimum length is six characters) for the
Informix user account. This creates an Informix user, group, and owner. Click Next.
8. The Database Size page opens as shown in Figure 11. Use the Database Size window to select the size
of the database, and then click Next.
Refer to Table 12 for a summary of the sizing requirements, which are based on the number of disk
drives being used. The database can reside on one or more logical volumes.
Two factors that determine the number of drives are the database vendor requirements and the Facility
Commander database size.
39
40
Facility Commander 2.2
Installation Manual
Figure 11. Database Size page
Table 12. Data Files Structure requirements
Logical volume
Mount point
Size required (MB)
Size to enter (MB)
LogVol06
/db1
2,048 (S) 2,048 (M) 2,048 (L)
2,400 (S) 2,400 (M) 2,400 (L
LogVol07
/db2
2,048 (S) 2,048 (M) 2,048 (L)1
2,400 (S) 2,400 (M) 2,400 (L)
LogVol08
/log
2,048 (S) 4,096 (M)
2,400 (S) 4,700 (M) 9,300 (L)
1.
8,192 (L)
S = Standard database, M = Medium database, L = Large database
9. The Data Files page opens as shown in Figure 12.
The drive must be a local drive on the system; it cannot be a network drive. The data file structure
consists of:
•
•
•
Master (/db1): Includes the data dictionary and schema
DB Logs (/db2): Includes transactions (DML) updates to the database
Log (/log): Includes logical log archive (backup) files
Select the disk drives to install the database, and then click Next.
Chapter 5
Installing Databases
Figure 12. Data Files page
10. The Pre-Installation Summary page opens. Click Install to complete the installation. A progress bar
displays during the installation.
This page allows you to verify the following before installing the database:
•
•
Product Name (Informix)
Disk Space Information (lists the required and available disk space)
11. When the installation is complete, a message displays stating the database has been successfully
installed. Click Done. The system must be rebooted after installation.
12. To reboot the system, type: reboot [Enter]
If errors occur, during the Informix installation, go to /tmp/informix. The error file is named
InformixDatabase_InstallLog.log. Use the more command to review the log file.
13. Continue with Installing the Linux Informix Schema on page 42.
41
42
Facility Commander 2.2
Installation Manual
Installing the Linux Informix Schema
To install the Informix database, follow these steps:
1. Log in as root.
2. Open a terminal window, and then mount the DVD and start the installation as follows:
Mount the DVD:
mount /dev/dvd /media/dvd [Enter]
Change directories to dvd:
cd dvd [Enter]
Start the Facility Commander installation:
sh FC_Installer_Linux [Enter]
3. The Facility Commander Welcome page opens as shown in Figure 13. Click Database.
Figure 13. Facility Commander Welcome page
4. A dialog box opens and asks if you want to upgrade the schema for Informix. Click No.
5. A dialog box opens and asks if you want to install the schema for Informix. Click Yes.
6. The Database Installation and Setup page opens. Click Informix Schema.
7. A dialog box opens confirming that Informix must already be installed on your system. Click Yes to
continue setup of your database.
8. The Informix Schema Introduction page opens. Click Next to continue.
9. The Informix Schema License Agreement page opens. Click I accept the terms of the License
Agreement, and then click Next.
Chapter 5
Installing Databases
10. The Informix ppadmin Password page opens. Enter a password for the ppadmin User, and then click
Next.
The ppadmin User has Database Administrator and resource privileges, which allows this user to
create and remove database objects.
11. The Informix ppapp Password page opens. Enter a password for the ppapp User, and then click Next.
The ppapp User has database connect privileges, which allows this user to insert and update
information in the databases.
12. The Database Size window opens. Select the same database size used during installation of the
Informix database, and then click Next.
13. The Schema Data Files page opens. See Figure 14.
The partition must be a local drive on the system; it cannot be a network drive. The data file structure
consists of
•
•
Data (/db3): Includes the data dictionary and schema
History (/db4): Includes the Facility Commander history tables
Select the partitions to install the schema data and history files, and then click Next.
Figure 14. Schema Data Files page
14. The Pre-Installation Summary page opens.
This page allows you to verify the following before installing the database:
•
•
Product Name (Informix Schema)
Disk Space Information (lists the required and available disk space)
Click Install to complete the installation.
15. When the installation is complete, the Install Complete page opens. Click Done. The system must be
rebooted after installation.
43
44
Facility Commander 2.2
Installation Manual
16. To reboot the system, type: reboot [Enter]
If errors occur, during the Informix Schema installation, go to /tmp/informix. The error file is
named InformixSchema.InstallLog.log.
You can also go to /tmp/informix/logs.The error files are named SchemaCreator.log,
SchemaCreatorErr.log, and create_files. Use the more command to review the log
file.
17. Continue with Installing Facility Commander applications on page 57.
Chapter 5
Installing Databases
AIX Informix Database
This section describes the steps needed to install the Informix database on an AIX operating system.
After installation of Informix is complete, you must run the AIX Informix schema to create the required tables.
Refer to Installing the AIX Informix Schema on page 54.
Before you begin installation of the AIX Informix, you will need to complete these tasks:
•
•
•
•
•
Moving Physical Volumes
Creating the user accounts
Creating the database logical volumes on page 47
Allocating space for the databases on page 48
File system sizing on page 49
Moving Physical Volumes
To move all remaining disk drives from the rootvg volume group, follow these steps:
1. Go to the AIX Application Manager and double-click System_Admin.
2. Double-click the Management Console icon. The Web-based System Manager window displays. In the
Navigation Area, expand the host name folder, then expand the Volumes folder.
3. Click Volume Groups. Right-click rootvg, and then select Properties. This displays the volume group
properties for rootvg.
4. Select the Physical Volumes tab. Move the available remaining physical volumes (physical drives) to
Physical Volumes in Volume Group.
Click OK. If this operation fails, select Forced option.
5. You are notified when this operation has successfully completed.
Creating the user accounts
To create the user accounts using the System Management Interface Tool (SMIT) graphical interface:
1. Open the System Management Interface Tool as follows:
On the command line, type: smit, and then press Enter.
or
Open the Application Manager and double-click the SMIT icon.
2. The System Management Interface Tool main page opens. Click Security & Users, Groups, and then
Add a Group.
3. The Add a Group page opens. Enter informix in the Group Name field. Change the field from False
to true in the Administrative group by clicking the up arrow.
Click Ok, and then click Cancel to close the page. The Add a Group page opens, showing the group
was added. Click Done, and then click Cancel.
4. Click Return to: Security & Users. Click Users, and then click Add a User.
45
46
Facility Commander 2.2
Installation Manual
5. The Add a User page opens. Create the following user accounts.
Create the informix user account as follows:
•
•
•
•
•
User Name: Type informix
Administrative User: False
Primary Group: Click List, and then select informix.
Another User can SU to user: True
SU Group: All
Configure all other options depending on your preferences, and then click OK.
Create the ppadmin user account as follows:
Note:
•
•
The ppadmin user has Database Administrator and resource privileges, which allows this user to create and
remove database objects.
User Name: Type ppadmin
Primary Group: Click List, and then select informix.
Configure all other options depending on your preferences, and then click OK.
Create the ppapp user account as follows:
Note:
•
•
The PPApp User has database connect privileges, which allows this user to insert and update information in
the databases.
User Name: Type ppapp
Primary Group: Click List, and then select usr.
Configure all other options depending on your preferences, and then click OK.
Click Ok, and then click Cancel to close the page. The Add a User page opens, showing the users were
added. Click Done, and then click Cancel to exit the page.
6. Exit the System Management Interface Tool by clicking Exit.
7. Open a terminal window and then type passwd informix to create a password.
Enter the new password, type: informix [Enter]
Enter the password again, type: informix [Enter]
8. Type su informix twice. If, after the second time, you are prompted to change the password,
change it to informix.
9. Type passwd ppadmin to create a password.
Enter the new password, type: ppadmin [Enter]
Enter the password again, type: ppadm1 [Enter]
10. Type passwd ppapp to create a password.
Enter the new password, type: ppapp [Enter]
Enter the password again, type: ppapp1 [Enter]
11. Type exit to return to root.
Chapter 5
Installing Databases
Creating the database logical volumes
To create the database logical volumes, follow these steps:
1. Open the System Management Interface Tool as follows:
On the command line, type: smit, and then press Enter.
or
Open the Application Manager and double-click the SMIT icon.
2. The System Management Interface Tool main page opens. Click System Storage Management
(Physical and Logical Storage), Logical Volume Manager, Logical Volumes, and then Add a Logical
Volume.
3. The Add a Logical Volume dialog box opens. Click List, and then select rootvg to add it to the
Volume Group name field on the Add a Logical Volume dialog box. Click Ok.
4. The Add a Logical Volume page opens. Enter the following: (the default value is used for many of the
fields)
Logical volume name: lv01
Number of logical partitions: 1
Physical volume name: Click List and select hdisk0 only if it is the only disk available. Otherwise
select all of the remaining physical volumes (hdisk1, hdisk2, etc.). Click OK.
Logical volume type: Click List and then click jfs2 (Enhanced Journaled File System).
Range of physical volumes: Click List and then click maximum.
Logical volume label: Enter /db1.
Maximum number of logical partitions (num.):
•
•
•
If one hard disk, enter 512
If two hard disks, enter 1024
If three hard disks, enter 1536
Click OK. A success message displays when complete. Click Done. Click Cancel to return to the
System Management Interface Tool main page.
5. Repeat steps 2 through 4 for lv02 through lv06. Refer to Table 13, Creating database logical volumes.
47
48
Facility Commander 2.2
Installation Manual
6. Click Cancel to exit the page.
Table 13. Creating database logical volumes
Volume group
Logical volume name
Logical volume label
rootvg
lv01
/db1
lv02
/db2
lv03
/db3
lv04
/db4
lv05
/log
lv06
/bud
Allocating space for the databases
To allocate space for the databases, follow these steps:
1. From the System Management Interface Tool main page, click System Storage Management (Physical
and Logical Storage), File systems, Add/Change/Show/Delete File Systems, Enhanced Journaled File
Systems, and then Add an Enhanced Journaled File System on a previously defined logical volume.
2. The Add an Enhanced Standard Journaled File System page opens. Fields indicated with an asterisk
(*) are required. Enter the following:
Logical volume name: Click List, and then select lv01
Mount point: /db1
Mount automatically at system restart?: Yes
3. Click OK. A success message displays when complete. Click Done. Click Cancel to return to the
System Management Interface Tool main page. Repeat steps 1 and 2 for lv02 through lv06. Refer to
Table 14, Logical volume sizing for databases
4. Exit from the System Management Interface Tool main page.
5. Reboot the system by typing: shutdown –Fr [Enter]
Do not use the reboot command at any time.
6. Open the System Management Interface Tool as follows:
On the command line, type: smit, and then press Enter.
or
Open the Application Manager and double-click the SMIT icon.
7. The System Management Interface Tool main page opens. Click System Storage Management
(Physical and Logical Storage), File systems, Add/Change/Show/Delete File Systems, Enhanced
Journaled File Systems, and then Change/Show Characteristics of an Enhanced Journaled File System.
8. The Single Select List page opens. Select /db1 from the Files System Name list.
9. The Change/Show Characteristics of an Enhanced Journaled File System page opens.
10. In the Size of File System field, Unit size, click List. Select Megabytes for the unit size.
Chapter 5
Installing Databases
11. In the Number of units (Num.), enter the appropriate value as shown in Table 14, Logical volume
sizing for databases. Click Ok. You are notified when this process successfully completes.
12. Repeat steps 6 through 10 for /db2, /db3, /db4, /log, and /bud. Refer to Table 14, Logical volume sizing
for databases.
Table 14. Logical volume sizing for databases
Volume
group
Logical
volume name
Mount point
Size required (MB)
Size to enter (MB)
rootvg
lv01
/db1
2,048 (S) 2,048 (M) 2,048 (L)1
2,400 (S) 2,400 (M) 2,400 (L)
lv02
/db2
2,048(S) 2,048 (M)
2,400 (S) 2,400 (M) 2,400 (L)
lv03
/db3
256 (S)
lv04
/db4
4,096 (S) 12,288 (M) 32,768 (L) 4,700 (S) 13,800 (M) 36,500 (L)
lv05
/log
2,048 (S) 4,096 (M)
lv06
/bud
32,768
1.
2,048 (L)
384 (M) 512 (L)
8,192 (L)
400 (S) 500 (M) 700 (L)
2,400 (S) 4,700 (M) 9,300 (L)
36,000
S = Standard database, M = Medium database, L = Large database
File system sizing
To size the file systems, follow these steps:
1. From the System Management Interface Tool main page, click System Storage Management (Physical
and Logical Storage), File systems, Add/Change/Show/Delete File Systems, Enhanced Journaled File
Systems, and then Change/Show Characteristics of an Enhanced Journaled File Systems.
2. The Single Select List page opens. Based on the sizing changes you need to make, select a File System
Name from the Single Select list.
3. The Change/Show Characteristics of an Enhanced Journaled File System page opens.
4. In the Size of File System field, Unit size, click List. Select Megabytes for the unit size.
5. In the Number of units (Num.), enter the appropriate value as shown in Table 15, System sizing
requirements. Click Ok. You are notified when this process successfully completes.
6. Repeat steps 2 through 6 for all file systems that require resizing.
Table 15. System sizing requirements
Volume
group
Logical
volume name
Enter mount
point
Size required (MB)
Size to enter (MB)
rootvg
hd1
/home
512
600
hd2
/usr
5,6,144
7,000
hd3
/tmp
2,048
2,400
hd4
/
4,096
5,000
hd9var
/var
4,096
4,800
49
50
Facility Commander 2.2
Installation Manual
To size the boot and paging logical volumes, follow these steps:
1. Open the System Management Interface Tool as follows:
On the command line, type: smit, and then press Enter.
or
Open the Application Manager and double-click the SMIT icon.
2. The System Management Interface Tool main page opens. Click System Storage Management
(Physical and Logical Storage), Logical Volume Manager, Logical Volumes, Set Characteristic of a
Logical Volume, and then Increase the Size of a Logical Volume.
3. The Increase the size of a Logical Volume dialog box opens. Click List, and then select boot or
paging to add it to the Logical Volume name field on the Increase the size of a Logical Volume
dialog box. Click Ok.
4. The Increase the size of a Logical Volume page opens. In the Number of Additional logical partitions
(Num.) field, enter a number of blocks of 128 MB that you want to add or delete from the existing
value. Click Ok.
Example: The current paging file size is 4 logical partitions (4 x 128 MB = 512 MB) and you want to
increase the size to 1024 MB. Put a value of 4 in the Number of Additional logical partitions (Num.)
field so that the logical partitions will now be 8 (8 x 128 MB = 1024 MB).
5. You are notified when this process successfully completes. Click Done. Click Cancel to return to the
System Management Interface Tool main page.
6. Exit from the System Management Interface Tool main page.
Volume group
Logical volume name
Recommended size
rootvg
hd5 (boot)
100 MB
hd
hd6 (paging)
RAM
Paging space
Less than 1 GB
2 times the size of RAM
1 GB to 2 GB
1.5 times the size of RAM
2 GB to 8 GB
Equal to the size of RAM
More than 8 GB
0.75 times the size of RAM
Chapter 5
Installing Databases
Installing the AIX Informix database
To install the AIX Informix database, follow these steps:
1. Log in as root, and then open a terminal window.
2. Log into Bash by typing bash in the terminal window.
3. Insert the Facility Commander 2.2 Installation DVD. If the autorun feature does not launch, mount the
DVD and start the installation as follows:
Change directories to mnt:
cd /mnt [Enter]
Make the dvd directory:
mkdir dvd [Enter]
Mount the DVD:
mount -vcdrfs -oro /dev/cd0 /mnt/dvd [Enter]
Change directories to dvd:
cd dvd [Enter]
If you are installing Facility Commander from an xterm window, type the following command:
export DISPLAY=<IP address of this computer>:0.0 [Enter]
Start the Facility Commander installation:
sh FC_Installer_aix [Enter]
4. The Facility Commander Welcome page opens as shown in Figure 15. Click Database.
Figure 15. Facility Commander Welcome page
51
52
Facility Commander 2.2
Installation Manual
5. The Database Installation and Setup page opens. Click Informix. A dialog box opens to confirm that
you want to install Informix. Click Yes.
6. The Informix Database Introduction page opens. Click Next to continue.
7. The Informix Database License Agreement page opens. Click I accept the terms of the License
Agreement, and then click Next.
8. The Informix Password page opens. Enter a password (minimum length is six characters) for the
Informix user account. This creates an Informix user, group, and owner. Click Next.
9. The Database Size page opens. Select the size of the database, and then click Next.
Figure 16. Database Size page
10. The Data Files page opens as shown in Figure 17.
The drive must be a local drive on the system; it cannot be a network drive. The data file structure
consists of:
•
•
•
Master (/db1): Includes the data dictionary and schema
DB Logs (/db2): Includes the Facility Commander database
Log (/log): Includes logical log archive (backup) files
Select the disk drives to install the database, and then click Next.
Chapter 5
Installing Databases
Figure 17. Data Files page
11. The Pre-Installation Summary page opens.
This page allows you to verify the following before installing the database:
•
•
Product Name (Informix)
Disk Space Information (lists the required and available disk space)
Click Install to complete the installation. A progress bar displays during the installation.
12. When the installation is complete, a message displays stating the database has been successfully
installed. Click Done. The system must be rebooted after installation.
13. To reboot the system, type: reboot [Enter]
14. If errors occur, during the Informix installation, go to /tmp/informix. The error file is named
InformixDatabase_InstallLog.log. Use the more command to review the log file.Continue
with Installing the AIX Informix Schema on page 54.
53
54
Facility Commander 2.2
Installation Manual
Installing the AIX Informix Schema
To install the Informix database, follow these steps:
1. Log in as root.
2. Open a terminal window, and then mount the DVD and start the installation as follows:
Mount the DVD:
mount -vcdrfs -oro /dev/cd0 /mnt/dvd [Enter]
Change directories to dvd:
cd /mnt/dvd [Enter]
If you are installing Facility Commander from an xterm window, type the following command:
export DISPLAY=<IP address of this computer>:0.0 [Enter]
Start the Facility Commander installation:
sh FC_Installer_aix [Enter]
3. The Facility Commander Welcome page opens as shown in Figure 18. Click Database.
Figure 18. Facility Commander Welcome page
4. A dialog box opens and asks if you want to upgrade the schema for Informix. Click No.
5. A dialog box opens and asks if you want to install the schema for Informix. Click Yes.
6. The Database Installation and Setup page opens. Click Informix Schema.
7. A dialog box opens confirming that Informix must already be installed on your system. Click Yes to
continue setup of your database.
8. The Informix Schema Introduction page opens. Click Next to continue.
Chapter 5
Installing Databases
9. The Informix Schema License Agreement page opens. Click I accept the terms of the License
Agreement, and then click Next.
10. The Informix ppadmin Password page opens. Enter a password for the ppadmin User, and then click
Next.
The ppadmin User has Database Administrator and resource privileges, which allows this user to
create and remove database objects.
11. The Informix ppapp Password page opens. Enter a password for the ppapp User, and then click Next.
The ppapp User has database connect privileges, which allows this user to insert and update
information in the databases.
12. The Database Size window opens. Select the same database size used during installation of the
Informix database, and then click Next.
13. The Schema Data Files page opens. See Figure 19.
The drive must be a local drive on the system; it cannot be a network drive. The data file structure
consists of:
•
•
Data (/db3): Includes the data dictionary and schema
History (/db4): Includes the Facility Commander history tables
Select the disk drives to install the schema data and history files, and then click Next.
Figure 19. Schema Data Files page
14. The Pre-Installation Summary page opens.
This page allows you to verify the following before installing the database:
•
•
Product Name (Informix Schema)
Disk Space Information (lists the required and available disk space)
Click Install to complete the installation.
55
56
Facility Commander 2.2
Installation Manual
15. When the installation is complete, the Install Complete page opens. Click Done. The system must be
rebooted after installation.
16. To reboot the system, type: reboot [Enter]
If errors occur, during the Informix Schema installation, go to /tmp/informix. The error file is
named InformixSchema.InstallLog.log. You can also go to /tmp/informix/logs.The
error files are named SchemaCreator.log, SchemaCreatorErr.log, and create_files.
Use the more command to review the log file.
Continue to Installing Facility Commander applications on page 57.
Chapter 6 Installing Facility Commander
applications
This chapter describes the necessary procedures to install Facility Commander for
server and client workstations, as well as remote media servers.
In this chapter:
Overview . . . . . . . . . . . . . . . . . . . . . . . . . . . . . . . . . . . . . . . . . . . . . . . . . 58
Installing Facility Commander 2.2 Server . . . . . . . . . . . . . . . . . . . . . . . 58
License Manager. . . . . . . . . . . . . . . . . . . . . . . . . . . . . . . . . . . . . . . . . . . 63
Installing the Media Server on the Facility Commander Server . . . . . . 64
Installing Remote Media Servers . . . . . . . . . . . . . . . . . . . . . . . . . . . . . . 66
Installing Client Workstations . . . . . . . . . . . . . . . . . . . . . . . . . . . . . . . . 69
Host File Setup . . . . . . . . . . . . . . . . . . . . . . . . . . . . . . . . . . . . . . . . . . . . 71
Starting Facility Commander . . . . . . . . . . . . . . . . . . . . . . . . . . . . . . . . . 73
58
Facility Commander 2.2
Installation Manual
Overview
This chapter contains the instructions necessary for installing the Facility Commander server, media server,
and client workstations as well as other components and options. Refer to the appropriate sections listed below.
Exit all other applications before starting the installation process.
If you are upgrading your Facility Commander 2.1 server, you must first complete the database migration
procedures prior to installing Facility Commander 2.2 server installation. Refer to, Upgrading from version 2.1
to 2.2 on page 18.
The database must be installed before proceeding to the server and client installations. Refer to Chapter 5,
Installing Databases on page 37.
Installing Facility Commander 2.2 Server
Depending on the operating system, follow these steps:
Linux
1. Log in as root.
2. Insert the Facility Commander Installation DVD. If the DVD does not autorun, perform the following:
Mount the DVD:
mount /dev/dvd /media/dvd [Enter]
Change directories to dvd:
cd dvd [Enter]
Start the Facility Commander installation:
sh FC_Installer_Linux [Enter]
3. Continue with Continuing the Server Installation on page 60.
AIX
Prior to installing Facility Commander 2.2, Java 6 must be installed.
To install Java 6:
Start the Facility Commander installation:
sh FC_Installer_aix [Enter]
1. Mount the Facility Commander installation DVD as follows:
a. Mount the DVD by typing the following command:
mount -vcdrfs -oro /dev/cd0 /mnt/dvd [Enter]
b. Change directories to dvd by typing the following command:
cd dvd [Enter]
c. If you are installing Facility Commander from an Xterm window, type the following command:
EXPORT display=<IP address of this computer>:0.0 [Enter]
Chapter 6
Installing Facility Commander applications
2. Copy the Java6.sdk.tar file by typing the following commands:
mkdir /tmp/java_home [Enter]
cd /tmp/java_home [Enter]
cp /mnt/dvd/aixsdk/Java* . [Enter]
3. Untar the Java6.sdk.tar file by typing the following command:
tar -xvpf Java6.sdk.tar [Enter]
4. Install the Java SDK file by typing the following command:
smitty installp [Enter]
5. The Install and Update Software page opens. Click Install Software.
6. The Install Software page opens. Enter ./ in the INPUT device / directory for software entry field,
then press Enter.
7. With the cursor on SOFTWARE to install, click F4 to view the Java6.sdk software to install, and then
click F7 to select it. Press Enter.
8. With the cursor on ACCEPT new license agreements?, click Tab to accept the license agreement.
9. Press Enter twice to begin the installation. Java 6 software is installed.
10. Press F10 to exit the installation page.
11. To verify that Java 6 has been installed, type the following command:
lslpp -l | grep Java
All the installed Java runtime environments available will be listed. Look for Java6.sdk in the output.
12. Once Java 6 has been successfully installed, open the Facility Commander Welcome page by typing
the following command:
cd /mnt/dvd [Enter]
sh FC_Installer_aix [Enter]
13. Continue with Continuing the Server Installation on page 60.
59
60
Facility Commander 2.2
Installation Manual
Continuing the Server Installation
To continue the server installation, follow these steps:
1. With the Facility Commander Installation DVD inserted in the DVD drive, click Server from the
Facility Commander Welcome page as shown in Figure 20.
Figure 20. Facility Commander Welcome page
2. A dialog box opens confirming that you want to install the server. Click Yes.
3. The Facility Commander Server Introduction page opens, click Next.
4. The Facility Commander License page opens. Select “I accept the terms of the License Agreement,”
and then click Next.
5. The Select a Database page opens.
Linux/AIX: Select Informix
6. The Hostname page opens. Accept the default value. This is the Facility Commander Server host
name. Click Next.
7. The Username page opens. Enter a database user name for the database server or accept the default
value. Click Next.
The default Informix database user name is ppapp.
8. The Server Database Password page opens. Enter the password for the database server, and then click
Next.
This password must match the one assigned when you created the user account as in the appropriate
procedure listed below.
•
•
Informix for Linux (Linux Informix Database on page 38)
Informix for AIX (AIX Informix Database on page 45)
Chapter 6
Installing Facility Commander applications
9. The Database Port page opens. Accept the default setting for the port number to which the server is
connected. Follow the on-screen directions based on the installed database, and then click Next.
The defaults values are:
•
Informix: 9088
10. The Facility Commander NTPD page opens as shown in Figure 21.
Figure 21. Facility Commander NTPD page
Enter the host name of the machine that will serve as the master-timekeeper. The system uses NTPD as
its time synchronization method between the Facility Commander and other systems.
Note:
Consult your IT department for the host name of the NTP server. If there is none, enter the host name of the
Picture Perfect server. You will set up the NTP services on the Picture Perfect system later during the
installation.
AIX/Linux: Enter a Stratum Value. The Stratum Value determines a computer’s role in the time
synchronization process. By default, the Picture Perfect server is assigned a Stratum Value of 10. Enter
11 here, unless the Picture Perfect server has been assigned a different value. Check the /etc/
ntp.conf on the Picture Perfect server. If that file does not exist, then enter 11.
Click Next.
11. The Modem Setup page opens. Click Setup Modem to set up your modem or if it is already installed,
click Next.
12. The SSL page opens. The Facility Commander Server host name is automatically entered. Enter the
name of the organization, the organizational unit (if applicable), city, state, and country. Click Next.
SSL enables a secure communication channel between the access control system and the Facility
Commander Server.
13. The Pre-Installation Summary page opens. Click Install to complete the installation. A progress bar
displays during the installation.
This page allows you to verify the following before actually launching the installation:
61
62
Facility Commander 2.2
Installation Manual
•
•
•
Product Name (Facility Commander)
Install Folder (location where Facility Commander files are stored)
• Linux/AIX (Default Directory)/var/FacilityCommanderServer
Disk Space Information (required and available space)
14. When the installation is complete, the Facility Commander Server has been successfully installed
page opens. Click Done to finish the installation. You are returned to the Facility Commander Main
Welcome window. Click Exit.
If errors occur, during the Facility Commander Server installation, go to /var/
FacilityCommanderServer. The error file is named
FacilityCommander_InstallLog.log. Use the more command to review the log file.
15. A dialog box opens stating Do you want to reboot now? Click Yes.
After installing Facility Commander Server, you will need to obtain a software license key. Continue to
License Manager on page 63.
Media server and client Web installations
To enable the media server and client installations to be installed from the Facility Commander 2.2 Server over
the Web, the web installer files need to be manually copied from the webinstallers folder located in the root of
the Facility Commander Installation DVD to the /var/FacilityCommanderServer/server/
webapps/Merlin folder in the Facility Commander 2.2 server.
To copy the Web installer files onto the Facility Commander 2.2 server:
1. Open a terminal window on the Facility Commander 2.2 server.
2. Type the following commands:
cd /var/FacilityCommanderServer/server/webapps/Merlin
cp -r <DVD mount point>/Web_Installers/* .
3. Exit the terminal window.
Chapter 6
Installing Facility Commander applications
License Manager
Facility Commander includes a copy-protection mechanism that requires a software license key. Facility
Commander licensable components of Facility Commander system include, but are not limited to, the number
of workstations, number of cameras, and software interface options.
After Installing Facility Commander, the License Manager window displays a 10-character machine code, and
prompts you to install the 40-character license key. This is when you should call GE Security for the key.
To complete licensing for Facility Commander, follow these steps:
1. Make sure you have successfully installed the appropriate database for the operating system and the
Facility Commander server software.
2. Reboot the system. For Linux and AIX users, make sure you are operating in graphical mode.
3. Open the License Manager page as follows:
Linux: Log in as root. Click the Facility Commander License icon on your desktop. A dialog box
opens to confirm that you want to run the Facility Commander License Manager, click Run.
The License Manager page opens and displays a 10-character machine code. Continue to the next step.
AIX: Log in as root. Open a terminal window, and type:
cd /var/FacilityCommanderServer/server/webapps/Merlin/WEB-INF/lib [Enter]
Type ./LicenseManager [Enter]
The License Manager page opens and displays a 10-character machine code. Continue to the next step.
4. To obtain a license key, contact GE Security Customer Support at:
Telephone: 1-888-437-3287, option 5
Email: [email protected]
Provide the following information. Customer Support will ask for the 10-character machine code.
After you have supplied that, Customer Support provides a 40-character license key code.
•
•
•
•
Customer company name and address
Business Partner name and address
Sales Order number
10-character machine code identifying the system
In the License code field, enter the license key code as provided by Customer Support, and then click
Validate and Save.
5. Check that all licensed components listed in the Facility Commander License Manager window are
correct. The Select location of License File page opens. Accept the default location for the
license.xml file. Click Save.
6. Reboot the system.
Linux: Type: reboot
AIX: Type: shutdown Fr now
Once you install the key, we strongly recommend that you store the key in a secure place if the system has to be
re-installed for any reason. Also, if the network interface card has to be replaced, a new key must be generated.
63
64
Facility Commander 2.2
Installation Manual
Installing the Media Server on the Facility Commander
Server
The Media Server can be installed on the Facility Commander Server, or on a separate computer. To install the
Media Server on a separate computer refer to, Installing Remote Media Servers on page 66.
If the Media Server is installed on a Windows operating system and the firewall is ON, all ports that are
configured in the Digital Video Recorders page, Addresses tab, need to be added to the firewall exceptions list.
To install the Media Server on the Facility Commander Server, follow these steps:
1. Insert the Facility Commander Installation DVD. A window displays asking if you want to run
/mnt/cdrom/autorun? Click Yes to continue.
2. The Facility Commander Welcome page opens as shown in Figure 22. Click Media Server.
3. A dialog box opens to confirm that you want to install the Media Server. Click Yes.
Figure 22. Facility Commander Media Server Welcome page
4. The Facility Commander Media Server Introduction page opens. Click Next.
5. The Facility Commander Media Server License page opens. Select “I accept the terms of the License
Agreement,” and then click Next.
6. The Facility Commander Server page opens. Enter the Facility Commander Server hostname. Accept
the default setting for the Facility Commander Server port. Click Test to verify the connection.You are
notified whether the test passes or fails Click Next.
Chapter 6
Installing Facility Commander applications
7. The Facility Commander Media Server NTPD page opens as shown in Figure 23.
Enter the host name of the machine that will serve as the master-timekeeper. The system uses NTPD as
its time synchronization method between the Facility Commander and other systems.
Note:
Consult your IT department for the host name of the NTP server. If there is none, enter the host name of the
Picture Perfect server. You will set up the NTP services on the Picture Perfect system later during the
installation.
AIX/Linux: Enter a Stratum Value. The Stratum Value determines a computer’s role in the time
synchronization process. By default, the Picture Perfect server is assigned a Stratum Value of 10. Enter
11 here, unless the Picture Perfect server has been assigned a different value. Check the /etc/
ntp.conf on the Picture Perfect server. If that file does not exist, then enter 11.
Figure 23. Facility Commander Media Server NTPD page
8. The Facility Commander Media Server Pre-Installation Summary page opens. This page allows you to
verify the following before actually launching the installation:
•
•
•
•
•
Product Name
Install Folder
Link Folder
Install Set:
Disk Space Information
9. Click Install to complete the installation. A progress bar displays during installation.
10. The Install Complete pages opens. Click Done to quit the Installer.
11. You are returned to the Facility Commander Welcome page. Click Exit.
12. A dialog box opens asking if you want to reboot now. Click Yes.
65
66
Facility Commander 2.2
Installation Manual
Installing Remote Media Servers
The Remote Media Server is an optional component when there are several geographically distributed sites and
it may be undesirable to transmit video clips across the network. For more information, see:
•
•
Centralized video management on page 3
Distributed video management on page 4
The media server software is installed on a separate, dedicated computer. The media server connects to remote
DVRs and processes the requests for video tagging and video playback. The Facility Commander server would
normally process the requests in a smaller environment.
The Media Server runs the media software, does not have a user interface, and does not contain a database. In
addition, some digital video software interfaces are Windows DLL-dependent. In those cases, a Windowsbased Media Server is required to play video.
The software must be installed on a Windows Professional XP, Windows Vista Professional, Windows Server
2008, or Linux 5.3 system (media server only).
The Media Server software can be installed in one of two ways:
•
By connecting to the Facility Commander Server computer through the Web browser
Note:
•
The web installers need to be manually copied from the webinstallers folder in root of the Facility Commander
Installation disc to the /var/FacilityCommanderServer/server/webapps/Merlin folder in the
Facility Commander 2.2 Server. Refer to , Media server and client Web installations on page 62.
From the Facility Commander Installation DVD.
Installing the Media Server from the Facility Commander Server
Note:
Prior to installing the Media Server from the Facility Commander Server, the hosts file on each computer must be set up
properly for the computers to communicate across the network. Refer to , Host File Setup on page 71.
To install the Media Server application from the Facility Commander Server computer, follow these
steps:
1. Open a Web browser.
2. Click in the Address bar and type the following URL:
http://hostname:8085/Merlin/MediaServer/Web_Installers/install.htm
Note:
Hostname represents the Facility Commander host name. Enter the host name or IP address in this instance
only.
3. The Facility Commander Media Server download page opens. Click Windows Download.
4. The File Download dialog box opens. Click Run to begin the MediaServer.exe download or click Save
to save the MediaServer.exe to your computer.
If you click Save, after the download is complete, double-click the MediaServer.exe file to begin the
download.
Chapter 6
Installing Facility Commander applications
5. Windows only: If upgrading a Facility Commander 2.1 media server, Facility Commander 2.1 media
server must first be uninstalled prior to installing the new Facility Commander 2.2 media server.
Click Start, Settings, Control Panel, and then Add or Remove Programs.
Click Facility Commander Media Server from the list, and then click Remove.
6. Proceed to step 2 of , Installing the Media Server from the Installation DVD on page 67.
Installing the Media Server from the Installation DVD
To install the Media Server application from the Facility Commander Installation DVD:
1. With the Facility Commander Installation DVD inserted in the DVD drive, the Facility Commander
Welcome page opens.
2. Click Media Server from the Facility Commander Welcome page as shown in Figure 24.
Figure 24. Facility Commander Welcome page
3. Windows only: If upgrading a Facility Commander 2.1 media server, perform these additional steps:
A dialog box opens asking you to confirm that you are ready to upgrade the Facility Commander
Media Server. Click Yes and another dialog box opens, showing the location of the Media Server
archive. When prompted, click Uninstall to delete the previous installation of the Facility Commander
Client.
Click Done when the uninstall completes, and the proceed to the next step.
4. A dialog box opens to confirm that you want to install the Media Server. Click Yes.
5. The Facility Commander Media Server Introduction page opens. Click Next.
6. The Facility Commander Media Server License page opens. Select “I accept the terms of the License
Agreement,” and then click Next.
67
68
Facility Commander 2.2
Installation Manual
7. The Facility Commander Server page opens. Enter the Facility Commander Server hostname. Accept
the default setting for the Facility Commander Server port. Click Test to verify the connection.You are
notified whether the test passes or fails Click Next.
8. The Facility Commander Media Server NTPD page opens as shown in Figure 25.
Enter the host name of the machine that will serve as the master-timekeeper. The system uses NTPD as
its time synchronization method between the Facility Commander and other systems.
Note:
Consult your IT department for the host name of the NTP server. If there is none, enter the host name of the
Picture Perfect server. You will set up the NTP services on the Picture Perfect system later during the
installation.
Linux: Enter a Stratum Value. The Stratum Value determines a computer’s role in the time
synchronization process. By default, the Picture Perfect server is assigned a Stratum Value of 10. Enter
11 here, unless the Picture Perfect server has been assigned a different value. Check the /etc/
ntp.conf on the Picture Perfect server. If that file does not exist, then enter 11.
Windows: The Stratum Value is greyed out and cannot be edited.
Figure 25. Facility Commander Media Server NTPD page
9. The Facility Commander Media Server Pre-Installation Summary page opens. This page allows you to
verify the following before actually launching the installation:
•
•
•
•
•
Product Name
Install Folder
Link Folder
Install Set
Disk Space Information
10. Click Install to complete the installation. A progress bar displays during installation.
11. The Install Complete pages opens. Click Done to quit the Installer.
12. You are returned to the Facility Commander Welcome page. Click Exit.
Chapter 6
Installing Facility Commander applications
13. A dialog box opens asking if you want to reboot now. Click Yes.
Installing Client Workstations
The client software provides monitor and control functionality through a series of applications that include the
Alarm Monitor, Event Monitor, Video Viewer, and Graphics Viewer.
The software must be installed on a Windows Professional XP or Windows Vista Professional system (clients
only).
The Client software can be installed in one of two ways:
•
By connecting to the Facility Commander Server computer through the Web browser, or
Note:
•
The web installers need to be manually copied from the webinstallers folder in root of the Facility Commander
Installation Disc to /var/FacilityCommanderServer/server/webapps/Merlin folder. in the Facility Commander
2.2 Server. Refer to , Media server and client Web installations on page 62
From the Facility Commander Installation DVD.
Installing the Client from the Facility Commander Server
Note:
Prior to installing the Client from the Facility Commander Server, the hosts file on each computer must be set up properly
for the computers to communicate across the network. Refer to , Host File Setup on page 71.
To install the client application from the Facility Commander Server computer, follow these steps:
1. Open a Web browser.
2. Click in the Address bar and type the following URL:
http://hostname:8085/Merlin/client/Web_Installers/install.htm
Note:
Hostname represents the Facility Commander host name. Enter the host name or IP address in this instance
only.
3. The Facility Commander Client download page opens. Click Windows Download.
4. The File Download dialog box opens. Click Run to begin the Client.exe download or click Save to
save the Client.exe to your computer.
If you click Save, after the download is complete, double-click the Client.exe file to begin the
download.
5. Windows only: If upgrading a Facility Commander 2.1 client, Facility Commander 2.1 client must
first be uninstalled prior to installing the new Facility Commander 2.2 client.
Click Start, Settings, Control Panel, and then Add or Remove Programs.
Click Facility Commander Client from the list, and then click Remove.
6. Proceed to step 3 of Installing the Client from the Installation DVD.
69
70
Facility Commander 2.2
Installation Manual
Installing the Client from the Installation DVD
To install the client application from the Facility Commander Installation DVD:
1. With the Facility Commander Installation DVD inserted in the DVD drive, the Facility Commander
Welcome page opens.
2. Click Client from the Facility Commander Welcome page as shown in Figure 26.
Figure 26. Facility Commander Welcome page
3. If upgrading the Facility Commander client, perform these additional steps:
A dialog box opens asking you to confirm that you are ready to upgrade the Facility Commander
Client. Click Yes and another dialog box opens, showing the location of the Client archive. When
prompted, click Uninstall to delete the previous installation of the Facility Commander Client.
Click Done when the uninstall completes.
4. A confirmation dialog box opens. Click Yes.
5. The Facility Commander Client Introduction page opens, click Next.
6. The Facility Commander License page opens. Select “I accept the terms of the License Agreement,”
and then click Next.
7. The Choose Install Folder page opens to indicate the directory that the Facility Commander client will
be installed in. Accept the default location or specify another by clicking Choose. If changed the
location, but decided to accept the default setting, click Restore Default Folder. Click Next.
8. The Choose Shortcut Folder page opens. Select a location for the Facility Commander Client shortcut
from the available options, and then click Next.
9. The Facility Commander Server page opens as shown in Figure 27. Enter the host name and the port
number of the Facility Commander server. Click Test to verify the connection.You are notified whether
the test passes or fails Click Next.
Chapter 6
Installing Facility Commander applications
Figure 27. Facility Commander Server page
10. The NTPD page opens. Enter the NTP server name, and then click Next.
11. The Pre-Installation Summary page opens. Click Install to complete the installation. A progress bar
displays during the installation.
This page allows you to verify the following before actually launching the installation:
•
•
•
•
Product Name (Facility Commander Client)
Install Folder (location where Facility Commander files are stored)
Shortcut Folder (location of the Facility Commander Client shortcut)
Disk Space Information (required and available space)
12. The Install Complete page opens. Click Yes, restart my system, and then click Done.
Continue to Host File Setup.
Host File Setup
The hosts file on each computer in a Facility Commander system must be set up properly for all computers to
communicate across the network.
The Facility Commander server, remote media servers, and Kalatel DVRs must have static IP addresses. Client
systems that are used for browser configuration or the Command and Control clients do not require static IP
addresses.
71
72
Facility Commander 2.2
Installation Manual
Client systems can use DHCP as long as long as there is a domain name server (DNS) that can resolve their
host names with IP addresses. Refer to Table 16.
Table 16. Hosts File Configuration Table
Not Using DNS
(you need hosts
file entries for:)
Using DNS for
Clients only
(you need hosts
file entries for:)
Computer
system
Code
Static IP
Required?
FC Server
F
Y
FMCP
FMP
Remote
Media
Servers
M
Y
FMCP
FMP
DVRs
D
Y
Not applicable
Not applicable
Client
systems
C
N
FMP
FMP
Picture
Perfect
Server
P
Y
F
F
Using DNS
systemwide
No entries
required for
the hosts
file on any
computer
system.
The host name should be entered wherever prompted except for the DVR. Do not use localhost as the host
name of a computer because Facility Commander uses the host name in services and for SSL certificates.
The Facility Commander definition of host name is the response that displays when you type hostname at
the command prompt in a terminal window.
The hostname command is valid regardless of the computer type (server, client) or operating system
(Windows, Linux, AIX). Host names are case-sensitive.
If you are not using DNS (domain name server), remember to add IP addresses in the appropriate host file in
the /etc directory as shown in Table 16. For example, the Facility Commander server requires IP addresses
in its host file for itself, media server (if present), the client, and the Picture Perfect server.
Make sure you can ping all computers by host name and DVRs by IP Address in all appropriate directions.
It is necessary to include Picture Perfect in all other computers’ host files because Picture Perfect is the master
timekeeper and is designated as the server for NTP time synchronization of the system. Refer to Appendix A,
Time Synchronization (NTP Setup).
If the host name or IP address of the Facility Commander server or client systems needs to be changed, please
refer to the “Advanced Configuration” chapter in the Facility Commander Administration Guide.
Continue to Installing the Picture Perfect Interface on page 95.
Chapter 6
Installing Facility Commander applications
Starting Facility Commander
Facility Commander starts automatically as a service in the Windows, Linux, and AIX operating systems.
To access and configure Facility Commander, follow these steps:
1. Open a Web browser.
2. Click in the Address bar and type the following URL:
http://hostname:8085/Merlin
Hostname represents the Facility Commander Application Server host name.
3. When the Login page displays, enter the user name (admin) and password (admin).
73
74
Facility Commander 2.2
Installation Manual
Chapter 7 Contacting technical support
This chapter provides information on how to contact technical support in case you
need assistance with your GE equipment.
In this chapter:
Contacting technical support . . . . . . . . . . . . . . . . . . . . . . . . . . . . . . . . . 76
76
Facility Commander 2.2
Installation Manual
Contacting technical support
For assistance installing, operating, maintaining, and troubleshooting this product, refer to this document and
any other documentation provided. If you still have questions, you may contact technical support during
normal business hours (Monday through Friday, excluding holidays, between 8 a.m. and 8 p.m. Eastern Time).
GE Security
United States: 1-888-GE SECURITY (1-888-437-3287)
Asia: 852-2907-8108
Australia: 61-3-9259-4700
Europe: 48-58-326-22-40
Latin America: 503-885-5700
Appendix A Time Synchronization (NTP Setup)
This appendix provides information on how to synchronize the time between all
the components of your Facility Commander system.
In this appendix:
Overview . . . . . . . . . . . . . . . . . . . . . . . . . . . . . . . . . . . . . . . . . . . . . . . . . 78
Achieving Time Synchronization. . . . . . . . . . . . . . . . . . . . . . . . . . . . . . . 78
Manual NTP Setup on the Picture Perfect Server . . . . . . . . . . . . . . . . . 79
78
Facility Commander 2.2
Installation Manual
Overview
It is essential that all devices and systems be synchronized for data accuracy. A Facility Commander system
may include:
•
•
•
•
•
Picture Perfect servers
Facility Commander application server
Facility Commander Remote Media Servers
Facility Commander clients and browsers
Digital Video Recorders (DVRs) and associated cameras.
Time synchronization across all components of the system, including Digital Video Recorders (DVRs) is
mandatory.
To illustrate the importance, consider an event-to-action mapping event to tag video associated with an alarm
condition.
For example, a Picture Perfect alarm is sent to the Facility Commander server and the associated video for the
alarm condition is tagged.
The timestamp of this video clip and the alarm event must be identical to make the association for both realtime viewing and subsequent history reporting.
It is very important all systems in this process be synchronized to the same master clock for data accuracy.
Contact your IT Department to find out if NTP services have been established at your site. If so, have the IT
Department implement it in the Picture Perfect and Secure Perfect servers. If not, follow the instructions below
to setup NTP in Picture Perfect.
The following section describes how to configure NTP services, if you want to use the Picture Perfect system
as the NTP master clock.
Achieving Time Synchronization
Network Time Protocol (NTP) is a protocol used to synchronize computer clock times in a network of
computers. NTP services are configured to start when the operating system boots up.
•
•
•
The Picture Perfect server is designated as the master time-keeper and runs the NTP service as Server.
All Facility Commander systems run the NTP service as Client.
For DVR time synchronization, the Facility Commander server software sends the time to each DVR
at regular intervals.
NTP must be set up manually on the Picture Perfect server, and should be done at the same time that the EIF
package is installed.
The NTP services are set up automatically for the Facility Commander servers and clients during the Facility
Commander installation process.
79
Manual NTP Setup on the Picture Perfect Server
To set up the NTP service as a server in the Picture Perfect host, follow these steps:
1. Make sure that the NTP configuration file (/etc/ntp.conf)is set up properly. AIX and Linux use
the same file.
•
•
Refer to Picture Perfect (Linux System) on page 79.
Refer to Picture Perfect (AIX system) on page 80.
2. Start NTP as a service so that it becomes part of the boot-up (init) sequence.
•
•
Refer to NTP Config File on page 79.
Refer to NTP Service Startup on page 80.
3. Verify that NTP is running.
Picture Perfect (Linux System)
NTP Config File
The /etc/ntp.conf file must contain the following lines:
server 127.127.1.0
server <ntphostname>
ntphostname is the host name of the Picture Perfect to which the Facility Commander server is
synchronized.
fudge 127.127.1.0 stratum 10
driftfile /etc/ntp/drift
broadcastdelay 0.008
authenticate yes
NTP Service Startup
This section describes how to start the service, set the service to run as a permanent service, and verify the
service is running.
To start NTP as a permanent service, type:
# chkconfig ntpd on [Enter]
To verify that it is started as a permanent service, follow these steps:
1. Run setup from the command line.
2. Select System Services.
3. Verify there is an asterisk (*) next to ntpd.
4. Reboot the system.
80
Facility Commander 2.2
Installation Manual
To verify that the service is running, follow these steps:
Type:
ps –ef | grep ntp [Enter]
The response should be:
ntpd –U ntp
Picture Perfect (AIX system)
NTP Config File
Verify the /etc/ntp.conf file contains the following lines:
server 127.127.1.0
fudge 127.127.1.0 stratum 10
driftfile /etc/ntp.drift
tracefile /etc/ntp.trace
NTP Service Startup
This section includes instructions to start the service, verify the service set to run as a permanent service, and
that the service is running.
To start NTP from the command line (will not restart after a reboot), type:
startsrc –s xntpd [ENTER]
To start NTP as a permanent service, use SMIT as shown below:
smit
Communication Applications and Services
TCP/IP
Further Configuration
Server Network Services
Other Available Services
Select xntpd subsystem
Start using the xntpd Subsystem
BOTH
To verify that the service is running, type:
ps –ef | grep ntp
The response should be:
/usr/sbin/xntpd