1
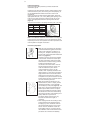
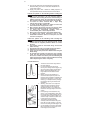
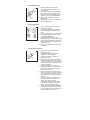
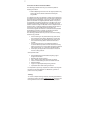
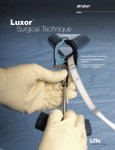
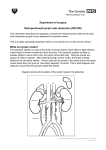
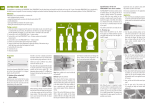
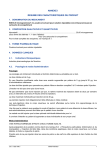
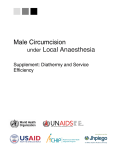
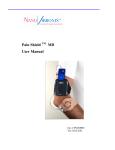
1
User Manual for Authorized & Trained Users Only
Intended use:
PrePex is a single use, disposable device; indicated for
circumcision of adult men, defined as circumferential excision
of the foreskin or prepuce at or near the level of coronal sulcus,
with minimal amount of preputial skin remaining.
Contraindications:
Dermatitis of the penis or foreskin, allergy to rubber, non -intact
skin on the penis or foreskin, active genital infection, warts on
the glans or the inner surface of the foreskin, anatomic
abnormality including phimosis, paraphimosis, torn or tight
frenulum, hypospadias, epispadias, any active penile diseases,
active infectious disease impairing health, history of bleeding
disorders, narrow foreskin opening.
Disposal:
Follow local, state and federal regulations with respect to
environmental protection when disposing of general and
infectious waste. If there are no regulations, the infectious
waste, including all device elements, tools and materials that
came in contact with the body or with body fluids should be
incinerated. Other general waste should be segregated and
stored in bins marked "General". The waste should then be
buried in a designated area.
Caution:
The device should not be used if the package has been
compromised. Use by trained personnel only. All device
components should not be reused at the risk of cross
contamination. The device is intended for adults only and is not
applicable for males under the age of 18. The device should be
used only in settings where suitable surgical facilities and skills
are available within a short time frame (6-12 hours) in order to
manage potentially serious complications resulting from device
displacements.
Device displacement when wearing the device, may lead to the
risk of adverse events. Informing the patient of safe behavior
when wearing the device is critical.
Clinical Experience:
Three clinical studies of PrePex were performed in Rwanda
according to the WHO official Evaluation Framework of Adult
Male Circumcision (MC) Devices1.
1. A study that demonstrated the safety & efficacy of the
PrePex device in 105 male subjects2. Results: All
subjects achieved circumcision with 1 case of diffuse
oedema after device removal, which resolved with
minimal intervention. Pain was minimal with brief
discomfort during device removal. The entire procedure
was bloodless, requiring no anesthesia, no suturing,
and no sterile settings. Subjects had no sick/absent
days associated with the procedure. Median time for
complete healing was 21 days after device removal.
There were no instances of erroneous placement and
no mechanical problems with the device. Conclusion:
The PrePex device was found to be safe and effective.
2. Randomized controlled study, comparing the safety
and efficacy of the PrePex in 144 adult male subjects to
a surgical circumcision method in 73 adult male
subjects3. Results: All subjects were circumcised in 10
working days. The nonsurgical MC mean procedure
time of 3.1 minutes (skin to skin), was significantly
shorter than the mean surgical procedure time (15.4
minutes skin to skin) (P , 0.0001). There were no
device-related adverse events. Healing time of the
PrePex arm was longer than the surgical arm.
Conclusion: PrePex nonsurgical MC, takes significantly
less time than surgical, is as safe, does not require
injections or sterile settings, is bloodless and seems to
be suitable for nurses.
2
3.
A Cohort field study that demonstrated the safety and
efficacy of the PrePex on 518 adult males, when the
procedure is performed by nurses4. Results: All 518
subjects from the pilot and pivotal phases achieved
complete circumcision. There were 5 AEs on 4
subjects (rate of 0.96%, 95% Confidence Interval:
0.31-2.24). AEs were moderate and were resolved
with simple intervention. Conclusions: The study
demonstrated that nurses can be easily trained to
perform safe and effective circumcisions using the
PrePex device.
Environmental Requirements and Storage Conditions:
Storage: -10ºC to 55ºC, away from direct sunlight, humidity up
to 80%.
Shelf Life:
The PrePex has a shelf life of 3 years.
Device Overview:
PrePex includes the following items:
1.
Placement Ring
2.
Elastic Ring
3.
Inner Ring
4.
Verification Thread
Leg
figure 1 – PrePex components
Accessoires:
The PrePex Sizing Plate (PSP) is intended for single use for
selecting an appropriate device size.
figure 2 – The PrePex Sizing Plate (PSP)
The use of PrePex requires additional tools and materials
which are not supplied with PrePex. For Placement:
Examination Gloves, Antiseptic solution, Skin Marker, Gauze,
5% Anesthetic Cream and Nurse Utility Scissors. For Removal:
Examination Gloves, Antiseptic solution, Sterile Harvey Wire
Scissors, Sterile Forceps, Sterile Spatula, Sterile Scalpel, 2
Wound dressings, Nurse Utility Scissors and a Cutter.
Patient Screening:
Before performing the procedure, screen the patient for any
contra indication, and physically test if the opening of the
foreskin is wide enough for the PrePex procedure. Perform the
test with examination gloves. Stretch the foreskin as described
in step 6 of the Placement procedure below, and visually asses
the flexibility of the foreskin and the opening. If there is
phimosis or tight frenulum (i.e. the opening is not wide enough
for the Inner Ring insertion), the patient should be contra
indicated for PrePex. Gently pull down the foreskin to expose
the sulcus and examine whether the foreskin is tight in the area
below the sulcus. If the foreskin is tight in the area below the
sulcus, the patient should be contra indicated for PrePex.
3
Patient Preparation:
During the PrePex MC procedure, providers should wear
examination gloves.
Prepare the skin with antiseptic solution, starting with the glans
and the shaft of the penis, and moving out to the periphery, as
per the WHO Manual for Male Circumcision Under Local
Anesthesia 5.
Use a new, single use PrePex Sizing Plate (PSP). Select the
appropriate size A, B, C, D, or E by sliding each opening of the
PSP over the glans and placing it directly under the coronal
sulcus. The appropriate size is the opening which fits best.
(figure 3)
Choose PrePex based on the sizing outcome (A, B, C, D or E).
Type
Diameter
Catalog #
A
26mm
DW0201
B
28mm
DW0202
C
30mm
DW0203
D
32mm
DW0204
E
34mm
DW0205
figure 3
Note – If the diameter under the coronal sulcus is too large and
it cannot fit in to the E opening or if it is too small and it cannot
fit precisely to size A, do not perform the PrePex procedure and
refer the patient to surgical circumcision.
Procedure preparation:
figure 4
figure 5
1. Mark the outer circumcision line according
to the WHO Manual for Male Circumcision
Under Local Anesthesia5 (Chapter 5-15,
and Fig 5.17, Chapter 5-27 and Fig 5.33
and Fig 5.34) using a standard medical skin
marker only (figure 4).
2. This step is common to all of the methods
of circumcision. Stretch the foreskin past
the glans and release. When the foreskin
has returned to a natural “resting” position,
indicate the intended line of the
circumcision with a skin marker. The line
should correspond with the corona, just
under the head of the penis. Some
uncircumcised men have a very lax
foreskin, which is partially retracted in the
resting position. In such cases it is better to
apply a little tension to the foreskin before
marking the circumcision line. However, it
is important not to pull the foreskin too hard
before marking the line, as this will result in
too much skin being removed.
3. Mark the intended circumcision line, as
described above, with a V shape, pointed
towards the frenulum, on the underside
(ventral aspect) of the penis (figure 5). The
apex of the V should correspond with the
midline raphe. Make sure the V shape is
not too sharp. Make sure that the marked
circumcision line will not be erased during
the PrePex procedure. If the marking is not
clearly visible do not perform the
procedure. Before continuing it is very
important to mark the line again, if
necessary
4. After verifying that the line marking is clear,
pull the foreskin down towards the body
and apply 1gr of 5% anesthetic cream on
the exposed shaft area up to the coronal
sulcus. Once the anesthetic cream has
been applied, there is no need to wait for
the anesthetic cream to take effect and the
procedure can commence immediately.
4
Placement Procedure:
1. Place the Elastic Ring on the Placement
Ring (see figure 6). Do not remove the
Verification Thread; it is intended to
correct Elastic Ring misplacement.
figure 6
2. Place the Placement Ring (with Elastic
Ring in place) on the penis shaft with the
Elastic Ring side facing away from the
body (See figure 7).
Steps 3 and 4 should be performed by 2
people.
3. The first person should stretch the
foreskin up and to the sides for insertion
of Inner Ring, holding the foreskin dorsal
figure 7
and ventral sides. Use fingers or a dry
gauze for a good grip (See figure 8)
Ensure that the foreskin is fully stretched
by viewing the sulcus area, thus assuring
Frenulum
there will be no double entrapped
foreskin.
4. The second person should insert the
Inner Ring with its flat parts toward the
dorsal and ventral penis sides into the
figure 8
opening of the foreskin (see figure 9),
assuring that one of the flat sides is in the
area of the frenulum and the other flat
side is on the opposite side of the
frenulum.
5. Warning: When introducing the Inner Ring
through the foreskin opening, be very
careful not to harm the foreskin. If it is
impossible to introduce the Inner Ring do
not perform the procedure.
Frenulum 6. Introduce the Inner Ring over the glans
and place it just below the glans (on the
sulcus).
7. Hold the foreskin closed at the tip of the
penis to secure the Inner Ring in place
(See figure 10).
figure 9
Advance the Placement Ring and Elastic
Ring towards the glans until you can
visually see that the Elastic Ring is
circumferentially just over and inside the
Inner Ring groove and that the Elastic
Ring and Inner Ring are aligned
8. Once the Elastic Ring and Inner Ring are
figure 10
aligned, with one hand support the
Placement Ring, with the other hand
adjust the foreskin so the marked
Leg
circumcision line is exactly underneath
the Elastic Ring. Adjust the foreskin from
beneath each of the 4 Legs by pulling the
skin downwards (See figure 11).
9. To place the Elastic Ring - Using 4 fingers
of your dominant hand hold the Elastic
figure 11
Ring and Inner Ring together in the space
between each of the 4 Placement Ring
Legs. Work with the thumb and finger of
your non dominant hand to release the
Elastic Ring from one Placement Ring
Leg at a time (figure 12).
10. Make sure the Elastic Ring is mounted
directly over the Inner Ring groove and
above the marked circumcision line
figure 12
previously marked. If the Elastic Ring is
not positioned as desired or if you identify
that there is double entrapped foreskin,
use the verification thread to pull it off the
penis and start the procedure again.
5
11. Upon proper placement of the Elastic Ring, discard the
Placement Ring, and cut the verification thread with the
nurse utility scissors
12. Supply the patient with 2 tablets of 400Mg ibuprofen or
other painkillers tablets and Post Placement information.
Instruct the patient on the following before sending him
home:
a. Not to move the Device, not even through clothes –
emphasize that touching the device while urinating or
bathing must not cause any movement of the device.
Any movement of the device may lead to surgical MC.
b. To return for device removal after 7 days. Early
removal may result in surgical MC.
c. To return to the MC center if he wants to remove the
device before the 7 days period is over.
d. Not to remove the device and not to let anyone other
than the designated provider to remove the device.
e. To report any unexpected situation, such as
uncontrollable pain or device displacement.
f. Not to pull on the foreskin in case partial detachment
g. To abstain from sexual intercourse and to avoid
masturbation when the device is on the penis, so it will
not move out of place.
Inform the patient of the following when sending him
home:
a. He may experience pain in the following weeks, and he
should take the supplied painkiller tablets to control
the pain.
b. The foreskin distal to the Elastic Ring will become
darker and dry.
c. Unpleasant odor may occur while wearing the device.
d. Infection may occur while wearing the device.
e. There may be some partial skin detachments along the
Elastic Ring.
f. He should bath normally and keep the inner foreskin
clean. The area should be rinsed thoroughly (holding
the source of water close to the penis and directing the
water stream to the foreskin opening) without touching
and/or displacing the device in any way.
Foreskin Removal:
figure 13
figure 14
1. The device is removed 7 days after it
has been placed.
2. It is recommended to use sterile
Harvey wire cutting scissors (figure 13),
due to their blunt edges and serrated
blades, specifically designed to cut
tough tissue like the dried necrotic
foreskin.
3. Before removing the foreskin it is
recommended to pull the penis and
foreskin gently upwards to separate the
foreskin from the glans. You may drip
fluids (e.g. Antiseptic solution) through
the foreskin opening to enhance this
separation.
4. Warning: Take care not to injure the
urethra through introduction of wire
cutting scissors into the meatus or
lacerate the glans by not holding the
foreskin far enough away from it when
cutting.
5. If the opening of the foreskin is very
narrow, you should dilate it gently with
the forceps tip to allow insertion of one
of the wire cutting scissors blade. Use
sterile forceps to hold the foreskin and
to pull it away from the glans.
6. The foreskin should be cut first
vertically toward the Elastic Ring and
then with an angle, spirally, to the line
that the Inner Ring is visible (figure 14).
7. Cut the foreskin as close to the Elastic
Ring as possible, so that the tip of the
Inner Ring becomes visible.
6
Elastic Ring Removal:
figure 15
8. Warning: Elastic Ring should be
removed only after the foreskin has
been removed.
9. Use a sterile scalpel to cut the Elastic
Ring placed over the flat part of Inner
Ring on the side that is opposite the
frenulum. Do not cut the Elastic Ring
10. on the same side as the frenulum
(Figure 15).
11. Take care not to harm the viable skin.
12. Discard Elastic Ring.
Inner Ring Removal:
1
2
3
4
figure 16
1. The Inner Ring is removed after the
Elastic Ring removal.
2. Use a sterile spatula to separate the
necrotic foreskin all around the Inner
Ring.
3. Pull the Inner Ring out on a curved side
using the spatula; take care to avoid
the frenulum (figure 16).
4. Partial separation of the necrotic
foreskin may occur, in such cases extra
care should be taken when extracting
the Inner Ring to minimize pain at the
separation area.
5. Cut the Inner Ring with a cutter before
discarding it.
Post Removal Procedure:
figure 17
1. Clean the circumcised penis with
antiseptic solution.
2. Dress the circumcised penis with a
standard non adherent pad.
3. Instruct the patient not to wet the
dressing for 2 days.
4. Supply the patient with a new dressing
to take home and instruct him that in
case the dressing on the penis gets wet
he should remove it and replace it with
a new dry dressing.
5. Instruct the patient to remove the
dressing completely in 2 days, at which
time he can wash the penis and the
wound area normally.
6. Instruct the patient to contact the MC
clinic in case of pain, infection, swelling
or fever. Inform the patient that all of
those risks may occur following device
removal.
7. Instruct the patient to abstain from
sexual intercourse for 6 weeks after
device removal and to avoid
masturbation, and that those actions
may lead to disruption of the wound
which will result in delayed healing.
8. Explain to the patient the importance of
using condoms, and that circumcision
is not a complete protective solution for
the prevention of HIV infection.
7
Procedure and Device Associated Risks:
The following possible risks may occur while the patient is
wearing the PrePex:
x Patient displacing the device from its original position may
lead to pain and to diffuse oedema that will require
surgical MC.
To mitigate such risks it is essential to explain to the patient that
he should not move the device even if he has pain or discomfort,
and he should not masturbate or have sex. In case of pain the
patient should take the supplied painkiller tablets. If the pain is
uncontrollable, the patient should return to the MC center to be
evaluated and clinically managed. Early controlled removal of
foreskin and device may be indicated. If there is displacement of
the device with or without oedema, the patient should return to
the clinic as soon as possible where the provider may
recommend surgical circumcision to avoid serious and possible
life threatening infection. Surgical circumcision should be
performed within 6-12 hours after displacement.
The following possible risks may occur as a result of misusing
the device by provider:
x
x
x
x
If the Inner Ring is not pushed all the way down to the
sulcus level this may lead to disturbance of urine flow.
If the Inner Ring is not pushed all the way down to the
sulcus level this may lead to insufficient removal of
foreskin.
If the circumcision line is not marked according to
recommendations presented in this document, this may
lead to removal of too much foreskin and future problems
with penile function, or to removal of insufficient skin.
Penile injury during foreskin removal due to misuse of
the wire cutting scissors.
Other possible risks:
x
x
x
x
x
x
x
Device displacement and oedema requiring urgent
surgical circumcision.
Bleeding after device removal.
Pain – mainly 2 days after Placement procedure.
Infection while wearing the device and after removal.
Delayed healing.
Injury to the penis particularly during removal.
Unpleasant odor while wearing the device.
It is important to report any complaint or incident occurring with
the device to the manufacturer Circ MedTech, by Email or
phone as soon as possible.
Training:
To receive complete training materials, including presentations
and videos, send an E-mail to [email protected] requesting the
training material and a CD will be sent as soon as possible.
8
References:
1. World Health Organization. Framework for Clinical
Evaluation of Devices for Adult Male Circumcision. Geneva,
Switzerland; WHO; September 2012,
2. Bitega JP, Ngeruka ML, Hategekimana T, Asiimwe A,
Binagwaho A. Safety and efficacy of the PrePex device for
rapid scale up of male circumcision for HIV prevention in
resource-limited settings. J Acquir Immune Defic Syndr.
2011;58; E127–E134.
3. Mutabazi V, Kaplan SA, Rwamasirabo E, et al. HIV
prevention: male circumcision comparison between a
nonsurgical device to a surgical technique in resource-limited
settings: a prospective, randomized, nonmasked trial. J Acquir
Immune Defic Syndr. 2012:61; 49-55
4. Mutabazi V,Kaplan S. A, et al. One Arm, Open Label,
Prospective, Cohort Field Study to Assess the Safety and
Efficacy of the PrePex Device for Scale Up of Non-Surgical
Circumcision when Performed by Nurses in Resource Limited
Settings for HIV Prevention, J Acquir Immune Defic Syndr,
Publish Ahead of Print, March 2013
5. World Health Organization. Manual for Male Circumcision
Under Local Anesthesia, Geneva, Switzerland; WHO; version
3.1.December 2009.
Must Consult
Instructions for
use
Product meets the
Requirements of the
applicable European
Directive.
Do not
reuse
Circ MedTech Limited
Hahoshlim st. 6
Herzelia, 46722
Made in Israel
Phone +972776935607
[email protected]
www.prepex.com
-10
MedNet GmbH;
Borkstrasse 10; 48163
Muenster; Germany
Phone +49 251322660
55°C
°C
PN-00111-Rev 12, Release 29 May 2013