1
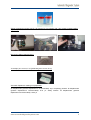
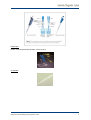
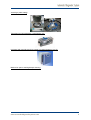
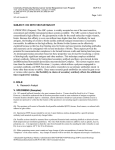
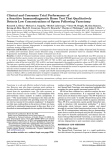
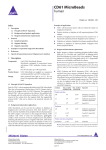
MATERIAL FOR SPERM ANALYSIS
Laboratory equipment:
Plastic Gloves
Recommended without Talcum
Slides
Recommended: Leja 10 (human), leja 20 (animal).
Or Makler chamber.
Temperature control: keep the chamber to the 37ºC using a heating stage or inside the incubator
Use a micropipette with a particular volume of sample(different for each analysis chamber, see
instructions of use).
With the Makler chamber you have to capture the fields images and videos outside the grid and avoid
line of scratching.
Neubauer counting chamber (only for manual counting)
Sample sterile collection container (e.g. Sarstedt: 100 mL)
www.automaticdiagnosticsystems.com
1
Phase contrast microscope (10x Ph +for human, Ph- for animals, 40X, 100x phase contrast positive
objectives) .
Microscope slides (standard size);
Coverslips (18 x 18 mm, # 1½ [thickness]; 22 x 22 mm; # 1½)
Automatic Pipettes for making wet preparation:
Air displacement (positive displacement recommended): 6 µL morphology smears: air displacement
(positive displacement recommended): 8-15 µL vitality smears: air displacement (positive
displacement recommended): 15-50 µL
www.automaticdiagnosticsystems.com
2
Pipette tips:
Plastic, for air displacement pipettes, volume 5-50 µL
Air pipettes
www.automaticdiagnosticsystems.com
3
Centrifuge (1000-3000g)
Test tubes for ICSI preparation, centrifugation, etc.
Incubator (with humidity and CO2 control) or heated chamber (+37°C)
Medium for sperm washing/sample cleaning.
www.automaticdiagnosticsystems.com
4
HOW TO PERFORME THE ANALYSIS:
Basic Guide lines for human semen analysis:
-
Abstinence days: W.H.O. recommended a period is between 2-7 days.
Collection: In sterile container maintained at 20-37ºC (important to avoid rapid temperature
changes) and stored in an incubator at 37ºC protected from light.
The sample must be analyzed between 30 and 60 minutes from the collection time. 60
minutes maximum.
TIMING OF PERFORMING ANALYSIS:
0-5 minutes: collect all the sample details and put the container in the incubator at 37ºC.
0-30 minutes: Check the liquefaction of the sample, the presence of prostatic crystals, and all the
macroscopic parameters (In case of ICSI, put 1 ml of sample in a test tube and overlayed it with 1 ml
of swim-up solution and wait 30 minutes).
Perform the motility and vitality analysis and prepare the stained slide for the morphology analysis.
After 30 minutes: Analyze the morphology slide (has to be dry and the sperms has to be dead and
fixed).
MATERIAL FOR MOTILITY ANALYSIS:
-
Microscope: 10x positive phase contrast objective (Ph negative for animals).
Disposables/Materials: Leja slides 4 chambers, 10 microns or Makler chamber (or Newbauer).
Automatic pipettes and pipettes’ tips.
1. Procedure with Makler (Subjective analysis)
REMEMBER TO HEAT THE MAKLER AT 37ºC BEFORE USING IT (10 MINUTES IN THE
INCUBATOR OR ON HEATING STAGE).
1) Homogenize the sample moving gently the container.
2) Take 5 µl of sample and put it in the center of the makler chamber (in the center of the circle)
then cover with the cover round slide of the chamber pressing gently to homogenize the
volume of sample on the surface (must have no air bubbles in the chamber).
3) With a 20x-40x objective count the spermatozoa in ten squares (random or on the diagonal).
www.automaticdiagnosticsystems.com
5
Organize the counting in:
- motile progressive sperms
- motile no progressive sperms
- motile in situ sperms
- static sperms
The total number of counted sperms represents the total concentration (to obtain the total
concentration multiply by 1x10^6).
To obtain the percentage of the four categories of sperms divide the total number for the number of
each category and multiply by 100.
Æ Total number of sperms X 100= % of rapid progressive sperms
Nº rapid progressive
Æ Total number of sperms x 100= % of motile no progressive sperms
Nº motile no progressive
Æ Total number of sperms x 100= % of motile in situ sperms
Nº motile in situ
Æ Total number of sperms x 100= % of static sperms
Nº static sperms
.
If the number of sperms is very low, count the sperms in all the grid and then divide the number
obtained for 10.
Æ Total sperm number counted in all makler x 10^6= total sperm concentration
10
Attention: count only the head of the sperms inside the squares and the heads on
square’s sides chosen before by the user.
two of the
Fig.1
www.automaticdiagnosticsystems.com
6
“Pin heads” should be counted separately and commented in the report form. Immature germ cells
should not be counted (these will be assessed in differential morphology count), but round cells and
inflammatory cells should be counted in the same way as the sperms and their number added in the
final report.
”Borderline cases": only spermatozoa whose head is located on the upper or left limiting lines (marked
“OK” in Fig. 1) should be counted as ”belonging” to that square. Thus, do not count spermatozoa
located on the lower or right limiting lines (marked “out” in Fig. 1).
Æ Clear the Makler chamber with tap water and dry very well (if the Makler chamber is very damaged
and scratched, must be changed with a new one).
2. PROCEDURE WITH LEJA SLIDE (Automatic Analysis)
Before performing the analysis, leave the Leja slide 10 minutes in the incubator at 37ºC or on the
heating stage.
Using the positive displacement micropipette, pick up 1 µl of semen and release slowly the sample in
the right space of the Leja slide waiting until is filled by capillarity.
Put the specimen slide in the microscope, focus and analyze with the SCA motility & Concentration
module. (Leja 10 is for 4 analysis; one analysis for each chamber in the slide).
IMPORTANT: In case of high concentration in the sample (> 90 millions/ml) the W.H.O recommends
to dilute the sample in order to better analyze the concentration and motility.
After the counting remember to arrange the values to the dilution (if you are working with SCA you just
have to insert the dilution rate in the window that will appear on the screen before the analysis).
SPERM SAMPLE DILUITIONS:
Table 1: Dilution of the ejaculate
Spermatozoa per
field of vision 40X
objective
Dilution
Semen µL
Diluent µL
< 15
1 + 4 (1:5)
100
400
15-40
1 + 9 (1:10)
50
450
40-200
1 + 19 (1:20)
50
950
1+ 49 (1:50)
50
2450
Quality Control
www.automaticdiagnosticsystems.com
7
Duplicate counting should be done to detect random errors in sampling and counting chamber.
Calibration of the positive displacement pipettes (some times called PCR pipette) and ordinary
pipettes for measurements of diluents should be done regularly. Pipettes showing erroneous results
should be amended according to instructions of the manufacturer or sent for repair and adjustments.
Results of calibration controls as well as repairs and adjustments should be recorded in a separate list
for each pipette. Great care is needed when mixing and diluting semen, mixing the diluted sample and
preparing counting chambers (attachment of coverslip). Counting chambers should be checked for
accuracy when new and regularly after use (risk for wear and changed chamber depth).
Values for semen Variables:
Normospermia: Normal ejaculate values.
Oligospermia: Sperm concentration < 20 Mil/ml
Asthenospermia: Forward progression (type A-B) sperms concentration < 50% or <25% rapid
progressive (type A) spermsconcentration.
Teratozoospermia: Percentage of normal morphology <30%.
Oligoasthenoteratozoospermia: Signifies disturbance of all three variables, < concentration + <
progressive sperms + < normal morphology.
Azoospermia: No spermatozoa in the ejaculate.
Aspermia: No ejaculate.
www.automaticdiagnosticsystems.com
8
SPERM WASHING
Sperm washing is the process that prepares a semen sample for an intrauterine insemination (IUI).
For an IUI to be performed, the semen sample must be washed free of debris, white blood cells, and
prostaglandins, which can cause the uterus to contract. The processing also removes dead sperm
and concentrates the sperm into a small volume that can easily be handled by the uterus. There are
three main methods of sperm washing: the swim-up, density gradient wash, and simple
(centrifugation) wash. The type of wash used depends on the individual characteristics of each semen
specimen.
Swim-Up Method
The swim-up is most successful when performed on patients with a normal semen analysis and is not
recommended for samples of high viscosity, with high numbers of round cells, or with a high content
of debris.In this procedure, the washing media is gently placed over the semen in a conical tube.The
specimen is then placed in an incubator for approximately one hour.During this time, the sperm are
allowed to swim up into the media, with the purpose of collecting the most motile, normal sperm, free
of debris.The supernatant is collected and centrifuged twice with sperm washing media.The final
pellet is then resuspended in approximately 0.5 mls of media.Modified sperm washing media must be
used to process the sample.
Density Gradient Wash Method
The discontinuous (density) gradient method should be used on samples containing round cells or
debris, or those with increased viscosity but a relatively normal concentration and motility.The
gradient is achieved by layering media of two different densities in a conical tube.The semen is then
placed on top of the gradient and the tube is then spun to allow the specimen to proceed through the
gradient.The resulting pellet should contain the motile, normal sperm, while the dead sperm and
debris are caught up in the gradient media.The pellet is then resuspended in washing media and
centrifuged twice.The final pellet is resuspended in a final volume of approximately 0.5 mls of
media.There are several commercially available kits.
Simple Wash Method
The simple (centrifuge) sperm wash should be performed on a sample that has a decreased
concentration and/or motility.A sample containing round cells and debris should not be prepared by
this method.Sperm washing media is added to the specimen and centrifuged.The pellet is recovered,
resuspended, and centrifuged again.The final pellet is resuspended in approximately 0.5 mls of
media.
In each of the above cases, the laboratory performs an analysis on both the fresh specimen and
washed specimen.This will include an assessment of the count, motility, volume, and viscosity.
www.automaticdiagnosticsystems.com
9
WHEN THE SAMPLE IS VERY DIRTY YOU HAVE TO CLEAN IT IN ORDER TO PERFORME A
GOOD ANALYSIS.
The recommended medium is Pure Sperm:
1) One uses a 40% solution on top and a 80% solution at the bottom in a centrifuge tube.
2) Then put 2ml of sperm on top and centrifuge at x600 for 20 minutes.
3) At bottom a pellet with beautifully clean sperm and 100% motility.
www.automaticdiagnosticsystems.com
10
VITALITY ANALYSIS:
STAINING FOR VITALITY TEST:
Duo vital (to work with the SCA Vitality module under fluorescence):
DUO-VITAL
KIT FOR SPERM VITALITY ASSESMENT IN ANIMAL SPECIES
The assessment of sperm vitality is one of the basic elements of semen analysis. Vital stains
can help to differentiate live from dead sperm. Results of vitality test are linked to the integrity of
the plasma membrane of viable sperm; an intact plasma membrane is able to exclude certain
stains either for bright-field microscopy or fluorescence microscopy. Sperm vitality evaluated
with the combined use of fluorescent dyes correlates with that determined by eosin-nigrosin
stains (bright-field microscopy) but opens a new range of possibilities for automatic counting
using flow citometry or fluorescence microscopy and image analysis data collection.
The DUO-VITAL kit is for the evaluation of sperm vitality from fresh or unthaws semen
samples. The kit provides the user with specific adjusted solutions of two reagents to evaluate
sperm vitality by means of a dual emission fluorescent signal (Green: Live; Red: dead).
Protocol:
Step 1: Dilute the sperm sample to a final concentration of approximately 10-15M/ml
Step 2: Add 1 microliter of the diluted sperm sample onto a clean slide. Add 1 microliter of the
fluorochrome solution red, and 1 microliter of the fluorochrome solution green to the diluted
sperm sample and mix. Cover with a clean coverslip and observe under the fluorescence
microscope.
Score “green” as live cells and “red” as dead cells. The analysis is automatic with the CASA
Sperm Class Analyzer-SCA Vitality. In some cases, “green-red” fluorescent sperm nuclei are
observed. This is mainly due to an incipient loss of membrane integrity. Score this sperm nuclei
as “dead”.
Used under these conditions, DUO-VITAL provides a High Effective Fluorescent Signal for
confident visual analysis of sperm vitality. The combination of DUO-VITAL with Computer
Assisted Sperm Analysis -CASA/Leja (or alternatives) multiple chamber slides allows the
simultaneous assessment of sperm concentration, vitality and motility. A CASA system for such
purposes is available (SCA-Vital. Microptic SL, Barcelona, Spain.
www.automaticdiagnosticsystems.com
11
2.Eosine (To analyze with SCA Video counter):
Reagents Eosine Y Æ Prepare the staining solution mixing a 0.5% (5g/l) solution of Eosin Y
(C.I. 45380) in a 0.9% (9 g/l) aqueous sodium chloride solution.
Procedure:
1) Mix one drop (10-15 µl) of fresh semen with the same volume of Eosin solution on a
microscope slide and cover with a coverslip.
2) After 1 minute observe the preparation with 20x or 40x objective under bright light or
phase contrast.
3) Count unstained sperm (white) as alive, and the stained sperm (rose) as dead.
3. Eosin–nigrosin (To analyze with SCA Video Counter)
Reagents:
Eosin Y (C.I. 45380), 10 g/l, in distilled water, i.e., 1%
Nigrosin (C.I. 50420), 100 g/l, in distilled water, i.e., 10%
Procedure:
-
Mix one drop of semen with two drops of 1% Eosin Y.
-
After 30 seconds, add three drops of 10% nigrosin solution and mix.
-
Place a drop of the semen–eosin–nigrosin mixture on a slide and make a smear within
30 seconds of adding the nigrosin. The smears should not be too thick. Allow to air-dry
and examine under oil immersion (1000) with a light microscope.
The live spermatozoa are white and the dead are stained red. The nigrosin provides a dark
background which makes the slides easier to assess.
www.automaticdiagnosticsystems.com
12
MORPHOLOGY ANALYSIS:
Microscope: 100x oil objective
Materials:
Diff-Quik staining solution (3 bottles, protocol).
or Cell-Vu prestained slide for morphology (protocol).
or Sperm Blue staining solution.
Positive displacement Micropipette
1. DIFF-QUIK
Diff-Quik fixative Solution, Diff-Quik Solution 1 (red), Diff-Quik Solution 2 (blue). Distilled water
STEP-BY-STEP DESCRIPTION:
If the raw sample is less than 1 M/ml, you can concentrate according to the following
procedure:
1. Determine the concentration of the sample (C).
2. Transfer 500 µl of sample to a centrifuge tube and add 1000 - 2000 µl of washing
medium (e.g.Hams F10 + 1% BSA).
3. Mix gently by swirling or agitate by running tube once along the top of an empty test
tube rack (no vortex).
4. Centrifuge sample for 5 minutes at 200 g.
5. Carefully aspirate the supernatant - being extremely careful. The volume of the
remaining pellet should be approximately 10 µl .
6. Resuspend the pellet using the volume determined by the following equation:
..........................V= 5C µl
Thus, if a sample had an initial concentration (C) of 20 M/ml, then:
........................ V= (5)(20) = 100 µl
So 100 µl of washing medium would be used to resuspend the pellet.
Samples that are concentrated using the above procedure may not have to be washed.
However, if the smear shows excessive debris, additional washing will be necessary.
Washing the sample
If the sample shows a lot of detritus is convenient to wash it:
1. Place 500 µl of sample into a microcentrifuge or conical tube.
www.automaticdiagnosticsystems.com
13
2 Add 500 µl of washing
2.
g medium (H
Hams F10 + 1% BSA).
If Percoll is used, the specimen must
m
be wash
hed complete
ely Percoll-fre
ee before
staining, otherwise sta
aining will be
e incomplete.
3 Swirl or Repeat
3.
R
pipettte gently to mix.
m
4 Centrifuge for 5 minuttes at 200 g.
4.
5 Remove supernatant by aspiration
5.
n.
6 Resuspend pellet in 500
6.
5 µl of wasshing medium
m.
7 Repeat pipette
7.
p
gentlyy to mix.
8 Centrifuge a second time
8.
t
for 3 minutes at 500
0 g.
9 Remove supernatant by aspiration
9.
n.
10. Resuspend pellet with
h 125 µl of washing
w
medium.
11. Repeat pipette
p
gentlyy to mix. The sample is no
ow ready to use
u to make a smear.
If sam
mple is extremely debris laden, repea
at steps 8-11 again
Prepare at least two smears
s from each sample
s
as fo
ollows:
e-cleaned microscope slid
des with alco
ohol. Rinse with
w distilled water and wipe
w
1. Wash pre
dry. Warm
m slides on the slide warmer set to 37
7°C.
2 Place a 5 µl droplet of sperm nearr the frosted end of the microscope
2.
m
slide.
3 Using ano
3.
other slide held obliquelyy to the first (approximate
(
ely 30° angle
e), touch it ag
gainst
the drop of
o sample (a
away from the
e frosted end
d).
4 After the droplet has spread
4.
s
along
g the junction
n of the slide
e, gently pull the second slide
s
away from
m the drop along the leng
gth of the firs
st slide.
Note: If specimen hass a very low initial concen
ntration (10 M/ml
M
or less)), the droplett
should be
e spread in a streak down
n the center of the slide to
t conserve ssufficient spe
erm
density.
Place
ed prepared smear on the
e slide warm
mer and allow
w to air dry (a
approximatelyy 15 minutes
s).
mmendable)
Staining with Diff--Quik (recom
www
w.automaticd
diagnosticsyystems.com
m
14
Reagents & Supplies Needed
•
•
•
•
Diff-Quik Kit: consisting of Fixative, Stain Solution #1 and Stain Solution #2
Distilled Water
Coplin Staining Jars
Paper towels
Diff-Quik Staining Protocol
1.
2.
3.
4.
5.
Fix smear by immersing slide in Diff-Quik Fixative 1 second 4 times
Stain sperm by immersing fixed slide in Diff-Quik Solution #1. 1 second 4 times
Stain sperm by immersing slide in Diff-Quik Solution #2. 1 second 4 times
Rinse slide gently in distilled water.
Allow to dry
If re-examination of slides is required, coverslipping will help prevent deterioration of the smear
due to repeated exposure to immersion oil. It will also help to maintain a clean objective.
Though coverslipping is optional, it is recommended.
Mounting a coverslip onto the slide requires the use of a mounting medium such as the Eukitt
mounting medium.
Coverslipping Procedure
1. Place 3-4 drops of mounting medium along the center of the dried slide.
2. Carefully place a clean coverslip (50mm x 22mm) on the slide.
3. Press the coverslip gently to distribute the mounting medium.
4. Allow to dry sufficiently.
www.automaticdiagnosticsystems.com
15
Advises for morphology analysis with Sperm Class Analyzer:
The following images show different kind of captures:
1. Correct image:
-
Clean background
Light stain
Optimum illumination control
Separated spermatozoa
2. Incorrect image:
-
Two spermatozoa heads very close together.
3. Incorrect image:
www.automaticdiagnosticsystems.com
16
- Background with a lof of detritus. Dirty background
Incorrect image:
- Too light image (some of the midpices cannot be analysed)
www.automaticdiagnosticsystems.com
17
Incorrect image:
- Too dark field (not enough contrast)
Incorrect image:
-
Too stained (acrosome cannot be detected)
www.automaticdiagnosticsystems.com
18
Incorrect image:
- One spermatozoon´s head is very close together with the tail of another.
www.automaticdiagnosticsystems.com
19
2.Cell-VU® Prestained Morphology Slides
Direction for use:
1.
Apply a small drop (approximately ~2-4 microliters) of
specimen on the center of the slide.
2.
Place a longer coverglass (24 x 60 mm) on top of the slide,
exerting slight pressure on the coverglass.
Note: Do not slide the coverglass as this will remove the stain.
Note: You can place covered slide coverglass side down on
paper towel and press
gently.
3.
Allow slide to stand at room temperature for 15 minutes before
microscopic observation is made. (Place loaded slide on
heating plate for 1 minute if you do not want to wait.)
Expected Findings:
These slides are for evaluating sperm head/acrosome size,
differentiation of white blood cells in peripheral blood and cytology of
body fluids.
Notes:
The stain absorbs into living or “recently” dead sperm. If the sperm
were dead at the time of collection they would be in some state of degradation and no longer able to
absorb the stain, but if you not prepared your slide immediately and the sperm has just died, it will still
stain.
You can archive for 30 days. Let air dry, remove coverglass and store in dark place. You will loose
the tails, but should still be able to see the heads fine. If you need to reread, a drop of stain on the
slide will “refresh” the slide.
3. Sperm Blue Staining Procedure
Background:
The stain has been developed to stain all the components of the sperm (acrosome, head, midpiece
and main piece of tail) differentially in different intensities of blue. The staining procedure is extremely
simple and only involves two main steps, fixing in one medium and staining in a second medium. It
works equally well for smears of “raw” semen as well as swim-up/Percoll/Pure Sperm gradient
preparations using most culture media.
Contents of Sperm Blue:
All Sperm Blue packages contain vials, bottles with equal volumes of fixative (Clear or transparent
solution in buffered salt) and a dark blue stain (dark blue staining solution in buffered salt).
Sperm Blue is packaged in three variations:
www.automaticdiagnosticsystems.com
20
1. Small 1.8ml vials consisting of 50 vials containing fixative and 50 vials containing the stain.
Allow fixing and staining of 200 smears on slides. (Approximately 0.45 ml sufficient to stain
one slide).
2. Two bottles containing 100 ml each of fixative and 100 ml stain. Allow staining of 200 smears
on glass slides.
3. Two bottles containing 250 ml each of fixative and 250 ml of stain. Sufficient to stain 500
sperm smears on slides.
If fixative and stains are stored at 4C it will last for one year. Room temperature storage not
guaranteed.
Staining Procedure:
1. Make sperm smear using 5µl of semen or 5 to 10 µl of swim-up sperm (adapt volume to
concentration of sperm) and allow to air dry.
2. Use a plastic disposable pipette to put 0.45 to 0.5ml of clear fixative solution over smear. Roll
slide from side to side regularly to ensure proper fixation over smear surface. Fix for 10
minutes.
3. Wash by dipping slide gently 2 to 3 times in beaker containing distilled water.
4. Use a plastic pipette to put 0.45 to 0.5ml of blue stain on fixed sperm smear. Roll slide from
side to side regularly and stain for 10 minutes.
5. Dip slides very gently 3 to 5 times in beaker containing distilled water until most of blue colour
disappears on slide. Air dry.
6. Mount slide with DPX or equivalent synthetic medium for permanent slides. When mounting
medium is dry view under oil immersion x1000.
OR
7. Do not mount cover slip after air drying but put immersion oil directly on slide and study
immediately using oil immersion optics at x1000. Discard slide after use (not permanent).
Precautions:
All cytological stains are toxic and handle with care. Always work with gloves and preferably in a fume
cupboard (preferable but not essential for Sperm Blue). Only stain when sperm are fixed (dead). Do
not use for live unfixed cells.
www.automaticdiagnosticsystems.com
21
W.H.O SPERM MORPHOLOGY
A. Head defects.
(a)Brush
(b)Pyriform
(c) Round
Without Acrosome
(c) Amorphous
(d) Vacuolated
www.automaticdiagnosticsystems.com
Small
(e) Reduced Acrosome
22
B. Neck and Midpiece defects.
(g) Bent neck
(h)Asymmetrical insertion (i)Thick midpiece
C. Tail defects.
(K)Short/Cut
(l)Thin midpiece
D. Cytoplasmic droplet
(l) Bent
(m) Coiled
www.automaticdiagnosticsystems.com
23
DNA FRAGMENTATION:
Kit Halomax:
Protocol included in the Halosperm kit for 10 analysis (see the attached file).
Is always recommendable do swim up of the semen sample before any analysis motility, morphology,
or DNA fragmentation analysis, to avoid the interference with the debris of the sample.
Protocol for the ICSI semen preparation-cleaning:
1) Put all the volume of the sample in a test tube (conical bottom if the sample has an high
concentration, otherwise normal test tubes) and add gently on the surface (maintaining the pipette
attached to the internal side of the test tube, no drops directly) 6 ml of G-Sperm with an air pipette .
Close the test tube.
2) Put the test tube in the centrifuge 1500 g/sec for 10 minutes (1400 g/sec if is the conical one)
3) When the centrifugation time is finished, take off all the upper liquid part leaving the bottom with the
semen.
4) Add gently on the surface maintaining the pipette attached to the internal side of the test tube (no
drops directly) 3 ml of G-Sperm and repeat the centrifugation: 1500 g/sec for 10 minutes (1400 g/sec
if the test tube is the conical one).
5) When the centrifugation time is finished, take off all the upper liquid part leaving the bottom with the
semen.
6) Swim-up: Add gently on the surface maintaining the pipette attached to the internal side of the test
tube (no drops directly) 0.5 ml of G-sperm.
7)Leave the test tube close (but not completely, the stopper only above, not pressed on) in the
incubator at 37ºC for 1 hour.
8)After 1 hour pick up from the surface (without touching the pellet below) 0.25 ml and put in a smaller
test tube with the name of the patient and the concentration of the sample (this last one after the
swim-up). Take a small aliquot from the main test tube and control the concentration.
N.B. A normal Swim up made with a clean sample is prepared in a test tube putting on the bottom 1
ml of semen and then adding gently 1 ml of G-sperm on the surface (maintaining the pipette attached
to the internal side of the test tube, no drops directly).
www.automaticdiagnosticsystems.com
24
Put the sample in the incubator at 37ºC with the stopper not completely closed (it has to move. After 1
hour pick up 0.5 ml of liquid from the surface (the liquid has to be transparent and clean, don’t touch
the semen below) and put it in a smaller test tube.
Pick up a small aliquot and control the concentration of the swimming sperm.
The meaning of the swim up is to provide a selection of the best motile spermatozoa.
If is a preparation for an intrauterine insemination, the protocol is the same, just change the G-sperm
with the sperm-washing.
Gradients of density:
Cleaning: put in a test tube
Æ 1 ml of LOWER solution
Æ 1 ml of UPPER solution
Æ 2 ml the semen sample (if the volume is higher, use two Different test-tubes).
Put the test tube in the centrifuge at 1500 g/sec for 10 minutes.
Recuperate the pellet in the bottom of the test tube (through away the rest) and put it in a small test
tube with 0.5 ml of sperm-washing solution. Mix gently with the pipette.
Take a small aliquot of the final sample and count concentration (the count represent the final
concentration/2 because the volume is 0.5 ml).
www.automaticdiagnosticsystems.com
25