1
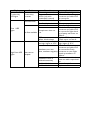
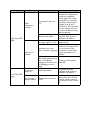
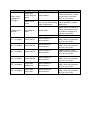
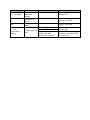
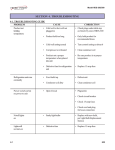
In any cases of service or maintenance please note the following instructions:
•
Service must only be carried out by suitably qualified personal.
•
When carrying out any work on the chiller, ensure that the power supply is off.
Switch the power supply off and ensure that it cannot be switched on
accidentally.
•
Do not disable the security measures.
•
Use only fuses with the same trigger characteristic. Should the fuse trigger again, then
it is possible that there is a serious defect within the chiller. In this case, please
contact the manufacturer.
•
Do not undertake any work on the refrigerant circuit, as poisonous, corrosive gases
and liquids may leak out. Should a repair on the refrigerant circuit be necessary,
contact a refrigerant engineer or your supplier.
Display
Conductivity
LED lights
Flow 1 LED
lights
High Press LED
lights
Fault
Causation
DI-cartridge wore down
Magnetic valve does not
switch (only with
conductivity control)
Water filter blocked
Pre-filter blocked
System bled?
Action
Replace DI-cartridge
Conductivity
Check fuse F4, check up
increases
connector and cable X2/3
on correct fit.
Replace filter inlet
Flow decreases
Clean pump pre-filter
See user manual
Check fuse F2, check up
connector and cable X2/3
Pump/motor does not
on correct fit. Sight check
No flow available run
up of pump and motor on
defects.
CPC water connection is Replace CPC-coupler.
defect, blocks always
Check up on correct fit.
Ambient temperature
Ambient temperature too
too high, higher as 35°C high, higher as 35°C
Check fuse F5, check
connector and cable X2/3
on correct fit. Check
Ventilator turns too
slow, ventilator stagnancy connector on case. Sight
Heat cannot
check up ventilator on
dissipate
defects.
Clean condensor block,
Condensor block is
blow out with compressed
polluted intensively.
air.
Air flow blocked
Ensure free air flow
Air filter blocked
Replace air filter
Display
Fault
Water
temperature
increases
High Temp LED
lights
Heat cannot
dissipate.
Compressor
always on
Low Temp LED
lights
Hot gas valve
does not switch
Causation
Action
Check temperature of
compressor (temperature
protection released?),
check cable X2/3, check
green LED on controller
Compressor does not
(on/off?), possible check
run
voltage on strip X2/3
terminal 13/14. Controller
has low voltage, thus the
internal compressor relay
cannot operate.
Hot gas valve must be
Hot gas valve defect
replaced. Sight check up
ventilator on defects.
Ambient temperature
Lower ambient
too high, higher as 35°C temperature
Check fuse F5, check
connector and cable X2/3
Ventilator turns too
on correct fit. Check
slow, ventilator stagnancy connector on case. Sight
check up ventilator on
defects.
Cooling medium inlet to
the condensor block too
Cooling circuit must be
hot Æ insufficient
refrigerant inside circuit repaired.
Æ Refrigerant circuit
leaky
Controller must be
Controller defect
replaced. Sight check up
ventilator on defects.
Check connector at the
valve, check cool. Check
Compressor cools too
fuse F3, check connector
much
and cable X2/3 on correct
fit.
Display
Water Level
(red/yellow)
LED lights
Fault
Water level
sensor does not
switch
Water loss in
circuit
Display has no
function
No voltage on
chiller
„F1“ on display
Sensor fault F1
„F2“ on display
Sensor fault F2
„F3“ on display
Sensor fault F3
„F4“ on display
Sensor fault F4
„F5“ on display
Sensor fault
conductivity
„F6“ on display
Sensor fault
power inlet
Causation
Action
Replace water level sensor.
Check connections, check
Switch defect
up connector and cable
X2/1 on correct fit.
Hose defect, hose clamps Locate leaky pot and renot correct fitted. Fitting seal (if possible!), replace
leaky. Evaporation
defect part.
Check up on correct fit at
chiller and socket. Check
Power cable
up cable on damage and
replace if necessary.
Socket defect
Repair socket
Replace sensor, check
Sensor defect or
cable, check up connector
disconnected
X1/3 on correct fit.
Replace sensor, check
Sensor defect or
cable, check up connector
disconnected
X1/3 on correct fit.
Replace sensor, check
Sensor defect or
cable, check up connector
disconnected
X1/3 on correct fit.
Replace sensor, check
Sensor defect or
cable, check up connector
disconnected
X1/3 on correct fit.
Replace sensor, check
Sensor defect or
cable, check up connector
disconnected
X1/3 on correct fit.
Replace sensor, check
Sensor defect or
cable, check up connector
disconnected
X1/3 on correct fit.
Display
„---„on display
Pr
Apr
„---„ at
conductivity
display
Fault
Set value
adjustment
blocked
Checkup not
passed
IO processor
defect
Causation
DI-cartridge defect
Conductivity over Water polluted
Magnetic valve does not
30µS
switch (only with
conductivity control)
Action
Change P19
Replace controller
Replace controller
Replace cooling water and
DI-cartridge
Check fuse F4, check up
connector and cable X2/3
on correct fit.