1
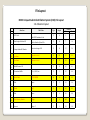
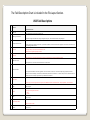
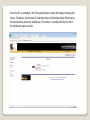
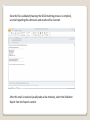
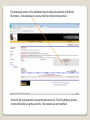
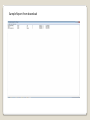
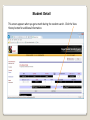
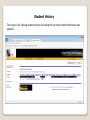
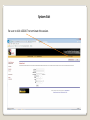
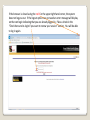
Unique Student Identifier System
(USIS)
url: https://usis.msde.state.md.us/usis_mhec
OVERVIEW
•
MHEC has partnered with the Maryland Department of Education (MSDE) to use their Unique Student
Identifier System (USIS). MSDE’s original system that creates State Assigned Student Identifiers
(SASIDs) has been in effect since 2008. The purpose of USIS is to allow higher education institutions
to search for SASIDs.
•
Every publicly-funded student in the State of Maryland is given a SASID that provides the ability to
uniquely identify Maryland students and track their movement. Students born before January 1,
1986 generally will not have a SASID. The SASID remains active until the student reaches the end of
the academic year of their 22nd birthday after which it is archived.
•
SASIDs are not reused and will NOT be replacing social security numbers.
•
The USIS file validation process encrypts and securely uploads institution files to search for SASIDs
using selected criteria.
•
Institutions will be able to access this system at any time to download SASIDs to update their own
systems. The goal is for institutional data collection files to include the SASID when files are
submitted to MHEC.
•
The overall objective to having the SASID as part of data collection is to enhance the State’s ability to
link higher education records with K-12 records and satisfy current expectations for data availability
and use for the Maryland Longitudinal Data System.
•
For User Login Information, send an email to [email protected].
File Layout
MHEC Unique Student Identification System (USIS) File Layout
111-Character layout
Data Item
No.
1.
2.
3.
4.
5.
6.
7.
8.
9.
10.
11.
12.
13.
FICE Code
State Assigned Student ID
Campus Student ID Number
Last Name
First Name
Valid Codes
Position
Start
End
Type
Length
C
6
1
6
C
10
7
16
Institution Assigned ID
C
10
17
26
Punctuation is allowed
C
25
27
51
Punctuation is allowed
C
15
52
66
C
15
67
81
Valid FICE Institution Code
Must be blank in Upload File
Middle Name or MI
Generational Suffix
Jr, Sr, I, II, III, etc…
C
3
82
84
Date of Birth
YYYYMMDD
N
8
85
92
Filler
Spaces
C
2
93
94
Gender
1 or 2
C
1
95
95
Filler
Spaces
C
6
96
101
Social Security Number
9 digits
C
9
102
110
Numeric
Always ‘1’
C
1
111
111
The Field Description Chart is included in the File Layout Section.
USIS Field Descriptions
No.
Data Item
Definition and Instruction
1.
2.
FICE Code
Must be your institution’s six-digit assigned institution code.
State Assigned Student ID
The valid State Assigned Student ID Number assigned through the USIS system. This field must be left blank when uploading file.
3.
Campus Student ID Number
4.
Last Name
5.
First Name
The number assigned by the institution to the student - any combination of numbers (not more than ten characters) right aligned. If fewer than ten characters are used,
zero fill remaining positions to the left.
Indicate up to twenty five (25) characters of the student's last name.
Punctuation, such as a hyphen or apostrophe, is allowed.
Indicate up to fifteen (15) characters of the student's given first name. Punctuation, such as a hyphen or apostrophe, is allowed.
6.
Middle Name or MI
Indicate up to fifteen (15) characters of the student's middle name or middle initial.
7.
Generational Suffix
Indicate the generational suffix for the student, if applicable. Valid values include Jr, JR, II, III, IV, V. Data should be alpha only, right justified, and without
punctuation. Use Roman numbering - 2nd should be II, 3rd should be III, 4th should be IV, 5th should be V. Jr and II are unique occurrences and should not be used
interchangeably. Please consistently report as indicated as per official birth documentation.
8.
Date of Birth
List the four digit year and two digit month and two digit date (YYYYMMDD) to indicate the student's birth date. (Example, September 7, 2002 is 20020907)
9.
10.
11.
Filler
Gender
Filler
Must be two spaces.
The one-digit code for gender of the student:
1 - Male
2 – Female
Must be six spaces
Social Security Number
12.
13.
For all students when available.
Numeric
Must always be “1”
File Naming Conventions and Upload Limitation
•
•
•
•
Blank spaces are NOT allowed in file names.
Special characters allowed in the file name are the dash (-) and underscore (_).
The file must be a text file with a .txt extension.
A single file for upload is limited to 5000 records.
If these conventions are not followed, processing will terminate and the email message below
will be received.
Login Screen
Enter your user ID and password. Click login to go to the File Validation screen to
upload your file. Your user ID and password have already been created.
File Validation
Click the drop down arrow to select the file type
Click browse to locate the file to be uploaded and select Upload File
Once the file is uploaded, the File Upload Status screen will display showing the
Status, File Name, Submission ID, Submitted by and Submitted Date information.
You should write down the Submission ID number to readily identify the file in
the validation report section.
Once the file is validated (meaning the SASID matching process is complete),
an email regarding the submission and results will be received.
After this email is received (usually takes a few minutes), select the Validation
Report from the Reports section.
Validation Report
Select the Submission ID and Date, and then click Refresh Report to view the Validation
Report on the screen. Once a file is validated, the system allows 48 hours from validation
to view and/or download the report. Files older than 48 hours are deleted from the
database.
The download section of the Validation Report allows the selection of different
file formats. Click download to receive the file in the format selected.
Once the file is downloaded, review the data returned. The file validation process
returns the SASID using the same file. File contents are not modified.
Sample Report from download
Student Search/View
This screen allows you to search for a student based on their last name, first name, date of
birth and social security number. Fill in these fields to search for a student attending your
institution.
If the institution has all the required information, information can be viewed on that
student.
Student Detail
This screen appears when you get a match during the student search. Click the View
History button for additional information.
Student History
This screen is for viewing student activity and seeing the last time student information was
updated.
College User Manual
This section contains the user manual with the instructions and screenshots for the USIS
system.
System Exit
Be sure to click LOGOUT to terminate the session.
If the browser is closed using the red X in the upper right hand corner, the system
does not log you out. If the logout option was not used an error message will display
on the next login indicating that you are already logged in. Place a check in the
“Check here and re-login if you want to renew your session” section. You will be able
to log in again.