1
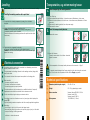
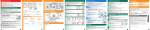
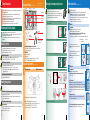
Levelling
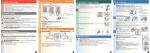
Transportation, e.g. when moving house
Intense noise, vibrations and “wandering” may be the result of incorrect levelling.
Aqua-Stop warranty Only for appliances with Aqua-Stop
1. Before transporting the washing machine:
In addition to warranty claims against the vendor from the purchase agreement and in
addition to our appliance warranty, we will pay damages under the following conditions:
Levelling the washing machine with a spirit level
1. If a fault in our Aqua-Stop system causes water damage, we will reimburse damages caused
to private customers.
1. Turn off the tap.
2. Drain residual detergent solution−> Instruction manual; Maintenance - drain pump.
3. Reduce the water pressure in the inlet hose −> Instruction manual; Maintenance - filter in
water inlet.
4. Disconnect the washing machine from the power supply.
5. Disconnect the hoses.
1. Loosen the lock nut using a spanner, by turning it in a clockwise
direction.
2. Change the height by turning the appliance feet.
Caution: all four appliance feet must be firmly on the ground.
The washing machine must not wobble.
Check the levelness of the washing machine with a spirit level and adjust
if necessary.
Washing machine
2. The liability warranty is valid for the service life of the appliance.
3. A warranty claim is only valid on condition that the appliance fitted with AquaäStop has been
correctly installed and connected according to our instructions. This condition includes the
correct fitting of an AquaäStop extension (genuine accessory).
Our warranty goes not cover defective power cables or fittings between the Aqua-Stop
connection and the tap.
2. Install the transport safety devices:
4. Appliances with Aqua-Stop do not need to be supervised during operation, nor secured
afterwards by turning off the tap.
The tap only needs to be turned off if you are away from home for a long period, e.g. for
several weeks' holiday.
1. Remove the covers.
After-sales service
ʑ
3. Tighten the lock nut against the housing.
In doing so, hold the foot tight and do not adjust its height.
Caution: the lock nuts on all four appliance feet must be screwed tightly
against the housing.
ʑ
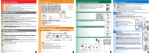
The power supply and voltage indicated on the washing machine (rating plate)
must be the same.
The connected load and fuse required are specified on the rating plate.
Make sure that:
– the mains plug fits the socket,
– the cable cross-section is adequate,
– the earthing system is properly installed.
The mains cable may only be replaced by a qualified electrician (if required).
Replacement mains cables are available from customer services.
1009 / 9000460857
ʑ
ʑ
ʑ
The washing machine must only be connected to an alternating current via a
properly installed earthed socket.
*460857*
Electrical connection
ʑ
ʑ
ʑ
ʑ
ʑ
ʑ
2. Insert all 4 sleeves.
Clamp the mains cable to the holders. Insert and
tighten the screws.
Do not use multiple plugs/couplings or extension cables.
If a residual current circuit breaker is used, only use a type which displays this
symbol: ‚.
Only this symbol guarantees compliance with the currently applicable regulations.
If you cannot rectify a fault yourself a Instruction manual: What do to if ..., Page 12/13,
please contact our after-sales service. We can always find a suitable remedy, so that a
technician is not called out unnecessarily.
Please give the after-sales service the product number (E no.) and the production number
(FD) of the appliance.
Product number
ʑ
This information can be found:
inside the washing machine door* / on the open
service flap* and on the back of the appliance.
Production number *depending on model
You can rely on the competence of the manufacturer. Please contact us.
This way, you can ensure the repair is carried out by trained service technicians who are
equipped with genuine spare parts.
Technical specifications
ʑ
ʑ
ʑ
Dimensions (width x depth x height)
60 x 59 x 85 cm
Weight
63 - 83 kg depending on model
Mains connection
Nominal voltage 220-240 V, 50 Hz
Nominal current 10 A
Nominal power 2,300 W
ʑ
Water pressure
100-1000 kPa (1-10 bar)
5
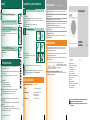
Contents
ʋ
ʋ
ʋ
ʋ
ʋ
ʋ
ʋ
ʋ
ʋ
ʋ
ʋ
ʋ
ʋ
Safety instructions . . . . . . . . . . . . . . . . . .
Environmentally-friendly disposal . . . . . .
Installation surface. . . . . . . . . . . . . . . . . .
Installing the appliance . . . . . . . . . . . . . .
Scope of delivery. . . . . . . . . . . . . . . . . . .
Hose and cable lengths . . . . . . . . . . . . .
Removing the transport safety devices . .
Water connection . . . . . . . . . . . . . . . . . .
Levelling . . . . . . . . . . . . . . . . . . . . . . . . .
Electrical connection . . . . . . . . . . . . . . . .
Transportation, e.g. when moving house .
Technical specifications. . . . . . . . . . . . . .
Aqua-Stop warranty . . . . . . . . . . . . . . . . .
.
.
.
.
.
.
.
.
.
.
.
.
.
.
.
.
.
.
.
.
.
.
.
.
.
.
.
.
.
.
.
.
.
.
.
.
.
.
.
Page
. 1
. 1
. 1
. 1
. 2
. 2
. 3
. 4
. 5
. 5
. 6
. 6
. 7
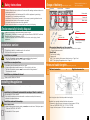
Do not operate the washing machine until you have read these instructions.
Please also observe the separate instruction manual.
Keep all the documents in a safe place for future reference, or to pass on to
the next owner.
Mains plug:
– do not plug in to/pull out of the socket with damp hands.
– when removing the plug from the socket, pull the plug body only, not the cable.
– never pull the plug out during operation.
Manufacturer -> Instruction manual
en
The contact details for your nearest after-sales service can be found here or in the After-sales
service directory (depending on the model).
After transportation, the transport safety devices must be removed. −> Page 3.
To prevent unused detergent from flowing straight into the drain during the next wash:
Pour 1 litre of water into compartment II and start the Empty programme.
Installation
instructions
6
7